M1 Garand · Volume 11
Common Problems and Repairs
The M1 fails in a short list of ways, and almost all of them were documented by the Army in the 1940s. This volume starts with a troubleshooting table, then takes the problems one at a time: short-stroking, clip trouble, bent and cracked operating rods, slam fires, doubling, extraction and ejection, the gas cylinder, the stock, and rebarreling. It assumes a gunsmith’s bench and a reader who knows how to use one.
11.1 Troubleshooting
Table 1 — Troubleshooting
| Symptom | Likely causes | Check | Fix |
|---|---|---|---|
| Short stroke — bolt does not lock back on the last round, or does not feed | Loose gas cylinder lock screw; lock not seated; leaking valve screw; carbon in the port or cylinder; weak rod spring; undersized piston; worn gas cylinder; rod binding on the stock; cold-weather lubricant; weak ammunition | Lock screw tight (cold); piston 0.525 inch minimum; cylinder pin gauges; spring; rub marks on the wood; tilt test | Tighten or clean; replace the spring, rod or cylinder; relieve the wood; relubricate |
| Clip jumps out early | Bent follower rod; weak clip latch spring; worn latch lug; worn follower rod claws or follower arm; worn clip | Follower rod straightness; latch lug edges; a known-good clip | Replace the follower rod, latch or spring; discard the clip |
| Empty clip will not eject | Broken or deformed clip latch spring; worn or broken clip ejector; damaged operating rod catch; short stroke | Latch spring; clip ejector; catch | Replace; fit the clip ejector |
| Bolt not held open after the last round | Short stroke; defective operating rod catch; damaged rod | Catch function; timing | Replace the catch or rod |
| Bolt fails to close | Dirty or damaged ammunition; dirty chamber; extractor not snapping over the rim; frozen ejector; damaged rod; weak spring; tight headspace | Clean; ejector movement; headspace | Clean; replace the ejector or spring |
| Failure to fire | Bolt not locked; bad ammunition; broken or worn firing pin; low protrusion; weak hammer spring | Protrusion 0.044–0.060 inch; pin tang; hammer spring | Replace the pin or hammer spring |
| Failure to extract | Dirty chamber; seized case; broken extractor; ruptured case | Chamber; extractor lip | Clean; ruptured case extractor; replace the extractor |
| Failure to eject | Weak, frozen or distorted ejector spring and plunger; short stroke | Ejector freedom | Replace the ejector |
| Doubling | Worn hammer hooks or sear; grease on the hooks and sear; bent pins; misassembly; trigger technique | Swap in a known-good trigger group | Replace hammer, sear or trigger |
| Slam fire or out-of-battery | High or sensitive primers; broken firing pin; damaged bridge or tang; tight headspace | Primer seating; pin tang; bridge notch; headspace | Correct the ammunition; replace the pin; condemn a bad receiver |
| Rear sight will not hold elevation | Sight tension too loose | Two-click thumb test (Vol 10) | Tighten the windage knob nut one click at a time |
| Poor accuracy | Throat or muzzle wear; loose stock fit; gas cylinder rotating on its splines; rod dragging; loose handguard | Gauges; stock fit; cylinder play | Rebarrel; fit the stock; fix the cylinder |
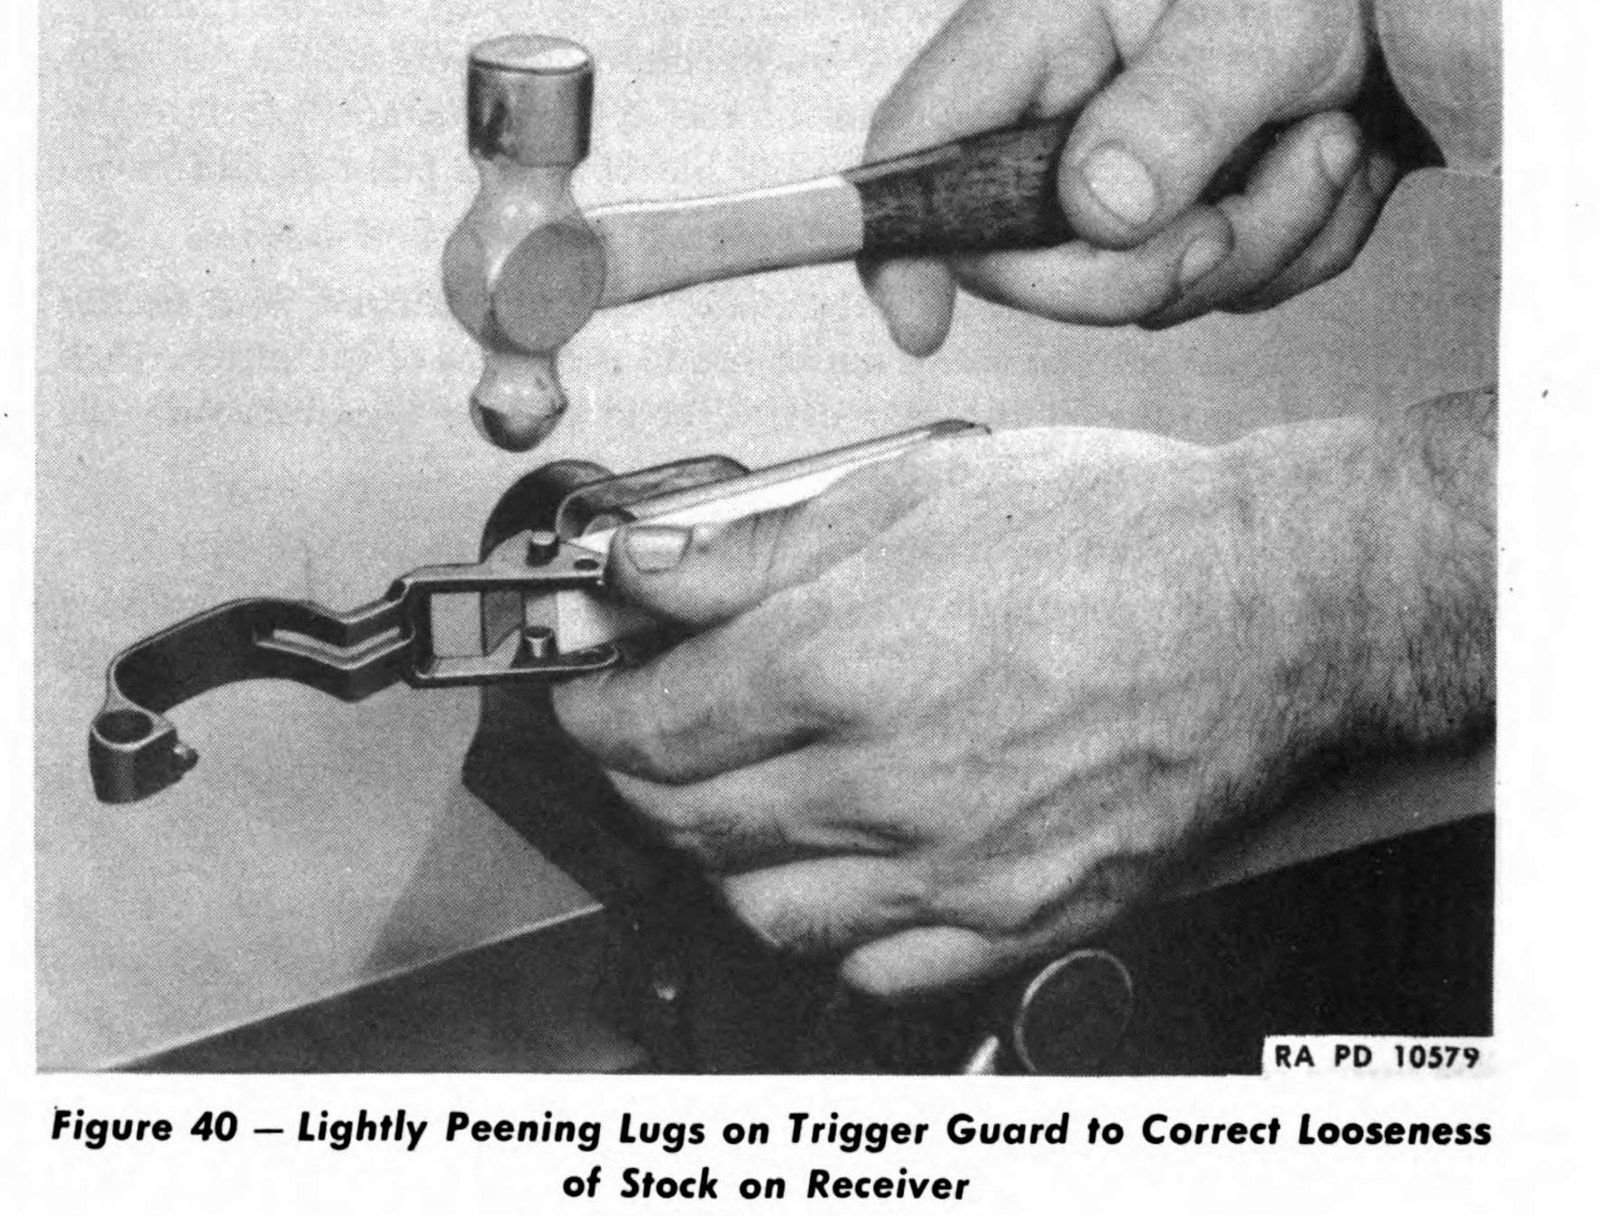
| Trigger group loose | Worn trigger guard lugs | Guard latch tension | Peen the lugs (above) |
| Handguards smoke when hot | Oil on the wood next to the barrel | — | Keep oil off barrel-side wood |
The table draws on the 1940 and 1965 field manuals, the 1969 operator’s manual, the 1966 depot manual and Garand Gear. Where a row rests on armorer consensus rather than a manual — doubling and slam fires, mostly — the sections below say so.
11.2 Short-Stroking
The 1969 operator’s manual’s causes for “short recoil,” with who was to fix them:
Table 2 — The 1969 operator's manual's causes for "short recoil," with who was to fix them
| Cause | Operator | Organizational |
|---|---|---|
| Gas cylinder lock screw loose | tighten | |
| Gas cylinder lock not fully seated | tighten | |
| Carbon or foreign matter in the gas cylinder or port | clean | |
| Defective operating rod spring | replace | |
| Gas cylinder not fully seated | remove and reinstall | |
| Improper lubrication in cold weather | clean and lubricate | |
| Unserviceable gas cylinder or piston | send to direct support |
The 1965 field manual adds two causes worth singling out: a valve leak in the gas cylinder lock screw (the valve not fully seated), and an undersized piston caused by abrasive cleaning. The 1966 depot manual adds an oversized gas cylinder and a rod binding in the stock.
Two things worth checking first on a used rifle: whether someone has been cleaning the piston with a wire brush, and whether the rod is rubbing on the stock. The 1966 depot manual’s fix for the second is to “relieve wood from gun stock assembly, where operating rod binds on wood” — not to bend the rod.
11.3 Clip Problems
The clip jumps out before the last round. The 1940 field manual’s stoppage table has one line for it: “Clip jumps out on seventh round → Bent follower rod → Replace.” Other causes, from armorer sources: a weak clip latch spring, a worn latch lug, worn follower rod claws, a worn follower arm, or a worn clip. Garand Gear’s check on the latch: its lug “must remain square with well-defined edges.”
The empty clip does not eject. The 1969 operator’s manual: a broken or deformed latch spring. Beyond that, a worn clip ejector, a damaged operating rod catch, or the rifle not cycling far enough. The 1966 depot manual shows filing the offset point of the clip ejector as a fitting operation.
New clips are stiff. Garand Gear: “New clips that haven’t been used before sometimes can be difficult to insert, especially if the parkerizing is coarse on the guide rails.” Smooth the rails lightly; do not blame the rifle.
11.4 M1 Thumb
It is not a malfunction, but it is the M1’s most common injury. The bolt closes under full operating rod spring pressure the instant a clip releases the catch, and a thumb left in the receiver is caught. Push the clip down, block the operating rod handle with the heel or knife-edge of the same hand, and roll the thumb out to the right. Vol 8 has the version for letting the bolt forward on an empty rifle.
11.5 Operating Rods
11.5.1 Bent rods
A rod bends from three causes, in Garand Gear’s list: high pressure in the gas cylinder (the wrong ammunition, Vol 12), binding (on the stock, or a damaged part), and poor lubrication. Forcing a rod out of the receiver anywhere other than its dismount notch is a fourth.
The manuals are unanimous that the rod is bent on purpose and must not be straightened by the soldier or the ordnance mechanic. That is still the right advice for an owner. But experienced armorers with a proper gauge do press minor bends back — one described taking about 0.100 inch out of the first bend at the receiver end and straightening the handle parallel to the receiver. The gauge matters: Fulton Armory describes the “special jig” in the Navy’s van at Camp Perry as the operating rod gauge, used to check “the many critical areas & bends.” If you think a rod is bent, send it to the CMP or Fulton Armory, or replace it.
11.5.2 Cracked rods
Fulton Armory: “WWII op rods would crack after a great deal of use & abuse, at the right angle where the handle goes to meet the tube.” Post-war rods have a stress-relief cut; the final design, 7790722-RA or -SA, often stamped NM, has it built in. Fulton’s advice for a shooter with an uncut wartime rod: “hang it on the wall or sell it to a collector and use a good cut rod.”
11.6 Slam Fires and Out-of-Battery Firing
A slam fire is a round firing as the bolt closes, before the trigger is pulled. The M1’s firing pin floats, so every time the bolt slams home it taps the primer. Two mechanical safeguards keep the rifle from firing out of battery (Vol 5): the firing pin tang must pass through a notch in the receiver bridge, which it cannot do until the bolt rotates to lock; and the hammer’s camming lug strikes the bolt, not the pin, if the bolt is unlocked.
What can defeat them, according to armorer consensus (not a manual): a high or overly sensitive primer, a cook-off, a broken firing pin jammed forward, damage to the bridge or tang, or a re-welded receiver that has moved the bridge out of specification.
The ammunition side is the one you control, and Wayne Faatz’s 1983 American Rifleman study of M1 slam fires is the best source: high primers, 0.005 to 0.010 inch above the case head, and cases sized so they were a “wedge fit” in the chamber were among the causes. Seat primers fully, full-length size, and consider military-sensitivity primers (Vol 13).
Hangfires and misfires, from the 1969 manual: keep the round locked in the chamber for 5 seconds. If the barrel is hot, extract immediately after those 5 seconds. “If the round cannot be extracted within an additional five seconds, it must remain locked in the chamber for five minutes because of the possibility of a cook-off.”
11.7 Doubling
The 1940 manual’s line: “Fires automatically → Sear broken or open → Replace trigger assembly or hammer spring housing.”
Armorer consensus, which is the best source found for the rest: worn hammer hooks are the most common cause, then a worn sear, trigger-group assembly errors, bent hammer or sear pins, grease on the hooks and sear, and a new shooter riding the trigger. The quickest diagnosis is to swap in a known-good trigger group. If the rifle stops doubling, the problem is in the group.
Do not stone M1 hammer hooks or sear engagement surfaces to lighten a trigger unless you have done it before on this rifle, and function-test with the hold-the-trigger check in Vol 8 afterwards.
11.8 Extraction and Ejection
From the 1969 operator’s manual:
Table 3 — From the 1969 operator's manual
| Malfunction | Cause | Fix |
|---|---|---|
| Failure to extract | Cartridge seized in the chamber | Remove the cartridge; clean the chamber |
| Failure to extract | Ruptured case | Remove with the ruptured cartridge extractor; replace the extractor |
| Failure to eject | Short recoil | See short-stroking |
| Failure to eject | Weak, frozen or distorted ejector spring and plunger | Replace the ejector |
The 1966 depot manual adds a case where the extractor “does not open enough to pass over rim of cartridge”: clean the bolt, or repair a distorted receiver. Garand Gear’s inspection point: check the extractor lip for cracks and wear, and keep the space between the locking lug and the extractor clean. The Army issued a ruptured cartridge extractor for pulling the front half of a separated case.
11.9 The Gas Cylinder
11.9.1 How tight the lock goes
The 1965 field manual says to screw the gas cylinder lock on “until finger tight (no tools).” Armorer practice, as reported from CMP forums, is to choose a lock that hand-tightens to between about 5:00 and 5:30 and then wrench it to 6 o’clock; for match rifles, the lock’s seat is reamed until it hand-tightens at about 5:30.
The more important point, from members of a specialist collectors’ forum’s advisory panel:
“It’s not the gas cylinder lock that dictates the accuracy of the rifle. It’s the gas cylinder. If you have zero rotation on the gas cylinder then you have accuracy.”
And: “If you aren’t trying to build a match rifle, and the rifle is accurate and functions, don’t get too anxious over the clocking of the lock.” Check that the cylinder has no rotational play on its splines. And never tighten the lock screw when the rifle is hot (1969 manual).
11.9.2 A loose gas cylinder
A cylinder that rotates on its splines is an accuracy problem. One gunsmith’s documented fix during a rebarrel: set the end of the barrel on wood and peen the edges of the barrel’s gas cylinder splines with a 1⁄8-inch punch to tighten the fit. That is one shop’s method, not an Ordnance procedure, but it is a sound one. National Match gas cylinders from 1958 had their rear ring reamed so it did not touch the barrel.
A bent gas cylinder is replaced, not straightened (1942 manual).
11.10 The Trigger Guard
The 1942 ordnance manual’s trigger guard section, which reads like a checklist:
- Check the guard for deformation, and the locking lugs and hammer stop for wear and burrs; check the latch for retention, wear and burrs.
- If the bow of the guard is bent up far enough to interfere with the trigger, straighten it or grind the tip of the trigger.
- When the locking lugs are worn, peen them lightly to resize them and dress them to shape with a fine file.
- The guard’s fork can be sprung in, causing binding, or sprung out, which stops the hammer pin extending far enough for proper bearing. Spring it back.
The same manual notes that “excessive force is sometimes required to close the trigger guard” on some rifles — a fitting problem, not a reason to force it.
11.11 The Stock
- Tight fit matters. Garand Gear: “Tight stock fit may be the most important factor in achieving good accuracy potential.”
- Handguards crack easily from mishandling. The front handguard’s ferrule and spacer need special tools and, per Garand Gear, “the only reason to remove these is to refinish the wood.”
- Where the rod binds, relieve the wood (1966 depot manual).
- Swelling: the depot manual has a procedure for “correcting swelling in stock assembly.” Its details were not read from the page, and no numbers are quoted from it here.
- National Match work: Type 2 National Match rifles from 1960 had glass-bedded stocks and front handguards glued to the lower band. That is not legal in the CMP’s as-issued matches.
11.12 Rebarreling
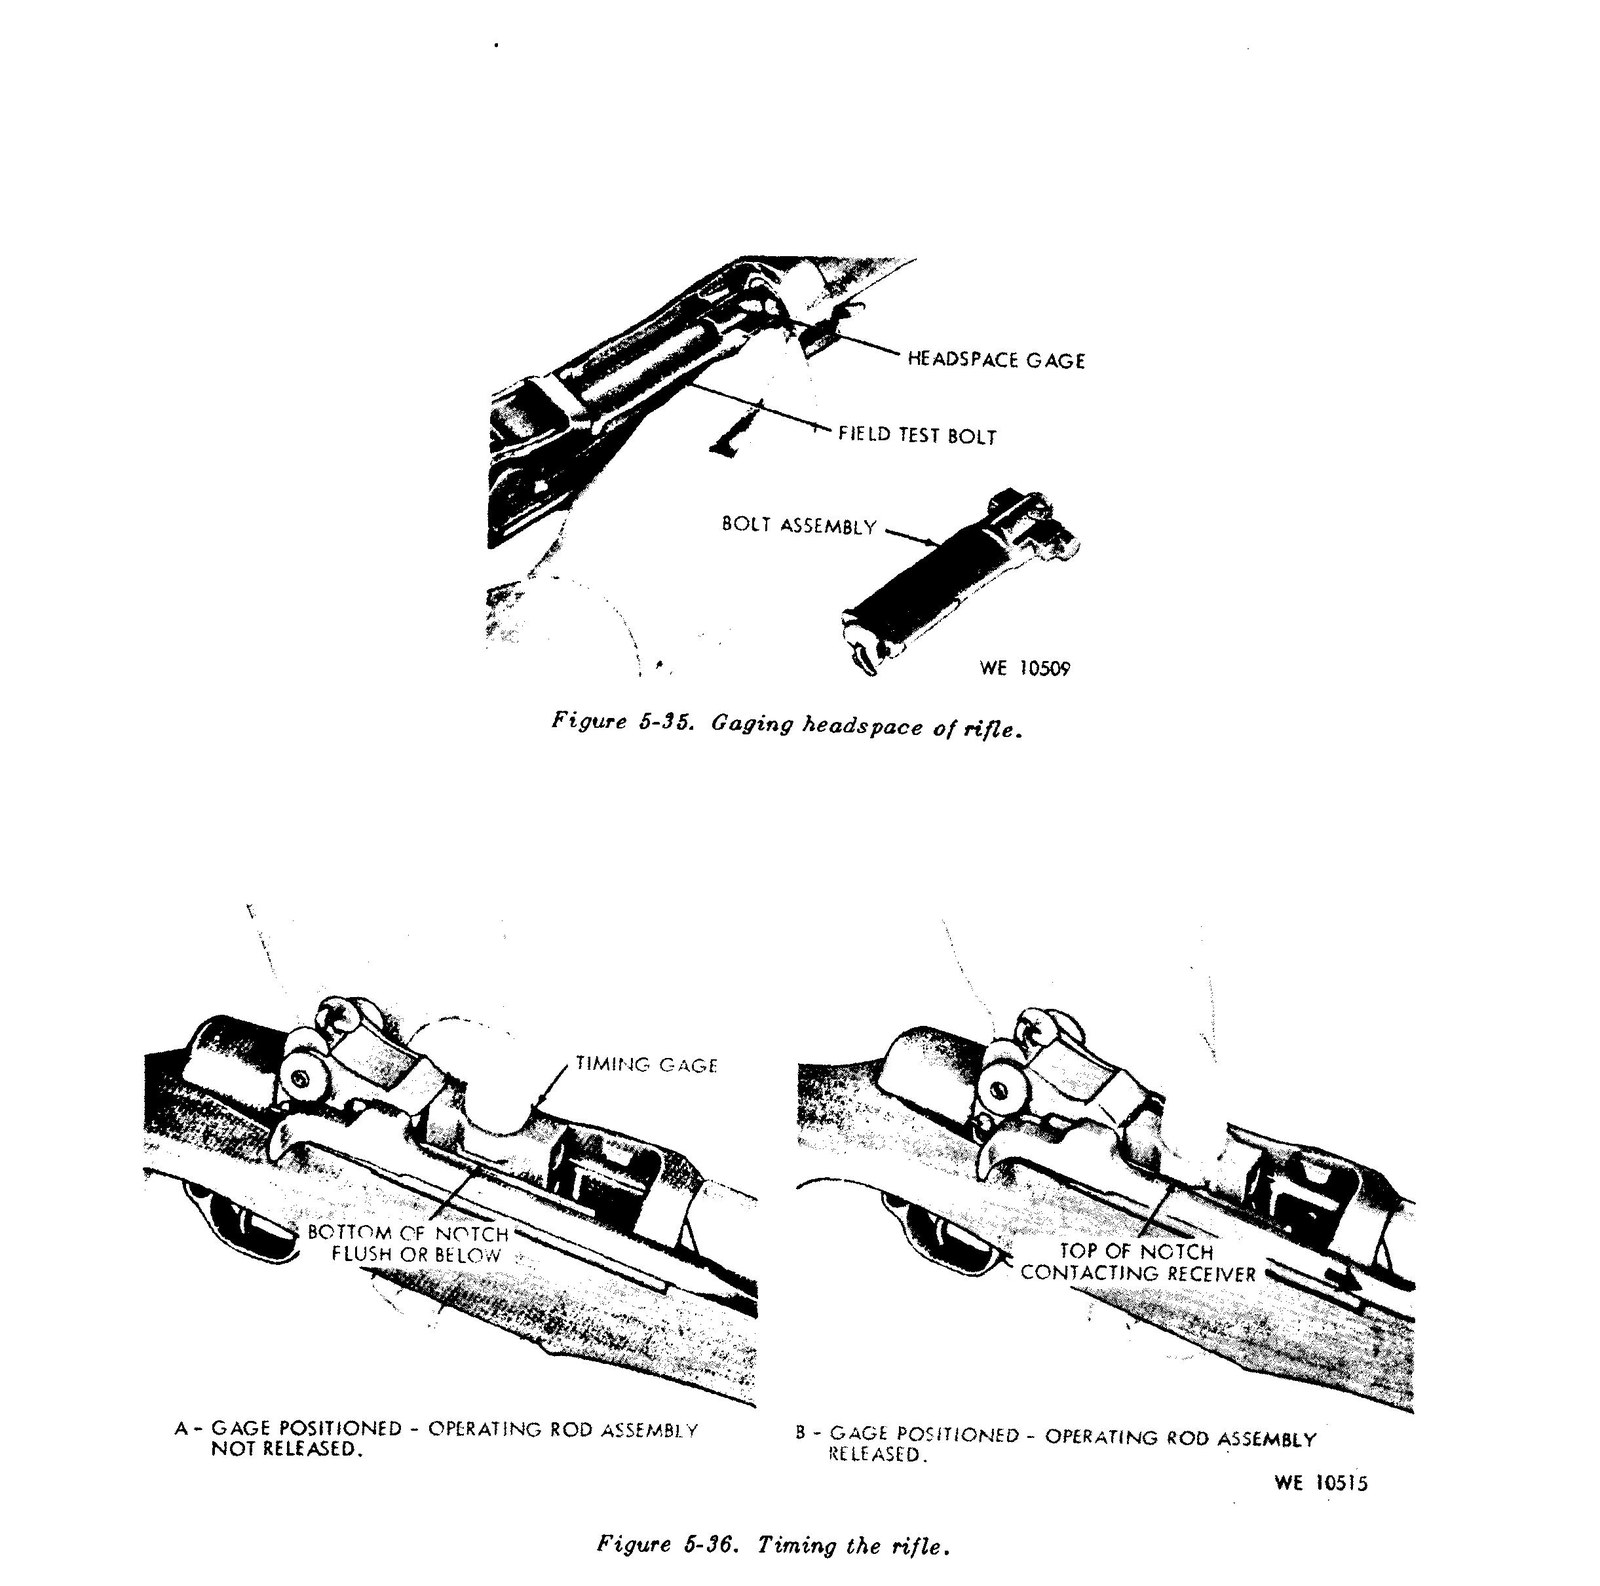
The depot tools were a barrel and receiver wrench, headspace reamers with fixtures, headspace gauges, a field test bolt and a timing gauge. No barrel torque specification was found in any manual or secondary source.
One gunsmith’s documented rebarrel is the best procedure found, and it is consistent with good practice on any military receiver:
- Use a proper enclosed receiver wrench that supports the receiver’s rails, and a barrel vise with rosin on the bushings. An open-jaw wrench can spring an M1 receiver; no documented incident was found, but the risk is widely stated and the fix is cheap.
- Mask the gas cylinder lock threads before clamping.
- The old barrel may need a long lever to break loose.
- Index the new barrel so the rear sight ears and the gas cylinder’s front sight dovetail are parallel — that gunsmith made a simple gauge of a wide bar across the sight ears and a narrow bar in the dovetail.
- New M1 barrels are typically chambered short — Fulton Armory’s GI-contour barrels are about 0.010 inch short — for finish reaming to headspace. Ream a few turns at a time, clean, and check, until the bolt closes on GO under light finger pressure and does not close on FIELD. “I never try to force a bolt closed on a gauge; light finger pressure is all that is needed.”
11.13 Drilled and Tapped Receivers
The receiver of the rifle documented in Vol 7 has three tapped holes for a side mount. No technical guidance specific to M1 receivers was found — nothing on whether drilling affects the receiver’s strength or heat treatment in practice. A claim circulates that drilling requires annealing and re-hardening; it is unsourced and should not be repeated as fact. The value consequences are in Vol 16: leave the holes, keep clean screws in them if the mount comes off, and disclose them.
Sources
- U.S. War Department and Department of the Army, FM 23-5 (1940 and 1965 editions), stoppages and immediate action.
- U.S. War Department, TM 9-1275 (1942), paragraphs 53, 66 and Figures 39–40.
- U.S. Army, TM 9-1005-222-12 (1969), Table 3-4 and paragraph 2-9.
- U.S. Department of the Army, TM 9-1005-222-35 (1966), Table 4-1, Figures 5-35 and 5-36, and Appendix II.
- Garand Gear, “M1 Garand Inspection,” “M1 Garand Strip,” “M1 Garand No-Fire,” and “M1 Garand En-Bloc Clip Problems.”
- Fulton Armory, “Everything you wanted to know about M1 Garand operating rods.”
- Wayne Faatz, “M1 Garand Slam-Fires: Potential Causes & Solutions,” American Rifleman (1983).
- Military Surplus Collectors Forums (milsurps.com), advisory panel thread on gas cylinder lock timing.
- Ken’s Gunsmith (ktgunsmith.com), “Garand Barrels.”
- Bruce N. Canfield, “The National Match M1 Garand,” American Rifleman.
- m1-garand-rifle.com, troubleshooting and loading pages.
Comments (0)