Headspace · Volume 12
Reading Fired Brass — The Only Witness to What Happens Under Pressure
Gauges measure a rifle at rest, under gravity on a bolt handle. Nothing you do at a bench replicates sixty thousand pounds per square inch, and a rifle can behave differently under that load than it does on the bench — bolt lugs deflect, a receiver stretches, a case grips a chamber and refuses to let go. The fired case is the only instrument that was present when it happened. This volume reads it.
The rule that governs the whole volume: when a gauge and the fired brass disagree, the brass is right. The gauge measured the wrong thing.
12.1 The Mechanism, in Three Acts
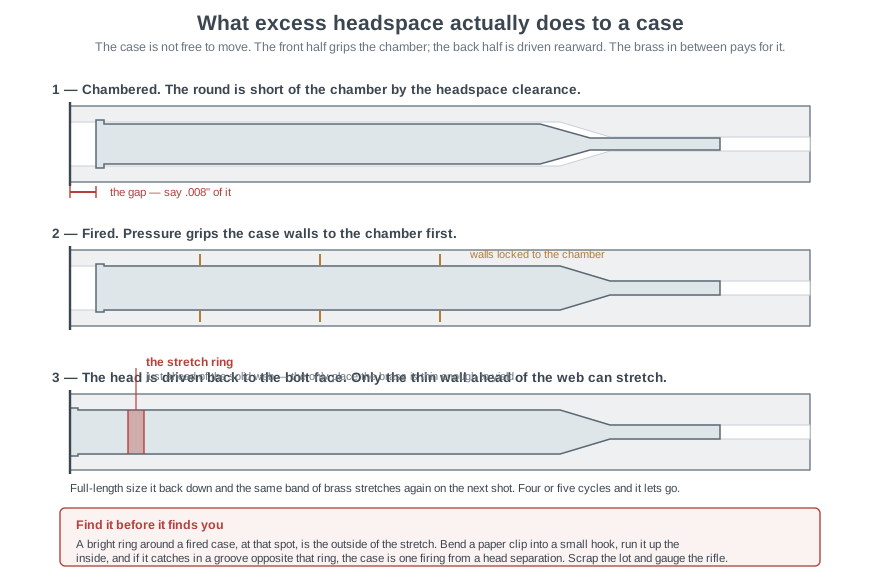
Understanding what a case does when fired with excess headspace makes every symptom below obvious rather than memorised.
Act one — the round sits forward. A chambered round is not against the bolt face; it is somewhere in the clearance between the shoulder stop and the bolt face. On many actions the firing pin’s blow drives it the rest of the way forward before ignition.
Act two — the front grips first. Pressure rises, the case walls expand outward to the chamber, and friction locks them there. This happens fast, and it happens before the case head has moved anywhere.
Act three — the head is driven back. The remaining pressure pushes the case head rearward until it meets the bolt face. But the front of the case is now welded to the chamber by friction. Something has to give, and the only brass thin enough and soft enough to yield is a narrow band just ahead of the solid web at the case head.
That band stretches. Full-length size the case back down and the same band is worked again next firing. Four or five cycles of this and it fails.
12.2 The Bright Ring
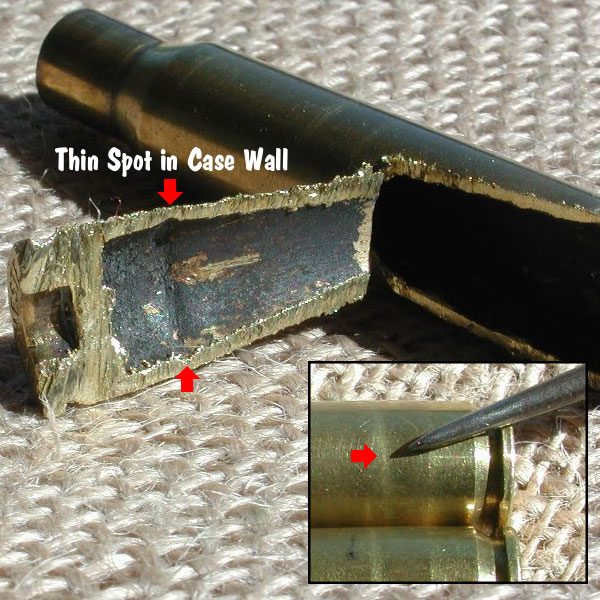
The most useful single diagnostic in reloading, and the easiest to see once you know where to look.
Hold a fired case under a light and look at the body about a quarter to three-eighths of an inch ahead of the extractor groove — where the case wall transitions from the solid web into the thin body. On a case that has stretched, there is a shiny band running around the circumference.
The ring is thinned brass. It is bright because it has been stretched and rubbed against the chamber wall, and because it is thinner it reflects differently than the brass either side of it.
A faint ring on a case that has been fired several times is normal. A distinct, bright, sharp-edged ring is a warning. A ring with a visible groove or step is a case one firing from parting.
12.3 The Paper-Clip Test
The confirmation, and it costs nothing.
Straighten a paper clip and bend a small, sharp hook — about a sixteenth of an inch — into one end. Run it down inside the case and drag the hook up the inner wall past the web transition.
If it runs smooth, the case is fine. If it catches in a groove at the same station as the bright ring, that groove is the inside of the stretch, and the case has thinned there to a fraction of its original wall.
Scrap that case. Then scrap the batch, because they have all had the same treatment. Then measure the rifle, because they are all telling you the same thing.
A dental pick works better than a paper clip and any hardware store sells one for a few dollars. A borescope is better still if you have one.
12.4 Primers
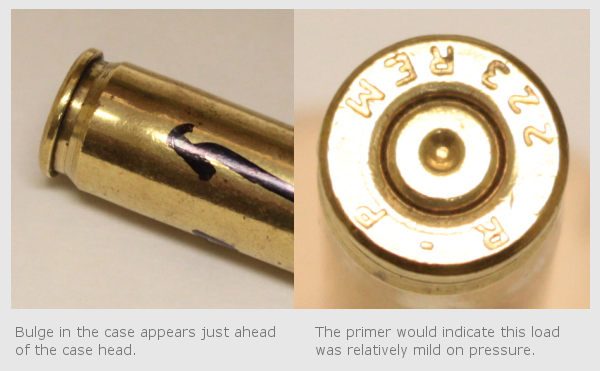
The primer is a pressure gauge and a displacement gauge at once, and Manson’s comparator instructions contain the sharpest description of the second role.
12.4.1 A protruding primer
Manson: “often the result of chamber headspace being longer than headspace of the cartridge. Occurs when the firing pin pushes the round forward in the chamber and the primer then backs out when full pressure is realized and the case grips the chamber walls, preventing it from fully contacting the breech face.”1
Read that as a sequence and it is Act One and Act Two in miniature. The pin shoves the round forward. Pressure starts, and the primer — which is a loose press fit — backs out of its pocket until it meets the bolt face. Then the case body grips the chamber, so the head never comes back to collect it. When you extract, the primer is standing proud.
A proud primer on a fired case is an excess-headspace signature, and it is the earliest one — it shows before the bright ring does. It has an important second property: the proud primer marks exactly where the bolt face was. Manson use this, instructing that in this situation “chamber headspace must be measured from the shoulder to the rear of the protruding primer.”1
The one confounder: a very light load in a rifle with normal headspace can also back a primer out, because pressure was never high enough to push the case head back and re-seat it. Check with a full-pressure load before concluding anything.
12.4.2 A cratered primer
Metal extruded backward into the firing-pin hole, leaving a raised collar around the pin dimple. Usually a pressure signal, sometimes an oversized firing pin hole, and not by itself a headspace indicator.
It matters here because it corrupts measurements. Manson: “if the primer has not backed out and metal has extruded into the hole in the breech face, the ‘splash’ must be removed before gauging headspace to achieve a true measurement.”1 File or sand it flat, or decap the case — and if you decap, do it “being careful not to expand the neck, which could cause shoulder movement,” which in practice means pulling the expander ball or using a dedicated decapping die.
If both conditions are present: “remove the protruding primer material without changing the location of the primer and take headspace measurements including the protruding primer.”1
12.4.3 A flattened primer
Flowed out to fill the pocket, with the radius at its edge squared off. A pressure signal, not a headspace one. It gets conflated because both appear together on a rifle being fed hot loads — and hot loads are one of the ways headspace grows in the first place (Vol 9, link one).
12.5 Case Length Growth
Measure a batch of cases each time you trim, and write down how much you took off. That number is data.
A rifle growing brass 0.001 inch per firing is behaving normally.
A rifle growing brass 0.004 or 0.005 inches per firing is drawing brass forward out of the web, which is the same act as the stretch ring, expressed at the other end of the case. Something is wrong: excess headspace, over-generous full-length sizing, or both.
This is the diagnostic in Vol 11 stated from the other side. Trimming is treating a symptom. If the symptom is loud, find out why.
12.6 Body Expansion at the Head
Measure the case body diameter about a tenth of an inch ahead of the extractor groove, on a micrometer, before and after firing. A few ten-thousandths of expansion is normal.
Growth of a thousandth or more, on a load that is not otherwise showing pressure signs, means the case head is being worked beyond its elastic limit. On a rifle that also shows a stretch ring, this is the case head telling you it is carrying more load than it should — often because the case is not fully supported, sometimes because pressure is genuinely too high.
This is also the measurement that catches a loose primer pocket, which is its own end-of-life signal: if a fired primer falls out or seats with no feel, the pocket has been expanded past recovery and the case is finished regardless of what the body looks like.
12.7 Extraction Feel
Free. Pay attention to it every time.
Sticky extraction on the first firing of new brass in a rifle with a clean chamber is usually pressure or a rough chamber, not headspace.
Extraction that gets progressively harder over a string is usually a chamber heating and fouling.
Extraction that becomes sticky as your reloads accumulate firings, in a rifle that used to extract cleanly, is brass that is no longer being sized enough — the shoulder has crept forward (Vol 10, the neck-sizing trap) or the body is springing back less. Measure a fired case on the comparator and compare it against your record.
12.8 A Separated Case
If the head does come off, the front of the case stays in the chamber. Symptoms: the bolt extracts a headless ring of brass; the next round will not chamber; and there is usually more gas in your face than usual.
Stop shooting. Do not attempt to chamber another round, and do not try to drive the stuck body out with a cleaning rod from the muzzle — you will burr the chamber.
The clean recovery is a broken case extractor, a tool made for exactly this. Failing that, Cerrosafe does it: Brownells document the method, and it is the same cast procedure as Vol 8 with a shorter dam. Clean the inside of the case with a dry bronze chamber brush, push a patch into the bore “to within ½” of the mouth of the broken cartridge case,” pour, let it cool to room temperature or half an hour maximum, and push the whole thing out with a cleaning rod. “In extreme cases, you may have to use a bore-fitting brass rod in place of the cleaning rod, and use a brass or plastic headed hammer to start the broken cartridge case from the chamber.”2
And Brownells’ closing instruction, which is the point of this whole volume:
“After the broken cartridge case has been removed, be sure to inspect both the rifle and the ammunition to determine the probable cause of the broken cartridge case. In some instances, the case separation may have been caused by excessive headspace. Some case head separations result from either incorrect ammunition or improperly loaded ammunition being used.”2
A head separation is not a bad piece of brass. It is a finding. Gauge the rifle before you shoot it again.
12.9 A Reading Order
Given a handful of fired cases from a rifle you are assessing, work in this order — cheapest and most informative first.
- Look at the primers. Proud primers are the earliest headspace signal.
- Look for the bright ring. Under a light, rotating each case.
- Run the paper clip. On any case showing a ring, and on two or three that do not.
- Measure head-to-datum on a comparator, ten cases, and note the spread. A wide spread points at lug bearing (Vol 9).
- Measure the case length and compare against your trim record.
- Measure the body just ahead of the extractor groove.
If steps 1 to 3 are clean and steps 4 to 6 are consistent, the rifle and the brass are in agreement and you can stop.
If anything in 1 to 3 shows, go to Vol 6 and measure the chamber. The brass has told you where to look; now get the number.
12.10 Bibliography
Footnotes
-
Manson Precision Reamers, “Instructions for the Manson Cartridge Comparator,” section “Special Note Concerning Measurement of Fired Cases.” Emphasis added. https://mansonreamers.com/instructions-for-the-manson-cartridge-comparator/ ↩ ↩2 ↩3 ↩4
-
Brownells, Inc., Cerrosafe Chamber Casting Alloy instruction sheet 076-200-446 (June 2006 revision), section “Removing Broken Cartridge Cases from Chambers.” Emphasis added. https://feeds.brownells.com/userdocs/learn/Inst-446.pdf ↩ ↩2
Comments (0)