Traditions Blunderbuss Kits · Volume 4
Unboxing & Inventory: Parts, Tools, and a Plan
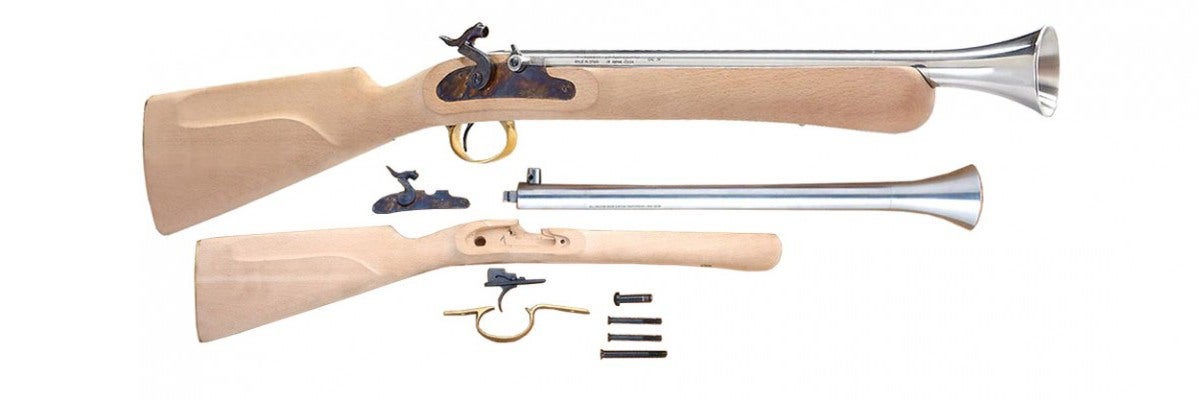
Before a single part goes together, you do two unglamorous things that decide how the whole build turns out: you inventory everything, and you assemble the small tool kit you’ll actually need. A muzzleloader kit is not a model kit — the parts are real steel and brass, they arrive slightly oversized or “proud” where they need hand-fitting, and the instructions assume you’ll do a little filing and sanding. None of it is hard. All of it goes better with a plan.
4.1 What’s in the box
Both the KR500 and KR510 kits ship as essentially a complete gun, disassembled and unfinished. Expect to find, give or take how Traditions packs a given run:
- The barrel — 16.75” of white steel, smoothbore, with the flared trumpet muzzle already formed. “White” means bare, unfinished steel: no bluing, no browning. Finishing it is your job (Volume 8).
- The breech plug and tang — the plug closes the rear of the barrel; the tang is the flat tongue that extends back over the wrist of the stock and takes a screw. On these kits the breech is usually already fitted to the barrel.
- The lock — a complete percussion lock (KR500) or flintlock (KR510) on its lockplate. This is the one part you should not need to take apart; treat it as a fitted subassembly.
- The stock — select hardwood, pre-inletted (the mortises for the barrel, lock, and tang are already roughed out) but unfinished and usually a little oversized at the edges. Sanding, staining, and sealing are yours (Volume 7).
- Brass furniture — the trigger guard and the buttplate, solid brass, usually needing a little fitting and polishing.
- The trigger and trigger plate — a single trigger and its mounting hardware.
- The ramrod — a wooden rod that lives under the barrel and seats your load. It usually needs trimming to length and finishing.
- A bag of small parts — the screws, pins, the tang bolt, lock screws, ramrod thimbles/pipes (the tubes that hold the ramrod under the barrel), a nose cap, and a nipple (KR500) or vent liner (KR510).
- An instruction sheet / owner’s manual. Read it before you touch anything. It is the authority for your specific gun — including the load data in Volume 9 — and it supersedes anything general said here.
First job: inventory against the parts list. Lay everything out, tick each part off the manual’s list, and confirm nothing is missing or damaged before you start filing — because the moment you modify a part, you own it, and a warranty replacement gets harder. This is also the natural moment for the “before” photo that opens your build.
4.2 The tools you’ll actually need
You have a full gunsmithing bench, so most of this is already in a drawer. The point of the list is that a blunderbuss kit needs surprisingly little — no lathe, no mill, no reamer:
For fitting the metal and wood:
- A set of needle files and a couple of larger flat/half-round files — for easing trigger-guard tangs, buttplate edges, and any proud metal.
- Sandpaper, a range of grits from ~120 up to 320/400 — for the stock. A sanding block keeps flats flat.
- A sharp chisel or two and/or a scraper — for any inletting that needs relieving so a part drops fully home. Inletting black (or lipstick) to mark high spots.
- Screwdrivers that actually fit — hollow-ground gunsmith bits. Muzzleloader screws are soft and slot-headed; a hardware-store driver will chew them. This is the one place not to improvise.
- A brass or nylon punch and a light hammer for the cross pins, so you don’t mar anything.
For finishing the wood (Volume 7): stain, a sealer/oil finish, rags, fine steel wool or a gray abrasive pad, and a way to raise the grain (a damp cloth).
For finishing the barrel (Volume 8): a thorough degreaser (this matters more than the finish itself), your chosen cold blue / rust blue / browning solution, clean cotton patches, fine steel wool or 0000 wool, and rubber gloves. Bluing and browning solutions are acids and salts — treat them accordingly.
For shooting later (Volume 10): a range rod or the ramrod, a powder measure, a short starter, a nipple wrench (KR500) or vent pick (KR510), a cap seater or flint, and cleaning gear. You don’t need these to build, but buy them with the kit so you’re not waiting when it’s done.
4.3 Read the sequence before you start
The build has a natural order, and getting it wrong means undoing finished work. The short version, expanded in Volumes 5–8:
- Dry-fit everything first, unfinished. Fit the barrel to the stock, the tang, the lock, the trigger, the guard, and the buttplate — all in bare wood and bare metal — until every part seats fully and the gun goes together cleanly. Fix every fitting problem now.
- Then, and only then, take it all apart to finish. Finish the wood and the steel separately, with the gun disassembled. You never want to stain a stock with the barrel in it or blue a barrel in the stock.
- Final assembly goes together from finished parts, ideally never to be filed again.
The single most common way a first kit comes out looking amateurish is rushing to stain the wood before the metal is fully fitted, then having to file the finished stock and patch the finish. Dry-fit completely first. Everything after that is patience.
4.4 A realistic time and difficulty estimate
This is a beginner-friendly kit — it is one of the reasons to start here rather than on a scratch-inlet longrifle. The metal is mostly fitted; the inletting is mostly done. Plan on a couple of focused evenings for fitting and assembly, then finishing time that is dominated by drying — several days if you do the wood in multiple thin oil coats and the barrel in a proper rust brown, which are the finishes worth waiting for. The work is not demanding for someone comfortable at a bench; the discipline is doing it in the right order and not hurrying the finish.
Comments (0)