Chauchat · Volume 8
Field Strip, Care, Stoppages and Repair
The soldier's field strip and the armourer's detail strip from the French and American manuals of 1916–1918, the cleaning and oiling the gun demanded, the stoppage tables phase by phase, the worn and broken parts the armourers expected, and what can be said about keeping one running today
8.1 The sources and their limits
Two primary procedures survive online: the French Instruction provisoire of February 1916 in its American translation of 1917–1918, and the Notes on Mechanism printed by the US 40th Division’s armourers’ school at Camp Kearny in February 1918, which adds an armourer’s detail strip and a long stoppage table.12 Armes Françaises summarises the French field strip with photographs.3 They use different names for the same parts; Volume 5 has a concordance. Where the procedures differ, both are given.
This volume is about taking the gun apart and keeping it working as the armies did. It is written for owners of registered guns and of deactivated ones, and for readers of the period manuals. It contains nothing on making or altering parts.
8.2 Safety first: the two rules the manuals repeat
- Never let the bolt slam forward on an empty chamber. The French instruction: uncock “by pressing the trigger, bringing the operating handle with the hand to its forward position in order to avoid a rough relax of the spring and consequently a possible breaking of a piece”. The American notes say it twice: “Never allow the bolt mechanism to snap forward, unless it is seating a cartridge in the chamber.”12
- The end cap is under spring load. The plug at the back of the jacket holds both recoil springs. Unscrew it “pushing it constantly forward in order to avoid damaging the threads and to prevent, at the end of the unscrewing, the hurling out of the plug through the sudden relaxing of the spring.”1
Before any of this, the gun must be unloaded: magazine out, bolt checked. Because the Chauchat fires from an open bolt, a gun with its bolt held back and a magazine fitted is ready to fire, and pressing the trigger to “uncock” it will fire it.
8.3 Field strip: the French procedure
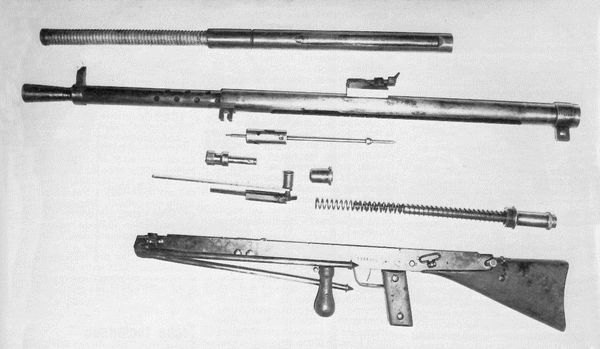
The 1916 instruction strips the gun in five steps, and forbids going further in the field: “Never dismount the pieces composing the receiver or fixed on it (transoms, trigger mechanism). These pieces, difficult to get together, are fixed to the brackets by screw bolts, so that a repeated unscrewing would wear them out”.1
- Uncock. Make sure the gun is unloaded and the safety is not on S; press the trigger and ride the operating handle forward by hand.
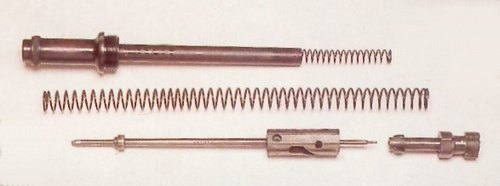
- Unscrew the plug. Push down the plug stop and unscrew the plug while pushing it forward. Take off the plug and the two springs and separate the three pieces. The barrel-spring bushing comes out with the spring or falls out when the bolt is removed.
- Separate the barrel jacket from the receiver. Rest the muzzle on something; draw the operating handle back; lower the handle of the front assembling bolt; raise the stop of the rear assembling bolt and push it out to the left; lift the rear of the jacket and lower and push it forward to free it from the connecting rod.
- Take out the bolt. Pull the operating handle fully back so the carrier reaches the rear cut-out of its slot; lift the carrier off the bolt; pull the bolt out of the breech casing; separate the head from the bolt body.
- Take out the barrel and breech casing. Lower the rear of the jacket and they slide out on their own.
Armes Françaises gives the same sequence in the same order, adding that the bipod comes off by turning it until its flat clears and drawing it forward.3
8.4 Field strip: the American soldier’s procedure
The Camp Kearny notes give an eight-step “Dismounting for cleaning to be done by the soldier” that reaches the same point in a different order:2
- See that the operating handle is forward; never let the bolt snap forward unless it is seating a cartridge.
- Press down on the spring guide latch, unscrew the spring guide cap, and remove the recoil spring and mainspring.
- Drive the rear assembling bolt in from the left side plate, turn its latch horizontal, and drive it from the right until the rear connector bushing is free.
- Turn the front assembling bolt arm straight down.
- Draw the operating handle to the rear and remove the housing with its contents.
- Draw the handle further back and remove the feed piece.
- Remove the bolt mechanism, the recoil spring bushing and the barrel group.
- Remove the bolt head from the bolt body.
The notes point out that the rear assembling bolt “cannot be removed from left side plate. It is so designed to prevent loss of same.”2
8.5 Reassembly
The French manual says only “The assembling is done in reverse way to the dismounting. Take care to strain nowhere, putting all pieces in position without force”, and then gives the points that trip people up:1
- Slide the barrel and breech casing into the jacket and line up the guide groove with the rear of the carrier slot.
- Put the bolt into the breech casing with the carrier seat in the cut-out, fit the carrier, and bring the handle to the middle of its slot.
- Present the receiver flat, front assembling bolt open; enter the roller of the cartridge guide into the groove of the connecting rod; press the receiver up and close the front bolt; fit the rear bolt.
- Press the trigger and push the bolt forward; fit the springs, bushing and plug, pushing forward while screwing so as not to cross the threads.
- “Cock and uncock the gun, holding the breech with the hand, with a view to making sure of the good working of the whole.”
The American notes add that the bolt head stop must be pressed in before the bolt goes into the casing (“Snap bolt head forward so that the bolt head stop may be pressed in”), that the cartridge guide cam must go under its cover, and that the spring guide cap must be screwed in “until the notch engages the spring guide latch”.2
8.6 The armourer’s detail strip
The American notes give a “Complete dismounting: To be done by an experienced armorer only”, in 21 steps, which goes on to strip the bolt, remove the bipod and its block, the cartridge guide and its cover, the barrel latch, the magazine stop spring, the trigger group and the magazine catch, and to separate the side plates.2 Its cautions are the useful part for anyone looking at an old gun:
- The barrel’s front end “is upset on the barrel nut”, and “The cylindrical surface of the barrel nut acts as a bearing for the front end of the barrel and must not be burred” if the radiator is ever removed.2
- “the heads of the cartridge guide cam cover bolts appear to be screw heads. These bolts cannot be turned by the heads, as they contain a stud which positions the cam on the bolt which is used as an adjustment of the cartridge guide cam cover”.2 Turning them with a screwdriver damages the adjustment.
- “The cartridge guide cannot be removed until the side plates are free to be separated.”2
- The bolt strips in this order: bolt head, extractor pin, extractor, extractor spring, ejector screw, ejector, ejector spring, bolt body, bolt stem pin, bolt stem, firing pin, bolt stem collar pin, bolt stem collar.2
The French manual forbids all of this below armourer level.1
8.7 Cleaning and oiling
The French instruction:1
- Clean and oil after every firing, “if possible, Russian mineral oil (Oleonaphtha)”.
- Kerosene cleans “the very fouled parts, but it is necessary to wipe carefully after using it and before greasing; otherwise all the parts put in kerosene would easily oxidize.”
- “the part that gets dirty, generally, is the barrel nut, especially after a firing of certain length.” Soak it in kerosene, then use the special scraper: put its axle in the muzzle and turn it. “Scrape lightly, taking care not to whiten the metal.”
- Clean the inside of the front-sight carrier, the recoil intensifier, carefully. Pass a rag through the barrel “and oil abundantly”.
- Keep the breech casing very clean, “especially at its forepart and at the posterior edge of the barrel. The support shoulders of the movable head lugs must be in a perfect state of preservation. Use to that effect a soft wooden scraper.”
- After a gas attack, oil everything “entirely and abundantly with Russian mineral oil. It gives a six hours preservation.”
The American notes add a different philosophy for oil:2
- Oil sparingly, wiping parts with an oiled rag: “If too much oil is used, and the weather is cold the oil gums and prevents proper functioning. In dry weather the excess oil collects dust”.
- “The gun should be oiled after the first two magazines have been fired”, because oil applied to the hot gun, “especially to the cartridge guide cam and the cam ways in the bolt body”, will not gum.
- During lulls, clear the brass and primer chips from the locking recess “by a piece of soft wood conveniently shaped”, and keep the bolt face, ejector and extractor clean.
- Clean especially “the extractor, ejector, guide lugs, cam cuts, bolt head stop, firing pin”.
- Chlorine gas rusts polished parts but not oiled ones; cartridges exposed to gas “should not be used in the gun; but should be turned in and cleaned and then re-issued.”
The issue kit (French): three-piece rod, barrel sponge, cleaning rod, jacket and breech-casing sponge, the 1907 socket extractor for stuck cases, an ejection peg, an oil can, a kerosene can, the barrel-nut scraper and a screwdriver.1 The American kit adds a chamber brush, a ruptured-cartridge extractor and a hand extractor.2
8.8 Cleaning in action: the team drill
The Camp Kearny notes describe how a team cleaned in a lull, with half the platoon’s guns kept in action: the second carrier stands guard with his rifle; the gunner unscrews the spring guide cap and hands the springs, feed piece and bolt to the first carrier to clean; the gunner takes out the barrel and breech casing and leaves them to cool while he cleans the receiver and housing; the first carrier cleans the barrel last, “it having had time to cool”, oils the parts and hands them back.2
8.9 The magazine
The magazine caused most stoppages, and both manuals treat it as part of the gun (Volume 6):
- Oil the magazines completely after each firing; dry them and wipe with an oiled rag.12
- Load them properly; do not force rounds in, which damages the lips.2
- Check that the sides are not bent and that the spring is not distorted.2
- Do not keep them loaded without need; load eighteen, not twenty.1
- Test the spring: removed, it should form “an incompletely closed crown” with no more than four fingers between its ends; if more, open the inner angles by hand; if still weak, replace it.1
8.10 Holding it: the face and the shoulder
The 1918 notes warn: “When the gun is fired from the shoulder, it is important that the gunner hold the piece securely against the shoulder, and when sighting rest the cheek well upon the breech housing so the spring guide cap will not injure the gunners face.”2 The French training centre at Châlons photographed the wrong way in January 1918, under the caption “Comment on ne doit pas épauler. Le tireur reçoit la ‘gifle’”: how not to shoulder it; the gunner gets “the slap”.4
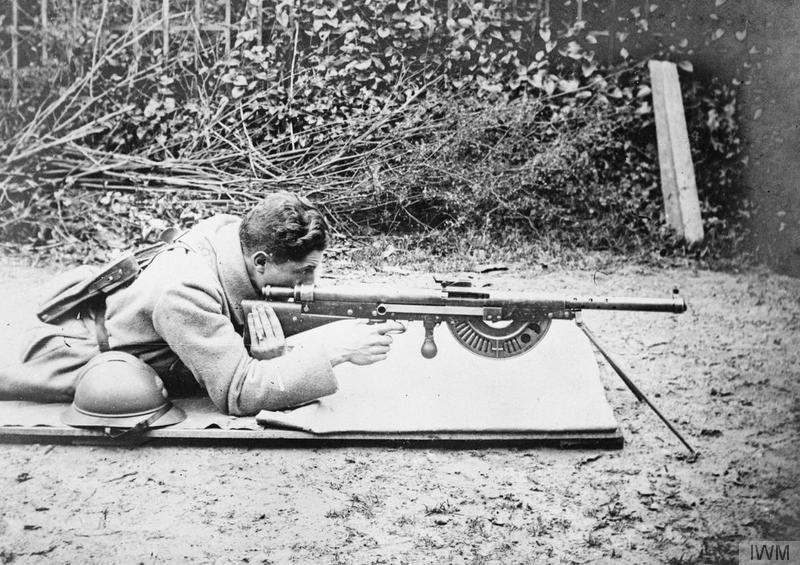
Holding hard matters mechanically as well. A loosely held gun moves back as a whole, the barrel does not recoil far enough, and the bolt is not caught by the sear: the first stoppage in the table below.2
8.11 Stoppages, phase by phase
The American notes list the stoppages by the phase of the cycle in which they happen (Volume 5), with cause, result and remedy. Condensed:2
Table 1 — Stoppages, phase by phase
| Stoppage | Cause | What the gunner sees | Remedy |
|---|---|---|---|
| Failure to recock (phase 1) | Not enough recoil: weak ammunition, friction in the recoiling parts, or the gun not held firmly | Bolt goes forward with the barrel; empty case not extracted | Cock by hand, which extracts and ejects the case |
| Barrel does not return (phase 2) | Weak recoil spring; dirt round the barrel, or the barrel sleeve expanded by heat; a dirty chamber that will not unlock | Barrel and bolt stuck together at the rear, empty case in the chamber | Pull the handle back and let go sharply; strike the butt with the palm; set S and strike the heel of the butt on the ground (“never with the toe”); dismount, clean, oil |
| Failure to extract | Defective or wrong-size cartridge; case stuck in the chamber; defective extractor, spring or pin | Case left in the chamber; the extractor may “tear off the rim” | Check ammunition; change extractor spring; hand extractor, then the ruptured-cartridge extractor |
| Failure to eject | Weak or dirty ejector | Case left between the side plates or jammed in the port | Turn the gun on its right side to drop it; clean the ejector; test its spring |
| Failure to feed (phase 3) | Weak or broken magazine spring; distorted magazine | No round in front of the feed piece | Change magazine |
| Double feed | Magazine lips too wide or misshapen | Two rounds pushed | Change magazine. “This stoppage should never occur as it is the first duty of the men to see that the magazines are in good condition.” |
| Cartridge badly presented | Magazine too wide or bent; weak spring; lips too close so the round dives; worn cartridge-guide roller | Bullet strikes the top of the breech casing or the guide block; bolt hits the side of the case | Tighten the lips or change the magazine; cock, press the spring down by hand, remove the damaged round |
| Misfire | Bad ammunition; weak mainspring; bent cartridge guide cam rubbing | Round chambered, not fired | Examine the ammunition; pack paper into the bottom of the spring tube to stiffen the mainspring; replace it; straighten the cam |
The heat figure is the one that matters most for the gun’s reputation. Under “Barrel does not return”: “As a rule there is an expansion of the sleeve after 300 or 400 rounds have been fired automatically or 700 to 1000 rounds of single shots.” The remedy is to oil the barrel sleeve through the ejection slot.2 The French 1916 instruction gives the same stoppage, adds the extra cause of a chamber “too large”, and allows one more remedy, “exceptionally”: levering the barrel forward with the ejection peg or a knife blade bearing on the back of the ejection opening.1 On magazine stoppages it adds simply that the gunner “should not lose any time and must take another clip.”1
The American notes also prescribe the packing-paper fix twice, as the gun’s only adjustment: “There are no adjustments on the gun, except in case the mainspring becomes weak it can be strengthened by shortening the interior of the spring tube by putting a wad of paper, or cloth, in the tube”.2
8.12 Worn trigger parts
The same notes give four faults of a worn trigger train:2
Table 2 — Worn trigger parts
| Symptom | Cause | Remedy in 1918 |
|---|---|---|
| Fires automatic when set on C | Worn regulator cam, or worn curved part of the trigger bar it bears on; slack in the cam’s bearings | Replace worn parts |
| Fires when set on S | Regulator cam loose, so it does not hold up the sear lever | Replace the regulator cam |
| Does not fire on C, but works on M | Curved part of the trigger bar distorted, or its notch worn | Armourer to fit the trigger bar (“File the curved portion of the trigger bar until it is timed in properly”) |
| Does not fire on either setting | Worn pivots: too much lost motion for the trigger to release the sear | Replace worn parts |
The first two are safety faults. A Chauchat that fires on safe, or runs away on single shots, has a worn or loose cam, and the 1918 remedy is replacement.
8.13 Broken parts
“The breakages occur at the weakest place, and are most always due to flaws in the steel,” say the 1918 notes, which give two causes:2
- Excessive recoil breaks the recoil spring bushing (it strikes the spring guide cap), the operating handle (it strikes the end of its slot), the feed piece, and the feed-piece stud.
- Premature firing. A primer standing proud of the case head can be fired by the bolt as it chambers the round, which “causes breakages on the head of the extractor, or will explode the breech casing” (Volume 6).
The notes add a warning that came from a death. If the operating handle breaks, the feed piece can separate from the bolt, and striking the butt to clear a jam can then send the bolt forward to fire a cartridge, because the cartridge guide is no longer working: “This accident caused a fatality in the French Army on September 20th 1916”.2
8.14 Accuracy acceptance
Muller’s 1933 text gives the French Army’s acceptance limits for the gun, fired single shot at 200 m with the 250 m sight setting:5
- Precision: the group’s height plus its width “ne doit pas dépasser 160” (the unit is unclear in the scan; centimetres is the likely reading).
- Zero: the mean point of impact inside a rectangle drawn on Planche XV, 60 cm either side of the aiming mark and from 50 cm above to 80 cm below it, as the plate shows (reproduced in Volume 5).
- Barrel wear is referred to a separate instruction on firing practice, which was not found.
8.15 Repair today
No current source for parts, springs or magazines could be verified for this dive, and no dealer is named here. What can be said from the sources:
- Springs and magazines were treated as consumables in 1916–1918: the magazine spring had a field test and was to be replaced when it failed it, and the mainspring was packed with paper as a stopgap and then replaced.12
- Parts were not reliably interchangeable on George Chinn’s account (“there was no interchangeability of parts”), although no inspection record was found to test this.6 A replacement part may need fitting; the 1918 notes already expected an armourer to file a trigger bar to time it.2
- The French manual forbids field dismounting of the receiver, transoms and trigger mechanism because their screws wear with repeated removal.1 On a gun a century old, those screws and the cartridge-guide cover bolts deserve care.
- Any work on a registered Chauchat that is more than cleaning and replacing worn parts with like parts belongs with a licensed specialist. On a deactivated or display gun, restoring function is not repair but the making of a machine gun (Volume 10).
8.16 What could not be established
- The French Army’s own spare-parts tables and wear limits.
- The French instruction on barrel wear referred to by Muller.
- Any current, checkable source of parts or magazines.
- The unit in Muller’s precision limit.
References
Footnotes
-
Provisional Instruction on the Automatic Rifle, Model 1915 (Chauchat), translated from the French edition of February 1916 (War Department Document No. 732, Army War College, January 1918), ch. II § IV, ch. III, ch. IV, Part III. https://archive.org/details/provisionalinst00deptgoog, accessed 2026-10-19. ↩ ↩2 ↩3 ↩4 ↩5 ↩6 ↩7 ↩8 ↩9 ↩10 ↩11 ↩12 ↩13 ↩14 ↩15
-
School of Automatic Arms, 40th Division, Camp Kearny, Notes on Mechanism of the Chauchat Machine Rifle, Model 1915, February 1918, pp. 1–2, 6–10, 18–25. https://archive.org/details/chauchatautomaticriflemodel1915notesonmechanism, accessed 2026-10-19. ↩ ↩2 ↩3 ↩4 ↩5 ↩6 ↩7 ↩8 ↩9 ↩10 ↩11 ↩12 ↩13 ↩14 ↩15 ↩16 ↩17 ↩18 ↩19 ↩20 ↩21 ↩22 ↩23 ↩24 ↩25 ↩26
-
“Le fusil-mitrailleur de 8 mm CSRG modèle 1915”, Armes Françaises, http://armesfrancaises.free.fr/FM%20Chauchat.html, accessed 2026-10-19. ↩ ↩2
-
Imperial War Museum Q 85382, “The French Army on the Western Front, 1914–1918”, photographer Pierre Pansier, January 1918, with the original French caption via imagesdefense.gouv.fr; Wikimedia Commons, https://commons.wikimedia.org/wiki/File:The_French_Army_on_the_Western_Front,_1914-1918_Q85382.jpg, accessed 2026-10-19. ↩
-
Cdt G.-H. Muller, Exposé schématique du fonctionnement des armes de petit calibre (Berger-Levrault, 1933), pp. 46–47. https://archive.org/details/expose-schematique-du-fonctionnment-des-armes-de-petit-calibre-by-tanant-1933, accessed 2026-10-19. ↩
-
George M. Chinn, The Machine Gun, Vol. I (Bureau of Ordnance, 1951), p. 241. https://archive.org/details/TheMachineGunVolume1ByGeorgeMChinn, accessed 2026-10-19. ↩

Comments (0)