MP7 Light Gun: Machined Aluminum · Volume 6
Finish, and the Orange Marking on a Metal Gun
Making machined aluminium read as H&K's black polymer: bead blasting, Type II and Type III anodise (what they grow, what they cost to do at home with the lab's own supply, and where they bind), Cerakote cured in the lab's powder-coat oven, which finish goes on which part, and how the mandatory orange band is fixed to a metal muzzle so that it is permanent: a bonded and pinned printed sleeve, not dyed anodise or paint
6.1 What the finish has to do
The printed build set the visual target: H&K’s receiver is “a smooth, low-sheen, even black with crisp edges and moulded texture on the grip”, and the metal parts of the real gun “read as metal against the polymer” (MP7 Printed Build Vol 7 §7.4). An aluminium copy has the opposite starting problem from a print: no layer lines to fill, but bright tool marks and a metallic surface that must be made to read as moulded plastic, while the real metal parts (rails, pins) still read as metal.
Three other jobs: survive handling (a games-night gun gets put down on tables); not ruin the fits (every finish adds thickness at threads, dowel holes and sliding channels, Section 6.7); and decide the electrics, because anodise and Cerakote are both insulators where intact, and the bonding scheme of Volume 7 depends on which faces stay bare.
6.2 Blasting first
Whatever the finish, the machined surface is blasted first: it erases tool marks and the boundaries between toolpaths, and gives an even matt texture. Glass bead gives a fine satin; aluminium oxide grit gives a coarser texture with more tooth, which is the preparation coatings usually ask for. The hero image of Volume 1 shows what a blasted machined aluminium part looks like before any colour.
A blast cabinet and compressor are not in the lab’s catalogue (question 5). Either is a common shop item; if there is none, the anodiser or coater blasts as part of the job.
Two cautions: blast after all machining and tapping, and mask threads, dowel holes, the joint faces and any sliding fit (Section 6.7), which blasting erodes.
6.3 Type II anodise
Anodising grows aluminium oxide out of the part itself in an acid bath under current. The Anodizing Reference Guide, summarising MIL-A-8625F, gives Type II (sulphuric) as 1.8 to 25.4 µm thick. The porous oxide takes dye before it is sealed, so a blasted part dyed black and sealed is the classic matt black aluminium finish.
What it does well. It is part of the metal: it cannot chip or peel, it does not hide edges, it adds only microns to a dimension, and it is what the real gun’s aluminium parts and nearly every aftermarket MP7 part carry (the TAGART backplate in Volume 3 is “black anodized”). What it does less well. Even blasted and dyed black, anodised aluminium keeps a faint metallic depth that reads as metal under a lamp; next to H&K’s polymer it can look like a metal copy, which it is. Dye colour also varies slightly between parts processed separately, so all the visible parts go in the same run.
Doing it in the lab. Caswell sells Type II kits for hobby shops. Its Standard Anodizing Kit (AN1) was $662.85 on 24 October 2026 and comes with four 6-gallon tanks 12 in in diameter and 14 in deep and two enamel dye and seal tanks, but no power supply, no heaters and no acid (“Requires 1 gallon Battery Acid”, a DC supply “required”). Caswell’s low-current-density (LCD) instructions give the recipe: 4.5 A per square foot (30 mA per square inch), voltage rising as the film grows to 7.5 to 15 V, about 90 minutes at 60 to 75 °F, a bath of 1 gallon of battery acid to 3 of distilled water, and a nickel acetate seal at 202 to 210 °F. They give typical thicknesses of 0.1 to 0.2 mil for interior parts and 0.8 to 1.0 mil for architectural work, and their “720 rule” for time: amps per square foot × minutes ÷ mils = 720.
- The lab already has the supply. The 50 A linear supply in the lab’s catalogue can run a whole gun’s worth of parts at once: two receiver halves, front cover, backplate and butt plate are very roughly 3.5 square feet counting both faces (an estimate from the 1,600 cm² outside area, doubled for the inside, plus edges), which at 4.5 A/ft² is about 16 A at up to 15 V. It has to run in constant current, which a linear bench supply normally can (question 6).
- Tank size is tight. A 315 mm half fits a 14 in (356 mm) deep tank standing up, with little to spare, and its 170 mm height leaves about 65 mm each side in a 12 in round tank, against Caswell’s advice to keep parts about 3 in from the cathode. Caswell’s larger AN3 system ($3,053.70) “Fits Parts Up To 23” Long x 10” Wide x 16” Tall”. Running the halves one at a time in the AN1 tanks is possible; doing it well needs practice on the coupons first.
- Hazards. Sulphuric acid, heated seal baths and hydrogen at the cathode; ventilation and acid handling are the cost of doing it at home.
Or send it out. A local anodiser does this routinely for lot charges. Whether a shop will anodise an MP7-shaped receiver without questions is not known; some will, and the design note of Volume 2 §2.7 answers the question if asked.
6.4 Type III hard anodise
Type III runs colder and at higher current to grow a far thicker, harder oxide: 12.7 to 115 µm, which “PENETRATES base metal as much as builds up on the surface”, the guide’s table giving “50% Penetration and 50% Buildup per Surface”. Its natural colour runs from light tan to black depending on alloy and thickness, and on 7075 it takes a bronze or brown cast (Volume 3). It has “Good dielectric properties”.
Its value here is wear: it is the right surface for the stock-rail channels and the foregrip hinge bores where steel slides on aluminium (Volume 5 §5.5). Its costs are dimensional (a 50 µm coat adds 25 µm a face, enough to bind a slip-fit dowel or a fine thread) and practical: it needs a chilled bath and higher current density. Caswell’s Hardcoat Type III system was $868.25 on 24 October 2026. The proposal is Type III only if the parts go to an outside anodiser, and then only on the channel and bore parts, masked elsewhere; done at home, Type II everywhere and a dry PTFE lubricant in the channels is the simpler path.
6.5 Cerakote
Cerakote is a thin ceramic-loaded polymer coating sprayed on a blasted, degreased part and baked. Cerakote’s knowledge base gives the cure for its H-Series: 250 °F (121 °C) for 2 hours after a 15-minute ambient flash on metal (Elite Series: 300 °F for 1 hour), recommends a convection oven, and warns that heating elements “can create hot spot that may cause degradation in Cerakote aesthetics”, to be checked with an IR thermometer.
- The lab has the oven. A powder-coat oven is in the lab’s catalogue, explicitly “not for heat treating”. Its size and temperature control are not recorded (question 7); a receiver half needs about 350 mm of clear length.
- It looks like polymer. A matt black Cerakote film over a blasted surface has no metallic depth. Of the three finishes it is the closest to H&K’s moulded receiver.
- It sits on the part. It builds a film and grows nothing into the metal, so threads, dowels and the joint faces must be masked (Section 6.7), and it can chip at sharp edges, which is a further reason for the 0.5 to 1 mm edge radii in Volume 3 §3.7.
- It needs a spray gun and blasting, which brings back question 5. A professional Cerakote applicator is the alternative; they coat firearms daily and a light-gun shell is less unusual to them than to an anodiser.
- Price. Cerakote’s own US product pages did not display a price for its H-Series colours when read on 24 October 2026; buy at order.
6.6 Which finish where
Table 1 — 6.6 Which finish where
| Part | Finish (proposed, MA-9) | Why |
|---|---|---|
| Receiver halves, front cover, backplate, butt plate | Blast, then Cerakote H-Series matt black | Reads as H&K’s polymer; cured in the lab’s oven; the parts that are polymer on the real gun |
| Rails (bought), hinge block, stock latch, small aluminium parts | Black Type II anodise (bought rails already are) | Reads as metal, as the real gun’s metal parts do; no film to chip on small edges |
| Stock-rail channels, hinge bores | Masked from Cerakote; anodised with their part, Type III if done outside | Wear surface for steel sliding on aluminium |
| Joint faces, dowel holes, threads, bonding point (Volume 7) | Masked bare | Fits, metal-to-metal joints and a deliberate electrical bond |
| Steel pins, rails, screws | Black oxide | As bought or blackened |
| Grip panels, magazine, camera housing (printed) | The printed build’s finish (Vol 7 §7.4) | Polymer, as on the real gun |
If Cerakote is not practical (no blasting or spray equipment, or the oven is too small): black Type II anodise everywhere is the fallback. It is more durable and reads more as metal.
6.7 Fits, threads and masking
Every finish changes a dimension. Type II adds a few microns a face; Type III tens of microns; Cerakote a film on top. The rules:
- Tap and STI-tap before finishing; install helical inserts after. Mask threaded holes with silicone plugs or screws.
- Mask dowel holes and the joint faces so the halves close metal to metal and the dowels keep their fit. The joint face is also where the halves bond electrically to each other (Volume 7).
- Sliding channels are drawn with the finish’s thickness in the clearance, checked on the coupon.
- The orange sleeve’s seat on the dummy barrel is masked bare for the epoxy (Section 6.8).
6.8 The orange band on a metal muzzle
The federal marking for a look-alike with a camera at the muzzle is the band: blaze orange, “permanently affixed to the exterior surface of the barrel, covering the circumference of the barrel from the muzzle end for a depth of at least 6 millimeters” (16 CFR 1272.3(b), as set out and discussed in Imitation Firearm Law Vol 1 §1.7; house rule D29 keeps it on). The law dive’s point about permanence is that the CPSC’s own example of a non-permanent marking is “a plastic, orange plug that has threading”, and that colour through the part is the strongest case (proposal IF-2). On a metal gun the choices are:
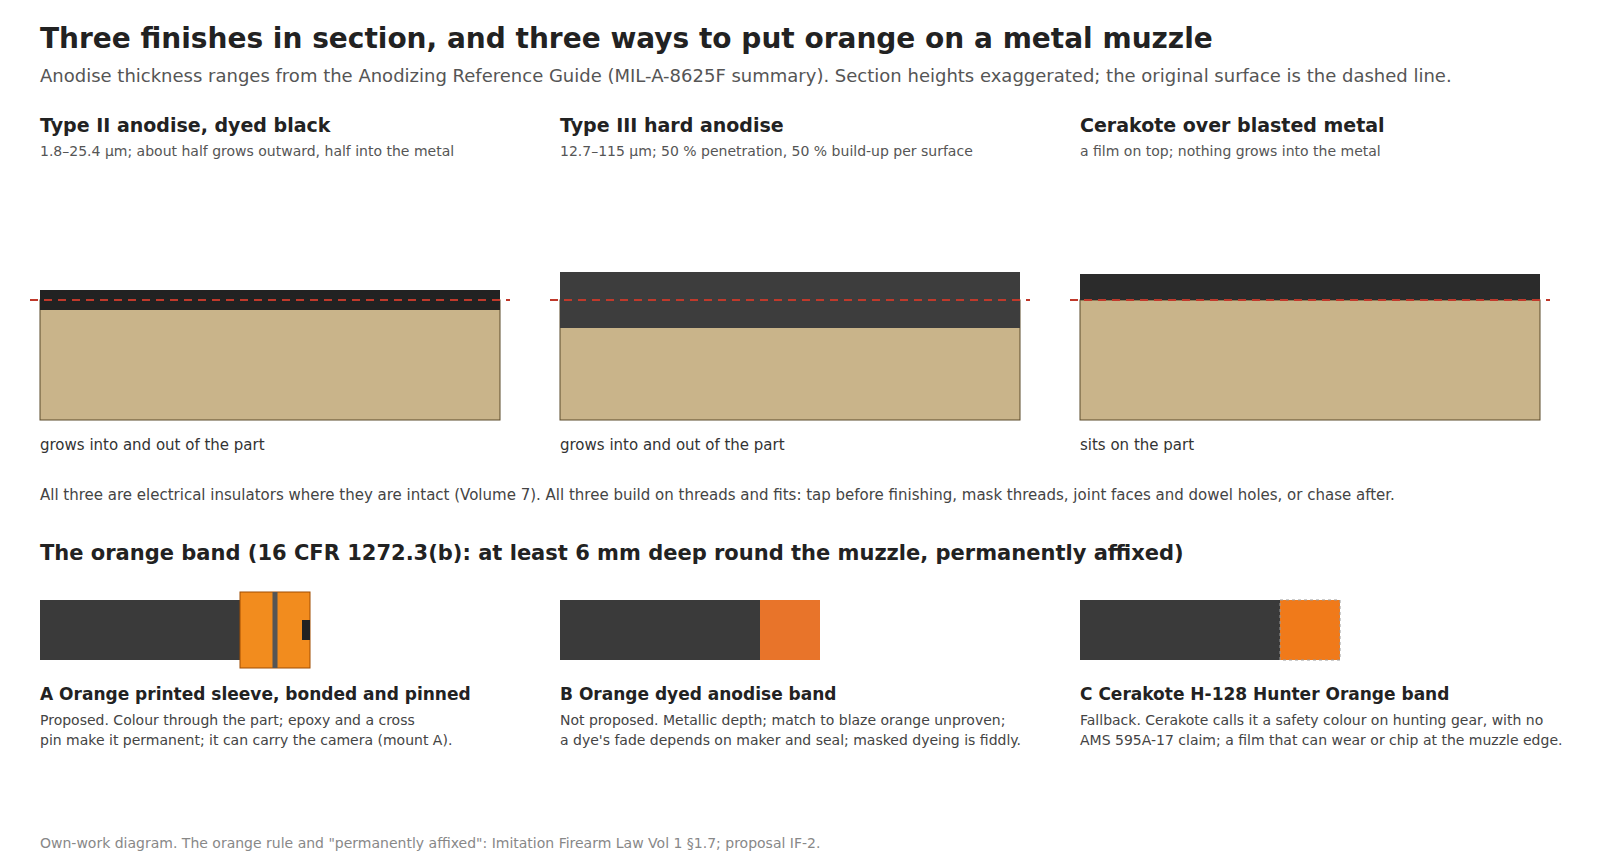
- A. An orange printed sleeve, bonded and pinned (proposed, MA-10). The printed build’s sleeve, unchanged: printed in orange, coloured all the way through, slid over the end of the solid dummy barrel, bonded with epoxy to a masked bare seat and retained by a cross pin through sleeve and dummy. The pin is a belt-and-braces answer to “permanently affixed”: it can come off only by drilling the pin out. In camera mount A (D43) the sleeve is the camera housing, its lens at the face, wired through a hole off the bore axis (Volume 2, rule 6). In mount B it is a plain sleeve. The orange filament’s brightness against AMS STD 595A-17 colour 12199 (the old Fed-Std-595B 12199) is the same open check as in the printed build (Vol 5 §5.2).
- B. A dyed orange anodise band. Possible, by masking the rest of the dummy barrel and dyeing the band orange. Not proposed: dyed anodise keeps a metallic depth, its match to blaze orange is unproven, dye light-fastness varies by dye maker and seal (no published scale for orange was found), and selective dyeing over a 6 mm band is fiddly.
- C. A band of Cerakote H-128 Hunter Orange. Cerakote describes H-128 as “a rich medium orange that is commonly found as a safety color on hunting gear”, with no claim against the AMS STD 595A-17 colour on the product page. It would be cured in the same oven as the black. A fallback only: it is a film that can wear or chip at the muzzle edge, which is the one place a gun is most often knocked, and paint over metal is the weaker “permanently affixed” case the law dive identifies.
The camera window is unaffected by any of this: the lens sits at the sleeve’s face, and the printed build’s aperture rule (an opening about three times the lens set-back) applies as before.
6.9 Markings
No H&K name, logo, model, calibre marking or serial-like plate (Volume 2, rule 7; LK-2). If the selector is a game input, neutral markings that say what it does are clearer than copies of H&K’s pictograms (Printed Build Vol 7 §7.6). On anodised or Cerakoted aluminium these can be laser-marked: the lab’s LONGER RAY5 10 W diode laser is the likely tool for removing dye or coating in a fine line, to be proved on the finish coupon. The 60 W CO2 laser is not the tool for bare aluminium.
6.10 The order of work
- Machine, deburr, break every edge to the drawn radius.
- Drill, ream, tap and STI-tap.
- Mask threads, dowel holes, joint faces, channels, the sleeve seat and the bonding point (Volume 7).
- Blast.
- Anodise the small parts (one run, so the colour matches); Cerakote the shell parts and cure.
- Unmask; install helical inserts; chase any thread that binds.
- Bond and pin the orange sleeve.
- Laser-mark any neutral markings.
6.11 Why this, and why not the others
Table 2 — 6.11 Why this, and why not the others
| Choice | Pick | Status | Why, and why not the others |
|---|---|---|---|
| Shell finish (MA-9) | Blast + Cerakote H-Series matt black on the receiver, cover, backplate, butt plate; black Type II on small aluminium parts | Proposed | Cerakote reads as polymer and cures in the lab’s oven; small parts read as metal, as on the real gun. Type II everywhere: the fallback, more durable but looks like metal. Type III everywhere: dimensional growth, colour, chilled bath. Paint: chips, weakest |
| Wear surfaces | Type III if outsourced, else Type II plus dry PTFE | Proposed | Hardness where steel slides |
| Home anodising | Caswell AN1 ($662.85) with the lab’s 50 A supply, if anodising is done in-house | Proposed (optional) | The supply is already there; parts fit the tank, tightly |
| Orange band (MA-10) | Orange printed sleeve, epoxy-bonded and cross-pinned | Proposed | Colour through the part; the strongest “permanently affixed” case; carries the camera. Dyed anodise: unproven colour, fade, fiddly. Cerakote H-128: a film at the most-knocked edge |
6.12 What could not be verified
- How close blasted, Cerakoted aluminium looks to H&K’s polymer, and how anodised aluminium looks beside it: only the coupon shows that.
- Whether the 50 A supply runs in constant-current mode and to the 15 V the bath needs: its model is not recorded.
- The powder-coat oven’s interior size and temperature accuracy.
- Whether a local anodiser or Cerakote applicator will take an MP7-shaped shell.
- Cerakote H-Series prices, coverage per part, and H-128’s colour against AMS STD 595A-17 colour 12199.
- Dyed-anodise light-fastness for orange: no published scale found.
- The RAY5’s marking quality on Cerakote and on black anodise: to be tried.
Sources
- Anodizing Reference Guide (MIL-A-8625F summary), https://www.anodizing.org/anodizing-reference-guide/, read 24 October 2026.
- Caswell Inc.: anodizing kits page (AN1 $662.85, AN2 $1,326.97, ANT3 $868.25, AN3 $3,053.70) and Standard Anodizing Kit page, https://caswellplating.com/anodizing-products/anodizing-kits.html; “LCD Anodizing Instructions”, https://support.caswellplating.com/portal/en/kb/articles/lcd-anodizing-instructions; all read 24 October 2026.
- Cerakote, “Cerakote Elite Series and H Series curing time and temperatures” (knowledge base 111), https://cerakote.com/resources/knowledge-base/111/properly-curing-cerakote-elite-series-and-h-series; Cerakote EU, “Hunter Orange H-128”, https://cerakoteeu.com/product/hunter-orange-h-128; both read 24 October 2026.
- Imitation Firearm Law Vol 1 §1.7; MP7 Printed Build Vols 5 and 7;
_shared/lab_capability.md(powder-coat oven, 50 A supply, lasers). - Wikimedia Commons, “Cheap carabiners.JPG”, User:Polyparadigm, public domain.
Comments (0)