Whitney Wolverine · Volume 6
Field Strip, Detail Strip, Maintenance and Repair
The takedown in the maker's words, what an original differs in, the two parts that escape, the magazine that must not be oiled, and where parts come from for a pistol whose makers are gone
A Whitney comes apart easily and goes back together less easily. The whole action slides out of the rear of the frame once a nut is removed from the muzzle, and then a handful of small parts are free to fall out. This volume sets out the takedown in the words of the only documents that describe it, says where those documents stop, and gives what is known about maintenance, failures and parts. It does not invent a procedure: where the documents are silent, it says what a correct procedure has to deal with.
6.1 What Documentation Exists
No original Whitney instruction sheet was located. Original instruction material did exist: Rock Island Auction’s lot descriptions record boxed pistols “containing a manual and papers”, “owner’s manual and warranty card”, and “instruction manual, promotional pamphlet, and warranty card”.1 None of those documents has been published in any form found, and the auction photographs do not show their pages.
What does exist:
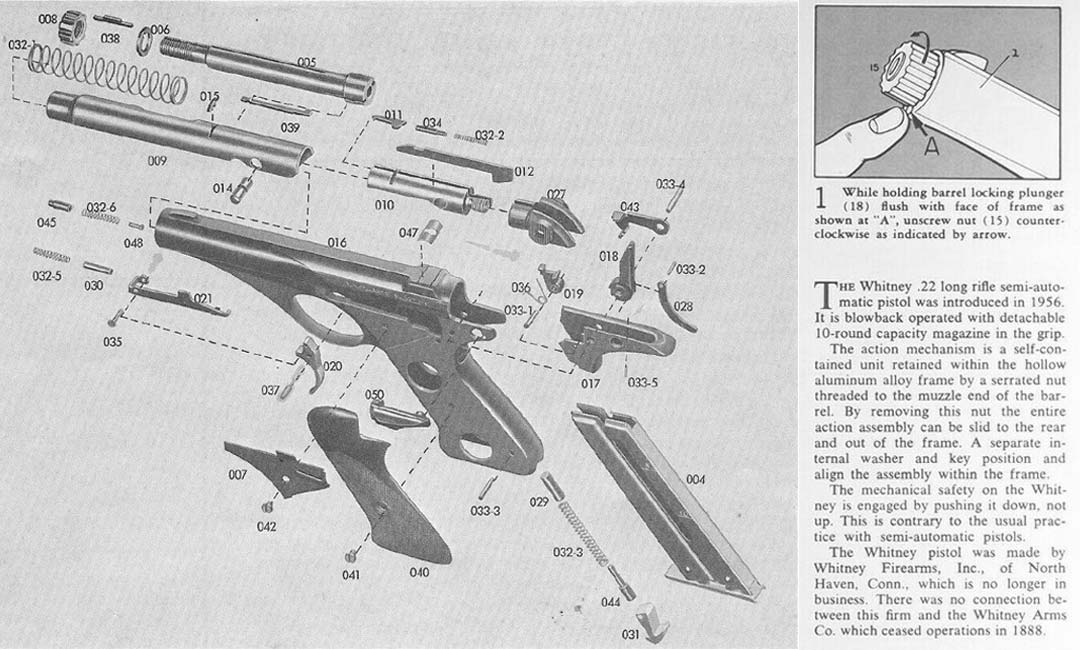
- The exploded-view page reproduced by Rock Island Auction (hero image). Its layout is that of the NRA’s “Firearms Assembly” pages in American Rifleman, but RIA does not identify the source and the attribution could not be confirmed. It describes the original pistol, gives the first takedown step and the principle of the rest, and draws every part with a number.2
- The Olympic Arms owner’s manual, Rev 7/05, for the 2005 reissue. It gives a full field and detail strip in twelve steps, maintenance instructions and a parts list. Olympic warns that “the design of the current Whitney Wolverine is slightly altered from the original” and that its parts schematic “will not accurately represent parts for original pistols”.3
- Owners’ accounts of taking down original pistols, which agree with the Olympic sequence (below).
The procedure given here is Olympic’s, used because it is the only complete one published, and because the original’s exploded-view page and owners of originals describe the same parts coming out in the same order. Where an original may differ, the text says so. The parts numbers in the drawing and in Olympic’s list are the same (Volume 5), which is itself evidence that the two pistols share the same architecture.
6.2 Before Starting
- Clear it. Olympic: point the pistol in a safe direction, remove the magazine, “pull the cocking piece to its full extent and remove any ammunition that may be inside the chamber”, and “with the cocking piece still pulled back, visually inspect the chamber”.3
- Work over a tray, or inside a bag. Owners’ accounts of a first takedown keep including a part on the floor. Xavier, disassembling an original in 2006: “unscrew this dealie on the muzzle, pull the innards out, and hell…what was that little bastard that just dropped out”. It was the barrel key; he found it with a magnet.4 Another owner of an original lost the firing-pin lock, which “did a ‘runner’”.4 A collector advised doing the job “within a pillow case or a box to keep things tidy”.5
- Know about the magazine disconnect. A reassembled Whitney will not drop its hammer without a magazine in it (Volume 5). One owner of an original was convinced he had broken it — “It was maddening” — until he inserted the magazine and the hammer fell.4
6.3 Field Strip
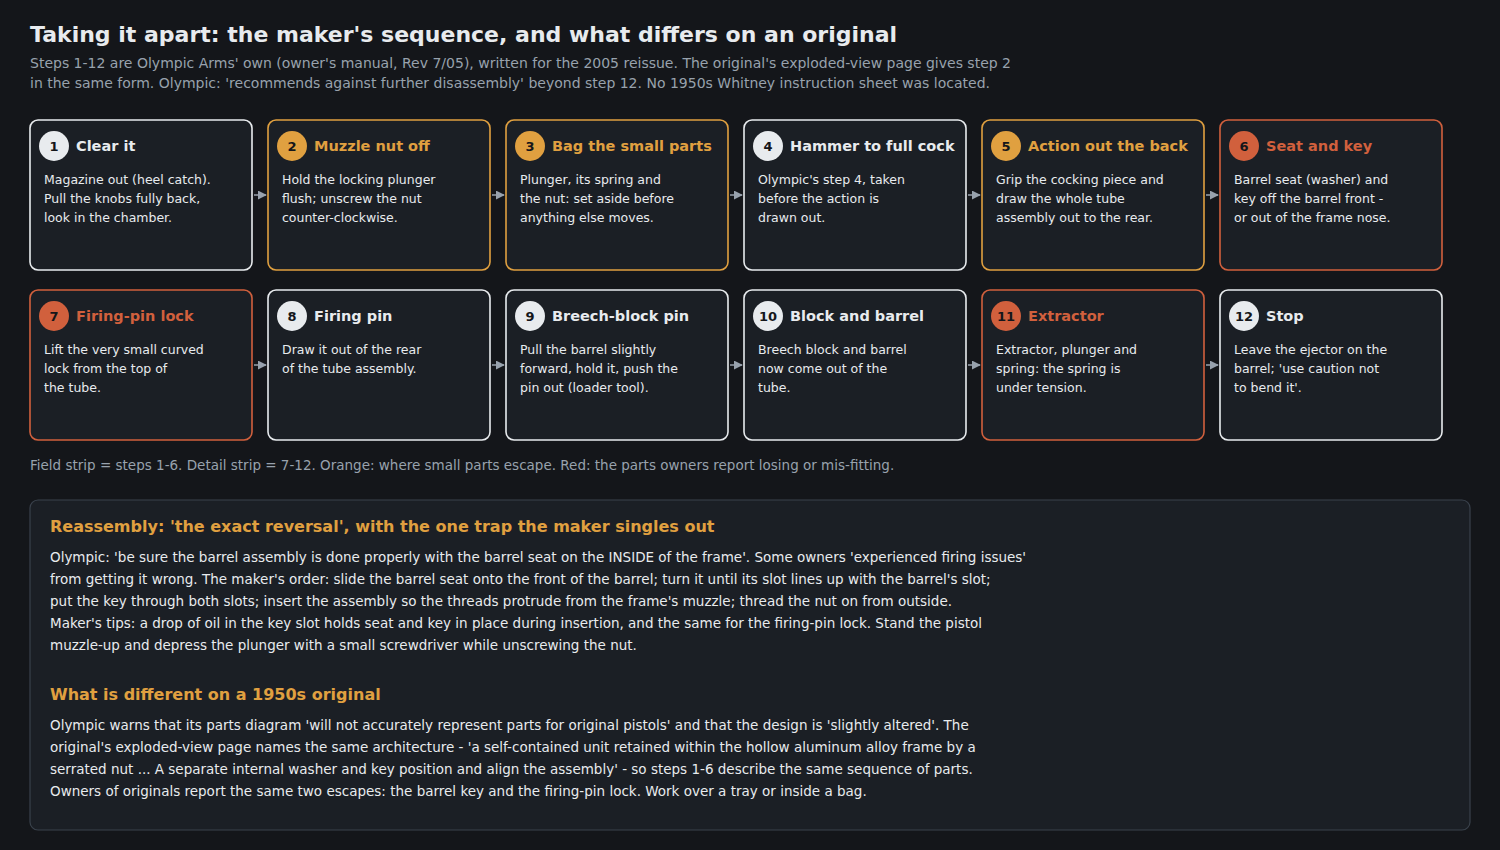
The field strip is Olympic’s steps 1 to 6. The first two are also on the original’s exploded-view page, in the same form.
- Clear the pistol as above, with the magazine out.
- Remove the barrel nut. Olympic: “Depress the locking plunger on the muzzle of the pistol and remove the barrel nut by turning it counter-clockwise.” The original’s page: “While holding barrel locking plunger flush with face of frame as shown at ‘A’, unscrew nut counterclockwise.”32 Olympic’s technicians use a small flat screwdriver: “stand the Whitney on end with the barrel pointing up. Then use the screwdriver to depress the locking plunger with one hand, and the other hand more easily unscrews the barrel nut.”3
- Set aside the small parts. “The locking plunger, its spring and the barrel nut should be set aside to prevent misplacement of these small parts.”3
- Cock the hammer. “Move the hammer to the full cocked position.”3
- Draw the action out of the rear. “Grasping the cocking piece, pull the entire tube assembly out through the rear of the pistol.”3 The original’s page: “By removing this nut the entire action assembly can be slid to the rear and out of the frame.”2
- Recover the barrel seat and key. “Remove the key and barrel seat from the front of the barrel. If the key does not come out with the barrel and tube assembly, be sure to remove it from the front of the frame.”3 This is the step at which the barrel key escapes.
The pistol is now in two groups: the frame, with the fire-control unit, trigger and magazine catch still in it; and the tube assembly — barrel, sleeve, bolt, recoil spring, firing pin and extractor.
Olympic’s manual says field stripping is not needed for routine cleaning: “Maintenance of the barrel tube assembly does not require the removal of the barrel tube assembly from the frame.”3
6.4 Detail Strip of the Action
Olympic’s steps 7 to 12 take the tube assembly apart. The original differs in detail by Olympic’s own statement, but an owner who took down an original described the same sequence in 2006: “The firing pin can be removed by taking out the little curved lock from the top of the carrier tube. After this, the firing pin may be removed, the pin holding the breechface pushed out and the whole shootin’ match removed.”4
- Remove the firing-pin lock “from the top of the slide. Take extra caution not to misplace this piece as it is very small.”3
- Remove the firing pin by pulling it “from the rear of the tube assembly”.3
- Push out the breech-block retaining pin. “The breech block retaining pin may now be removed by pulling the barrel slightly forward and holding it in that position while the retaining pin is pushed out. The mag loader tool can be used to push the retaining pin out.”3 This is the cross pin [44] of the patent, which ties the bolt to the sleeve (Volume 5). Pulling the barrel forward takes the recoil spring’s load off it.
- Separate the breech block and barrel from the tube. “The breech block and barrel can now be removed from the tube.”3
- Remove the extractor, “extractor plunger, and spring. The spring is under tension, therefore we recommend caution in its removal.”3
- Stop. “It is recommended that the ejector be left attached to the barrel. If it must be removed, use caution not to bend it.” And: “Olympic Arms recommends against further disassembly of the Whitney Wolverine pistol.”3
6.5 The Fire-Control Unit: Where the Published Procedures Stop
Neither document describes removing the hammer, sear, trigger, safety, magazine catch or magazine disconnect, and no procedure for them was located. None is reconstructed here. What a correct procedure has to deal with can be stated from the patent and the parts lists:
- The action frame is held by the pivot pins. In the patent the hammer and sear sit in a separate action frame fitted into a pocket below the bore, and “the auxiliary or action frame 17 when assembled into the main frame through the rearwardly facing opening into the chamber 16 is secured in place by the pivot pins 21 and 33 which form the pivots for the hammer and sear”.6 Drifting a pivot pin therefore also releases the unit that holds the other pin’s part.
- The hammer spring is under compression and does two jobs. It sits in a bore in the grip, drives the hammer through a plunger and strut, and at its lower end bears on the magazine catch (Volume 5). Releasing it releases both.
- There is a side plate and one screw. Olympic’s parts list includes a side plate and a “Screw, Pistol Grip & Side Plate”; a collector counted three screws on the whole pistol, “two for the grips and one for the sideplate”.35
- The safety, sear bar and magazine disconnect interlock with the sear (Volume 5), and the patent’s own figures show the safety finger passing through an opening in the frame to reach the sear.6
- “Most parts are held in by other parts.” The collector’s comparison with the Mauser C96 is the right warning: order matters, and parts are captured by other parts rather than by screws.5
On a collectable original, the fire-control unit is best left to a gunsmith who has done one, with the exploded view in front of them.
6.6 Reassembly, and the Mistake the Maker Warns About
“Re-assembly of the Whitney Wolverine is the exact reversal of the steps used to disassemble the pistol.”3 Olympic singles out one step, because getting it wrong causes misfires:
“The parts view does not clearly depict how the barrel needs to be assembled. As a result, some Whitney owners have experienced firing issues. When re-assembling your Whitney after maintenance, be sure the barrel assembly is done properly with the barrel seat on the inside of the frame.”3
The order it gives: “First the barrel seat is slid onto the fore end of the barrel. Then rotate the barrel seat until the slot on the barrel seat is aligned with the slot on the barrel. With the slots aligned, insert the barrel key through both slots. Next, the barrel assembly is inserted into the frame with the forward threads protruding from the muzzle of the frame. The barrel nut is then threaded onto the barrel from the outside of the frame.”3 Olympic’s tip for keeping the small parts in place during insertion: “putting a drop or two of gun oil onto the slot for the barrel key and seat which helps to hold these two pieces in place for insertion into the frame. The same tip applies to the firing pin lock on the top of the barrel tube assembly.”3
Why the barrel seat matters follows from Volume 5. The seat and key “position and align the assembly within the frame” (the original’s page).2 A seat fitted outside the frame, under the nut, would leave the barrel free to sit wrongly in the frame, and the chamber would not sit where the bolt and firing pin expect it. The “firing issues” Olympic describes are what that would produce.
One owner of an original found “a sort of washer affair which fits between the barrel nut and the frame” in addition to the barrel seat inside, and thought it “looks sort of ‘kluged’”.4 Nothing in the exploded view or the Olympic list shows a washer under the nut. A washer found there on an original is most likely a later addition or a barrel seat fitted in the wrong place, and should be checked against the drawing before firing.
6.7 Cleaning and Lubrication
Olympic’s maintenance instructions, for the reissue:3
- Barrel. “The barrel should be cleaned regularly with bore cleaner.” “Inspect the barrel for buildup and/or obstructions.”
- Action. “Pull the cocking piece back and release it several times. Pull and retraction should be smooth and consistent. Clean and lubricate the internal components of the barrel tube assembly periodically. This will reduce friction and wear of components.”
- Feeding and extraction. “When firing your Whitney make notes of feeding and extracting. Cleaning and lubricating components of the barrel tube assembly is essential for proper feed and extraction.”
- The magazine: do not oil it. “For longer magazine life and increased reliability of the Whitney Wolverine magazine, Olympic Arms recommends AGAINST lubricating the magazine. Cleaning of the external shell should be performed as needed. Under normal use and conditions the magazine internal components should not need to be cleaned or lubricated.”
- Products. Olympic “does not recommend any specific brands” and “only requires that you use gun specific products”.
The original magazine was designed to be taken apart for cleaning — “Unlike most other .22’s, the Whitney clip can easily be disassembled for cleaning” (1956) — and because it carries the bullet guide (Volume 5), its lips are the pistol’s feed ramp.7 Keeping them clean, dry and undamaged is keeping the feed ramp in order.
No inspection intervals or part-replacement intervals are published by either maker.
Rimfire fouling. A .22 blowback deposits unburnt powder and lubricant in the chamber, on the bolt face and in the firing-pin channel. On the Whitney the firing pin and its channel are inside the bolt inside the sleeve, which makes a fouled pin channel likely after long use and a plausible cause of light strikes (below). The hub’s .22 Rimfire dive covers choosing .22 ammunition by gun, including for semi-automatics that need high-velocity loads to cycle.
Dry firing. No maker’s guidance on dry firing the original was found, and one owner of an original wrote in 2006, “I am not sure if a Wolverine can be dry fired safely. I am guessing it cannot be.”4 With a full-reach firing pin (Volume 5), the conservative course on a collectable pistol is not to dry-fire it without a rimfire snap cap. That is caution, not a documented Whitney instruction.
Storage. Olympic’s advice for the reissue: clear the pistol, which leaves the hammer cocked, then insert an empty magazine and lower the hammer to half-cock before removing the magazine and storing it.3 Whether the original has the same half-cock notch is not stated in any source for the original.
6.8 Caring for an Aluminium Frame
The Whitney’s frame is anodized aluminium, and it should be treated as that, not as blued steel. Two points follow from the material; they are general principles of anodized aluminium, not Whitney-specific instructions from a maker:
- Chemistry. Anodizing is an oxide layer, and strongly alkaline cleaners attack it. Solvents intended for steel parts should be checked for compatibility with aluminium before they touch the frame, and kept off it where there is doubt. Once the anodizing is damaged it cannot be touched up to match; re-anodizing means stripping the frame.
- Refinishing destroys value. Volume 3 shows that a polished original, however attractive, is sold by the major auction house as a professionally refinished pistol. A worn original finish is worth more to a collector than a new one. The frame should not be polished, bead-blasted or re-anodized on a pistol whose value matters.
The steel parts — barrel, sleeve, bolt, springs — take ordinary gun oil and ordinary care.
6.9 Ammunition
The pistols were made for the .22 Long Rifle ammunition of the 1950s, and both makers’ guidance, and owners’ experience, point the same way: they need ammunition with enough energy to cycle the sleeve and bolt reliably.
- Olympic (reissue): “designed to function best with .22 LR high velocity ammunition. To avoid malfunction Olympic Arms strongly recommends against using economy ammunition.” Tested successfully with “Federal Lightning, Winchester Super X and Remington #1522”. Hyper-velocity “will function … but with the effect of accelerated wear on the pistol and its components”. Olympic recommends against steel-cased ammunition.3
- J. B. Wood (reissue): “Some serious target pistols are tuned to work with Standard Velocity loads, but in this case they may not fully cycle the bolt.” About 100 rounds of CCI Mini-Mag, no malfunctions.8
- American Rifleman (reissue, 2014): cycled reliably with Federal, CCI and Remington; “jamming repeatedly with Winchester rounds”.9 That conflicts with Olympic’s list, which includes a Winchester load; the Winchester load in the review is not named, and the two may be different products.
- Owners of originals: one found performance “ranged from abysmal to good” with ammunition — repeated feed failures with Remington brass-plated hollow points, one jam in 50 but “numerous ‘light strikes’” with Federal Champion, and no failures and one light strike with Remington Thunderbolt solid lead. Another, who owns both an original and a reissue, found both “like CCI Velocitor best”.4
The practical conclusion from these sources: test the pistol with several high-velocity loads, keep the one it likes, and treat a failure pattern that follows the ammunition as ammunition, not as a broken gun.
6.10 Malfunctions and Their Causes
Collected from the sources, with the most likely causes the sources give or the mechanism implies. Where a cause is an inference from the mechanism it is marked.
Table 1 — Malfunctions and Their Causes
| Symptom | Likely causes | Source |
|---|---|---|
| Hammer will not fall after reassembly | Magazine out — the magazine disconnect is working | Owner of an original4; period ad10 |
| Misfires after reassembly (“firing issues”) | Barrel seat fitted outside the frame instead of inside | Olympic manual3 |
| Light strikes | Fouled firing-pin channel (owner’s plan, and the usual rimfire cause); ammunition with hard priming; worn or weak hammer spring (inference from the mechanism) | Owners of originals4 |
| Failure to feed | Ammunition (Remington brass HP in one original); damaged or dirty magazine lips, which are the feed ramp (inference, Vol 5); an oiled magazine | Owner4; Olympic3 |
| Failure to cycle / stovepipe | Standard-velocity or economy ammunition; dry or fouled tube assembly | Wood8; Olympic3 |
| Loading the magazine jams it | A round loaded reversed — “If you get a round reversed in the magazine though, you are screwed for a while” | Owner4 |
| Extraction failures | Worn or damaged extractor — an owner of an original reports one needing replacement | Owner4 |
| Reissue: repeated jams with spare magazines | Early Olympic parts; Olympic later revised the bolt, barrel and magazine (Volume 7) | Owners of reissues4 |
6.11 Parts That Break or Wear
No maker published a list of wear parts or replacement intervals. The sources record:
- Firing pins. An owner who bought his pistol new in 1962 ordered “a replacement firing pin” from Whitney in 1965 and kept the dated receipt.4 The firing pin was therefore a part owners needed, and one the company, or its successor, still supplied three years after new pistols were in the shops.
- Extractors. One owner’s original “seems like the extractor may need to be replaced”.4 Olympic warns the extractor spring “is under tension”.3
- Small captured parts, lost rather than broken: the barrel key, the firing-pin lock, the barrel-nut locking plunger and its spring.43
- The ejector, fixed to the barrel; Olympic warns against bending it.3
- Magazines, whose lips are the feed ramp. A bent lip is a feeding fault that no work on the pistol will cure.
The aluminium frame itself does not appear in any failure report located. The 1956 design argument — that the recoil load reaches the frame at the muzzle nut as compression rather than as a steel block battering the rear of the frame — is consistent with that, but the absence of reports is not proof.
6.12 Bench or Gunsmith
On the documented evidence:
An owner can do at the bench: the field strip (steps 1–6), cleaning of the tube assembly and barrel, the detail strip of the tube assembly (steps 7–11, with care for the extractor spring), replacement of a firing pin or extractor where a part is available, and magazine cleaning on the original.
A gunsmith, or at least the exploded view and an unhurried afternoon: anything in the fire-control unit — hammer, sear, sear bar, safety, magazine disconnect, trigger and magazine catch — because no procedure is published, the parts are captured by one another, and the hammer spring is under load and does two jobs. Fitting a replacement part that was not made for that pistol.
Nobody, on a collectable original: refinishing the frame (above and Volume 3).
6.13 Parts for a Pistol Whose Makers Are Gone
The original makers ceased trading in the late 1950s, and the reissue maker in 2020. The documented sources of parts, in order:
- Whitney, to at least 1965. The owner’s receipt for a firing pin in 1965 is the latest documented factory parts sale.4
- Olympic Arms, from 2005. Its manual: “Many of the parts from the original Whitney Wolverine are available through Olympic Arms. Please call our Customer Service Team if you need a replacement part for your original Whitney Wolverine.”3 Where Olympic’s original parts came from is not stated. Olympic announced its closure in January 2017 and, per the Blue Book of Gun Values, sold its remaining products until late 2020.11 That source of parts has ended.
- Samson Manufacturing, 2007. Claimed “a huge inventory of original parts from the 50’s … from the original manufacturer” in connection with a revival that never happened.12 Whether any of those parts reached the market is not known.
Current availability could not be confirmed. The large surplus-parts dealers were checked but their catalogues could not be read, and no current, dated listing of Whitney parts was found. No reproduction parts maker was located. No part number, price or supplier is given here for that reason.
Reissue parts in an original. Olympic states that its design is “slightly altered” and its schematic does not represent the original’s parts; Wood reports that “some of the internal parts were slightly altered, to make them stronger”.38 The part numbering is shared, but a shared number is not proof of fit. No source documents which Olympic parts fit an original. Any reissue part fitted to an original should be treated as an unknown until it has been fitted and checked by someone who can judge headspace, extractor tension and fire-control engagement. Olympic’s own later magazines, by one owner’s report, did not interchange with its own earlier ones.4
References
Footnotes
-
Rock Island Auction Company lot descriptions, including auction 4096 lots 1596 and 1598 (6 December 2025), auction 4095 lot 565 (15 August 2025), auction 89 lot 1617 (26 August 2023) and auction 87 lot 3683 (11 December 2022), https://www.rockislandauction.com/detail/{auction}/{lot}/ , retrieved 2026-09-19. ↩
-
Exploded view and takedown text page for the original Whitney pistol, as reproduced by Rock Island Auction, “Rise and Fall of the Whitney Wolverine”, https://www.rockislandauction.com/riac-blog/rise-and-fall-of-the-whitney-wolverine ; read from the image 2026-09-19. Original publication not identified. The text’s own call-outs (“plunger (18)”, “nut (15)”) use a different numbering from the part numbers printed on the drawing. ↩ ↩2 ↩3 ↩4
-
Olympic Arms, Whitney Wolverine Owner’s Manual, Rev 7/05, sections “Clearing the Pistol”, “Loading”, “Disassembly”, “General Notes”, “Maintenance”, “Notes on Ammunition” and parts list, https://web.archive.org/web/2016/https://www.vintagegunleather.com/gun-manuals/pdf_O/olympic_whitney_wolverine.pdf , retrieved 2026-09-19. ↩ ↩2 ↩3 ↩4 ↩5 ↩6 ↩7 ↩8 ↩9 ↩10 ↩11 ↩12 ↩13 ↩14 ↩15 ↩16 ↩17 ↩18 ↩19 ↩20 ↩21 ↩22 ↩23 ↩24 ↩25 ↩26 ↩27 ↩28 ↩29 ↩30 ↩31
-
“Whitney Wolverine Range Report”, Nurse With a Gun blog, 10 January 2006, and reader comments, http://xavierthoughts.blogspot.com/2006/01/whitney-wolverine-range-report.html , retrieved 2026-09-19. Owner testimony, much of it anonymous; used as testimony only. ↩ ↩2 ↩3 ↩4 ↩5 ↩6 ↩7 ↩8 ↩9 ↩10 ↩11 ↩12 ↩13 ↩14 ↩15 ↩16 ↩17 ↩18
-
“Ahead of its time: The Whitney Wolverine pistol”, Smith & Wesson Forum, archived 7 April 2015, https://web.archive.org/web/20150407043719/http://smith-wessonforum.com/lounge/210508-ahead-its-time-whitney-wolverine-pistol-pics-box-now-included.html . Owner testimony. ↩ ↩2 ↩3
-
R. L. Hillberg, US Patent 3,060,810, issued 30 October 1962, https://patentimages.storage.googleapis.com/pdfs/US3060810.pdf . ↩ ↩2
-
William B. Edwards, “The Oldest Name in Guns Comes Back”, Guns, August 1956, https://web.archive.org/web/20160304110716/http://www.gunsmagazine.com/1956issues/G0856.pdf , retrieved 2026-09-19. ↩
-
J. B. Wood, “Writer gets his Whitney Wolverine after long wait for unusual .22”, TheGunMag, 29 July 2013, https://web.archive.org/web/20160407182905/http://www.thegunmag.com/writer-gets-his-whitney-wolverine-after-long-wait-for-unusual-22/ , retrieved 2026-09-19. ↩ ↩2 ↩3
-
B. Gil Horman, “Olympic Arms Whitney Wolverine .22 LR Pistol”, American Rifleman, 20 June 2014, https://www.americanrifleman.org/content/olympic-arms-whitney-wolverine-22-lr-pistol/ , consulted 2026-09-19. ↩
-
Galef and Whitney period advertising, as reproduced by Rock Island Auction in the blog above. ↩
-
Blue Book of Gun Values, “Olympic Arms Whitney Wolverine” and manufacturer note, https://bluebookofgunvalues.com/products/olympic-arms-whitney-wolverine , read 2026-09-19. ↩
-
Samson Manufacturing Corp., “Coming Soon — The Whitney Wolverine!”, archived 31 May 2007, https://web.archive.org/web/20070531231836/http://www.samson-mfg.com/Whitney.htm , retrieved 2026-09-19. ↩
Comments (0)