Ruger Mark III & Mark IV · Volume 8
Keeping It Running — Maintenance, Malfunctions and Repair
Cleaning and lubrication, the parts that wear, the Army's 1959 troubleshooting tables and detail strip, and where a bench repair ends and Ruger's factory service begins
A Ruger .22 automatic will run for a very long time on very little care, which is part of why so many of them are neglected until they stop. This volume collects what the maker and the one armorer-level manual that exists for the type say about keeping the pistol running and putting it right: cleaning, lubrication, inspection, the parts that wear, the malfunctions and their causes, and the line between what an owner can do at the bench and what belongs to a gunsmith or to Ruger.
8.1 The sources, and one caution about them
Two kinds of document are used, and they speak with different authority.
- Ruger’s instruction manuals for the Mark III (2015) and the Mark IV (current revision) are the owner-level authority for the pistols documented in these volumes. They cover cleaning, lubrication, malfunction clearance and inspection, and they draw a firm line at the field strip.12
- The US Army’s TM 9-1005-226-14 of July 1959 is the only armorer-level manual found for any Ruger .22. It covers the Mark I Target as a service match pistol and goes much further than Ruger: troubleshooting tables at operator and gunsmith level, a full bolt and grip-frame detail strip, and repair instructions including stoning the hammer notch.3
The caution: the Army manual describes a 1959 Mark I, not a Mark III or Mark IV. The Mark III adds a magazine disconnect, a loaded-chamber indicator, an internal lock and a hold-open; the Mark IV has a different frame and takedown (Volume 3). Where the Army’s detail strip is summarised below, it is as a record of how the armorer’s side of the design works, not as a procedure for the pistols documented here. For those, Ruger’s manual says that beyond the field strip “further disassembly should be undertaken only by the factory,” and that is the maker’s position this volume reports.1
Replacement intervals. No Ruger document consulted publishes a round count or time interval for replacing any part — spring, extractor, firing pin or otherwise. The Army manual replaces parts on condition, not on schedule. No interval is given here, because none has been published.
8.2 Cleaning, per Ruger
Ruger’s routine is the same in the Mark III and Mark IV manuals, and both link to an online video of it (“Ruger Tech Tips”; “Ruger.com/TechTips”).12 When: “At regular intervals, or whenever the pistol has been exposed to sand, dust, extreme humidity, condensation, immersion in water or other adverse conditions, disassemble, clean, and oil it.” The Mark IV manual adds “after each range session.”12
- Unload, and field-strip as in Volume 4.
- Bore: “run a properly sized, solvent-wetted patch through the bore several times,” then a solvent-wetted bristle brush “back and forth the full length of the bore as many times as necessary to remove grease and dirt from the bore and chamber,” then dry patches. Ruger gives the reasons: “Bore fouling can contribute to reduced accuracy, and grease accumulation in the chamber can interfere with proper feeding.”
- “Using powder solvent on a clean patch or bristle brush, remove powder residue from all components of the pistol.”
- A dry patch through the bore, then a very lightly oiled one; wipe all surfaces, then wipe with a very lightly oiled cloth.
- If the magazine is dirty, strip and clean it (Volume 4 §4.9).
- “Before firing remove all oil and grease from the bore.”12
Two additions in the current Mark IV manual apply equally to any Ruger .22: “The use of caustic or acetone-based cleaners are not recommended as the solvent may harm the finished surfaces, plastics, laminates, composites, rubber grips,” with the advice to test any cleaner on an inconspicuous area first; and “never use automotive or paint stripping products.”2
On the Mark I–III, cleaning from the breech is possible only with the receiver off the frame. Ruger’s 2016 release made the point for the Mark IV: with the new takedown “the barrel can be properly cleaned from chamber to muzzle.”4 The bore on either generation is cleaned with the bolt out, which the field strip provides.
8.3 Lubrication
Ruger’s instruction is short and is mostly a warning against excess:
“Only a light application of oil is needed to provide adequate lubrication of moving parts and to prevent rust. Excess accumulations of oil tend to attract particles of dust and dirt and may congeal in cold weather which can interfere with the safe and reliable function of the pistol.”1
Its “Warning — Lubrication” gives the two failure modes of over-oiling: a bore “even partially” obstructed by oil or grease, which “may result in damage to the pistol,” and oil on ammunition — “Do not spray or apply lubricants directly on ammunition. If the powder of a cartridge is affected by the lubricant, it may not be ignited, but the primer firing may push the bullet into the bore where it may become lodged,” and the next shot fired into the obstruction “may damage the pistol and cause serious injury or death.”1
Ruger’s manuals do not publish a list of lubrication points. The Army’s 1959 schedule for the Mark I Target is specific but reflects its period: the bolt assembly “weekly and after firing, clean with rifle-bore cleaner (CR). Dry and oil with PL special”; the bore, chamber and receiver cleaned “immediately after firing and on two consecutive days thereafter,” left well coated, then cleaned, dried and lightly oiled on the third day, and weekly thereafter; “Wipe clean before firing.”3 That three-day routine was written for service ammunition and preservative oils of the late 1950s. It is recorded as the Army’s practice, not proposed as a modern schedule.
Storage. Ruger: “Do not keep the pistol stored in a leather holster or case. Leather attracts moisture, even though the holster or case may appear to be perfectly dry.” Guns “should not be stored loaded,” and both manuals ask for the supplied lock to be used.12
8.4 Inspection, and what to look at
Before each use (Mark IV manual). “Prior to each use, visually inspect the firearm to ensure no components are damaged, missing, loose, bent, cracked, chipped, or peened. If you observe excessive wear, you should stop using your pistol and contact customer service or a trained, certified gunsmith to evaluate its condition and replace any worn parts.”2
After any reassembly. The bolt and trigger function check printed in the Mark IV manual and summarised in Volume 4 §4.8, and on the Mark I–III the one-line test that the bolt opens fully.21
Fired cases. Both manuals ask the owner to read the brass: “form the habit of examining fired cartridge cases. If they have bulged heads or frequently show splits on any part of the case, the rifle or pistol should be returned to the factory for inspection” (Mark III); “If they are bulged or show splits on any part of the case, discontinue using the ammunition” (Mark IV).12 The two manuals attribute the same symptom to different causes — the pistol in one, the ammunition in the other — and the prudent reading is to check both.
Armorer’s inspection (Army, 1959). “There are no gage checks required for field inspection of the cal .22 Ruger pistol. Manual cycling, close visual inspection, and function firing will usually suffice.” The inspector checked the chamber and bore “for obstructions, pitting, rings, or bulges,” cycled the action, checked that the rear sight adjusted and held its setting, and required a trigger pull “smooth, free from creep, and within the limits of 2¼ pounds minimum to 3¼ pounds maximum.”3
8.5 Parts that wear or break
Assembled from the Army’s maintenance paragraphs and Ruger’s warnings. Every entry is attributed; the list is not a Ruger service bulletin.
Table 1 — Parts that wear or break
| Part | What happens | Source and remedy |
|---|---|---|
| Firing pin stop (small cross-pin in the bolt) | If missing or omitted at reassembly, the firing pin travels far enough “to irreparably dent the rear end of the chamber” | Ruger’s most emphatic warning in every manual; check it at every reassembly (Volume 4)15 |
| Firing pin | Mushrooming; breaking; a “short firing pin” gives failure to fire | Army: examine for mushrooming and replace; replace short or broken pins3 |
| Extractor, extractor spring | Wear and burrs; breakage; a set spring | Army: “Inspect the extractor for wear and burs. Replace broken extractor”; replace a bent or set extractor spring. Failure to extract is the symptom3 |
| Recoil spring assembly | Bent, kinked or broken; weak spring causes failure to feed | Army: replace the spring assembly3 |
| Rebound spring | Bent or set | Army: replace3 |
| Chamber mouth | Rough, or burred at the edge — “caused by long firing pin hitting chamber” | Army: “Replace barrel.” On a Ruger that means the serialized barrel/receiver, which Ruger does not sell separately: a factory repair31 |
| Magazine spring, follower, button, lips | Set or kinked spring; burrs; damaged lips — the manuals’ first suspects for feeding trouble | Army: replace set spring, remove burrs; Ruger: check spring tension and lips, and do not use damaged magazines31 |
| Mainspring and housing | Loss of tension; worn claws on the housing; latch not holding | Army: examine for tension and set, claws for wear, latch for holding. No disassembly of the housing authorised3 |
| Hammer and sear | Worn notches | Army: inspect and replace; Ruger: factory-fit parts31 |
| Safety | Worn notches, bending, sluggish movement | Army: replace, or lightly stone the notch if sluggish; Ruger: factory-fit part31 |
| Hammer strut | Bent or broken | Army: replace3 |
| Hammer pivot pin (Mark III) | Can drift out if the left grip panel’s relief is too deep | Ruger: check the clearance cut in any non-Ruger left grip panel1 |
| Loaded-chamber indicator pin (Mark III) | Can fall out of the receiver with the receiver off the frame | Ruger: check before refitting the receiver1 |
| Barrel nut (22/45 Lite, threaded Mark IV) | — | Ruger: never loosen or remove; not repaired under warranty if tampered with12 |
8.6 Malfunctions and their diagnosis
Ruger’s procedure is the same in both manuals and is ordered deliberately: suspect the ammunition first, then clean, then inspect the magazine, and stop if the problem persists.12
- “If it appears that the gun and magazine are not at fault and that the jam was caused by the type of cartridge being used, then try another type.” (The Mark IV manual puts inspection of the firearm and magazine for fouling and worn parts first.)
- If a change of ammunition does not cure it: unload; “thoroughly clean the magazine and bolt mechanism, paying particular attention to removing accumulated grease,” using “a bristle brush and solvent to remove grease and fouling from the bolt face, the extractor, the chamber, and the feed ramp.”
- “Check to see that the magazine spring tension is adequate.”
- “Check the magazine lips to be certain they are free of nicks and burs and are not deformed.”
- Remove excess oil and solvent, load, and try again “slowly,” with eye and ear protection and the face clear.
- “If the above procedures do not result in a smooth and reliably functioning firearm, don’t use the gun” — return it to Ruger.
Clearing a jam. Remove the magazine first if possible; lock the bolt open; “use only wood ‘tools’ so that a cartridge will not be ignited if you strike a primer and so that the chamber and magazine will not be damaged. A 3/16” wood dowel rod with a point on one end is useful.” Never force a cartridge into the chamber by striking the bolt: “rimfire cartridge jams can result in the potentially very dangerous situation of a cartridge discharging before it is chambered.”1
Misfires. The current Mark IV manual: after a round fails to fire or has “unusual report (either louder or quieter than normal), keep the pistol pointed in a safe direction for 30 seconds prior to ejecting the chambered round.” The Army’s 1959 figure for pistols was “Wait 10 seconds,” with the warning that a hangfire’s delay “in most cases will fall within the range of a split second to several minutes.”23 The longer, current figure is the maker’s.
Failure to extract when cycling by hand. Ruger’s Mark III manual singles this out: “These failures usually are the result of the bolt not being pulled rearward vigorously, coupled with an accumulation of bullet lubricant in the chamber.” And a trap: with an empty magazine in the pistol, an extracted cartridge “may drop on top of the magazine. Then when the bolt goes forward, the cartridge will be chambered again!”1
The Army’s troubleshooting tables for the Mark I Target (the operator’s table is shared with the High Standard Supermatic, and its slide-related entries belong to that pistol):3
Table 2 — Malfunctions and their diagnosis
| Malfunction | Probable cause | Army’s corrective action |
|---|---|---|
| Failure to feed | Rough chamber or burr on chamber edge | Replace barrel (gunsmith) |
| Sticking firing pin | Gunsmith | |
| Weak recoil spring assembly | Replace (gunsmith) | |
| Weak magazine spring | Replace magazine spring | |
| Broken magazine catch | Replace magazine catch | |
| Battered cartridge | Remove cartridge | |
| Dirt in magazine or on magazine catch | Clean | |
| Failure to load | Cartridge not extracted — broken extractor or weak extractor spring | Replace extractor or spring |
| Dirty chamber | Clean chamber | |
| Failure to fire | Defective primer | Discard cartridge |
| Short or broken firing pin | Replace firing pin | |
| Weak spring; defective sear or hammer | Gunsmith | |
| Failure to function freely | Lack of lubrication | Lubricate |
Two failures specific to the Mark III and Mark IV are not in the 1959 tables because the parts did not exist. A trigger that will not move on a Mark III or IV with a round chambered is the magazine disconnect doing its job if no magazine — or a magazine without the Mark III interlock — is in the pistol (Volume 6). A bolt that will not open fully after reassembly on a Mark I–III is the hammer strut out of its seat in the mainspring housing, and Ruger’s cure is to open the latch and repeat the reassembly steps (Volume 4).1
8.7 The detail strip the Army authorised in 1959
The Army manual is the only published procedure found for taking a Ruger .22 apart beyond the field strip. It is summarised here as a record of the design and as a comparison for anyone reading Volquartsen’s kit instructions (Volume 7). It describes the Mark I Target; it is not Ruger’s procedure for the Mark III or Mark IV, for which Ruger reserves further disassembly to the factory.31
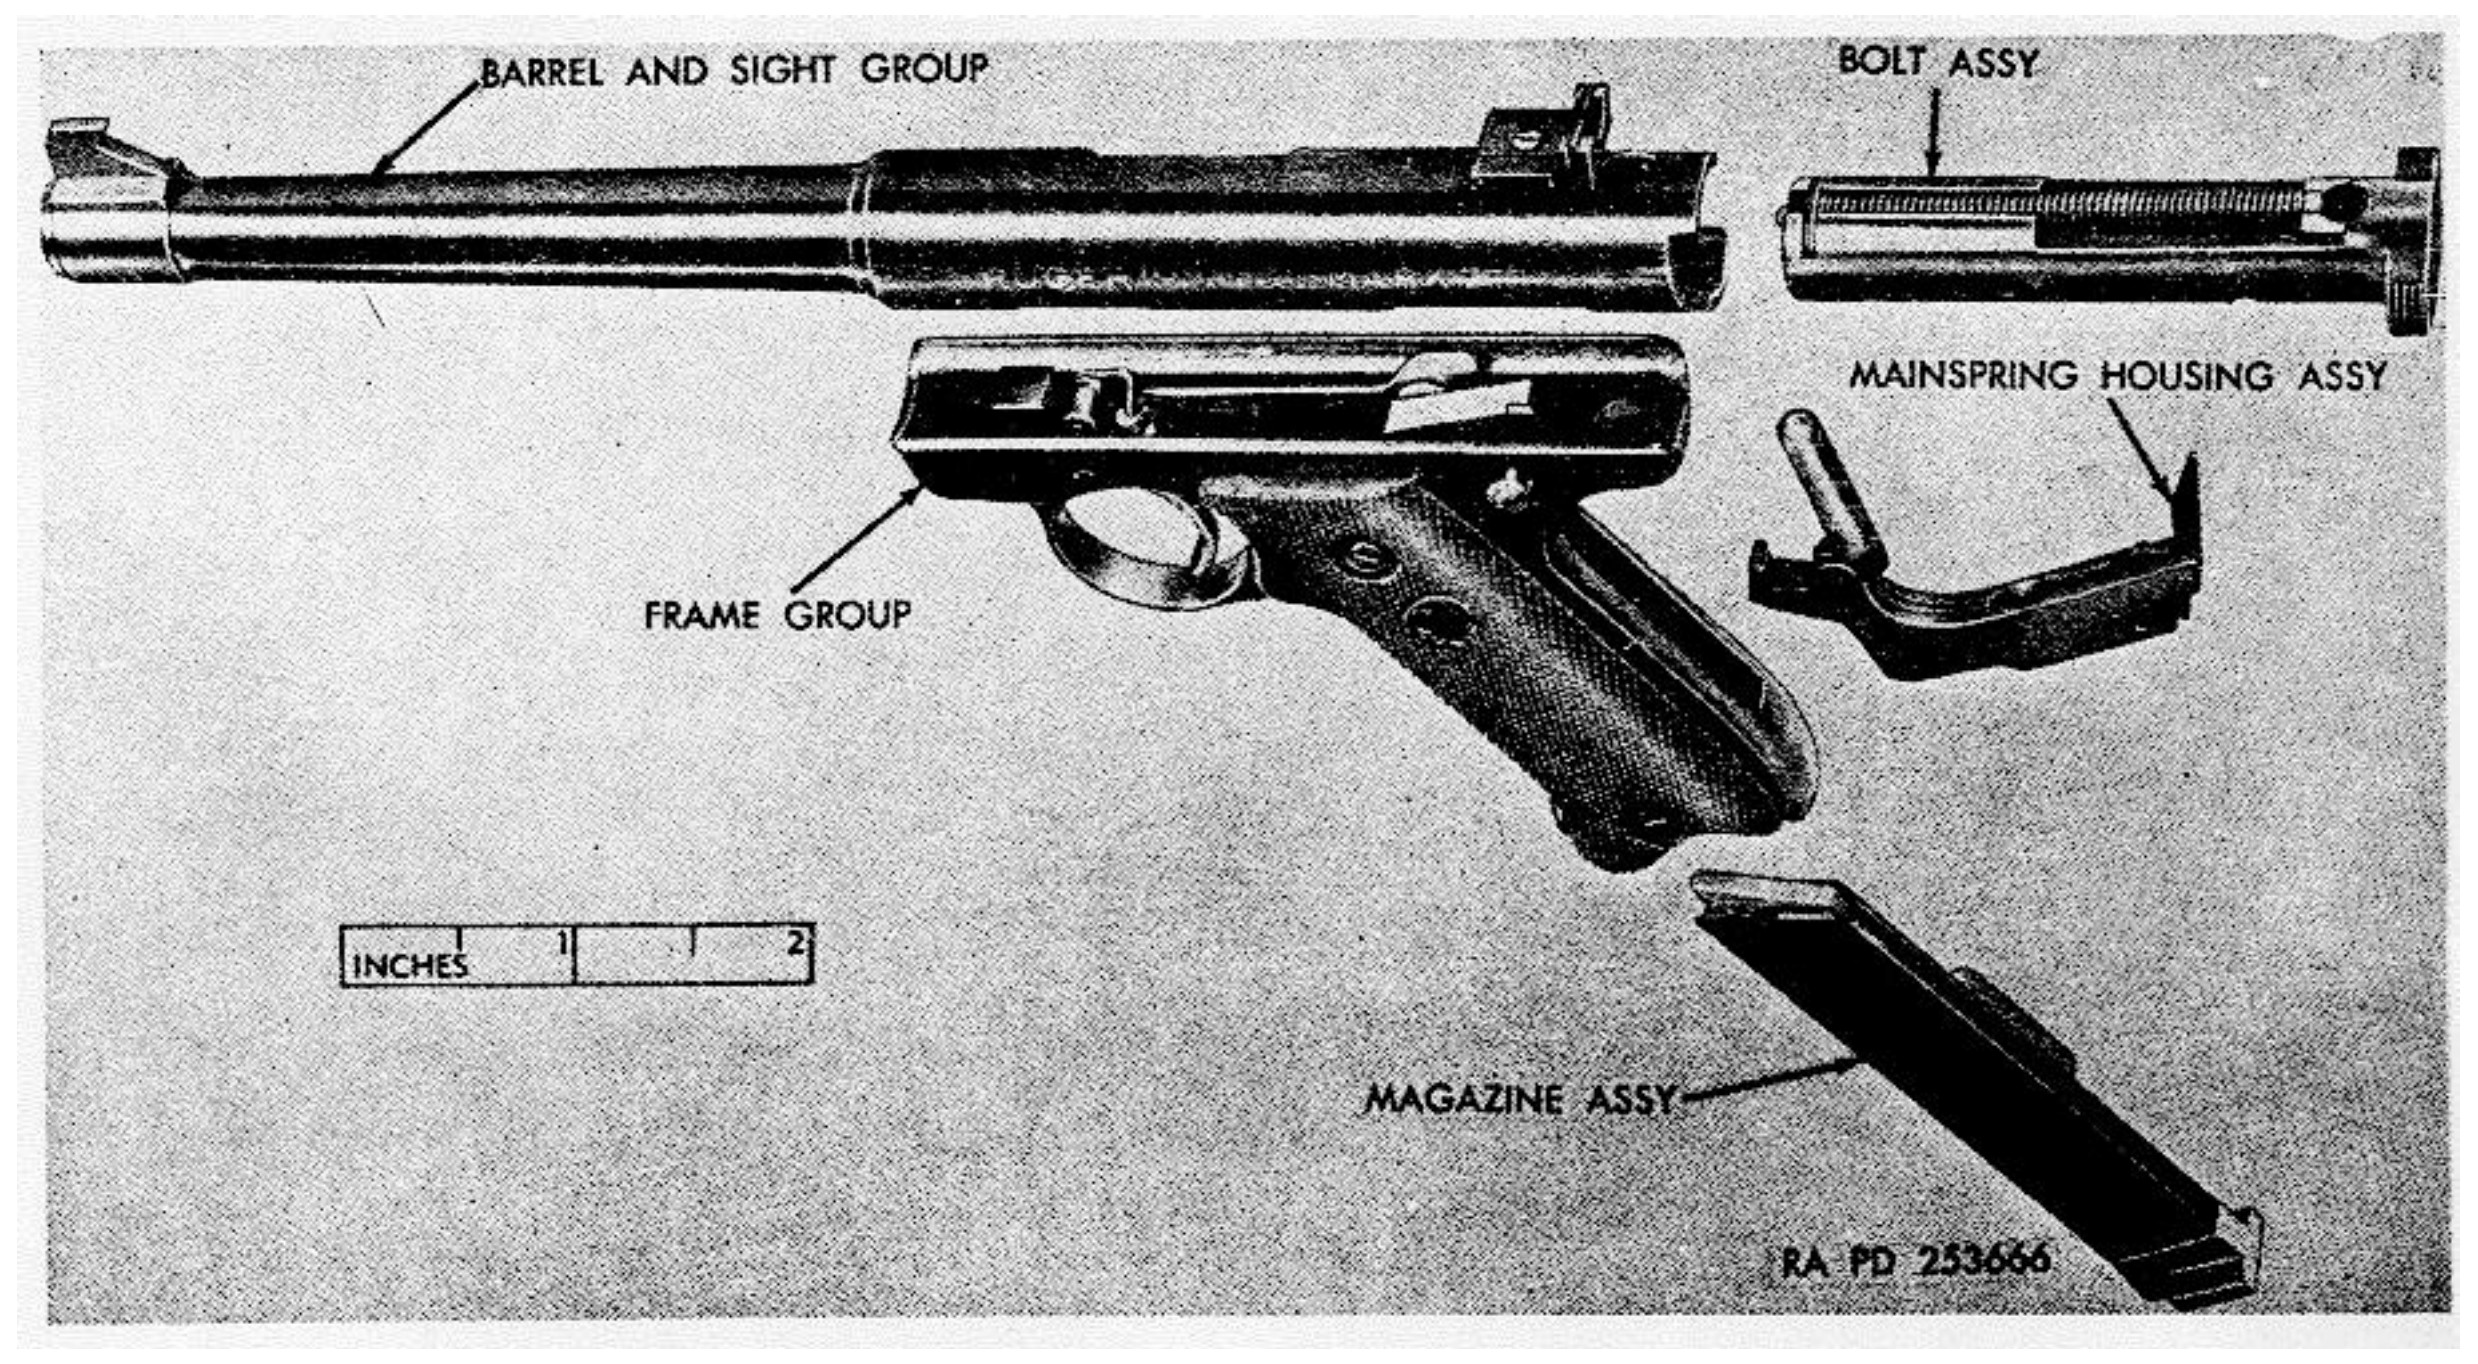
Bolt (para. 67). Lift the recoil spring assembly off the top of the bolt; drive out the firing pin stop and remove the firing pin, rebound spring support and rebound spring; depress the extractor plunger and, holding it, remove the extractor, then “slowly release pressure on the extractor spring” and remove plunger and spring. Reassembly reverses it, with the rebound spring support fitted “with bent edge of support down,” and the firing pin stop driven in and the pin tested “for ease of motion.” The manual also authorises the gunsmith to “stone the front of bolt slightly if cartridges fail to seat properly in the bolt recess.”3
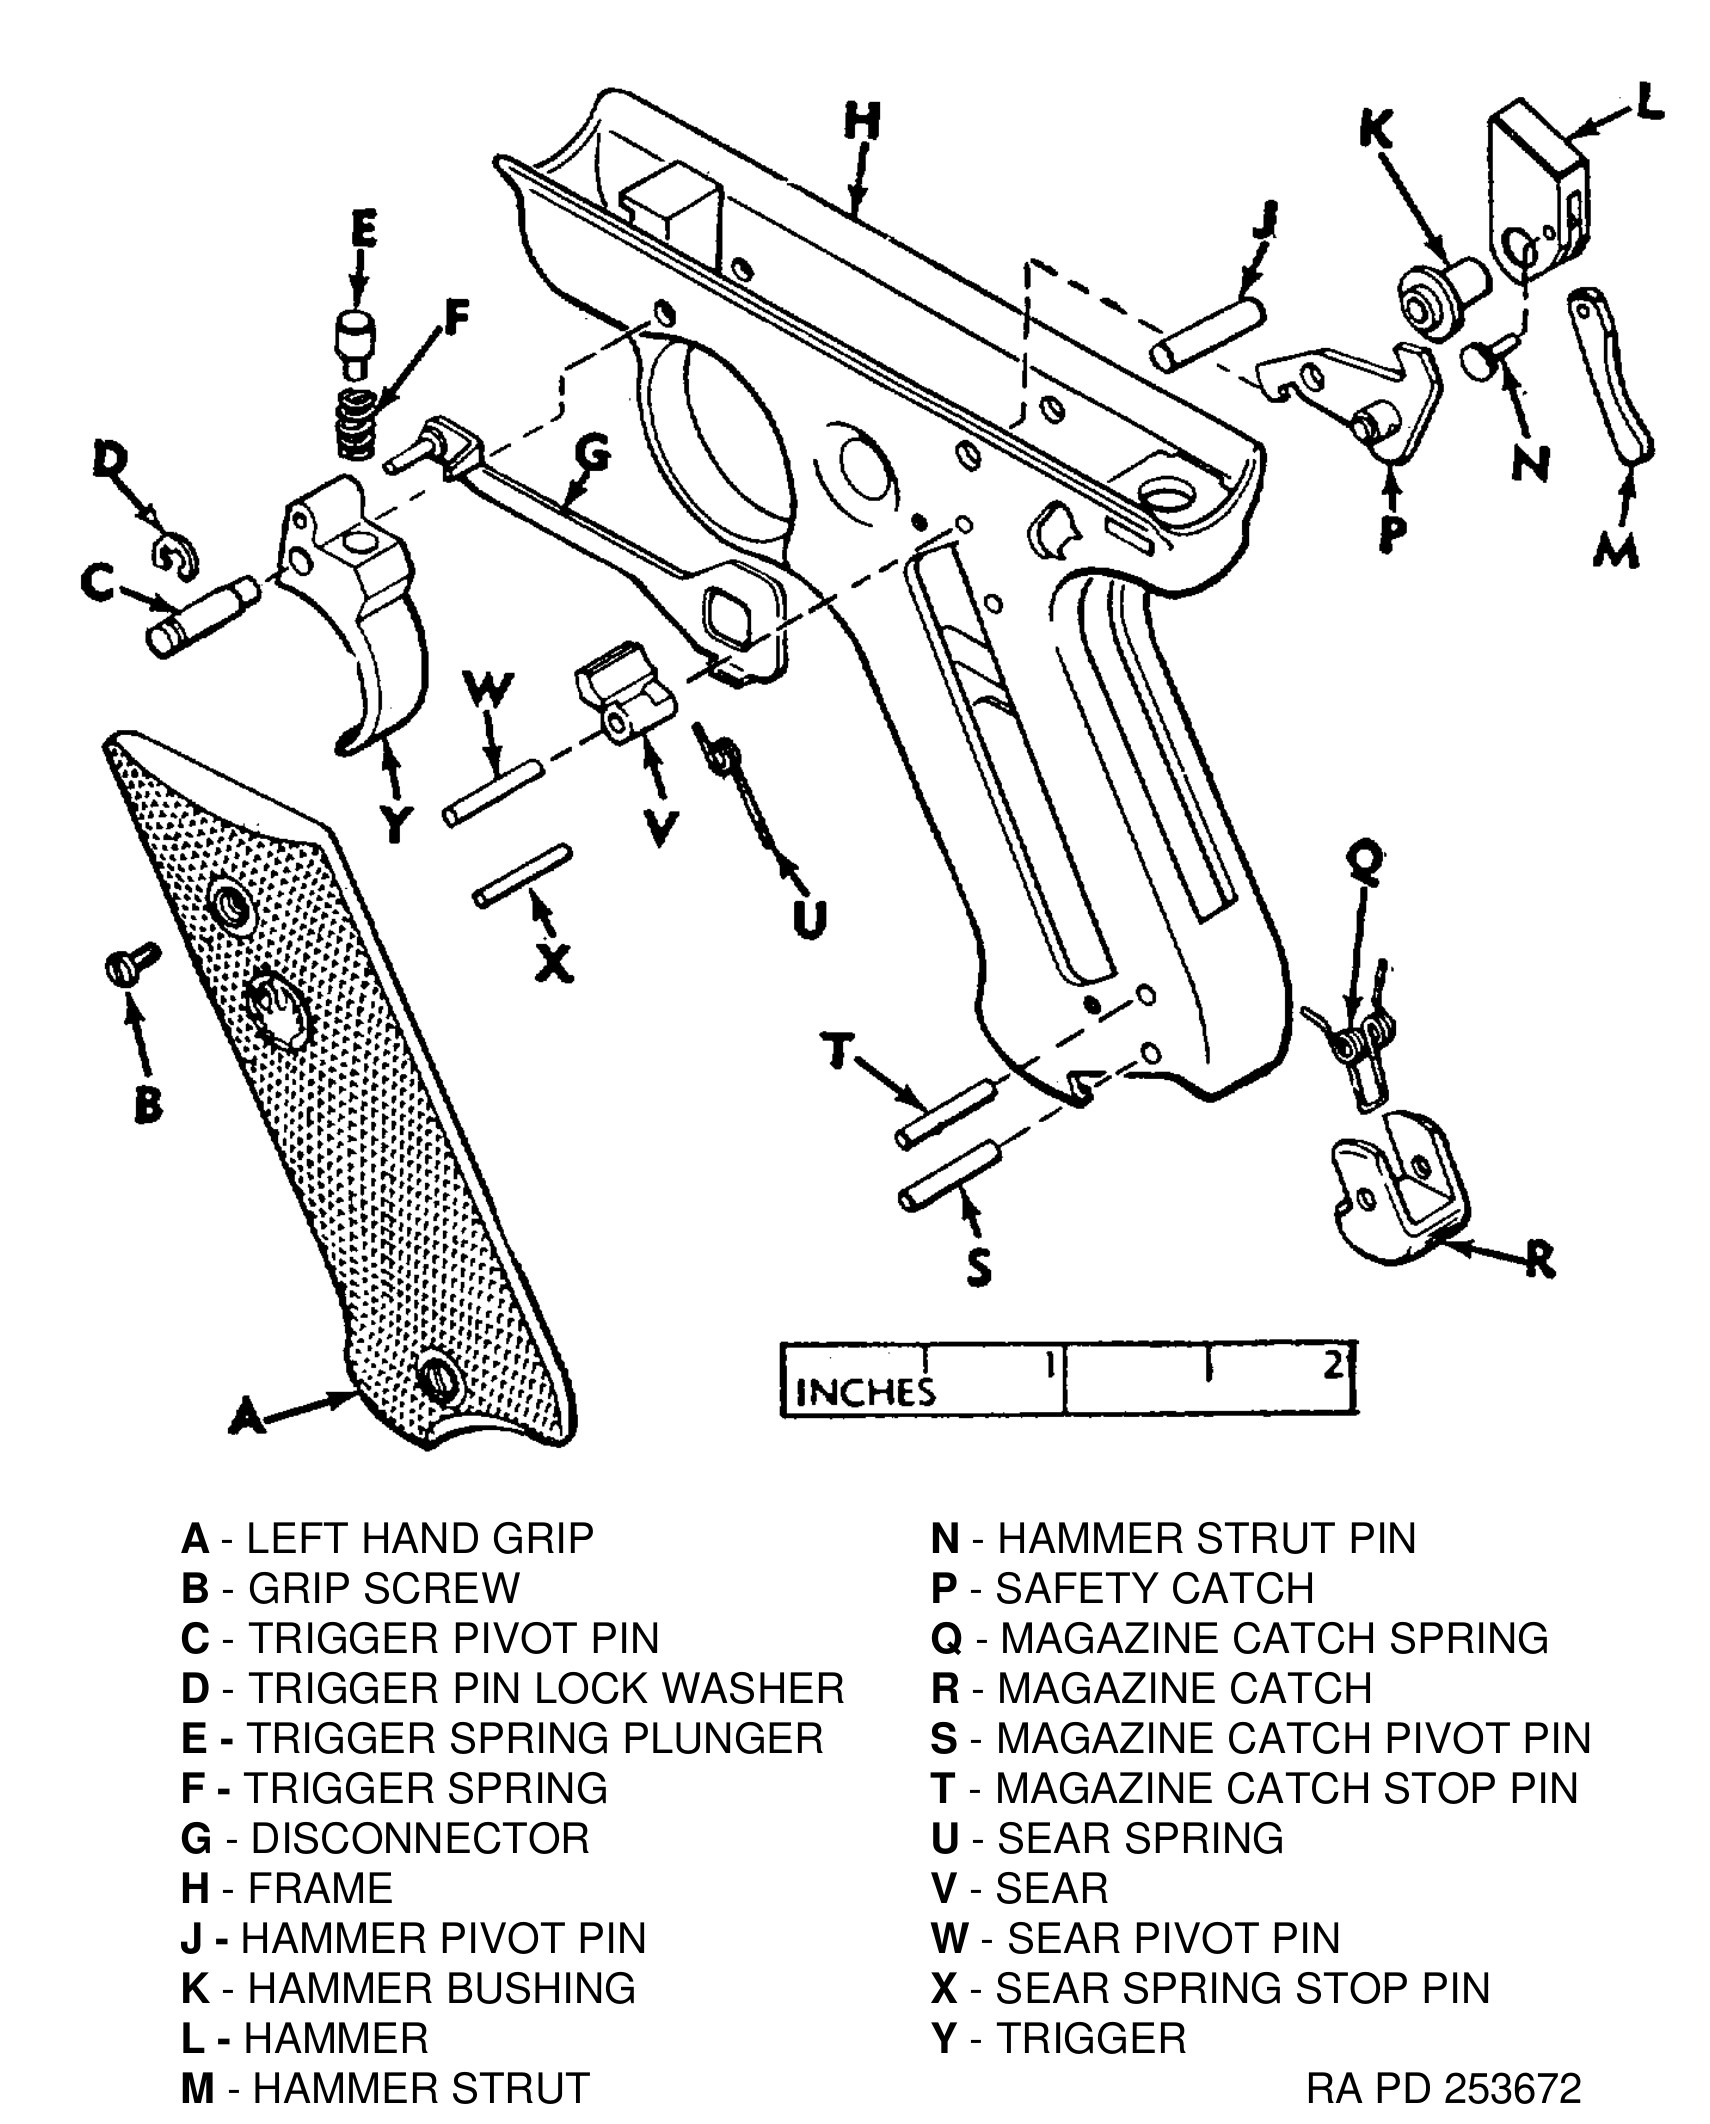
Grip frame (para. 69). Grips off; push out the hammer pivot pin and remove the hammer, hammer bushing and safety catch; remove the trigger pin lock washer from inside the frame; push out the trigger pivot pin and remove the trigger and disconnector; remove the trigger spring and plunger; push out the sear pivot pin and remove sear and sear spring; drive out the magazine catch pivot and stop pins; and — the one irreversible step — “drill out staking on hammer strut pin (N) and remove pin,” which is re-staked at assembly.3
The trigger work it permitted. “If trigger pull is heavy or light, proper stoning of notch on hammer with a fine grit triangular oilstone can adjust the pull. To make trigger pull heavier, stone the hammer notch to a positive angle (hook). To make the trigger pull lighter, stone the hammer notch to a negative angle (upsweep). The pull should always remain between 40 and 50 ounces.”3 That was a 1959 armorer’s instruction for a service match pistol, written for trained gunsmiths with inspection gauges and replacement parts on hand. Ruger lists the hammer and sear of the Mark III among the parts that “must be factory fitted,”1 and replacement hammers and sears — Volquartsen’s among them — are sold precisely so that no stoning is required (“No stoning or fitting required”).6 The instruction is recorded here for what it shows about where the Ruger’s trigger pull is made; it is not offered as a procedure.
What the Army did not authorise. “No disassembly of the mainspring housing assembly is authorized,” and the barrel and receiver group was limited to “removal of the rear sight elevation screw … for cleaning.”3
8.8 Bench, gunsmith or factory
Drawing the lines Ruger draws, with the Army’s armorer level in between:
Table 3 — Drawing the lines Ruger draws, with the Army's armorer level in between
| Work | Who, per the sources |
|---|---|
| Field strip, cleaning, lubrication, magazine strip | Owner, per Ruger’s manuals (Volume 4)12 |
| Recoil spring, extractor, firing pin replacement | Armorer/gunsmith in the Army’s scheme (para. 67);3 Ruger treats the complete bolt assembly as a factory-fit part on the Mark III1 |
| Hammer, sear, trigger, safety, disconnector, mainspring housing | Factory fit in Ruger’s Mark III parts list, “on an exchange basis only”; gunsmith level in the 1959 Army manual13 |
| Anything on the barrel/receiver: chamber damage, barrel replacement, threading | Factory — “the barrel/receiver assembly is defined as a ‘firearm’ by Federal Law and is not offered for sale separately”12 |
| Barrel nut on 22/45 Lite and threaded models | Do not touch — not repaired under warranty if disturbed12 |
| Aftermarket trigger kit | The kit maker’s instructions; Volquartsen offers installation (Volume 7). Outside Ruger’s “Warning — Alterations”17 |
Ruger’s service terms, from the manuals: service is by repair authorisation number; all work “is subject to a minimum labor charge and charges for shipping and handling”; “most models can be reblued” (Mark III manual) or “refinished” (Mark IV), but “custom gunsmithing service or nonstandard alterations are NOT AVAILABLE”; factory-fitted parts are fitted “on an exchange basis only. We will not return the replaced parts”; and a non-licensee “must” ship a handgun by private overnight carrier, never by US Mail. The Mark III manual gave Ruger’s Prescott, Arizona service department, (928) 541-8892; the current Mark IV manual gives Customer Service at (336) 949-5200.12 Ruger’s manuals also explain that no warranty card is packed: the company “has elected not to provide any written warranty, either ‘limited’ or ‘full’,” and refers owners to state implied warranties.1
8.9 Parts availability
- Ruger sells parts by name, and asks for “the model and the entire serial number of the firearm for which the parts are being ordered”; parts marked with an asterisk are factory-fit only; the barrel/receiver is not sold.1 Ruger’s parts lists in the Mark III and Mark IV manuals are the reference for part names and key numbers. Current Ruger parts prices were not checked for this dive.
- Volquartsen lists, for the Mark II/III, replacement extractors, firing pins, recoil rods and springs, hammers, sears, disconnectors and triggers, and a mainspring latch removal tool (Volume 7 §7.4). Several of its bolt parts are listed for the Mark IV as well.8
- The Mark I and Mark II manuals are marked “For Reference Only,” and Ruger describes those models as “out of production.” Parts availability for them was not researched and is not asserted.
8.10 A maintenance record for the two pistols
As documented in September 2026, no round counts, cleaning history, parts replacements or malfunction history are recorded for either pistol. A useful record, to be kept in the unit file rather than in these volumes, would note for each pistol: approximate round count; ammunition used; any stoppages with their type and the fix; parts replaced and when; and, when the Volquartsen kit is fitted to the Mark III, the date and the kit variant, since fitting it removes the magazine disconnect and changes the function check (Volume 7). The magazines are shared between the two pistols if the Mark IV proves to be a steel- or aluminium-frame model (Volume 6), so their condition belongs in the record of both.
References
Footnotes
-
Sturm, Ruger & Co., Instruction Manual for Ruger Mark III … Autoloading Pistols, © 2015, code AP & KAP 9/15 R15, pp. 20–22, 28–30, 33–37, 48, https://ruger-docs.s3.amazonaws.com/_manuals/markIII.pdf , consulted 2026-09-19. ↩ ↩2 ↩3 ↩4 ↩5 ↩6 ↩7 ↩8 ↩9 ↩10 ↩11 ↩12 ↩13 ↩14 ↩15 ↩16 ↩17 ↩18 ↩19 ↩20 ↩21 ↩22 ↩23 ↩24 ↩25 ↩26 ↩27 ↩28 ↩29 ↩30 ↩31 ↩32 ↩33
-
Sturm, Ruger & Co., Instruction Manual for Ruger Mark IV … Autoloading Pistols, code PM1179, © 2026, pp. 13–14, 19–20, 27–29, 31–34, https://www.ruger.com/dataProcess/manual/fetch.php/ms/40160/manual_40160.pdf , consulted 2026-09-19. ↩ ↩2 ↩3 ↩4 ↩5 ↩6 ↩7 ↩8 ↩9 ↩10 ↩11 ↩12 ↩13 ↩14 ↩15 ↩16
-
Departments of the Army and the Air Force, TM 9-1005-226-14 / AFM 50-11, 20 July 1959, paras. 36c (lubrication), 41–43 and Table III (operator troubleshooting), 57b (inspection), 58 and Table IV (gunsmith troubleshooting), 65–69 (barrel, housing, bolt, magazine and grip-frame maintenance), figs. 48, 55 and 57; Wikimedia Commons File:TM-9-1005-226-14.pdf, consulted 2026-09-19. ↩ ↩2 ↩3 ↩4 ↩5 ↩6 ↩7 ↩8 ↩9 ↩10 ↩11 ↩12 ↩13 ↩14 ↩15 ↩16 ↩17 ↩18 ↩19 ↩20 ↩21 ↩22
-
Sturm, Ruger & Co., “Ruger Perfects Rimfire — Again: Introducing the One-Button Takedown Mark IV,” 22 September 2016, https://ruger.com/news/2016-09-22.html , consulted 2026-09-19. ↩
-
Sturm, Ruger & Co., Instruction Manual for Ruger Mark I Target Model and Standard Model Automatic Pistols, code A-7-81, https://ruger-docs.s3.amazonaws.com/_manuals/markI.pdf (scanned; OCR), consulted 2026-09-19. ↩
-
Volquartsen Firearms, “Accurizing Kit for the Ruger MK II or MK III Pistol,” https://volquartsen.com/products/354-accurizing-kit-for-the-ruger-mk-ii-or-mk-iii-pistol , consulted 2026-09-19. ↩
-
Volquartsen Firearms, “Installation of the Accurizing Kit for the Ruger MKII or MKIII,” https://volquartsen.com/howto/install_mk2_accurizing_kit , consulted 2026-09-19. ↩
-
Volquartsen Firearms, “Trigger and Action Parts for Ruger MKII, MKIII, and 22/45,” https://volquartsen.com/departments/internal-parts-for-ruger-mkii-mkiii , consulted 2026-09-19. ↩
Comments (0)