Ruby Pistol · Volume 6
Keeping It Working: Field Strip, Detail Strip, Care and Repair
The French Army's own stripping and cleaning instruction, a gunsmith's bench account, what a detail strip must allow for when no manual exists, the inspections that matter on a century-old Eibar pistol, and the failures these pistols are known for
6.1 Before anything: is it safe to handle?
A Ruby-type’s hammer is hidden and it has no grip safety and no cocking indicator (Vol 4). There is no way to tell from outside whether it is cocked. Treat every one as cocked and loaded until the magazine is out and the chamber has been seen to be empty.
The French instruction puts the order plainly: withdraw the magazine first, “then, an essential precaution to avoid any accident, bring the breech block fully back so as to extract the cartridge that may still be in the chamber”.1
Two further cautions are particular to these pistols:
- The safety may not do its job. Forgotten Weapons records French complaints that holsters pushed the lever off safe; the unsigned French collector text says some pistols fired when the lever was moved to fire.23 Do not rely on it while handling.
- The firing pin may be stuck forward. TFB’s gunsmith warns that a firing pin “may become lodged in the port and turn the gun into a ‘runaway’ gun … The pin becomes fixed and just hits the next cartridge as it’s loaded.”4 A pistol whose firing pin tip stands proud of the breech face with the hammer down and the pin pushed back should not be loaded at all.
6.2 Field strip: the French instruction
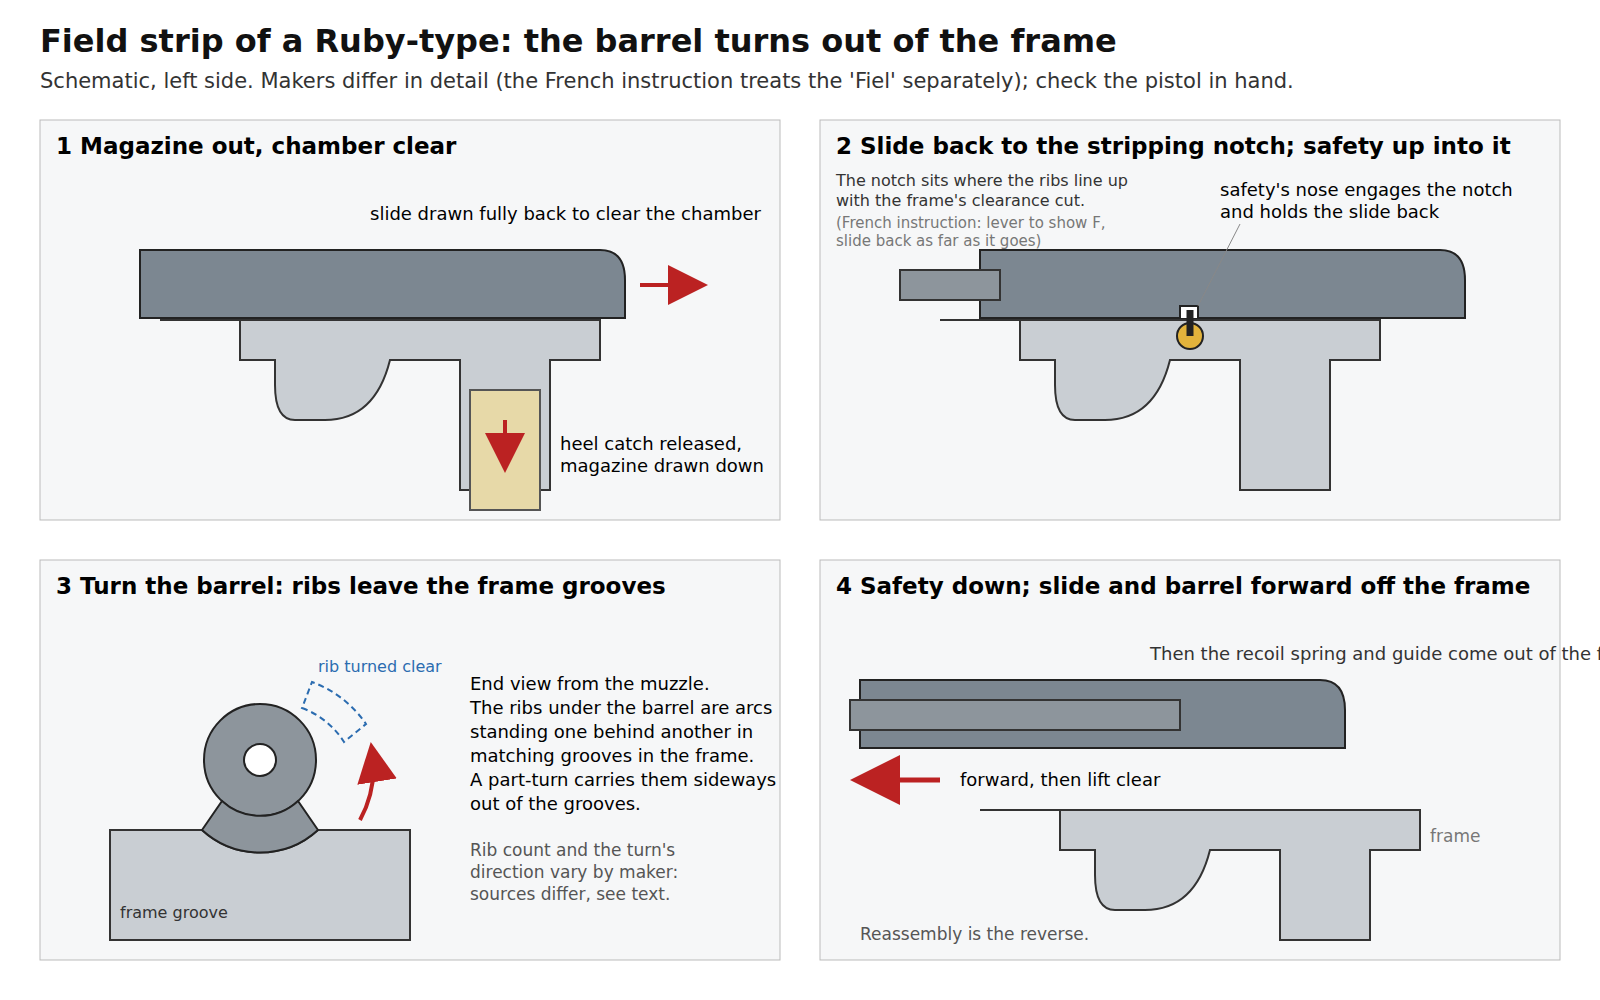
The French Army’s instruction gives the field strip for “the greater number of ‘Ruby’-type arms” in four steps.1
- Remove the magazine from the grip as above, and draw the breech block fully back to clear the chamber.
- “Set the safety lever so as to leave the letter F visible and draw the block back as far as possible, as shown in fig. 2.”
- “Remove the barrel; for this, turn it from left to right; draw it forward; give it a further rotation from right to left and finally free it completely from the breech block.”
- “Remove the block, then the recoil spring and the left grip, without pushing the dismounting any further.”
The figure the instruction refers to is not reproduced in the transcription, and “left to right” is not tied to a point of view; read from the muzzle end, as the soldier holding the pistol would see the barrel, it would mean clockwise. The barrel’s grooved muzzle collar (Vol 4) is what the fingers grip to turn it.
Three things stand out. The barrel comes out of the slide forward, while the slide is still on the frame, with two rotations: one to free its ribs from the frame, a second to free it from the slide. The slide comes off after the barrel. And the soldier was to go no further than the left grip: “sans pousser plus loin le démontage”.
6.3 Field strip: a gunsmith’s account
TFB’s gunsmith-writer stripped one pistol on camera in 2023 and describes it differently:4
- Clear the pistol.
- Remove the magazine by the heel catch (“very soft heel release compared to others from this era”).
- “Lock the slide back by flipping the safety up into the locking notch.” His notch was worn, and he had to pull the slide a little further by hand.
- “With the slide held back (may have to push or pull it back and forth to find the sweet spot) simply grip the barrel and twist it so the bottom lug rotates to the left or counterclockwise (looking from the rear of the gun).”
- “At this point the safety can be disengaged and the slide lowered. The slide will come off the frame along with the barrel.”
His sequence is the one in Browning’s patent, in which the slide “is pressed rearward until the locking-ribs b may be turned into the recess c, after which the breech-slide, with the barrel, may be drawn from the frame”.5 The French instruction’s barrel-first method and the gunsmith’s slide-and-barrel-together method are both possible on the 1903 pattern, depending on whether the slide’s front opening lets the barrel’s collar pass. The instruction itself says the brands differ “in the way they are dismounted”.1 On an unfamiliar pistol, try the gunsmith’s method first: it needs no force on the barrel inside the slide.
6.4 The Fiel, and other exceptions
The instruction names one exception. “To dismount pistols of the ‘Fiel’ make, of which only a small number exist in service, proceed as follows, after removing the magazine: draw back the block and engage the nose of the safety in its front notch; turn the barrel from left to right and free the assembly formed by the barrel and the block. To separate these last two parts, give the barrel a rotation from right to left and take the barrel out through the lower part of the block.”1 The Fiel, by Forgotten Weapons’ list, is Erquiaga y Cía’s.6
Two points follow for any Ruby-type. The safety may engage more than one notch on the slide, so the right one has to be found. And if a barrel will not turn at the first notch, it is not a reason for force: the TFB account says to move the slide “back and forth to find the sweet spot”.4 A reader on Forgotten Weapons adds a cause when the slide will not come off at all: a bent sear that leaves the hammer short of full cock, so that the hammer stops the slide coming far enough back (below).7
6.5 Reassembly
“Reassembly is done by following the dismounting operations in reverse order,” says the instruction.1 In practice: recoil spring and guide into the frame; slide and barrel on from the front (Browning: the slide “can be mounted upon and removed from the frame only from the front”); slide back to the notch; barrel turned to bring its ribs into the frame grooves; safety down and slide forward.5 If the instruction’s barrel-first method was used, the slide goes on first and the barrel goes in through its front and is turned home. Check function (below) before loading.
6.6 Detail strip: no manual, so what a procedure must allow for
No detail-strip instruction for any Ruby-type maker was found for this dive. The French instruction stops at the left grip; no Spanish maker’s manual, armourer’s manual or exploded drawing with a sequence was located. A sequence is therefore not given here, because a reconstructed one could be wrong for the pistol in hand. What a correct procedure must allow for, from the sources that describe the insides:
- Two different spring systems. Browning’s 1903 uses a V mainspring and a single combined sear-and-trigger leaf spring that also holds the magazine catch.5 A reader on Forgotten Weapons says the Ruby uses coil springs for the sear and magazine catch.7 Identify which the pistol has before driving any pin, because a leaf spring held by one pin will release several parts at once.
- The mainspring and catch from below. The same reader: to free the hammer spring “you have to pull the hammer spring from the bottom of the grip, which means driving out the pin for the magazine catch and hammer strut, and good luck getting them all back in in less than a day”.7 That is a description of difficulty, not a sequence, but it locates the work.
- Firing pin retention. On the TFB pistol “the extractor pin” also holds the firing pin, and “some are literally peened in the bolt block and drilling and re-peening are needed to repair”.4 The unsigned French collector text says the firing pin is held “by a simple screw in the underside of the breech block”.3 Browning’s pin is in two pieces behind a bushing in the breech face.5 Look before pushing.
- The safety lever. It is the stripping catch and the sear block, and its removal position is not documented. It usually comes out only at one angle; find it rather than force it.
- Hand fitting. Parts were fitted to each pistol, and the unsigned collector text says many carry an assembly number (Vol 5).3 Keep each pistol’s parts together; they will not go into another.
- Soft screws. TFB’s gunsmith found “screws boogered” on his.4 Use hollow-ground screwdrivers fitted to each slot.
6.7 Cleaning and lubrication
The instruction’s cleaning is brief and complete for a field strip: “clean carefully the guides of the frame and of the breech block, and all the accessible parts of the mechanism. Oil lightly the hammer notch, the guides of the frame and of the block, and the trigger mechanism.”1
Two additions apply to a pistol a century old:
- Ammunition history. Whether the French wartime 7.65 mm loads were corrosively primed was not established for this dive. A pistol of unknown history, or one fired with old surplus of unknown priming, should be cleaned as if corrosive, with a water-based cleaner first and then solvent and oil.
- Light oil only. The instruction says légèrement, lightly. Heavy grease in the hammer and sear area slows a weak hammer spring; oil in the firing-pin channel collects fouling and is one route to a sticking pin.
6.8 Inspection: the checks that matter
The checks below follow from the failures the sources record (next section). They are ordinary bench checks; none is from a Spanish or French document.
Table 1 — Inspection: the checks that matter
| Check | How | Why |
|---|---|---|
| Firing pin free and retracting | with the slide off, push the pin forward and release; it must return under its spring, tip behind the breech face | runaway fire from a stuck pin (TFB)4 |
| Firing pin tip | no burrs, no mushrooming, correct protrusion when pushed | broken and bent pins are common (TFB)4 |
| Hammer reaches full cock | cycle the empty slide slowly and confirm the sear holds | bent sear leaves the hammer at partial cock (FW reader)7 |
| Safety function | on safe: trigger and slide blocked. Off safe: nothing moves on its own | holster and lever faults (FW; collector text)23 |
| Trigger reset | with an empty pistol, hold the trigger back, cycle the slide, release: the hammer must stay cocked until the trigger is let forward and pulled again | the instruction’s “let the trigger come forward after each shot”1 |
| Slide notch | look for peening where the safety’s nose engages | TFB’s notch was worn by the harder safety4 |
| Barrel | bore, and the outside for bulges or cracks | Pollard’s “split barrels”; a dealer’s pistol with a bulged barrel89 |
| Extractor | hooks a rim firmly; spring returns it | weak extraction from a tired spring (TFB)4 |
| Magazine | lips even and undamaged; follower free; catch notch clean | thin lips; poor feeding from a mismatched magazine (Vol 7)4 |
6.9 Known failures and their causes
Table 2 — Known failures and their causes
| Symptom | Likely cause | Source |
|---|---|---|
| Fires as the slide closes; keeps firing | firing pin stuck forward (“runaway”) | TFB4; unsigned collector text3 |
| Fires when safety moved to fire; fires on its own | worn or badly made sear/safety engagement | unsigned collector text3 |
| Click, no bang | broken or short firing pin | TFB4 |
| Slide will not come off; hammer seems “half-cocked” | bent sear, hammer short of full cock | FW reader7 |
| Slide will not stay at the stripping notch | peened notch | TFB4 |
| Empty case left in chamber or stovepiped | weak extractor spring | TFB4 |
| Magazine drops out, or rounds nose-dive | magazine from another maker; damaged lips | Jaeger Platoon; TFB104 |
| Pistol goes off safe in a holster | safety lever too exposed | Forgotten Weapons2 |
| Split or bulged barrel | poor steel, or an obstruction | Pollard; Legacy Collectibles listing89 |
The full-automatic fire some accounts mention (an unsigned collector text says some pistols “went to full automatic”) is a failure of the sear or disconnector.3 It is dangerous, and a pistol that does it is also, in US law, a machine gun (Vol 8). A pistol that doubles must not be fired again until the cause is found and fixed.
6.10 What can be fixed at the bench
For a reader with a lathe, a mill and heat-treatment capability, most of these pistols’ failures are small-part failures, and the parts are simple shapes:
- Firing pin and rebound spring. A turned part. Copy the original’s length and tip profile, check protrusion against the breech face, and make sure it retracts fully. Where the pin is peened in, TFB’s gunsmith drilled and re-peened.4
- Extractor spring. A small coil or leaf spring; replace rather than stretch.
- Sear and hammer notch. Straighten nothing that has bent; a bent sear has already shown it is soft. Make a new one, harden and temper it, and stone the engagement square. This is the part on which the pistol’s safety depends, and it should be tested exhaustively with an empty chamber before any live round.
- Stripping notch. A peened notch can be dressed, but it was peened because the slide is softer than the safety’s nose; it will peen again.
- Magazines. Lips can be dressed and a follower freed; making one is Vol 7’s subject.
What should not be done at the bench without the means to test it: rebarrelling, or any work on a barrel showing a bulge or crack. A bulged barrel is scrap.
6.11 Parts
No current source of new parts specific to any Ruby-type maker was found for this dive. Spare parts are found as used parts, and Jaeger Platoon’s verdict from the Finnish Army’s experience applies: parts “manufactured by different manufactures simply did not necessarily have any part, that was compatible … and in some cases this included even magazines”.10 A part from the same maker is the best chance; a part from the same pistol’s era and maker, fitted by hand, is the realistic one; a made part is often the only one.
6.12 What could not be established
- Any maker’s or armourer’s detail-strip sequence.
- The French instruction’s figure 2, and the viewpoint for its “left to right”.
- Whether French wartime 7.65 mm ammunition was corrosive.
- Any current supplier of Ruby-type parts.
References
Footnotes
-
French Army instruction on the 7.65 mm automatic pistols in service (title, date and issuing authority not given), as transcribed by Tir Sportif Chabris, https://tirsportifchabris.fr/blog/pistolet-ruby-7-65-demontage, consulted 2026-10-19. Quotations translated for this dive. ↩ ↩2 ↩3 ↩4 ↩5 ↩6 ↩7
-
Ian McCollum, “Spanish Eibar/Ruby Pistols”, Forgotten Weapons, 19 October 2012, https://www.forgottenweapons.com/spanish-eibarruby-pistols/, consulted 2026-10-19. ↩ ↩2 ↩3
-
Unsigned collector text on the Ruby pistol, Tir Sportif Chabris, https://tirsportifchabris.fr/blog/vue-eclatee-pistolet-ruby, consulted 2026-10-19. No author or sources. ↩ ↩2 ↩3 ↩4 ↩5 ↩6 ↩7
-
Sam S., “TFB Armorer’s Bench: Commentary on The 1915 Spanish Ruby Pistol”, The Firearm Blog, 27 August 2023, https://www.thefirearmblog.com/blog/2023/08/27/tfb-armorers-bench-commentary-1915-spanish-ruby-pistol/, consulted 2026-10-19. ↩ ↩2 ↩3 ↩4 ↩5 ↩6 ↩7 ↩8 ↩9 ↩10 ↩11 ↩12 ↩13 ↩14 ↩15 ↩16
-
John M. Browning, “Automatic firearm”, US Patent 747,585, granted 22 December 1903, https://patents.google.com/patent/US747585, consulted 2026-10-19. ↩ ↩2 ↩3 ↩4
-
Ian McCollum, “Spanish Eibar/Ruby Pistols” (Vault page), Forgotten Weapons, https://www.forgottenweapons.com/other-handguns/eibar-ruby/, consulted 2026-10-19. ↩
-
Ian McCollum, “Serbian/Yugoslav Ruby Pistol”, Forgotten Weapons, 2 March 2022, reader comments, https://www.forgottenweapons.com/serbian-yugoslav-ruby-pistol/, consulted 2026-10-19. ↩ ↩2 ↩3 ↩4 ↩5
-
Major Hugh B. C. Pollard, Automatic Pistols (London: Pitman, 1920), p. 30, https://archive.org/details/automaticpistolspollard1920, consulted 2026-10-19. ↩ ↩2
-
Legacy Collectibles, “SOLD - Spanish Alkartasuna Ruby Pistol Rig - GI Bring-back w/ Capture Doc”, item 36083 (bore: “Bulged Barrel”), https://legacy-collectibles.com/36083-spanish-alkartasuna-ruby-pistol-rig-gi-bring-back-w-capture-doc, consulted 2026-10-19. ↩ ↩2
-
Jaeger Platoon, “Revolvers & Pistols part 3: 7,65 mm Pistol M/19 ‘Spanish’”, http://www.jaegerplatoon.net/PISTOLS3.htm, consulted 2026-10-19. ↩ ↩2
Comments (0)