LeMat Revolver · Volume 6
Strip, Clean, Maintain and Repair — Keeping a Two-Barrel Cap-and-Ball Revolver Working
The maker's field-strip, what a detail strip has to respect, why the LeMat takes longer to clean than any other percussion revolver, the parts that wear and break on originals and reproductions, and what can be fixed at the bench
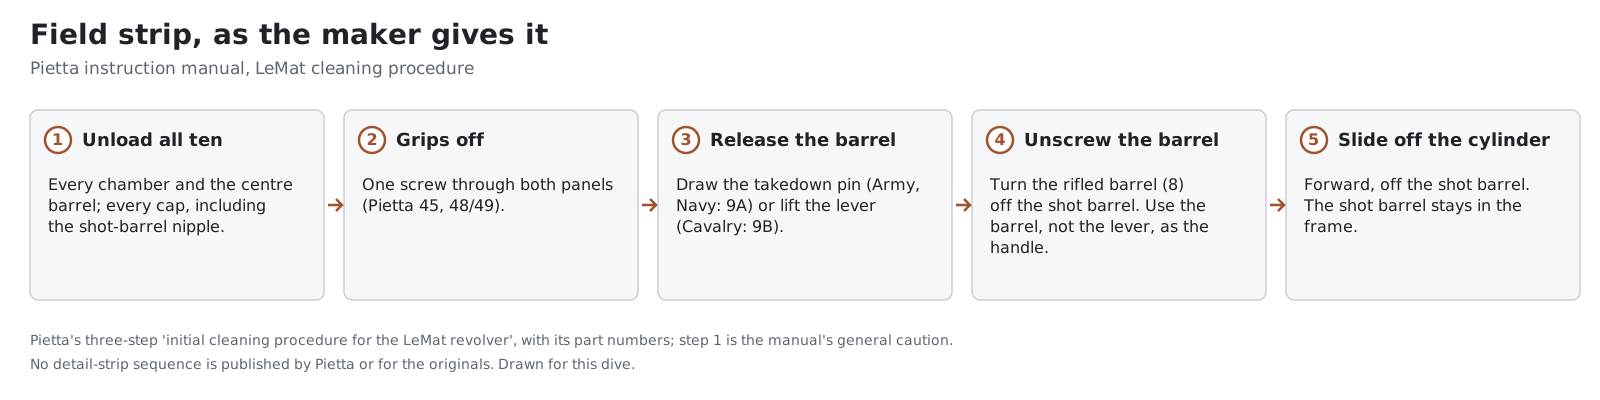
The LeMat is the hardest percussion revolver of its era to keep clean. It has two barrels, one of which is also the bearing on which the cylinder turns; ten nipples instead of five or six; a cylinder lock that depends on clean holes in the face of the cylinder; and a loading lever that breaks if it is used wrongly. This volume sets out what the maker says about taking it apart and cleaning it, what the evidence of surviving originals says about what wears, and what a reader should and should not attempt.
6.1 What documents exist
- Pietta’s instruction manual for its percussion guns gives a three-step “initial cleaning procedure for the LeMat revolver,” a general cleaning method, a tip on adjusting the cylinder stop, and a 55-part parts list for the LeMat.1 It is the only maker’s procedure found.
- No original manual or Confederate armourer’s instruction for the LeMat was located. The Confederate Ordnance field manual of 1861 gives the gun four sentences and no maintenance instructions (Volume 2).2
- Collectors’ observations — Edmunds on cleaning a reproduction and on the condition of more than a hundred originals; College Hill Arsenal on the parts commonly replaced; auction catalogues on the faults of specific guns — supply the evidence on wear.34
So the field strip below is the maker’s, the detail strip is not published, and the wear list is drawn from the record of surviving guns. Nothing here is reconstructed from memory.
6.2 Field strip: the maker’s three steps
Pietta’s procedure, verbatim, with its part numbers:1
“INITIAL CLEANING PROCEDURE FOR THE LEMAT REVOLVER – MAKE SURE YOUR GUN IS UNLOADED
- To clean the gun thoroughly, remove the grips (part no. 48/49) by unscrewing the screw located in the middle of same.
- Remove the barrel locking stud (part no. 9A) or the barrel bracket (part no. 9B).
- Unscrew the rifled barrel (part no. 8) and slide off the cylinder. Use the same cleaning procedure as above.”
Its general cautions apply first: “ALWAYS MAKE SURE THE REVOLVER IS COMPLETELY UNLOADED BEFORE CLEANING. WEAR SAFETY GLASSES IN CASE YOU LOSE CONTROL OF SOME SPRING-LOADED COMPONENT WHICH COULD INJURE YOUR EYES.”1
Notes on each step.
- Unloaded means all ten. Check every chamber and the centre barrel, remove every cap, including the one on the shot-barrel nipple. A ball seated without powder, or a charge under a ball, must be removed first; Pietta’s troubleshooting says to take off the cylinder and use a worm, or unscrew the nipple and push the ball out — and “NEVER remove the nipple when the gun is loaded” with powder.1
- Grips. The two grip panels are held by one through-screw (part 45) with nuts in the panels (46, 47).1 Removing them is what exposes the frame for cleaning inside the grip frame; it is not needed to remove the cylinder.
- The latch. Pietta’s Army and Navy have a takedown pin (9A), which is drawn out; the Cavalry has a takedown lever (9B), which is swung.1 On originals, the corresponding part is the spring latch, flip-out lever or knurled pin of Volume 4. Its retaining spring is one of the parts most often found replaced on originals.4
- Unscrewing the barrel. The rifled barrel turns off the shot barrel. Use the barrel itself, not the loading lever, as the handle; the lever is weak.
- Sliding off the cylinder. The cylinder comes forward off the shot barrel. The shot barrel stays in the frame.
Reassembly is the reverse. Pietta gives no torque or alignment instruction. The barrel must be screwed fully home and the latch engaged; a barrel that will not accept its latch is not home.
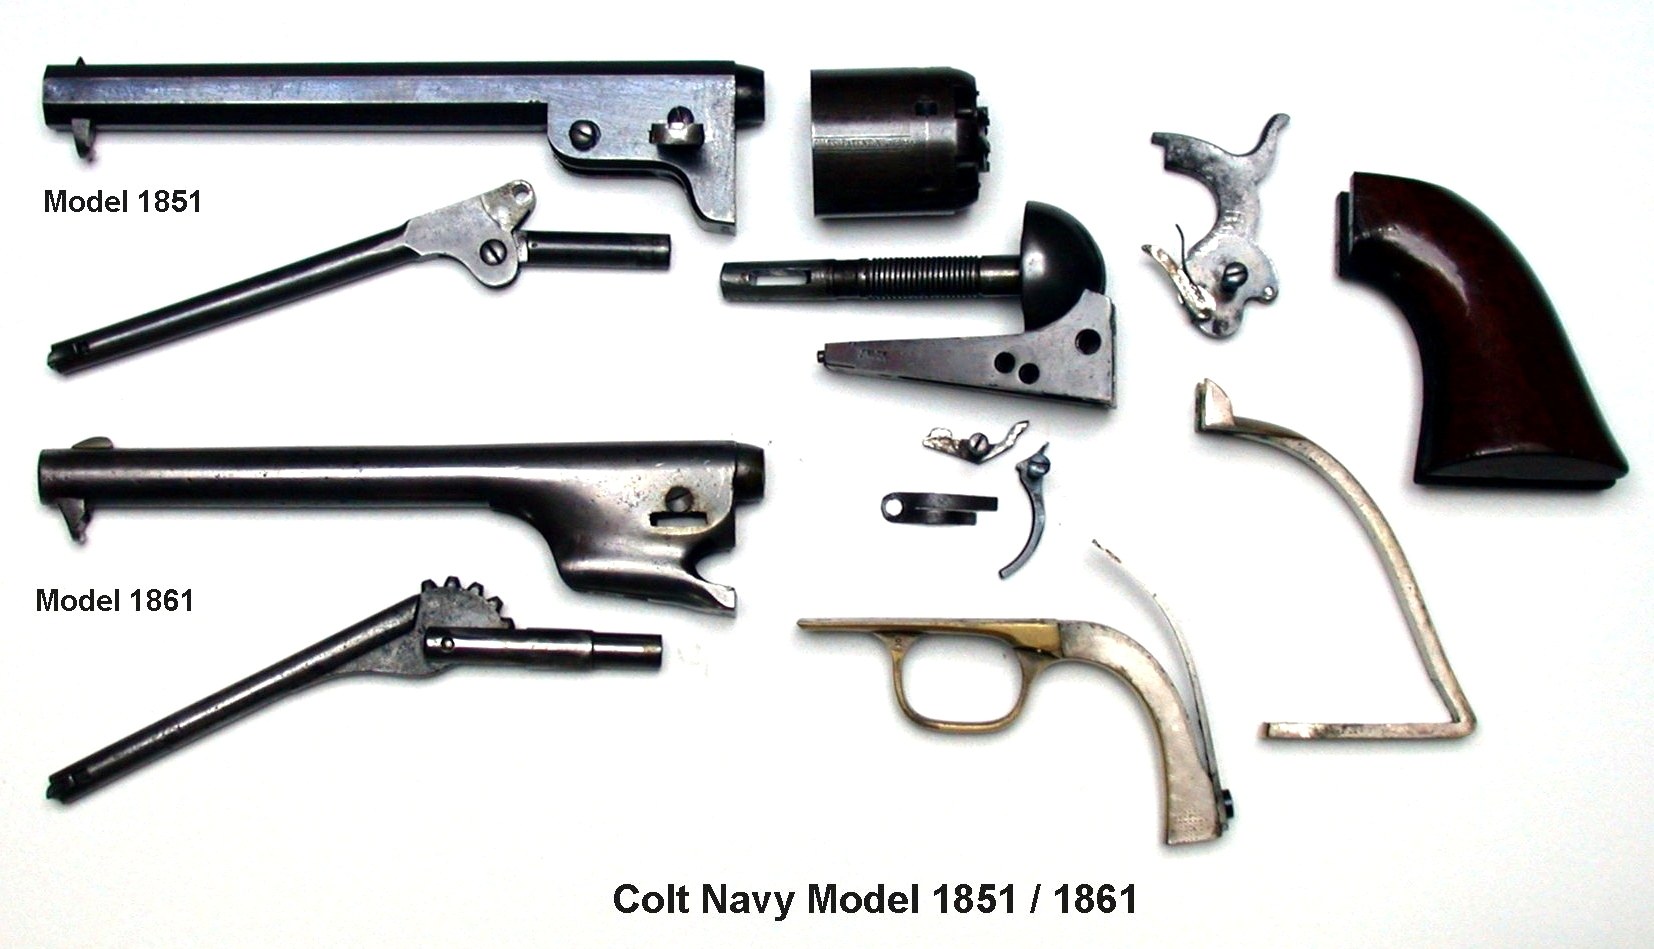
Contrast with the Colt. On a Colt-pattern open-top the barrel is held by a wedge driven out sideways, and Pietta’s manual describes tapping it out “with a wooden or plastic wedge and a hammer.”1 Nothing on a LeMat should need to be hammered.
6.3 Detail strip: what a correct procedure must account for
Pietta publishes no detail strip for the LeMat, and none was found for the originals. A sequence is therefore not given here. What the parts list and the catalogue descriptions establish is the set of facts that any correct procedure has to respect:
- The lockwork is behind a side plate on the left of the frame (Pietta 24, with nut 17).1 Julia’s Second Model serial 1475 is numbered “on the inside of the sideplate,” so the originals open the same way.5 The side plate is the access, not the grip frame.
- The mainspring is screwed and retained. Pietta lists a mainspring screw (44), a mainspring retainer (38) and its pin (39).1 Tension must be relieved before the hammer screw is touched; a mainspring released under load is what the manual’s safety-glasses warning is about.
- The hammer carries its own spring-loaded head. The movable head (31) has its pin (55), a spring (34) and two screws (33, 35).1 It can be removed from the hammer independently. On originals it is a part often repaired or replaced, and Julia’s Baby serial 5 has “a welded repair to nose of hammer including the selector and selector screw.”46
- The hand has a bracket. Pietta mounts the hand and its spring (40) on a hand bracket (41) with a screw (42).1
- The cylinder stop has five parts and an adjusting screw (19, 20, 21, 36, 37, 54 and 16).1 Its setting is lost if the parts are disturbed and must be re-timed (§6.9).
- The shot barrel is screwed into the frame, and on the reproduction its breech is a separate plug (15) with its own nipple (13).1 There is no reason to remove it for cleaning, and on an original there is every reason not to: it is the cylinder’s bearing and the rifled barrel’s anchor.
- Screws on originals are hand-fitted and numbered. Serials and assembly numbers appear on many small parts, and parts are not interchangeable between guns.47
- Use hollow-ground screwdrivers that fit the slots. Slot damage is one of the commonest signs of amateur work on any nineteenth-century arm, and College Hill notes slot wear on the screws of a typical original.4
A reader who needs to go further than the field strip on a Pietta should obtain the exploded diagram from the maker’s manual and work from it; on an original, the work belongs with a gunsmith who knows nineteenth-century European lockwork.
6.4 Cleaning after shooting
The maker’s method. Pietta: “Carefully clean all the metal parts with a good quality black powder solvent or with plenty of hot water. Dry all parts thoroughly and lubricate lightly with gun oil. Do not apply the oil heavily as this will contribute to additional fouling during shooting and require more cleaning between shots.”1 And: “YOUR MUZZLELOADING FIREARM MUST BE CLEANED AFTER EACH SHOOTING SESSION TO PREVENT RUST AND CORROSION FROM DAMAGING THE METAL PARTS.”1
The reasoning — that black-powder fouling draws moisture and rusts steel quickly, and that hot water dissolves it — is covered in Traditions Blunderbuss Kits, Volume 10 and is not repeated here.
How long it takes. Edmunds, cleaning his Navy Arms reproduction after shooting a modern non-corrosive black powder: “In using modern cleaning solvents and hot soap and water, it took me more than half an hour to properly clean the weapon, and some recesses in the cylinder nipple area still needed extra attention. I was aided in the cleaning by using hot water from the faucet in the kitchen sink — not available to Johnny Reb, who was limited to a nearby creek.”3
A practical order that follows from the maker’s steps and the anatomy:
- Field strip as in §6.2.
- Barrel: scrub the rifled bore and wipe the rear lug, where it surrounds the shot barrel.
- Cylinder: scrub each chamber; pick each of the nine nipple recesses; clean the stop-pin holes in the rear face and the central bore where the cylinder rides on the shot barrel.
- Shot barrel, still in the frame: scrub its bore from the muzzle, and wipe its outside, which is the cylinder’s bearing surface.
- Frame: clean the breech face, the stop-pin opening, the recess around the shot-barrel nipple, and the hand’s window.
- Nipples: remove, clean and inspect, if your practice is to remove them (see §6.8 on nipple wear).
- Hammer head: clean around its pin and the selector.
- Dry everything, oil lightly, reassemble.
6.5 The places fouling hides on a LeMat
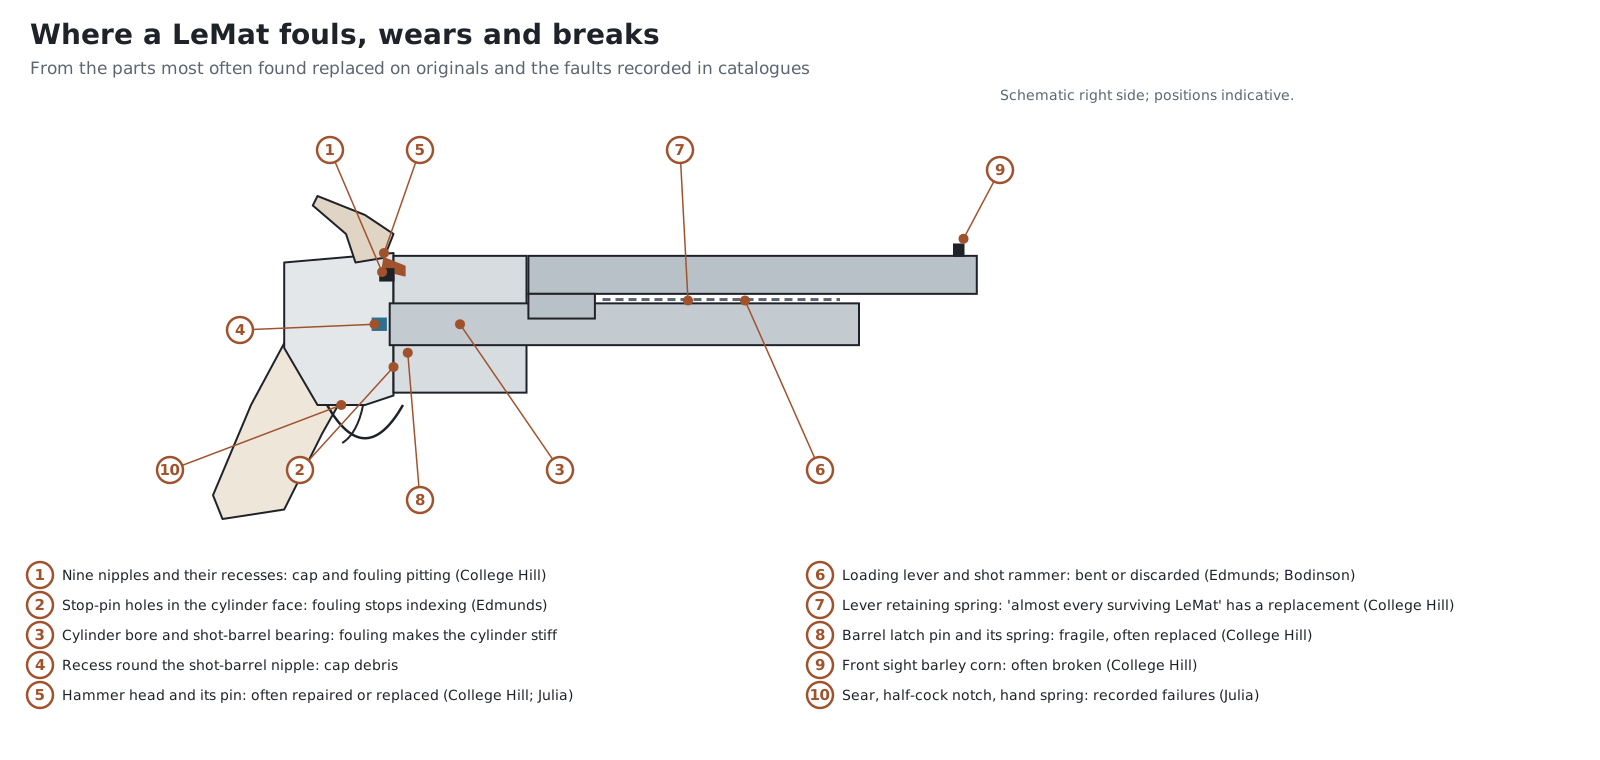
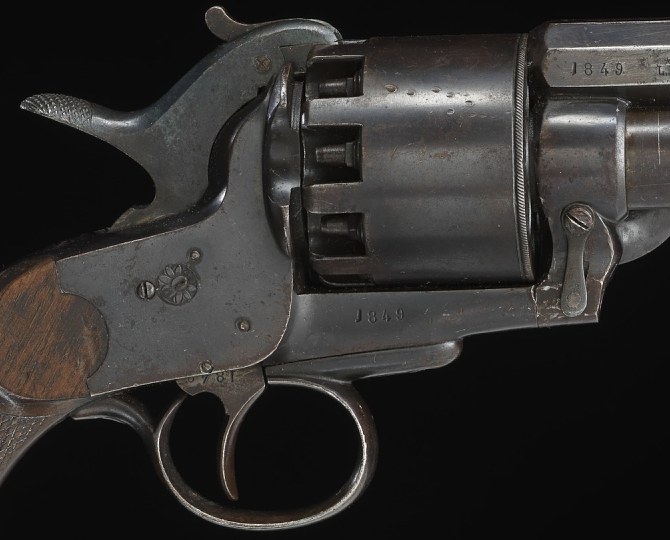
Five places are particular to the LeMat:
- The stop-pin holes. The reciprocating pin must enter clean holes; Edmunds’s reproduction stopped indexing after four or five shots because of fouling there.3 Clean them every cylinder at the range and every time the gun is stripped.
- The cylinder’s bearing on the shot barrel. The 1869 patent provided “a circular recess … around the barrel, which will serve to hold the oil or other lubricator” — LeMat himself saw the bearing as a place needing lubrication.8 Fouling blown forward from the cylinder gap gets between cylinder and shot barrel; a cylinder that becomes stiff to turn after a few shots is usually suffering here or at the pin.
- The recess round the shot-barrel nipple. It sits in the breech face below the cylinder, where cap debris collects.
- Ten nipple recesses. Edmunds noted that even after half an hour, the recesses “still needed extra attention.”3 College Hill describes the pitting on an original around “the face of the cylinder … the loading lever pivot hinge and of course in the chambers of the cylinder and the cone recesses,” which it attributes to “the erosive characteristics of the caustic percussion caps of the period.”4
- The hammer head’s pivot, which carries a spring and is exposed to cap blast.
6.6 Lubrication and storage
- Light oil only on steel after cleaning (Pietta).1
- Degrease before shooting — chambers, bore, nipples and recesses — and fire caps on the empty gun to clear oil from the nipples (Pietta).1 Oil in a nipple is a common cause of misfires.
- Grease at the chamber mouths when loaded (natural lube, water-pump grease or vegetable fat), which “aids in cleaning” (Pietta).1
- Storage: unloaded, locked, with ammunition and powder stored separately; Pietta also says to keep “black powder and percussion caps in separate locations.”1
Originals. Edmunds’s observation that relatively few of the more than a hundred originals he examined showed heavy corrosion at the hammer nose or nipple cuts suggests that most were either cleaned well or little used.3 For an original that is not going to be fired, the conservator’s rule applies: clean minimally, do not polish, keep it dry and lightly protected, and do not remove patina (Volume 7).
6.7 Inspection: what to check, and how often
Pietta publishes no inspection schedule or part-replacement intervals for the LeMat. The following checks follow from the failure record in §6.8 and are offered as practice, not as the maker’s schedule.
Table 1 — Inspection: what to check, and how often
| When | Check | Why |
|---|---|---|
| Every session, before loading | Nipples tight and unbroken; hammer head stays in each position under its spring; cylinder indexes and locks at all nine stops | Broken nipples are recorded on originals; a weak head spring lets the head move; the stop is the part that fouls |
| Every session, at the range | Lever stays clipped; shot rammer in the lever | The lever drops when the shot barrel fires (Bodinson) |
| Every cleaning | Barrel latch and its spring; lever catch spring; stop pin moves freely | The parts most often found replaced on originals (College Hill) |
| Periodically | Chamber-to-bore alignment at each stop; hand engagement; half-cock holding | Out-of-time cylinders and failed half-cock are recorded on originals |
6.8 Parts that wear and break
From College Hill Arsenal’s description of a near-complete Second Model, and from the faults recorded in auction catalogues:
Table 2 — From College Hill Arsenal's description of a near-complete Second Model, and from the faults recorded in auction catalogues
| Part | Fault recorded | Source |
|---|---|---|
| Loading-lever retaining catch spring | ”subject to breakage from normal use … almost every surviving LeMat has had this part replaced” | College Hill4 |
| Loading lever | ”regularly replaced with a modern reproduction part”; frequently missing; bent or broken when used without the shot rammer in its handle | College Hill; Edmunds43 |
| Shot-barrel rammer | ”often replaced”; frequently discarded | College Hill; Edmunds43 |
| Barrel latch pin and its spring | ”a fragile part that is often replaced”; replaced on serial 1576; a “contemporary replacement of frame to bbl locking pin” on Baby serial 5 | College Hill; Julia4136 |
| Hammer nose (movable head) | “regularly repaired or replaced”; welded repair on Baby serial 5; “somewhat battered” on serial 8948; “slightly loose” on serial 1576 | College Hill; Julia461013 |
| Front sight “barley corn" | "often broken and missing” | College Hill4 |
| Nipples | one broken on serial 1576; broken on carbine serial 49 | Julia1314 |
| Half-cock notch or sear | ”hammer will not hold at half cock” on serial 8948 | Julia10 |
| Timing | ”Timing needs adjusting” on serial 28 | Julia11 |
| Hand spring | ”appears to be broken & does not function” on carbine serial 206 | Julia12 |
| Cylinder stop | ”not very effective” on carbine serial 3157 | Julia15 |
| Grips | sanded, cracked, chipped checkering | College Hill; Julia413 |
| Bores and chambers | pitting from caustic caps and black-powder fouling | College Hill4 |
Three patterns stand out. Springs — the lever catch spring, the latch spring, the hand spring — are the commonest failures, which is normal for small flat springs in nineteenth-century arms. The hammer head takes the blast of every cap and the force of every blow and is a recurring repair. The loading lever fails for the design reason explained in Volume 4.
6.9 Timing the cylinder stop
Pietta’s manual gives the one adjustment it documents for the LeMat:
“SPECIAL TIP: The sear adjustment screw (part no. 16) located in the right side of the frame should be used to set up the cylinder locking. Screwing this screw will slow down the release of the cylinder stop stud, unscrewing it will put forward the release of the cylinder stop stud.”1
(The parts list calls part 16 the “tension spring adj. screw”; the text and the list name the same screw differently.)1
What the adjustment does is change when in the hammer’s travel the cylinder stop releases and re-engages. If the stop drops too late, the cylinder overruns the chamber before the pin catches; if too early, the pin rides on the cylinder face and may not catch at all. The symptom Garbers reports from the originals — cylinders that “either over- or under-rotate” — is the same family of fault.7
A safe check on an unloaded gun: cock slowly and watch each chamber come up to the barrel; the pin should drop into its hole as the chamber arrives in line, at all nine positions. Make small adjustments, one at a time, and recheck. Beyond that — a worn hand, a worn ratchet tooth, a burred stop pin — the work is gunsmithing.
6.10 Bench repairs, gunsmith repairs, and what not to do to an original
On a Pietta, at the bench:
- replacing nipples, grips, the lever catch spring, the takedown pin spring and other small springs from the maker’s parts;
- cleaning and lightly stoning burrs on the stop pin and its holes;
- adjusting the cylinder-stop screw as the manual describes;
- replacing a bent loading lever with a maker’s part.
On a Pietta, for a gunsmith or the maker’s service:
- re-timing a cylinder that will not index after cleaning and adjustment;
- fitting a new hammer head, hand or cylinder stop;
- any repair to the shot barrel or its seating in the frame;
- any repair to a chamber, ratchet or cylinder bore;
- a barrel that will not screw fully home or latch.
Pietta’s US company lists “Repairs” among its services, and sells spare LeMat cylinders (§6.11).16
On an original:
- do not fire it;
- do not polish, reblue or re-case-harden it; refinishing destroys value (College Hill writes of “untouched” condition as the quality buyers prize, and Rock Island describes a refinished First Model as “period refinished”);417
- do not replace original parts with reproduction parts without recording it; replaced parts — even “old replacement” springs — are described in every serious catalogue entry and affect value;4
- do not remove the shot barrel or the side plate unless a qualified conservator or gunsmith needs to;
- do not separate numbered parts.
6.11 Parts availability
- Pietta reproductions. F.lli Pietta runs an online spare-parts shop at spareparts.pietta.it, and its manual says: “ALWAYS STATE TYPE AND CALIBER OF GUN WHEN ORDERING SPARE PARTS.”1 Its US company sells a spare LeMat .44 cylinder, engraved, SKU PAFLEMAT12, at $135.00 (read 18 October 2026), and EMF lists the same cylinder at $135.00, temporarily out of stock.1618 Parts are generally not interchangeable between Pietta’s patterns — a Cavalry uses a takedown lever (9B) and an Army or Navy a takedown pin (9A).1
- Originals. There is no source of original parts other than other originals. Reproduction parts made to fit originals exist — College Hill notes that loading levers on originals are “regularly replaced with a modern reproduction part,” and the dealer Red Jackson offered LeMats with replacement levers that were “exact copies of the original.”43 Who makes them now was not established for this work. Volume 8 discusses making parts.
6.12 What could not be verified
- Any original or Confederate maintenance instruction for the LeMat.
- A detail-strip sequence for either the original or the Pietta; none is published.
- Pietta’s inspection intervals or part life; none is published.
- Current makers of reproduction parts for originals.
- Whether Pietta’s US repair service covers the LeMat specifically.
Sources
Footnotes
-
F.lli Pietta, instruction manual for muzzleloading percussion firearms, English edition, pp. 15–33 and 50–51 (LeMat parts list), https://pietta.it/wp-content/uploads/2024/05/avancarica_Ing.pdf, read 2026-10-18. ↩ ↩2 ↩3 ↩4 ↩5 ↩6 ↩7 ↩8 ↩9 ↩10 ↩11 ↩12 ↩13 ↩14 ↩15 ↩16 ↩17 ↩18 ↩19 ↩20 ↩21 ↩22 ↩23
-
Edward N. Simmons, “Dr. Jean Alexander Francoise Le Mat and the New Orleans Affair,” ASAC Bulletin 22:33–41 (1970), read 2026-10-18. ↩
-
Frederick R. Edmunds, “Some Thoughts on the Confederate LeMat Revolver,” ASAC Bulletin 100:24–28 (2009), read 2026-10-18. ↩ ↩2 ↩3 ↩4 ↩5 ↩6 ↩7 ↩8
-
College Hill Arsenal, “2nd Model LeMat — Lovely Untouched Example,” serial 1784, read 2026-10-18. ↩ ↩2 ↩3 ↩4 ↩5 ↩6 ↩7 ↩8 ↩9 ↩10 ↩11 ↩12 ↩13 ↩14 ↩15 ↩16 ↩17 ↩18
-
James D. Julia, Inc., Second Model serial 1475, read 2026-10-18. ↩
-
James D. Julia, Inc., lot 1442, Baby LeMat serial 5, read 2026-10-18. ↩ ↩2 ↩3
-
Alan Garbers, “The LeMat’s Grapeshot Revolver,” GUNS Magazine, 15 September 2021, read 2026-10-18. ↩ ↩2
-
F. A. Le Mat, US Patent 97,780, 14 December 1869, read 2026-10-18. ↩
-
Holt Bodinson, “The Awesome LeMat,” GUNS Magazine, 7 February 2014, read 2026-10-18. ↩
-
James D. Julia, Inc., London serial 8948, read 2026-10-18. ↩ ↩2 ↩3
-
James D. Julia, Inc., lot 148, First Model serial 28, read 2026-10-18. ↩ ↩2
-
James D. Julia, Inc., carbine serial 206, read 2026-10-18. ↩ ↩2
-
James D. Julia, Inc., lot 252, Second Model serial 1576, read 2026-10-18. ↩ ↩2 ↩3 ↩4
-
James D. Julia, Inc., carbine serial 49, read 2026-10-18. ↩
-
James D. Julia, Inc., lot 137, carbine serial 3157, read 2026-10-18. ↩
-
Pietta Firearms USA, product pages “LeMat .44 Caliber Cylinder” (SKU PAFLEMAT12, $135.00) and site menu (“Repairs”), https://piettafirearms.com/lemat-44-caliber-cylinder/, read 2026-10-18. ↩ ↩2
-
Rock Island Auction Company, auction 74, lot 3304, read 2026-10-18. ↩
-
EMF Company, LeMat category page, https://www.emf-company.com/store/pc/LeMat-c555.htm, read 2026-10-18. ↩
Comments (0)