Borchardt C-93 · Volume 6
Field Strip, Detail Strip, Care and Repair
The factory's own takedown, quoted word for word from the Loewe and DWM manuals with their hand-position plate, then what the period sources and the collector record say about cleaning, wear, breakage and parts
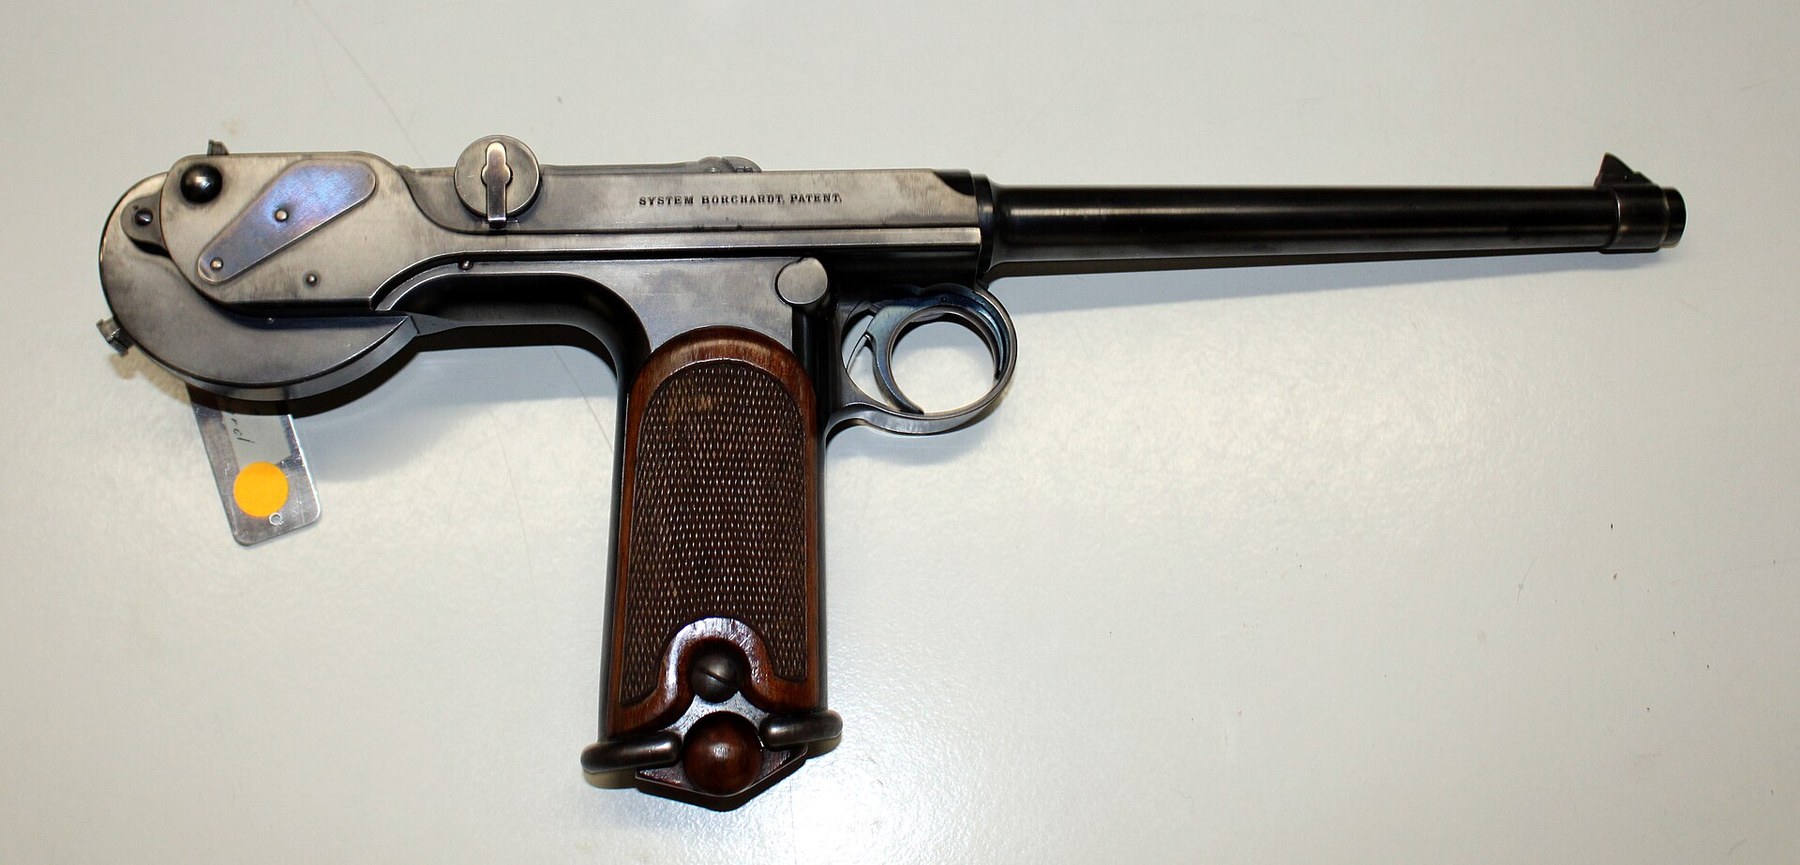
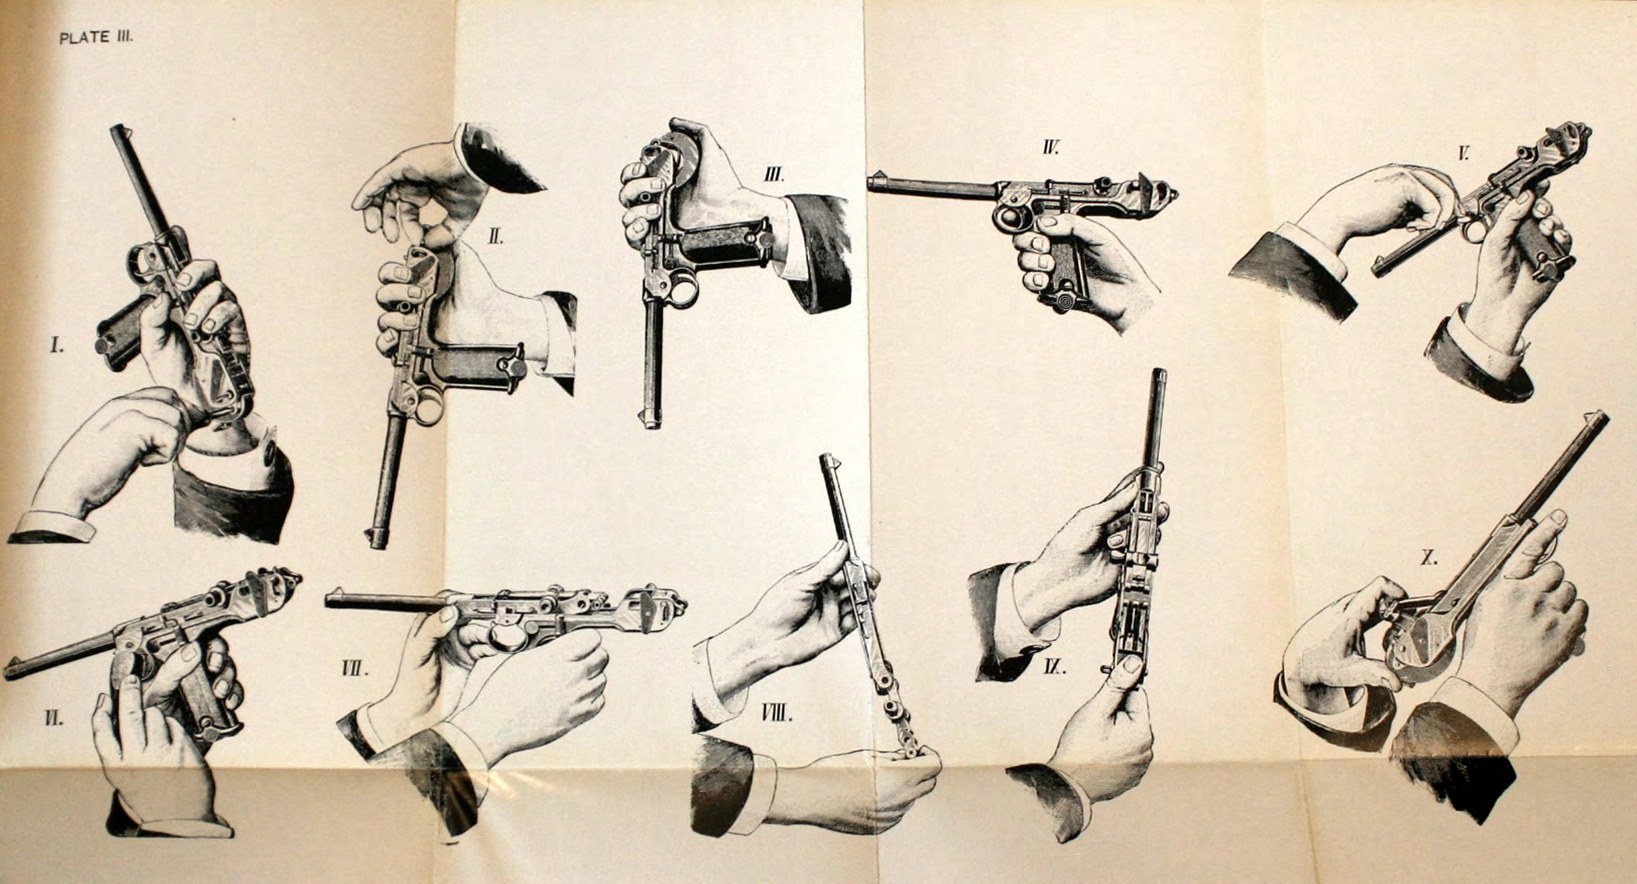
The C-93 is unusual among nineteenth-century arms in that its maker’s own disassembly instructions survive in two editions, in English, with a plate of the hand positions. This volume therefore does not reconstruct a takedown from memory or from later writers. It quotes the factory, and adds only what the factory did not say, marked as such.
The pistols that survive are rare, valuable, more than 125 years old, and largely irreplaceable in their springs. Nothing in this volume is an encouragement to strip one. It is a record of how the factory intended it to be done, for the owner who must, and for anyone who wants to understand the gun from the inside.
6.1 Where this procedure comes from
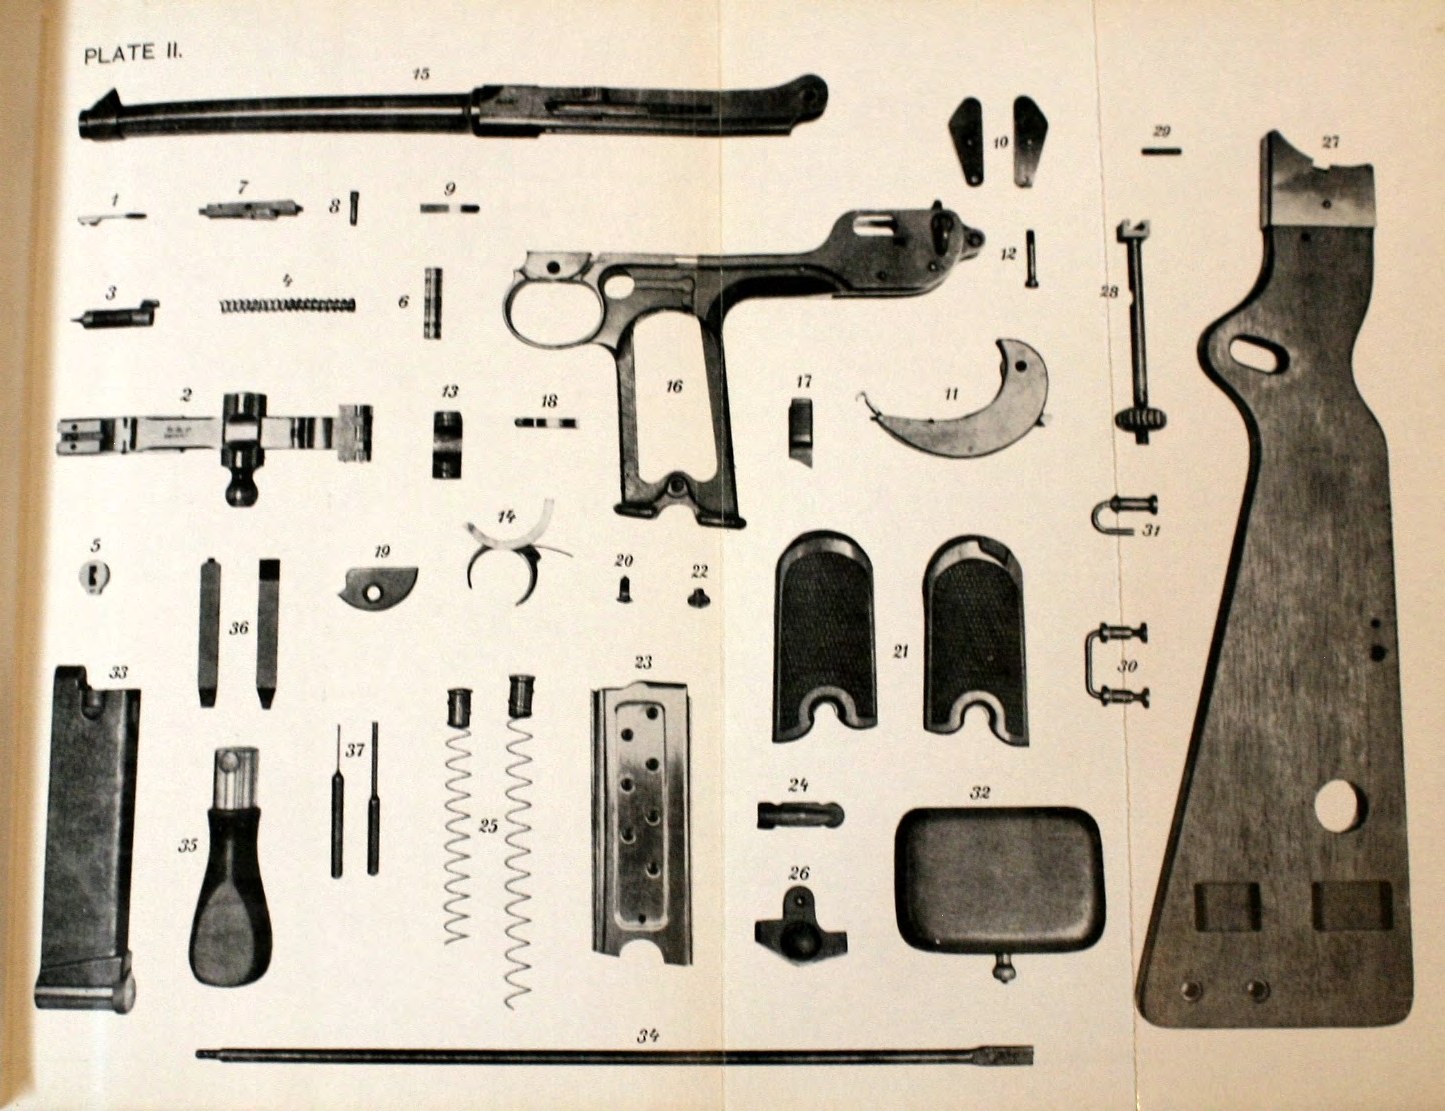
The text is from the DWM English manual, Automatic Repeating Pistol, Borchardt Patent, under the headings “Directions for the manipulation of the Borchardt Repeating Pistol” and “Taking apart for cleaning”, printed pages 9 to 13.1 The Loewe English manual, Repeating Pistol (System Borchardt), has the same sequence in nearly the same words on its printed pages 7 to 11; the differences are set out in their own section below.2 Figure numbers in the text refer to Plate III above. Part numbers in brackets in the commentary refer to the factory parts list reproduced in Volume 4.
The manuals’ English is a translation from German and is quoted as printed, including its spellings (“than” for “then”, “springbox” as one word). “The facing side”, in the factory’s usage, means the left side of the pistol as it is held; pins are driven out “from the right to the left”.
6.2 Making it safe
The Loewe manual’s warning stands at the head of everything else: “The repeating pistol will always remain loaded and cocked when not all the cartridges are fired out of the magazine and barrel-chamber, it is therefore of the utmost importance either to unload the arm or to secure it by pushing up the safety, whenever the firing is discontinued.”2
Unloading, in the factory’s words:
Removing the magazine. “Press upon the magazine holder with the thumb of the right hand and pull the magazine out of the pistol grip with the left. The magazine can also be taken out, when all parts of the mechanism are locked by the safety.”
Discharging the chamber of the barrel. “After removing the magazine open the breech slowly and the cartridge will fall through the grip into the hand.”1
The cartridge falls through the grip because the magazine well is open at the bottom once the magazine is out. With the magazine removed and the breech opened, the chamber can be checked by eye.
The first step of the takedown itself, “Pull the trigger to release the firing bolt”, releases the striker so that its spring is not under tension while the pistol is apart. A LugerForum contributor passing on advice attributed to the collector Doug Smith gives the same caution: make sure the pistol is not cocked before working on it.3
6.3 Operating it, as the factory taught
Loading the magazine. “Take the magazine into the left hand and slide the cartridges with the right under the inward bent lips, assisting with a downward pressure of the indexfinger of the left upon the previously inserted cartridge. A full charge consists of 8 cartridges.”
Inserting the magazine. “Push the magazine into the opening at the bottom of the pistolgrip until it is caught by the selfacting magazineholder. A slight blow with the left against the bottom of the magazine will help to secure it.”
Charging the chamber of the barrel. “Place the indexfinger of the left over the knob of the togglejoint, and the thumb behind the springbox at the rear end of the pistol: than draw the knob backward until the breech is fully opened (Plate III, Fig. X) This allows the top cartridge to rise in front of the breechblock. After releasing the knob, the breech closes instantly and the cartridge is pushed out of the magazine into the chamber of the barrel.”
Firing. “In firing it is only necessary to pull the trigger; the pistol remains loaded and cocked after each shot. Whenever the firing is discontinued the safety should be pushed up without fail.”1
The Loewe manual adds that the safety “is easily done by the thumb of the right”, and that the holes in the magazine “permit one at all times to ascertain the remaining number of cartridges”.2 The charging grip, left forefinger over the knob and left thumb braced behind the spring box, is drawn in Plate III, Fig. X, and engraved in Scientific American’s 1895 article (Volume 2).
6.4 Cleaning without taking it apart
The factory expected the barrel to be cleaned without disassembly, using the wooden barring block supplied with the pistol.
Cleaning the barrel. “Remove the magazine and replace it by the wooden barring block, open the breech fully and push the bar up in front of the breechblock, the latter will now rest against the bar and is held back, while the barrel is being cleaned.”1
The Loewe manual’s heading for the same passage is “Cleaning without taking apart”, and it calls the block “a wooden bar”.2 The barring block in the DWM outfit also carried the jointed cleaning rod and the oil box (Volume 5). Because the pistol has no hold-open, the block is the only way the factory provided to keep the breech open, and the barrel is cleaned from the breech end with the block in place.
6.5 Field strip: “Taking apart for cleaning”
The DWM text follows in full, broken into steps for reference; the numbering is this dive’s, the words are the factory’s.1
Step 1. Release the striker.
“Pull the trigger to release the firing bolt.”
Commentary. With the pistol unloaded and the magazine out. This removes the tension of the striker spring 44.
Step 2. Remove the spring box and unhook the closing spring.
“Loosen the springbox-screw (see Fig. I). Grasp the pistol with the right hand (see Fig. II) and press with the thumb against the spring-box, while the screw is being taken out with the left, now release the pressure slowly and the springbox will follow the thumb (see Fig. III) together with the closing pin. The latter is then unhooked from the stirrup.”
Commentary. This is the step that can do damage. The spring box 26 contains the double closing spring 31 under load, and its screw 28 is what holds it to the grip. The thumb takes the load while the screw comes out, then lets the box come back slowly. The Loewe text has “together with the closing-spring” where the DWM has “closing pin”; the Loewe wording is the clearer, since what comes away with the box is the spring, whose free end is then unhooked from the stirrup 54 on the rear toggle link.2 A LugerForum contributor who worked the sequence out from the parts diagram before seeing the manual put the same point bluntly: “The most important thing to observe is holding the mainspring housing tightly while taking out the retaining screw.”3 His “mainspring housing” is the factory’s spring box.
Step 3. Free the connecting pin.
“The right and the left coverplate are now raised sufficiently at the lower end to free them and are then turned sideways against their stops (see Fig. IV) so that the connecting pin can be pushed out towards the facing side of the pistol.”
Commentary. The cover plates 23 and 24 lie over the ends of the connecting pin 56 where it runs in its slots in the grip. They are raised at the lower end and swung against their stops, not removed, and the connecting pin then comes out to the left. The same collector warns that the plates are located by a T-shaped stud which must be held down while the plate is turned, or it can twist out of alignment; he describes repairing a pistol on which that had happened.3 With the connecting pin out, the rear toggle link is no longer joined to the receiver.
Step 4. Remove the trigger.
“Remove the trigger-cover-screw (see Fig. V) and by means of a slight push upward the trigger-cover (see Fig. VI).”
Commentary. The trigger cover 12 and its screw 13 retain the trigger 10, which runs in its curved groove on the left of the grip. The DWM text does not say in so many words that the trigger is then lifted out, but its next sentence begins “After the removal of the trigger”.
Step 5. Draw the firing system out of the grip.
“After the removal of the trigger, the barrel and forked receiver with lock-mechanism can be pulled out of the guides and casing of the grip (see Fig. VII).”
Commentary. The barrel, receiver, breechblock, toggle and sear, the “firing system” of the manual’s Plate I, slide forward out of the grip as one unit. The trigger has to come out first because its arm bears on the sear, which rides on the receiver.
Step 6. Separate the lock from the receiver.
“The lock-mechanism is then separated in the same manner from the receiver (see Fig. VIII).”
Commentary. The breechblock with its toggle slides out of the receiver’s guide grooves.
Step 7. Remove the striker and extractor.
“The firing-bolt is taken out by unscrewing the breechblock screw with the special screw-driver having a central stud.
The extractor must be pressed upward in order to be pulled out of the breech-block.”
Commentary. The breechblock screw 42 closes the rear of the block and is the seat of the striker spring. The “special screw-driver having a central stud” is one of the implements in the outfit (Volume 5). The extractor 46 is a spring piece on top of the block.
That is the field strip. The pistol is now in its main groups: grip with spring box removed, barrel and receiver, lock, striker and spring, extractor, trigger and cover, connecting pin.
6.6 Detail strip: “A further separation of parts is seldom required”
The factory’s own advice comes first: “A further separation of parts is seldom required.” The rest of the text, which follows, was written for an armourer.1
“When it becomes necessary, all pins and bushings should be driven out toward the facing-side, from the right to the left.
The sear can be taken out after removing the searscrew.
The sear spring is pushed out of its seat with a screwdriver.
The closing spring and its bushing are freed by first removing the small holding pin and then pressing out the springbox-bushing; this is done by inserting the springbox-screw and using it as driver.
The ejector and its spring fall out after the removal of the ejector pin.
The cover plates will be released when they are raised over and turned beyond their stops.
The recoil-spring at the bottom in the rear part of the receiver casing of the grip can be pulled out forward after the recoil-spring-pin has been driven out.
The cheek-pieces are removed by pressing against their inner face after the screws are withdrawn.
By pushing the safety downward after the removal of the left cheekpiece, it falls out, the safety spring is then taken out and the magazine-holder can be pushed through the grip from the left to the opposite side.
The breechblock, the toggles, the friction-rolls and the catch-lever remain assembled as much as possible, they can be separated however, by carefully driving out the connecting pins.
The magazine springs and cover can be taken out, after the bottompiece has been released by pressing out the pin.”
Commentary, by part.
- Sear (35). Held by the sear screw 36. Its yielding pin 39 and the pin’s spring 40 are “contained in the sear” and are the disconnector (Volume 4). They are the parts on which the pistol’s firing once per pull depends.
- Closing spring (31). The factory does give a procedure for freeing the spring and its bushing from the box. A collector quoting the late Ian Hogg advises: “Do not attempt to remove the recoil spring from the housing.”3 Hogg’s “recoil spring” is the factory’s closing spring. His advice is a caution, not a factory rule, and given that no maker of replacement springs is known (below), it is good advice.
- Recoil (buffer) spring (17). Pulled out forward after its pin 18 is driven out.
- Cheekpieces (4, 5). Removed by pressing on the inner face once the screws 6 are out. Pressing from inside avoids levering the chequered wood off its seat from outside.
- Safety (7), safety spring and magazine holder (9). The single spring 8 serves both. The safety comes out downward once the left cheekpiece is off; the magazine holder then pushes through the grip from left to right.
- Lock (41, 47–59). The factory’s preference is that the breechblock, toggle links, rollers and catch lever stay assembled. The DWM list sells them as one assembly (“Breechblock with togglejoint, pins, stirrup, friction rolls and catchlever”), and the Loewe list groups 41 to 59 as “one complete lock-mechanism”.12
- Magazine. The bottom piece 65 is held by a pin; with it released, the spring leaves and top plate come out.
6.7 Reassembly
“Assembling is done in the reversed order from the above.
One has to observe that the sear-screw is turned so, that the flat face on the lower cylindrical part will correspond with the groove in the receiver.
When the receiver and the assembled mechanism is being pushed into the guides of the grip, the rear end of the ejector has to be lifted, so that the breechblock can pass freely over its forward end; this is done by passing a screw driver through the springbox-opening in the grip and pressing up against the under side of the projecting rear-end of the ejector (see Fig. IX).”1
The two notes are the traps. The sear screw 36 has a flat on its lower part which must align with a groove in the receiver; turned wrong, it will not seat. And the ejector 14, pivoted in the grip and sprung upward, must be held up from behind through the opening where the spring box normally sits while the barrel-and-lock unit slides home, or the breechblock will foul it.
The spring box goes back on last. In reverse of Step 2, the closing spring’s end is hooked onto the stirrup, the box is pressed home against the spring’s load, and the screw is driven while the thumb holds it.
Attaching the buttstock. “Insert the small tenon at the back of the spring-box into the slot of the small end of stock and turn the projecting roughed nut until the pistol is firmly seated.”1
6.8 Where the Loewe and DWM instructions differ
Table 1 — Where the Loewe and DWM instructions differ
| Point | Loewe English manual | DWM English manual |
|---|---|---|
| What comes away with the spring box | ”together with the closing-spring" | "together with the closing pin” |
| Sear spring | ”separated from the receiver by withdrawing the searspring-screw. (In the latest construction the sear-spring is not held by a screw, but in a slot out of which it is pushed after the removal of the sear)" | "pushed out of its seat with a screwdriver” |
| Magazine spring | Removed through the top without removing the bottom piece: “by pressing down the rear-end of the springtop-plate sufficiently, its forward end will jump out between the sides of the magazine in front of the overhanging lips, this forward end is grasped and the spring is drawn out with a little practice by alternately moving it forward and backward” | Bottom piece released by pressing out its pin |
| Barrel cleaning block | ”a wooden bar" | "the wooden barring block” |
Sources: the two manuals.21 The sear-spring change is the only one that reflects a change to the pistol; the owner of an early pistol should expect a screw, and of a later one a slot.
6.9 Lubrication and preservation
The manuals say almost nothing about lubrication. The only period statement found is the DWM claim that the box magazine “permits the use of greased ammunition”, which implies a lubricated cartridge was expected to be usable.1 The outfits contained an oil bottle, an oil box in the barring block and, in one Loewe outfit, a grease container and a solvent bottle (Volume 5). No published lubrication schedule, lubricant specification or list of lubrication points from the factory was located.
What follows is therefore not from a C-93 source. It sets out what a correct preservation approach has to take into account, from the materials the sources describe:
- Finishes. The sources describe original rust blue on the steel, fire-blued spring steel for the cover plates, and nickel-finished magazine bodies.456 Each tolerates solvents and abrasives differently; the fire-blued plates, whose colour is a thin oxide, are the most easily damaged by abrasive cleaning.
- Wood. Cheekpieces, the stock, the cheekpiece of the stock, the magazine bases and the barring block are wood, and most are numbered to the pistol. Oil and solvent migrating into them stains and softens them.
- Leather. The holster is, in the auction trade’s words, rarer than the stock because leather “deteriorated over the years”.7 It needs to be kept away from the steel it can corrode.
- Springs. The double closing spring lives under load in its box whenever the pistol is assembled. No source consulted says whether storing the pistol assembled harms it.
For a pistol that is shot, the moving surfaces described in Volume 4 are where friction lives: the receiver’s guides in the grip, the breechblock’s ribs in the receiver, the toggle pins, the roller axle, and the curved butt piece the rollers strike. A light oil on those surfaces is the general practice for nineteenth-century mechanisms of this kind; it is offered here as general practice, not as a factory instruction.
6.10 Inspection
No factory inspection schedule was located. From the mechanism in Volume 4 and the faults reported below, the parts that deserve attention on any C-93 before it is fired are:
- The sear’s yielding pin and its spring (39, 40). If the pin does not yield and return, the pistol may fire more than once per pull. See the function check below.
- The double closing spring (31). A weakened spring may fail to close the action fully or to hold the toggle down.
- The buffer (recoil) spring (17). It takes the surplus energy at the end of every stroke.
- The catch lever and its spring (57, 59) on the right of the knee, which hold the toggle closed.
- The cover plates and their studs (23, 24). Twisted studs are a documented consequence of careless takedown.
- The extractor (46).
- The magazine’s feed lips and leaf spring (68–71).
- The bore. Early smokeless primers were commonly corrosive; that was not confirmed for the original Borchardt ammunition in the sources consulted.
6.11 What wears and what breaks
The record of failures in the sources consulted is thin, and almost all of it is anecdote.
Table 2 — What wears and what breaks
| Report | Source | Weight |
|---|---|---|
| ”Top assembly is loose, will not return fully to battery”; the pistol did not sell | James D. Julia, April 2017, unserialised prototype | An auction house’s description of one pistol |
| Cover-plate stud twisted out of alignment by turning the plate without holding the stud | LugerForum, 2007 | A collector’s repair account |
| Spring box must be held while its screw is removed | LugerForum, 2007 | A collector’s advice, consistent with the factory text |
| ”Do not attempt to remove the recoil spring from the housing” | Ian Hogg, quoted on LugerForum, 2007 | A writer’s caution |
| Non-original cover plate made of flat stock, not spring steel | LugerForum, 2011 | A collector’s identification |
| ”The spring plates have been correctly reproduced but I don’t know a source” | LugerForum, 2011 | A collector’s statement |
| A “nosedive” feed failure at round seven in a short range clip | A YouTube clip described in a National Interest article | Not read directly; unverified |
| ”In 1898, Germany adopted a total of 145 C93 pistols, but found that it jammed too often to be effective” | English Wikipedia, Luger article | Citation not traced; not adopted |
| ”The action was both frail and complicated” | Pollard, 1920 | A writer’s judgement, with a wrong mechanism description |
Sources: as listed.835910 The German Wikipedia article’s description of the C-93 as fehleranfällig, failure-prone, appears without evidence.
Two inferences, stated as inferences. First, the action is a balance of mass and springs set up for the factory cartridge, a 5.5 g bullet over 0.45 g of powder at 400 m/s by the factory’s figures (Volume 7); ammunition much weaker may fail to open the toggle fully, and much stronger may batter the rollers, the curved butt piece and the buffer spring. No source consulted documents either failure on a C-93. Second, the parts most likely to have been weakened by age are the springs, and the closing spring is the hardest of them to replace.
6.12 A function check derived from the mechanism
No factory function check was located. The checks below are derived by this dive from the mechanism described in the patent and manuals (Volume 4), for an unloaded pistol with the magazine removed, and are offered as such.
- Safety. Cock the action by drawing back the toggle knob and letting it close. Push the safety up. Per the manuals, it should lock the sear and trigger “and prevent every motion of the mechanism”, including the barrel’s rearward movement. The trigger should not release the striker.
- Trigger and sear. Safety down. Pull the trigger: the striker should release.
- Disconnector. Hold the trigger fully back. With the trigger still held, draw the toggle back and let it close, which recocks the striker and returns the barrel. The striker should not release as the parts close. Release the trigger slowly: the yielding pin should snap forward behind the trigger’s wedge with a perceptible reset. Pull again: the striker should release. If the striker follows the breechblock home with the trigger held, the disconnector is not working and the pistol must not be fired. A limitation: the yielding pin is carried by the sear on the receiver, and in firing it meets the trigger as the receiver returns through its 0.118 in of travel. Whether drawing the toggle by hand moves the receiver through that travel is not documented. If it does not, this check does not fully exercise the pin, and a pass is necessary but not sufficient. The usual gunsmith’s confirmation for any self-loader, offered here as general practice and not as a C-93 instruction, is a live test with only two rounds loaded, fired at a safe backstop, looking for the second round firing without a deliberate release and second pull of the trigger.
- Toggle closure. Let the toggle close under its own spring from full open. It should go fully home, and the catch lever on the right of the knee should engage.
- Magazine catch. Insert an empty magazine; it should be held by the catch and released by pressing the catch from the left.
A note on the third check: a pistol that fires more than one shot per pull of the trigger is, in United States law, a machine gun, whether or not that was intended. Volume 9 returns to this for anyone making a C-93-pattern pistol, but it applies equally to anyone firing an original whose yielding pin is worn.
6.13 Repair: what an owner can do, and parts
What the factory expected an owner to do is the field strip: release the striker, remove the spring box, free the connecting pin, take out the trigger, slide out the firing system, separate the lock, and take out the striker and extractor. Its own advice for everything beyond that was that it was “seldom required”.1
What needs a gunsmith is everything in the detail strip, and any work on the springs, the sear and its yielding pin, the catch lever, the cover-plate studs, or the toggle pins. A gunsmith experienced with the Luger will recognise the family resemblance; the C-93’s spring box and roller arrangement have no Luger counterpart.
Parts. No commercial source of new C-93 parts was found in the course of this research. Searches of the usual parts houses and general searches for reproduction magazines, springs and stocks returned only original pistols for sale.11 A collector stated in 2011 that the spring plates “have been correctly reproduced but I don’t know a source”.5 Reproduction stocks, holsters, cases and grips appear in the trade, without named makers (Volume 5); one reproduction stock was offered new in October 2026 at $1,995.12 A Japanese model-gun maker is reported to have made a non-firing C-93 whose parts interchange with an original’s (Volume 9), which, if correct, would make it a source of dimensions, not of parts.
The practical consequence is that a broken spring, sear pin or extractor on an original C-93 has to be made. The factory parts list in Volume 4 is the inventory; Volume 9’s from-scratch path is, in effect, the repair manual for any single part.
6.14 What could not be established
- A factory lubrication schedule or lubricant specification.
- A factory inspection schedule or function check; the check above is derived.
- Any current maker of C-93 parts, including the reproduced spring plates mentioned in 2011.
- Whether storage with the closing spring under load harms it.
- Documented failures of the action beyond individual auction descriptions and anecdote.
- Whether the original ammunition was corrosive-primed.
References
Footnotes
-
Deutsche Waffen- und Munitionsfabriken, Automatic Repeating Pistol, Borchardt Patent, English edition (Berlin S.W., n.d.), “Directions for the manipulation of the Borchardt Repeating Pistol” and “Taking apart for cleaning”, printed pp. 9–13, Plates II and III. Scan circulated by Forgotten Weapons, https://www.forgottenweapons.com/wp-content/uploads/2013/10/Borchardt-C93-Manual-English.pdf; page images at https://landofborchardt.com/C93manual.html, consulted 2026-10-18. Transcribed for this dive. ↩ ↩2 ↩3 ↩4 ↩5 ↩6 ↩7 ↩8 ↩9 ↩10 ↩11 ↩12
-
Ludw. Loewe & Co., Repeating Pistol (System Borchardt), English edition, printed pp. 7–13. Page images at https://landofborchardt.com/LoeweManual.html, consulted 2026-10-18. ↩ ↩2 ↩3 ↩4 ↩5 ↩6 ↩7
-
“Borchardt Disassembly Instructions”, LugerForum, Early Lugers 1900–1906 sub-forum, thread begun 28 May 2007, posts by Ron Wood (29 May 2007), Vlim (29 May 2007, quoting Ian Hogg) and Big Norm (31 May 2007, citing Doug Smith), https://forum.lugerforum.com/forum/showthread.php?p=125897, consulted 2026-10-18. Forum posts; Ron Wood’s advice paraphrased except where quoted. ↩ ↩2 ↩3 ↩4 ↩5
-
Collectors Firearms, serial 1910, https://collectorsfirearms.com/product/borchardt-c93-semi-auto-pistol-7-65x25mm-ah9044/, consulted 2026-10-18. ↩
-
Ron Wood, “Borchardt - Luger Predecessor”, LugerForum, 5 April 2011, https://forum.lugerforum.com/forum/showthread.php?p=192957, consulted 2026-10-18. Forum post. ↩ ↩2 ↩3
-
Rock Island Auction Company, lot 75-2694, https://www.rockislandauction.com/detail/75/2694/loewe-1893-borchardt-pistol-with-matching-stock, consulted 2026-10-18. ↩
-
Rock Island Auction Company, lot 60-1360, 8 December 2013, consulted 2026-10-18. ↩
-
James D. Julia, Firearms, April 2017, lot 1518, https://jamesdjulia.com/?p=548182, consulted 2026-10-18. ↩
-
“Luger pistol”, English Wikipedia, https://en.wikipedia.org/wiki/Luger_pistol, consulted 2026-10-18. ↩
-
H. B. C. Pollard, Automatic Pistols (London, 1920), pp. 9–10. Internet Archive
automaticpistolspollard1920, consulted 2026-10-18. ↩ -
Searches of Gun Parts Corporation and general web searches for reproduction C-93 magazines, springs, stocks and parts, 2026-10-18. Absence of a result is not proof that no maker exists. ↩
-
Handguns of the World, “Borchardt 1893 Stock”, SKU B4271, $1,995, “1 in stock”, https://handgunsoftheworld.com/product/borchardt-1893-stock/, consulted 2026-10-18. ↩
Comments (0)