MG 42 · Volume 6
Field Strip, Detail Strip, Maintenance and Stoppages
Which German manuals exist and why this volume cannot quote them, the 1943 US stripping sequence for the MG 42, the maker's sequence for the MG 3, cleaning and lubrication, the kit the gun carried, immediate action, and what wears
6.1 Read this first
The MG 42 is a machine gun. In the United States one may be owned only as a registered, transferable National Firearms Act weapon or held by a licensed dealer or manufacturer (Volume 8). This volume describes how the gun is taken apart for cleaning and how it is kept working, from published manuals, for owners of registered guns, collectors of inert display guns and readers of history. It is not a guide to altering any firearm, and it gives no information about converting, reactivating or building one.
Every sequence below is quoted or closely paraphrased from a named manual. Where a manual is silent, this volume says so instead of filling the gap.
6.2 The manuals: what exists and what was read
The German army issued several documents for the MG 42. None could be read for this dive, because no copy was found in a public scan; each is listed here so a reader can look for it:
Table 1 — The German army issued several documents for the MG 42. None could be read for this dive, because no copy was found in a public scan; each is listed here so a reader can look for it
| Document | Title as listed | Date | Where it was found listed |
|---|---|---|---|
| D 166/1 | Maschinengewehr 42 | 1943 (a reprint seller dates it 2 September 1943) | Artillery Arsenal bibliography; germanmanuals.com12 |
| Merkblatt 41/18 | Anleitung für die Handhabung und Bedienung des M.G. 42 als le. und schw. M.G. | 1943 | Artillery Arsenal; a catalogue record in the French defence ministry’s digital library1 |
| H.Dv. 241 | Ausbildungsvorschrift für das M.G. 42 als le. u. s. M.G. (Waffenausbildung) (Entwurf) | reprint dated 15 September 1944 | Bundesarchiv RHD 4/1117, via the Deutsche Digitale Bibliothek; germanmanuals.com32 |
| H.Dv. 181/7 | Waffentechnisches Handbuch für M.G. 42 (the armourer’s handbook) | 1944 | germanmanuals.com; a user upload on Scribd, not accessible2 |
| D 124/2 | the Lafette manual for the MG 34 and MG 42 | 5 March 1943 | germanmanuals.com2 |
| Merkblatt 25b/34 | Richtlinien für die Überprüfung von Waffen und Ausbildungsstand am MG 34 und 42 (inspection) | 1944 | Artillery Arsenal1 |
A note on “D 124”: the number is sometimes cited as the MG 42’s own manual. On the listings found for this dive, D 124/2 is the tripod (Lafette) manual covering both guns, not the gun’s description; the MG 42’s own handling manual is D 166/1 and its training regulation H.Dv. 241.
What this volume rests on instead:
- The US War Department’s German Infantry Weapons (May 1943), which gives the MG 42’s stripping order, maintenance notes, unloading and immediate action as US intelligence understood German practice from captured guns.4
- George M. Chinn, The Machine Gun, volume I (1951), for unloading and bolt removal.5
- Rheinmetall’s Machine Gun MG3 Operator’s Manual (1992), the maker’s English manual for the MG 3, whose bolt, feed, barrel change and butt are the MG 42’s re-chambered for 7.62×51 mm. Its sequences are given as the MG 3’s; where the MG 42 differs (the 1943 handbook’s buffer-housing turn, for instance) both are given.6
6.3 Unloading and clearing
Rheinmetall’s first rule: “Every MG must be regarded as loaded until the gunner has convinced himself that no round has been left in the chamber of the barrel.” Its check: “Cock bolt and push safety catch into ‘S’ position. Open cover, and turn feed tray upwards. Ensure that barrel is clear.”6 And: “If round fails to ignite in barrel which is fired hot, only cock bolt after time allowed for cook-off has elapsed (approx. 5 minutes).”6
The 1943 handbook’s MG 42 sequence: “cock the gun by pulling the operating handle to the rear, and set the safety lever to the ‘safe’ position. Raise the feed cover by pushing forward the feed-cover catch (at the rear end of the feed cover). Remove the belt from the gun. After checking to be sure that the chamber is empty, close the feed cover, move the safety lever to the ‘fire’ position, and ease the bolt forward by holding the operating handle and squeezing the trigger.” With the 75-round drum, the drum comes off before the cover is opened.4
Chinn calls the MG 42 “one of the easiest known machine guns to unload”: the selector to Safe, the cover raised “as far as it will go”, and the remainder of the belt “lifted out”.5
The MG 3 manual adds one prohibition worth keeping for any gun of the family: “Releasing the bolt with no barrel in the weapon is prohibited.”6
6.4 Field strip: the 1943 sequence for the MG 42
The May 1943 handbook gives the MG 42’s stripping in this order.4
- Bipod. “Compress the spring catch on the bipod. Rotate the bipod forward, and remove it from the gun.”
- Feed cover and feed block. “Release the feed-cover catch (located at the back end of the feed cover) by pushing it forward. Raise the feed cover to a 45-degree angle (halfway). The feed-cover hinge pin may now be removed, and the feed-cover assembly removed from the gun. To remove the feed mechanism, push back the spring-loaded cover over the pawls to the rear. At the same time, compress the spring clip on the feed arm and lift out the feed mechanism.”
- Shoulder stock. “Press the catch located on the underside of the plastic shoulder stock. Give the shoulder stock a quarter turn (in either direction) and then remove.”
- Buffer housing and return spring. “In removing the buffer housing, the large recoil, or return, spring will be released. Therefore, care should be taken to maintain pressure on the buffer housing while removing it. Press the buffer-housing catch, which is located beneath the rear end of the receiver just back of the pistol grip, turn the buffer housing clockwise 180 degrees (one-half turn), and ease the buffer housing away from the receiver, releasing gradually the tension on the return (recoil) spring.”
- Bolt. “First, press the trigger; then strike the operating handle toward the rear with the palm of the hand, thus bringing the bolt to the rear. Withdraw the bolt from the open rear end of the receiver, if necessary, by pushing with the finger.”
- Barrel. As for the barrel change (Volume 4): cock, safe, push the barrel-change lever forward and swing the rear of the barrel out.
Chinn’s shorter description agrees on the principle: “The bolt is removed first by letting it go home, then by twisting the butt stock to detach the latter. The driving spring and bolt then slide readily out the rear.”5
6.5 Field and detail strip: the maker’s sequence for the MG 3
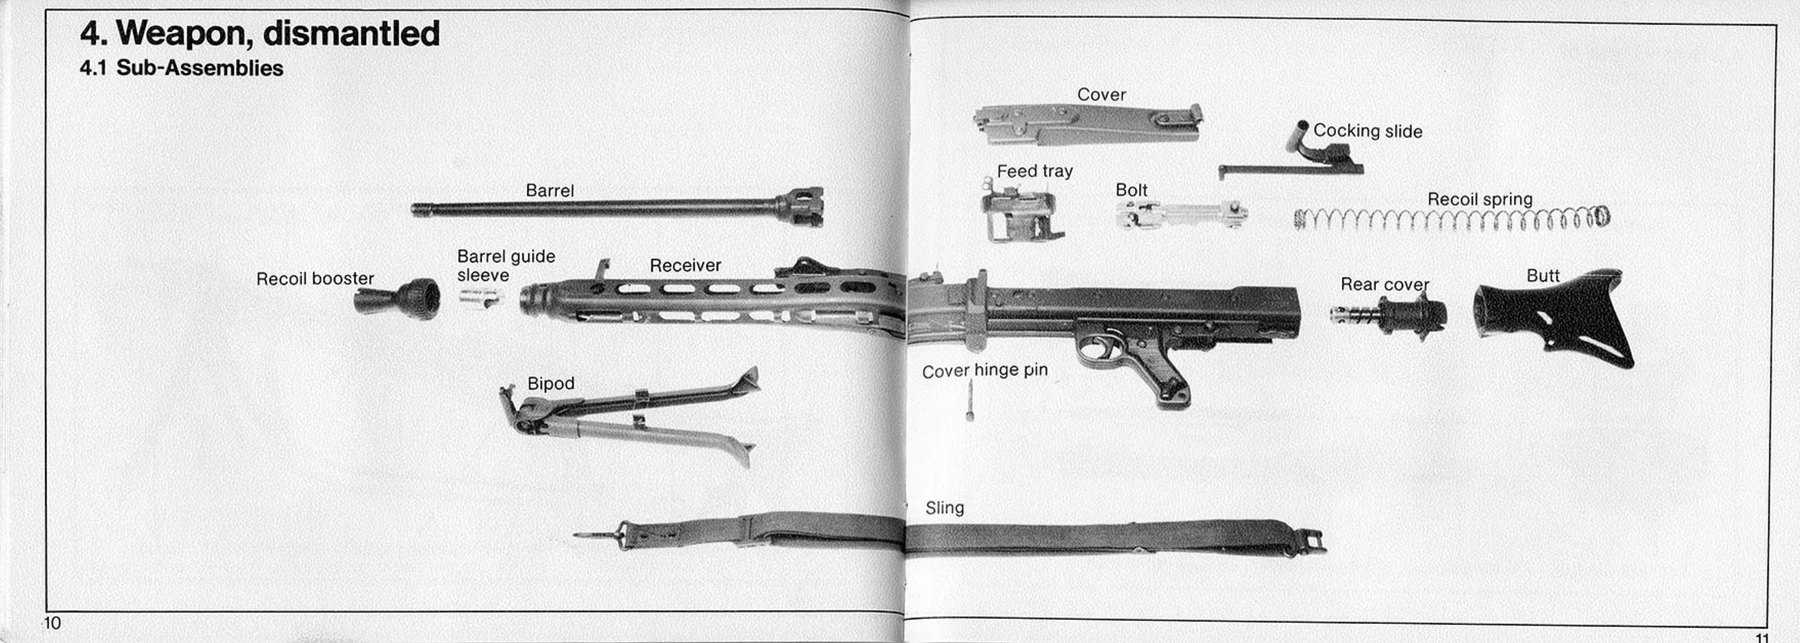
Rheinmetall’s manual dismantles the MG 3 into sub-assemblies in this order (section 6), with a picture for each step.6
- Bipod and sling.
- Feed mechanism. “Actuate cover catch. Open cover. Turn feed tray upwards, and pull out cover hinge pin.”
- Butt with rear cover and recoil spring. “Depress rear cover catch. Rotate butt together with rear cover through 90° anti-clockwise. Remove butt together with rear cover and recoil spring (ATTENTION — Spring is still compressed!)”
- Bolt. “Retract cocking slide, and catch bolt.”
- Cocking slide. “Swing cocking handle forward until catch disengages. Then pull back cocking slide, tilt downwards, and remove.”
- Barrel. “Unlatch barrel change flap. Open barrel change flap. Remove barrel.”
- Recoil booster. “Lift up catch, and unscrew recoil booster.”
- Barrel guide sleeve. “Lift up catch. Insert finger into barrel guide sleeve and, along large opening in housing, slide back as far as to barrel change flap, and remove barrel guide sleeve.”
Then the detail strip of the sub-assemblies:
- Cover. “Depress retaining spring of transport lever, lift up transport lever, and remove. Lift out connecting lever together with belt feed slide. Depress pressure plate, and push in direction of arrow.”
- Butt with rear cover. “Depress thrust bolt, and rotate rear cover through 45° either clockwise or anti-clockwise. Take off rear cover.”
- Bolt. “Pull locking rolls outwards. Rotate bolt housing anti-clockwise through 90° and remove. Remove ejector rod and bolt catch. Remove from bolt head: firing pin holder, firing pin, and ejector.”
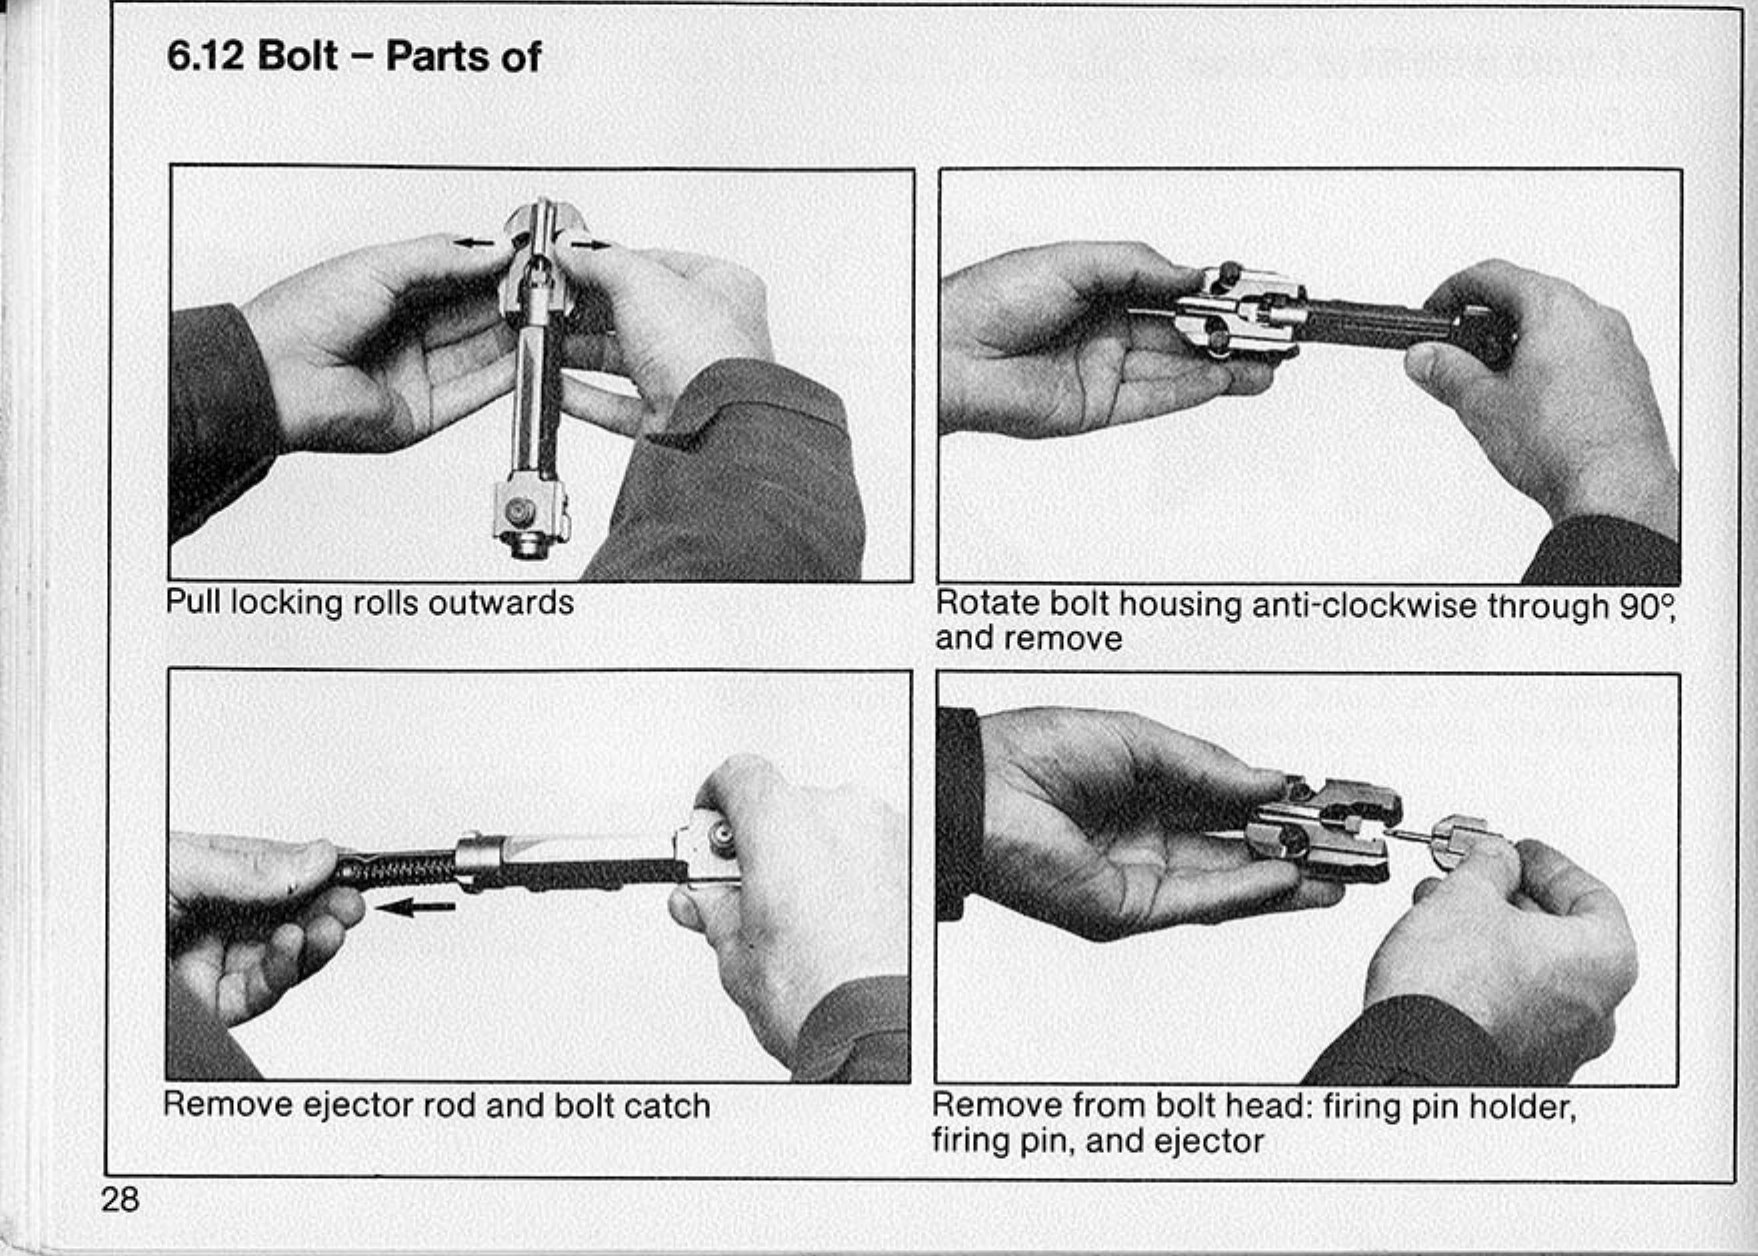
The two sequences differ in a detail an owner will meet. The 1943 US handbook turns the MG 42’s buffer housing clockwise 180°; Rheinmetall turns the MG 3’s butt with rear cover anti-clockwise 90°. They are different guns and different descriptions, and an owner of an MG 42 should follow the 1943 description or, better, a German wartime manual if one can be found, not the MG 3’s.
6.6 Reassembly checks
The 1943 handbook: “Assembly is carried out in the reverse order of that used in the stripping process. The following steps should be checked when putting the bolt assembly back into the receiver. Insert the bolt head, being sure that the heel of the firing pin (which is on the bolt housing) is on top. The feed-arm operating stud should also be upward, and the extractor should be on the bottom side of the bolt.”4
Rheinmetall’s bolt reassembly (section 7.1), quoted in full because it is the step most easily got wrong: “Place bolt catch in bolt housing. Insert firing pin into firing pin holder, and fit in bolt head. The flat side of the firing pin holder must point upwards. Refit ejector. Push locking rolls outwards, and keep in that position. Lay ejector rod onto firing pin holder, and prevent from shifting. Push bolt housing over ejector rod until it bottoms. Then rotate bolt housing clockwise through 90°. Force locking rolls inwards.”6 And to put the bolt back in the gun: “Force locking rolls inwards. Insert bolt, and push forward, at the same time actuating the trigger.”6 The cover’s hinge pin goes in “from left side, with flat side of knurled collar pointing downwards”.6
The common thread with the G3 family, whose regulation warns against forcing a bolt home with its rollers out (see PSG1 Volume 4), is that the rollers must be in the bolt head when the bolt goes into the receiver.
6.7 The kit that went with the gun
The MG 3 manual lists the gun’s accessories in three containers:6
- Carrying bag: a spare bolt, an asbestos cloth (for handling hot barrels), the combination tool, an oil can and a muzzle cap.
- Container with spare barrel.
- Cleaning kit: container, cleaning wick, dusting brush, cleaning chain, oiling brush, oil cylinder and cleaning brush.
A spare bolt in the gunner’s bag is a telling detail: the manual’s own remedy for a “defective bolt” is “replace bolt”, and section 5.4 describes changing the bolt in the field.6
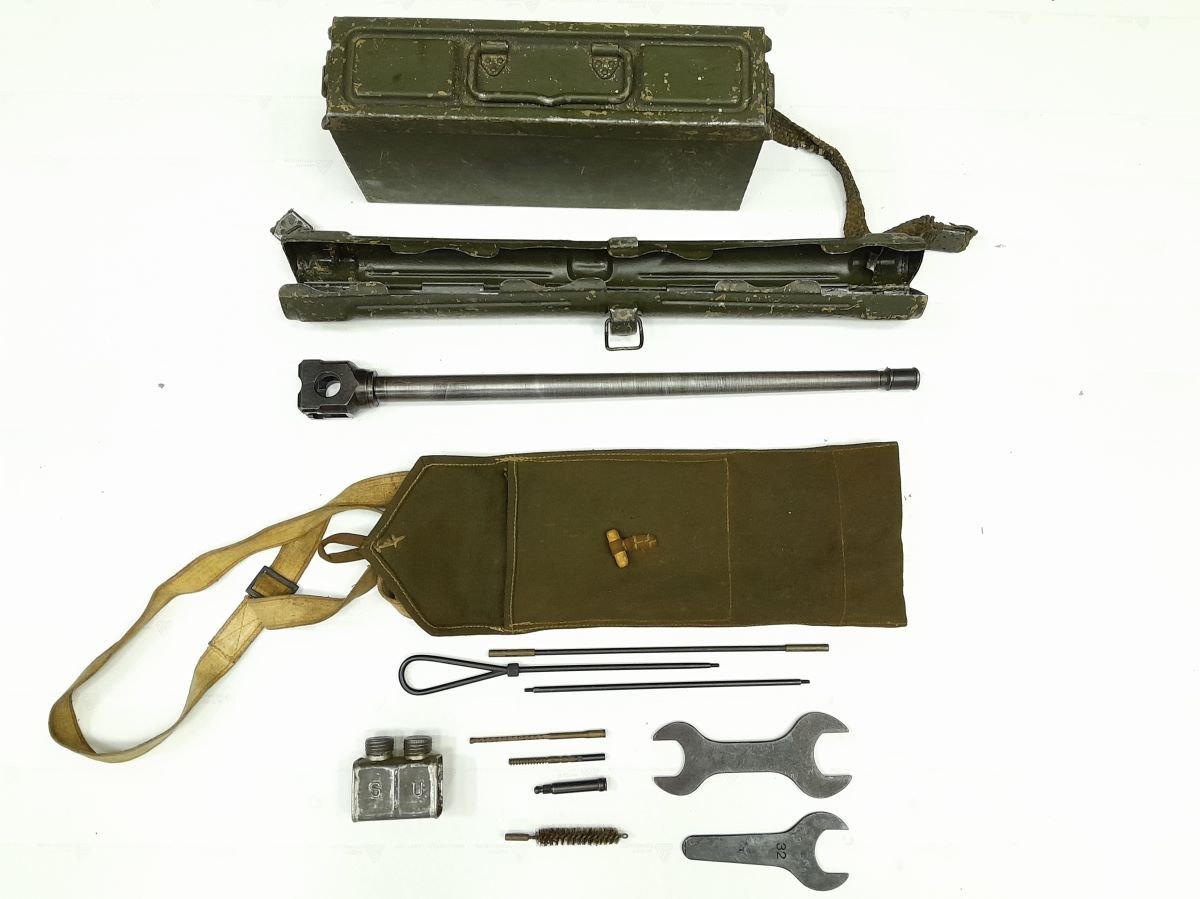
The wartime equivalent can be read from a surviving set. Romania’s National Heritage Institute records an MG 42 (code cra, 1944–45) with its tripod, a spare barrel in a khaki steel cylindrical case, a German ammunition box with two 50-round belts, a canvas bag with strap, a three-section cleaning rod, a two-compartment oil can, a hair brush, a rag head and a tow head, a 32 mm spanner, a double 32/27 mm spanner, and a broken-case extractor.7 The 1943 US handbook mentions the asbestos hand pad “furnished with maintenance kit”, and says the gun’s accessories, “not all … known”, were “probably similar to those of the M.G. 34”.4
6.8 Cleaning and lubrication
The 1943 handbook, for the MG 42: “Like the M.G. 34, the M.G. 42 is sensitive to dust, dirt, and sand. To function well, this weapon must be kept cleaned and oiled at all times. The ejection port should be kept closed whenever the gun is not actually firing … The tracks on which the bolt slides should be oiled carefully. The bolt head and bolt parts should be oiled lightly. Otherwise, normal care, such as given U. S. automatic weapons, will suffice.”4
Rheinmetall, for the MG 3:6
- “Proper maintenance and cleaning are prerequisites for proper functioning.”
- “Weapon must not be heavily bumped onto ground.” “Close dust cover when transporting weapon.” “Do not lean weapon against walls in order to avoid entry of foreign particles into barrel.”
- “Make it a rule to clean the weapon after each use.”
- “Cleaning brush (with brass wire bristles) to be used for weapon cleaning oil only. Oil brush (with hair bristles) to be used for weapon lubricating oil only.”
- “Clean barrel each time before firing. Clean and oil barrel after each firing.”
- “After cleaning and re-assembly check weapon for free movement and proper functioning of all parts.”
Neither source names a lubricant specification, a lubrication chart, or a cleaning interval in rounds. The Romanian record’s “two-compartment oil can” and the MG 3 manual’s two brushes, one for cleaning oil and one for lubricating oil, point to the same practice: a cleaning oil and a separate lubricating oil, kept apart.76 Which oils, and to what German or NATO specification, the sources read do not say, and this volume does not suggest modern equivalents.
6.9 Belts
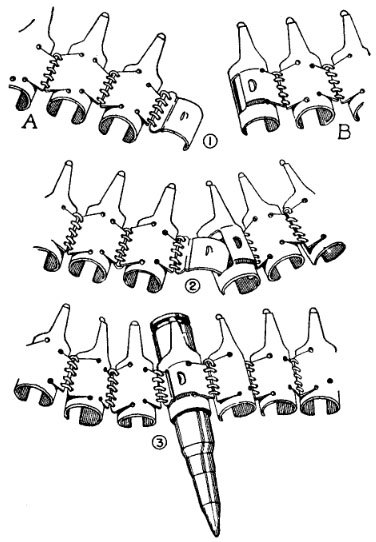
The MG 42 used the MG 34’s belts: non-disintegrating steel links, 50 rounds to a section, joinable into longer belts.84 The US Army illustrated how the sections join, the last link of one belt taking the starting tab of the next and locked by a cartridge.
The 1943 handbook says to insert the belt “with the open end of the links down”; the MG 3 manual’s trouble table, for its own belts, says “Load ammunition belt with belt links upwards”.46 The 1943 handbook also warns that some German 7.92 mm ammunition is “expressly forbidden for use in the machine gun”, giving the example of the Patrone 318 for the PzB 39 anti-tank rifle, which “will not fit in the chamber”.4
6.10 Stoppages and immediate action
The 1943 handbook (MG 42). “If the gun fails to fire, pull the operating handle to the rear and return it to its forward position. Then pull the trigger. About the only types of stoppage that will occur in the M.G. 42 are caused as follows: (1) by empty cases jamming in the catch between the bolt and the operating handle, or (2) by empty cases jamming between the bolt head and the barrel extension. To clear the first type of stoppage, the bolt must be drawn back a little by pulling back on the operating handle, holding the bolt level with the feed-arm roller, and moving the operating handle back and forth. To clear the second type of stoppage, merely hold the bolt back and shake the gun several times. This stoppage cannot be cleared by pushing in the end of the bolt or by using a stick or other object to remove the jammed case.”4
Rheinmetall (MG 3), section 9.6
Table 2 — Stoppages and immediate action
| Trouble | Cause | Remedy |
|---|---|---|
| Weapon fails to fire | Trigger on “Safe” | Push safety catch into “F” position |
| Ammunition belt incorrectly loaded | Load ammunition belt with belt links upwards | |
| Defective ammunition | Reload, and actuate trigger again | |
| Defective bolt | Replace bolt | |
| Non-intended interruption of fire | Defective ammunition | Reload, and actuate trigger again |
| Belt jammed | Eliminate obstruction | |
| Defective bolt | Replace bolt | |
| Cartridge case ejection trouble | Remove jammed cartridge case, reload, and actuate trigger again | |
| Flange on cartridge case base broken away, or cartridge case torn into pieces | Change barrel. Remove cartridge case fragment, using combination tool |
The combination tool’s three uses, per the same manual, are removal of cartridge cases, removal of case fragments, and replacing the extractor.6 The wartime kit’s “broken-case extractor” serves the second.7
The hot-barrel rule bears repeating. With a round that has not fired in a hot barrel, the MG 3 manual says to wait about five minutes before cocking, because the round may cook off.6 The 1943 handbook says nothing on the point.
6.11 Repair, wear parts and parts supply
The German armourer’s handbook (H.Dv. 181/7) is described by its reseller as the repair and inspection guide for the armourer, including “materials and heat treatment of all parts”, but it could not be read.2 No wartime or maker’s list of wear parts, replacement intervals or gauge dimensions was found. What the operator’s manuals show is the division of labour:
- The gunner changes barrels, changes the whole bolt for the spare, clears cases and fragments, and with the combination tool replaces the extractor.6
- Everything beyond that, including bolt components other than those the operator’s detail strip covers, headspace, barrel condemnation, the trigger mechanism and any welding or straightening of the stamped receiver and jacket, is an armourer’s job. The manuals read assign none of it to the gunner.
Barrel life. No figure was found for the MG 42. The barrel-change schedules (Volume 4) concern heat in a single engagement, not wear.
Parts. For owners of registered guns and collectors of display guns in the United States, MG 42 parts circulate from wartime stocks and from the long post-war service of the Yugoslav M53; dealer descriptions note Yugoslav markings mixed with German ones on assembled guns.9 Parts for the 7.62 mm MG 1 and MG 3 family are a different supply and, in the barrel, bolt and feed, a different calibre. Whether a given part fits a given gun is for an armourer to judge with the gun in hand; no published interchange list was found.
6.12 What could not be established
- The text of any German MG 42 manual (D 166/1, Merkblatt 41/18, H.Dv. 241, H.Dv. 181/7).
- A lubrication specification, inspection schedule, wear-part list, gauge set or barrel-life figure for the MG 42.
- The MG 42’s own field-strip turn direction for the buffer housing other than from the 1943 US translation (clockwise, half a turn).
- Accessory lists from a German source; the wartime kit is described from a surviving Romanian set and the 1943 US handbook.
References
Footnotes
-
“Vorschriften zu schweren Infanteriewaffen”, The Artillery Arsenal (bibliography), https://theartilleryarsenal.blogspot.com/p/vorschriften-infanteriewaffen.html , consulted 2026-10-19. ↩ ↩2 ↩3
-
German Manuals (reprint seller), catalogue, https://www.germanmanuals.com/manuals.html , consulted 2026-10-19. ↩ ↩2 ↩3 ↩4 ↩5
-
Deutsche Digitale Bibliothek, “H.Dv. 241 Ausbildungsvorschrift für das MG. 42 als le. u. s.MG. (Waffenausbildung) (Entwurf)”, Bundesarchiv RHD 4/1117, https://www.deutsche-digitale-bibliothek.de/item/IX6GM4HR4U22PK77R4QNRXGXC46XBD4R , consulted 2026-10-19. ↩
-
US War Department, Military Intelligence Service, German Infantry Weapons, Special Series No. 14 (25 May 1943), section 13, “M.G. 42”, subsections d (“How to Operate”) and f (“Maintenance”), pp. 88–94. Internet Archive, https://archive.org/details/German_Infantry_Weapons_1943_MIS_Special_Series_No._14 , consulted 2026-10-19. ↩ ↩2 ↩3 ↩4 ↩5 ↩6 ↩7 ↩8 ↩9 ↩10
-
George M. Chinn, The Machine Gun, vol. I (Washington: Bureau of Ordnance, Department of the Navy, 1951), chapter 33, pp. 486–487. Internet Archive, https://archive.org/details/TheMachineGunVolume1ByGeorgeMChinn , consulted 2026-10-19. ↩ ↩2 ↩3
-
Rheinmetall International S.A. (Brussels), Machine Gun MG3 Operator’s Manual, Cal. 7.62 mm x 51 (printed in the Federal Republic of Germany, 1992), sections 1, 5.2–5.4, 6, 7, 8, 9, 10 and 11, pp. 6–45. Internet Archive, https://archive.org/details/machine-gun-mg-3-operators-manual-1992 , consulted 2026-10-19. ↩ ↩2 ↩3 ↩4 ↩5 ↩6 ↩7 ↩8 ↩9 ↩10 ↩11 ↩12 ↩13 ↩14 ↩15 ↩16 ↩17
-
Institutul Național al Patrimoniului (Romania), classified movable heritage record “Mitralieră 7,92 mm MG 42 cu afet”, CIMEC, https://clasate.cimec.ro/Detaliu.asp?tit=Mitraliera—Mitraliera-7-92-MM-MG-42-cu-afet&k=16782ddd28f34c6cbc0fdc33357fa7b1 , as reproduced in the descriptions of the institute’s photographs on Wikimedia Commons (“Mitralieră MG 42 cu afet” 01–26, 31 October 2022), consulted 2026-10-20. ↩ ↩2 ↩3
-
US War Department, Tactical and Technical Trends No. 20 (11 March 1943), item 16, p. 28. Internet Archive, https://archive.org/details/TacticalAndTechnicalTrendsNos1-20 , consulted 2026-10-19. ↩
-
International Military Antiques, item ONAC23027, https://www.ima-usa.com/products/original-german-wwii-mg-42-display-machine-gun-marked-bpr-for-johannes-grossfuss-metalworking , consulted 2026-10-20. ↩
Comments (0)