Arcade Light Guns · Volume 3
Positional Guns — Potentiometers on a Mount, 1988 to 2014
Taito's Operation Thunderbolt and Space Gun, SNK's Beast Busters, Sega's Line of Fire and Alien3, Midway's Terminator 2 and Revolution X, and the fixed-gun cabinets still sold for flat panels: the gears, the 5 kΩ pots, and the three-point calibration that makes them work
A positional gun never looks at the screen. It is fixed to the cabinet on a mount that turns on two axes, each axis turns a potentiometer through gears, and the game reads the two voltages and converts them to a screen position with a calibration taken by the operator. Nothing about the display matters: not the scan, not the brightness, not the room lights, not whether the picture comes from a tube, a projector or a flat panel. That is why makers chose it for large-screen and projection cabinets in 1988, and why it is still used on LCD cabinets today.
The aiming theory, including what an angle sensor cannot know about the player’s eye, is the planned Positional and Inertial dive’s. This volume is the hardware the manuals show.
3.1 How a Positional Gun Works
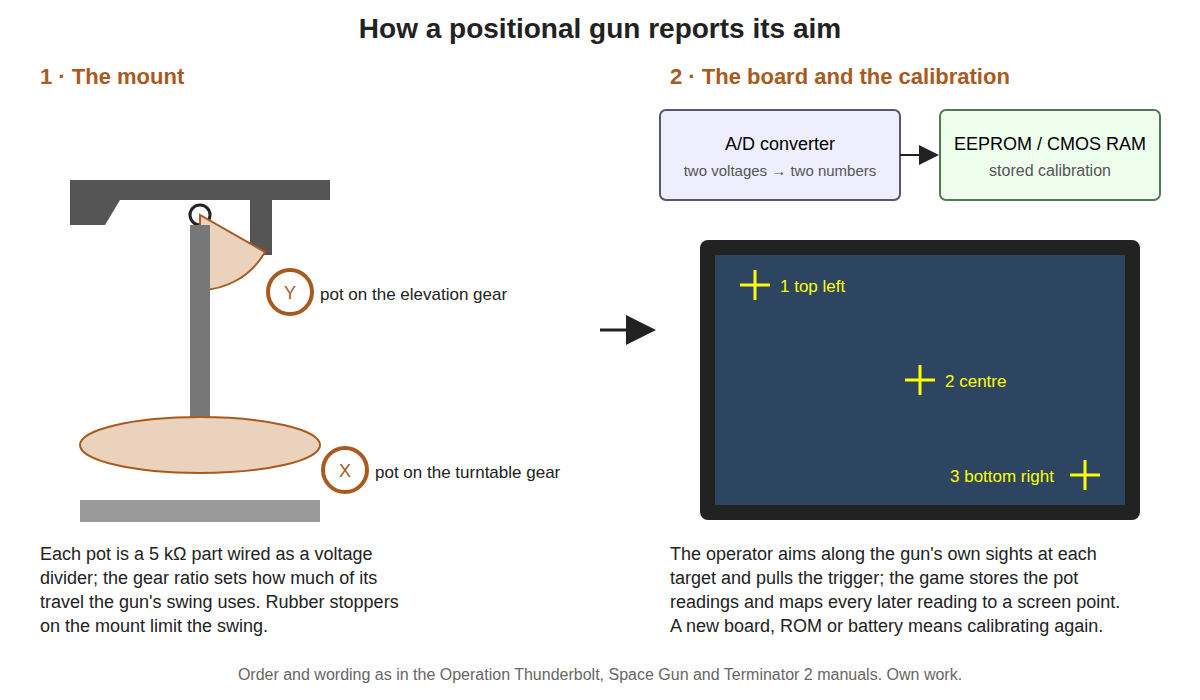
The parts are the same in every manual read for this dive:
Table 1 — The parts are the same in every manual read for this dive
| Element | What the manuals show |
|---|---|
| Sensor | A 5 kΩ potentiometer per axis: “two 5k-ohm potentiometers for the X-Y position” (Operation Thunderbolt);1 “B-5K” (Space Gun);2 “Potentiometer, 5K, Long Life” (Terminator 2);3 “Potentiometer, B - 5k Ω Lin” (Alien3);4 “5k ohm pot” (Aliens Armageddon)5 |
| Drive | Gears from the mount to the pot: gear A, gear B and a gear bracket (Space Gun, Operation Thunderbolt); “Gear Drive” and “Gear Pinion” (Terminator 2); “VOLUME GEAR” and “ADJUSTMENT GEAR” (Line of Fire); a “Gear segment with hub” and “Gear 32DP 16T” (Aliens Armageddon) |
| Conversion | An A/D converter on the game board; MAME’s notes name an ADC0808 on Operation Thunderbolt1 |
| Calibration | Three targets shot with the gun’s own sights, stored in EEPROM or battery-backed RAM |
“B” in a Japanese pot marking denotes a linear taper, which Sega’s “Lin” spells out.4 A linear pot matters here: the game’s three-point calibration assumes that equal angles give equal changes in voltage between the points it measured.
3.2 Taito: Operation Thunderbolt and Space Gun
Taito followed the optical Operation Wolf with two positional cabinets. MAME’s notes on Operation Thunderbolt (1988) are blunt — “The gun is NOT a light gun, it uses two 5k-ohm potentiometers for the X-Y position” — and its edge-connector pinout carries “1 P Gun X Position” and “1 P Gun Y Position” alongside “1 P Gun Solenoid”. The same notes record that “Operation Thunderbolt operates on hardware very similar to the Taito Z system, in particular the game Spacegun. The lightgun hardware in these two (as well as the eeprom and calibration process) looks identical.”1
Taito America’s Operation Thunderbolt manual sets the sights in a fixed order — “UPPER LEFT – CENTER IN – LOWER RIGHT” — and is emphatic about how: “Always use the sight on the gun. DO NOT use the red circles … ALWAYS USE PHYSICAL GUN SIGHTS WHEN MAKING ADJUSTMENTS.” When the data is stored the screen reads “EE ROM READ OK”.6 Its parts list carries gears A and B, a gear bracket, a “volume bracket” and a variable resistor, and a solenoid assembly (M9001569; Taito America 140-913023) for the recoil.6

Space Gun (1990) is the better documented of the two. Its UK service manual from the distributor Electrocoin describes “a high powered pump-action fully automatic machine gun and a foot pedal”.2 The gun base is a small machine: a sub shaft and side brackets in Oiles flange bushes (LFF-1510, 80F-0905, 80F-1810), rubber stoppers, an up base and an under base, and on each axis a gear pair driving a “VARIABLE RESISTER … B-5K” on a volume bracket, with a tension spring.2
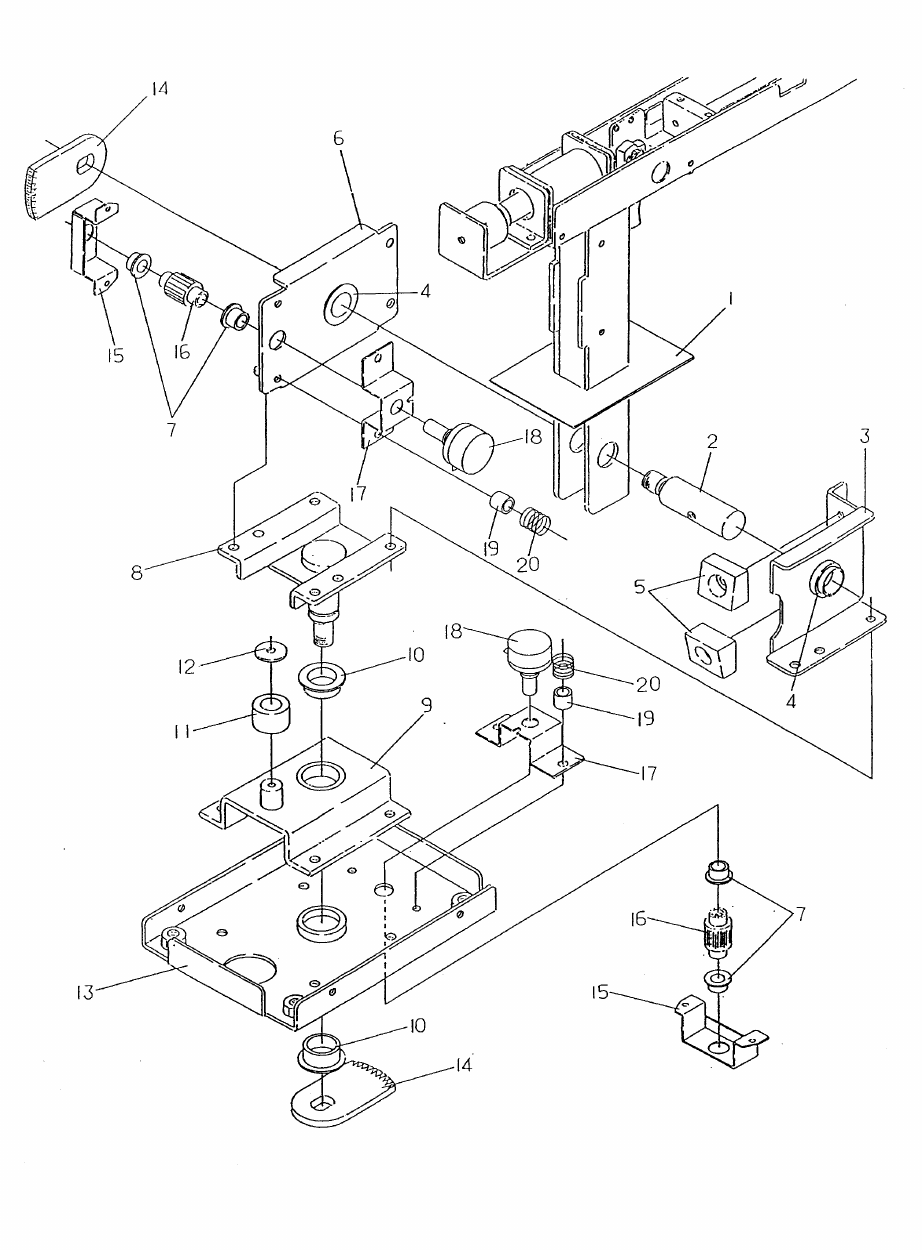
The set-up procedure differs from Operation Thunderbolt’s only in detail: aim at the top left, the centre, then the bottom right, after which “you are asked to INITIATE EEPROMS”. The manual’s note is a practical one: “When setting gun to the centre of the screen it might not set directly on the target. Therefore lower the gun about one inch below the indicator and set.”2
3.3 SNK Beast Busters, 1989
SNK’s Beast Busters was “a large dedicated (non-jamma) triple machine gun game”, in MAME’s words.7 SNK’s own manual describes the gun as “a realistic appearing machine gun, featuring solenoid activated recoil effect and X-Y control potentiometers for aim control”.8 The gun parts (A8002-001 onwards) include housings, barrels, a sight, a mecha base, a solenoid base and solenoid assembly, a “weight” and “weight sheet”; the mount parts include a “VR-Pinion”, “Potentiometer”, “VR-Spring” and a “Turn Table assy”.8
The manual reprints an SNK service bulletin that is a useful warning for any positional cabinet. Boards were being returned for warranty repair “that have had no hardware problems. These PCBs were simply in need of proper Gun Aim Calibration.” If calibration is run “and one or more Gun Assemblies are defective, the game will freeze upon power up. This is due to improper Gun Aim data stored in the EPROM on the Main PCB.” The bulletin’s conclusion: “we should not assume that changing the main PCB will solve the problem.”8 A worn pot calibrates badly, and the bad calibration then looks like a board fault.
3.4 Sega: Line of Fire, Laser Ghost and Alien3
Sega’s Line of Fire (disclosed 1989) has a “GUN UNIT (GUN-2000)” whose two axes each turn a “V.R.” (variable resistor) through gears. The manual’s adjustment section is the most explicit account of the gearing found for this dive:9
“This machine allows, during the test mode, the GUN UNIT’s sight to be electronically adjusted and therefore, V.R. adjustments are normally not required. However, when the electronically adjustable scope is exceeded, or the V.R. GEAR is idly racing, make the following adjustments.”
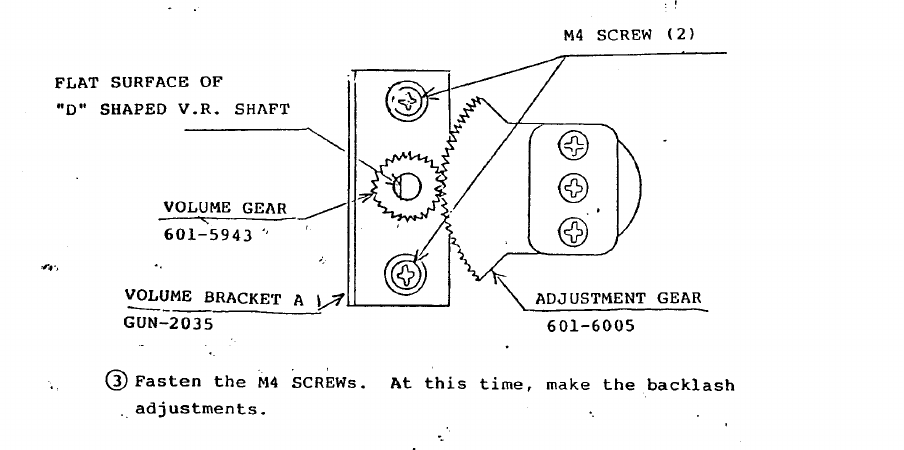
The procedure centres the pot within its travel so that the gun’s swing stays inside the range the software can correct. The same manual has left and right “circuit protector” buttons “used to prevent overcurrent of the GUN UNIT SOLENOID”, and the instruction “When the SOLENOID does not function, check to see if the CIRCUIT PROTECTOR is functioning.”9
Laser Ghost (manual © Sega 1991) uses the same idea in a lighter gun: its manual has procedures for “REMOVING THE VOLUME FOR VERTICAL DIRECTIONS” and ”… FOR HORIZONTAL DIRECTIONS” (“volume” being Sega’s word for a pot), and for replacing an LED board and a motor with a “MOTOR WEIGHT”.10 Alien3: The Gun (© Sega 1993) lists “Potentiometer, B - 5k Ω Lin”, a “VIBRATE MOTOR” with replaceable brushes, and a V.R. adjustment section for when “the CONTROLLER’s V.R. values can not be adjusted to the allowable range”.4
3.5 Midway: Terminator 2 and Revolution X
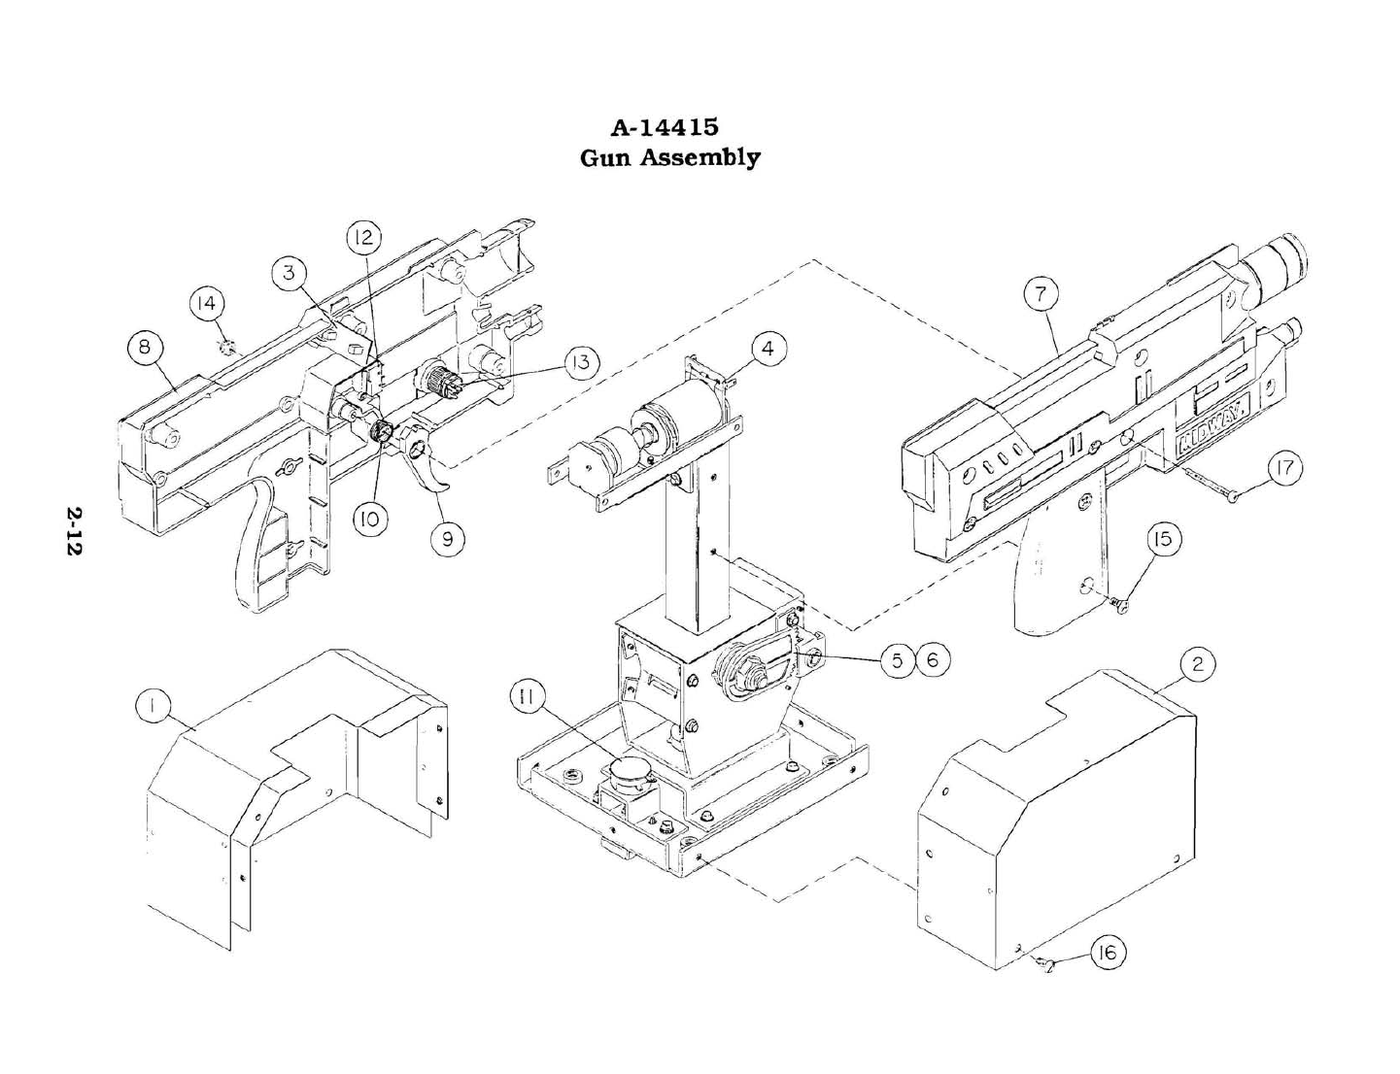
Midway’s Terminator 2: Judgment Day (1991) is the best-known positional cabinet, and its manual is the most complete. The gun assembly, A-14415, contains:3
Table 2 — Midway: Terminator 2 and Revolution X
| Item | Part number | Description |
|---|---|---|
| 1, 2 | A-14444, A-14590 | Housing assembly, left and right |
| 3 | A-14914 | Gun LED assembly |
| 4 | A-14455 | Coil and bracket assembly |
| 5 | 03-8528 | Gear drive |
| 6 | 03-8529 | Gear pinion |
| 9 | 03-8539 | Molded trigger |
| 11 | 5014-12909-00 | Potentiometer, 5K, long life |
| 12 | 5647-12863-00 | Switch, snap action, trigger |
| 13 | 5641-12864-00 | Switch, pushbutton, rocket |
The manual is firm that calibration is software, not a screwdriver job: “Do not attempt to calibrate by opening the guns and adjusting the potentiometers manually.” The Calibrate Guns option presents “three targets … in the top left, center, and bottom right”, stores the result “in the CMOS RAM”, and warns “if you change boards or replace ROMs, RAMs, or the battery, you must recalibrate the guns. Guns do not operate unless they are calibrated.” A cabinet that has lost its battery boots with “CMOS RAM Error — Unable to read gun calibration values.”3
Revolution X (1994) used the same kind of gun. Its operations manual (16-40019-101, May 1994) is catalogued on the Internet Archive but its scan was not available; MAME’s driver shows the guns read as analogue inputs and a DIP switch labelled “Cabinet” with two settings, “Rev X” and “T2 Retrofit”.11 Midway sold the game to go into existing Terminator 2 cabinets, guns and all, which is the strongest evidence available that the two guns were interchangeable.
Sega’s Gunblade NY (1995) is the other well-known mounted-gun cabinet of the period. MAME reads its guns through the A/D converter as analogue inputs, which points to potentiometers; no Gunblade service manual was read, so that is recorded as unconfirmed.12
3.6 The Flat-Panel Fixed Guns, 2014
The method is still in production. Raw Thrills’ Aliens Armageddon (© 2014) shipped in two forms: a 55-inch deluxe cabinet with handheld camera guns (Volume 4) and a 42-inch “Fixed Gun Cabinet” on potentiometers.5
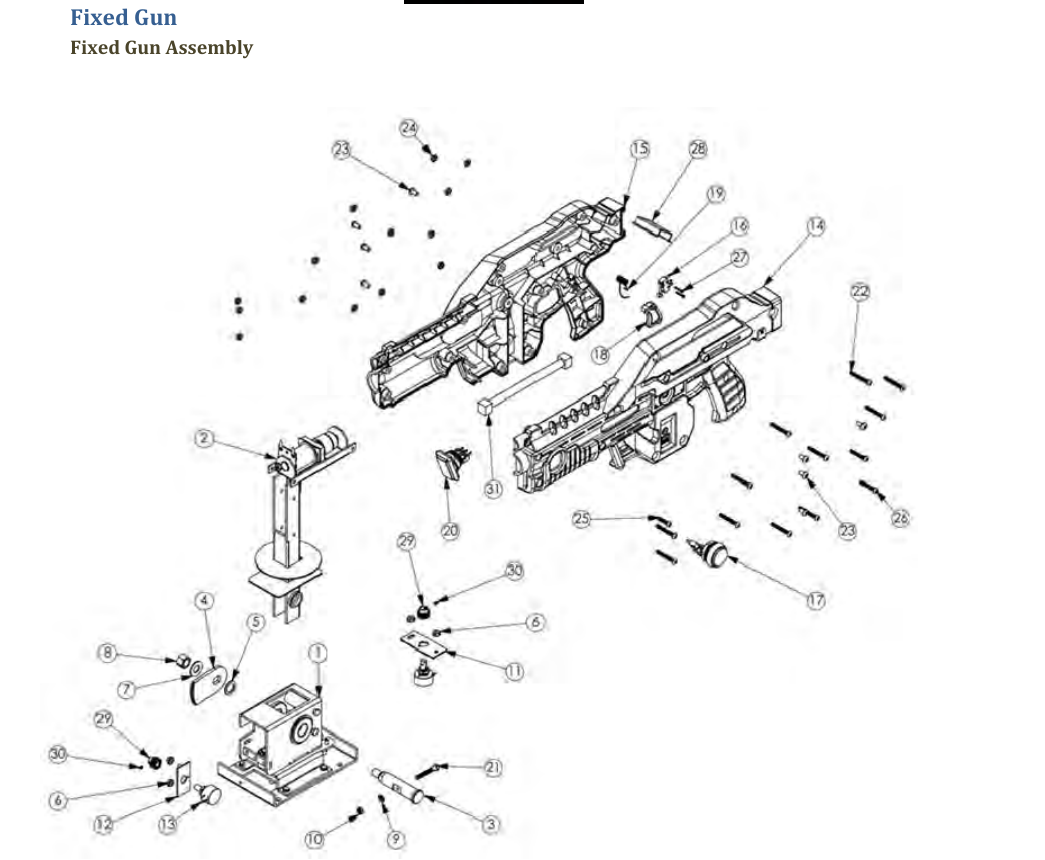
The parts list gives “Long life pot with nut & washer” 96-4916-00 (two per gun), “Gear segment with hub” 96-4907-00, “Gear 32DP 16T .25 bore .5 long” 96-4917-01, pot mounting brackets 96-4904-00 (horizontal) and 96-4913-00 (vertical), and a bracket sub-assembly “with handle & mounting bracket coil pads”.5 The service section explains where the pots are (“The x-axis pot is located under the gun base below the trigger. The y-axis pot is located on the side of the gun base below the reload button”) and how to test them: “swivel gun along an axis paying attention to the resistance. There should be a steady linear increase or decrease in resistance with no jumps. Replace the gears, if they are worn or cracked.”5 A replacement pot is fitted “with the same orientation”, keys mated, and the gun recalibrated.5
Namco’s Deadstorm Pirates Special Edition (© 2014) is the same idea on a 55-inch LCD: its manual has procedures for “Replacing the potentiometer (for left-right)” and “(for UP-DOWN)” and an error table entry “Initialize the potentiometer”.13
3.7 What Positional Guns Trade Away
Table 3 — What Positional Guns Trade Away
| Advantage | Cost |
|---|---|
| Works on any display: CRT, projector, LCD | The gun must be mounted; no handheld positional arcade gun appears in any manual read |
| Immune to room light, reflections, screen brightness | The pots wear: “long life” pots, “no jumps” tests, worn gears |
| No screen flash, no lens to clean | Calibration is stored data; a flat battery or bad EEPROM stops the game |
| Simple: two voltages and an ADC | The gun reports its own angle, not where the player’s eye sees the sight; a calibration taken from one stance is a compromise for all others |
The last row is why every manual insists on the gun’s own sights for calibration. A positional gun measures angle at the mount; the player aims along the barrel from wherever he stands. Calibrating with the physical sights makes the two agree along the line of the sights at the calibration distance, and the geometry of the cabinet (a fixed mount at a fixed distance) keeps the disagreement elsewhere small. The theory belongs to Aiming Maths and Calibration (planned).
3.8 What could not be verified
- Revolution X’s gun from Midway’s manual; MAME only.
- Gunblade NY’s sensing; MAME only.
- Operation Thunderbolt’s pot part number; the OCR of the Taito America parts list is too poor to trust beyond “variable resistor”.
- Beast Busters’ “Lens” part. The gun parts list in the scan appears to include a lens; on a potentiometer gun its purpose (a sight?) is unknown, so it is not described.
- Deadstorm Pirates’ gun parts. Only the procedure titles were read.
Sources
Footnotes
-
MAME,
src/mame/taito/othunder.cpp, PCB notes and memory map, mamedev/mame master, read 2026-10-19. ↩ ↩2 ↩3 -
Taito / Electrocoin Automatics, Space Gun Service Manual, game description, gun set-up, Gun Assy parts (pp. 14–17). Internet Archive item
arcademanual_Space_Gun. Read 2026-10-19. ↩ ↩2 ↩3 ↩4 -
Midway Manufacturing, Terminator 2: Judgment Day Operations Manual, 16-40009-101, December 1991, set-up, Calibrate Guns, A-14415 Gun Parts. Internet Archive item
arcademanual_T2_Judgement_Day_16400091011_Dec_1991. Read 2026-10-19. ↩ ↩2 ↩3 -
Sega, Alien3: The Gun Owner’s Manual, © Sega 1993, parts list, §9-2, §9-3, output test. Internet Archive item
arcademanual_Alien_3_The_Gun_Manual. Read 2026-10-19. ↩ ↩2 ↩3 -
Play Mechanix / Raw Thrills, Aliens Armageddon Setup and Operation Service Manual, © 2014, Gun Pot and Gear Service (p. 18), Fixed Gun Assembly (pp. 51–52). Internet Archive item
manualzilla-id-6032150. Read 2026-10-19. ↩ ↩2 ↩3 ↩4 ↩5 -
Taito America Corporation, Operation Thunderbolt Operating Manual, Gun Sight Settings and Gun Assy parts lists. Internet Archive item
arcademanual_Operation20Thunderbolt. Read 2026-10-19. ↩ ↩2 -
MAME,
src/mame/snk/bbusters.cpp, header notes, mamedev/mame master, read 2026-10-19. ↩ -
SNK, Beast Busters manual with service bulletin “SNK Beast Busters Gun Calibration”. Internet Archive item
arcademanual_BeastBusters.man. Read 2026-10-19. ↩ ↩2 ↩3 -
Sega, Line of Fire Upright Temporary Manual, © Sega 1989, circuit protectors, §12, §16. Internet Archive item
arcademanual_Line_of_Fire_Temporary_Manual. Read 2026-10-19. ↩ ↩2 -
Sega, Laser Ghost owner’s manual, © Sega 1991. Internet Archive item
arcademanual_laser-ghost. Read 2026-10-19. ↩ -
MAME,
src/mame/williams/midxunit.cpp,revxinput ports and DIP switches, mamedev/mame master, read 2026-10-19. ↩ -
MAME,
src/mame/sega/model2.cpp,gunbladeinput ports, mamedev/mame master, read 2026-10-19. ↩ -
Namco America, Deadstorm Pirates Special Edition Operation Manual, © 2014, contents and troubleshooting. Internet Archive item
manualzilla-id-6011117. Read 2026-10-19. ↩
Comments (0)