Remington 870 Express Tactical · Volume 4
Keeping It Working — Field Strip, Detail Strip, Maintenance and Repair
The maker's own takedown and reassembly, what a detail strip must account for when no armourer's manual is public, and the classic 870 repairs, with who should do each
This volume is the practical half of the mechanism described in Volume 3. It follows the maker’s own manual step by step for everything the manual covers, says plainly where the manual stops, and sets out the classic 870 repairs with the evidence for each and an honest line between what an owner does at the bench and what goes to a gunsmith.
4.1 What the Maker Publishes, and What It Does Not
RemArms publishes one document for owners: the Owner’s Manual for the Model 870 and 870 Super Magnum, form RD 7058, revised May 2026.1 It covers loading and unloading, the magazine plug, a field strip down to the trigger plate, reassembly, cleaning and lubrication, and a parts list. It does not cover disassembly of the bolt, the trigger plate or the magazine extension, and it tells the owner not to try: “Only a qualified service facility should service, repair or modify your Remington firearm”, and “All adjustments to the trigger and trigger plate assembly must be made by the factory or a REMINGTON AUTHORIZED SERVICE CENTER.”1
Remington’s armourer-level documents were never public. Its military website of 2010 listed “Part/Tech Manuals” as “Coming Soon…” behind a login, and RemArms today runs its armourer training through “Authorized Armorer School Instructors” listed on its law-enforcement page.23 No armourer’s manual and no US military technical manual for the 870 was located in public archives for this dive. Where this volume goes past the owner’s manual, it says what its source is — usually the 1950 patent — and it does not reconstruct a disassembly sequence from memory.
RemArms’s own maintenance recommendation is short: “RemArms recommends that you have your firearm professionally serviced annually. You should also have your firearm professionally serviced after prolonged storage, or if there is ever any question pertaining to the proper functioning characteristics of your firearm.”1
4.2 Clearing the Gun
Every procedure below begins with an empty gun. The manual’s unloading sequence, which does not require firing or cycling live shells through the chamber at speed:1
- Point the firearm in a safe direction.
- Engage the safety. The red band will not show.
- Push upward on the action-bar lock.
- Pull the fore-end slowly rearward until the front of the shell is even with the ejection port.
- Lift the front of the shell outward and remove it from the ejection port.
- Pull the fore-end fully rearward until the next shell is released from the magazine.
- Tip the firearm sideways to allow the shell to drop from the ejection port.
- Close and open the action until all shells are removed.
Then look into the ejection port, and at the magazine follower through the loading port, to confirm both are empty. On the gun documented here the magazine holds six with its factory extension (Volume 1), so step 8 runs longer than on a standard-tube gun.
4.3 Field Strip: the Manual’s Steps
The manual’s disassembly runs to fourteen steps, three of which (10 to 12) apply only to the Super Magnum’s port cover. For a standard 870 such as the Express Tactical, the sequence is:1
- Engage the safety mechanism. Red band will not show.
- Push the action-bar lock upward and pull the fore-end rearward to open the action. Check the chamber and magazine are empty.
- Slide the fore-end forward approximately halfway.
- Unscrew and remove the magazine cap.
- Take hold of the barrel ahead of the magazine tube and pull the barrel from the receiver.
- Push the carrier upward.
- Reach into the bottom of the receiver. Depress and hold the left shell latch.
- Slide the fore-end forward and off the magazine tube.
- Lift the breech bolt assembly and slide assembly from the rear of the action bars.
Then, for the trigger plate:
- Tap out the front and rear trigger-plate pins.
- Lift the rear of the trigger-plate assembly, slide it rearward and remove it from the receiver.
The manual’s warnings belong with the steps. At step 8: “The top right edge of the slide may bind on the bottom front edge of the ejection port in the receiver. To free the slide, push the front end of the bolt down.” At step 14: “DO NOT allow the hammer to snap forward when the trigger plate is removed. This can best be assured by keeping the safety mechanism engaged at all times.”1
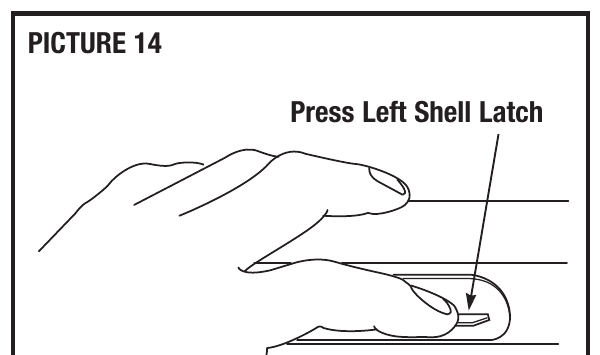
Why step 7 is there. The action bars carry a stop that bears on a shell latch and prevents “inadvertent removal of the breech mechanism when the gun has been taken down by removal of the barrel” (Volume 3).4 Pressing the left latch clears the stop. If the fore-end will not come off, the latch is not fully depressed.
On the gun documented here, two things differ from a factory gun. The Fab Defense PR-870 forend replaces the factory fore-end on the same fore-end tube, and the magazine carries a factory two-shot extension in place of a plain magazine cap (Volume 1). The manual does not address either. Removing the barrel on an extended-tube gun means unscrewing whatever holds the barrel ring at the front of the extension; how that is arranged on the factory Express Tactical extension is not described in any source located, and it should be checked on the gun rather than assumed.
4.4 Reassembly: the Manual’s Steps, and the One That Catches People
The manual’s reassembly sequence for a standard 870:1
- Check that the end of the action-bar lock is below the end of the left connector (Picture 19).
- Carefully insert the trigger-plate assembly, carrier first, into the receiver.
- Align the holes and tap in the front and rear trigger-plate pins.
- Place the fore-end assembly over the magazine tube.
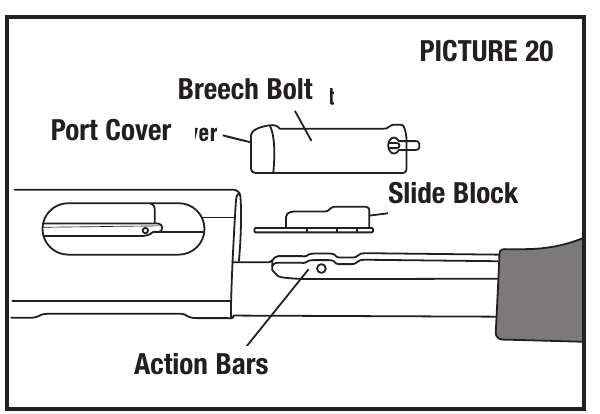
- Position the slide block assembly and breech bolt assembly on the rear of the action bars (Picture 20).
- Guide the action bars into the receiver until stopped by the right shell latch.
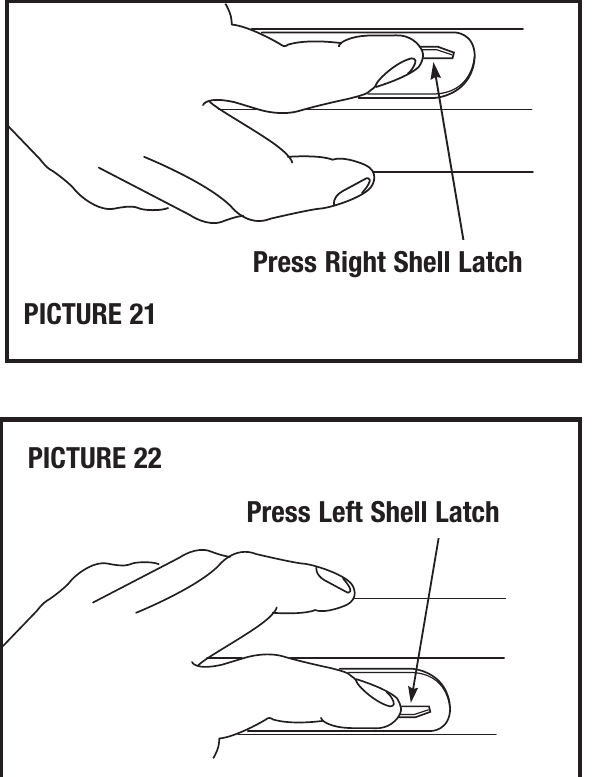
- Push the carrier upward; depress and hold the right shell latch (Picture 21).
- Slide the fore-end rearward until stopped by the left shell latch.
- Reach into the bottom of the receiver; depress and hold the left shell latch (Picture 22).
- Slide the fore-end rearward until stopped by the action-bar lock.
- Push upward on the action-bar lock and slide the fore-end rearward approximately halfway.
- Replace the barrel and magazine cap.
Steps 5 and 6 are for the Super Magnum only.
Step 1 is the one that catches people, and the manual puts it first for that reason. The action-bar lock and the left connector sit side by side on the trigger plate (Volume 3, Picture 19). The manual’s check is that the lock’s end is below the connector’s before the plate goes in. The manual does not say what happens if it is not; the reading offered here, from the mechanism in Volume 3, is that the action-bar lock would then not be positioned to engage and release the left action bar and the connector would not work the disconnector as designed, so the check is worth doing every time the plate comes out.
At step 14, the barrel goes in with its ejector cut aligned with the ejector: “Align the ejector cut on the rear of the barrel with the ejector in the receiver … Carefully seat the barrel into the receiver. DO NOT force the barrel against the ejector.”1
After reassembly, a function check with no ammunition present: the action opens only with the action-bar lock pressed while the hammer is cocked; the trigger does nothing with the safety on; with the safety off the hammer falls and the action-bar lock releases; the trigger is dead while the action is open and until it is released. Those are the behaviours the patent claims for the fire control (Volume 3).5
4.5 Detail Strip: Not Published
The maker’s documents stop at the trigger-plate assembly, which the manual says to “Clean as a unit with oil only”, and at the breech bolt, which it says to “Clean as a unit”.1 Neither is to be taken apart by the owner.
No detail-strip sequence is given in this dive, because no manual that publishes one was obtained, and this hub does not reconstruct disassembly sequences from memory. What can be set out from the patent and the parts list is what a correct procedure has to account for.
The bolt group. The patent describes the bolt group coming apart in three pieces once out of the gun: “The locking block may be lifted from the recess in the breech bolt, the bolt lifted from the breech bolt slide, and the slide disengaged from the interengaging notches in the action bars.”5 Inside the bolt, the parts list shows a firing pin held by a firing-pin retaining pin with a firing-pin retractor spring, and an extractor held by an extractor plunger and extractor spring.1 A procedure must therefore account for a cross pin under light spring load, and a small plunger and spring that are released when the extractor comes out. The locking block goes back only one way; the patent made it asymmetric so it cannot be reversed.
The trigger plate. The parts list shows a hammer driven by a hammer spring through a hammer plunger, a sear with its spring, a trigger and its pin, left and right connectors on a connector pin, the action-bar lock and its spring, a carrier and carrier dog with a dog follower and follower spring, a carrier pivot tube, and a safety held by a detent ball, a spring and a spring retaining pin.1 A procedure must account for a hammer spring under considerable compression, a detent ball that will leave the plate if released carelessly, the carrier-dog spring, and the order in which the connectors, sear and trigger stack. The manual’s single warning about the plate — never let the hammer snap forward with the plate out of the gun — applies throughout.
The receiver. The shell latches sit in staked grooves and the ejector is riveted in (Volume 3). Neither is removed in a detail strip; both are repair operations.
4.6 Cleaning and Lubrication
The manual’s procedure, in order:1
- Barrel. A cleaning rod and a brush of the correct gauge, dipped in solvent, run through several times; then patches until a patch comes out clean. Clean from the chamber end towards the muzzle where possible. Then: “Remove all shooting residue from the locking notch in the barrel” (Picture 17) — the recess in the barrel extension that the locking block’s lug engages.
- Choke tube. Remove it, clean it and its threads with solvent, wipe dry, “Apply oil on threads” and reinstall “snugly, but DO NOT OVERTIGHTEN”. On a Rem Choke barrel, “NEVER fire the firearm without the choke tube installed.” The extended ported tactical tube on the gun documented here is a choke tube in this sense.
- Breech bolt. “Clean as a unit. Brush with cleaning solvent and wipe clean and dry.”
- Receiver. “Brush the inside of the receiver with cleaning solvent and wipe dry.” The manual adds: “There may be sharp edges inside the receiver. Keep fingers covered or gloved when wiping.”
- Trigger plate. “Clean as a unit with oil only.” Spray it with oil, “Let stand for 15 minutes. Spray again to wash off components. Shake off excess lubricant.”
- Lubrication. “Over-lubrication should be avoided at all times. A thin coat of oil is all that is needed to prevent the possibility of rusting.” For storage, “carefully cleaned and thoroughly oiled”; on reuse, “all excess lubrication must be removed. The chamber and bore must be thoroughly wiped dry.”
How often. “Make it a practice to clean your bore every time you’re going to shoot. Be sure to clean your entire firearm before and after long-term storage and no less than once a year”, and whenever the gun has been exposed to “rain, dirt, mud, snow, sleet or saltwater”.1
For an Express finish. Volume 2 set out Remington’s own description of the Express finish as “bead blast blue”. Whatever its actual rust rate, the manual’s instruction to wipe outside surfaces “with a light coat of oil occasionally” is the defence, and a matte finish that looks dry should be treated as dry. The finish on the gun documented here is not recorded.
4.7 The Magazine Tube and Its Spring
The manual shows two kinds of magazine spring retainer: one with a round centre hole, pried out with a screwdriver under its rim, and one with a slot, pushed in and turned 90 degrees to release it from “the detents on the top and bottom of the magazine tube”.1 Both are under spring tension, and the manual’s warning is to wear eye protection and to keep a hand over the tube’s mouth.
The tube, follower and spring are worth cleaning whenever the gun has been wet, because the magazine is a closed tube under the barrel and holds water. Remington’s own Police specification fitted “a longer magazine spring which ensures positive feed and function” under the recoil of buckshot and slugs (Volume 2).6 A magazine spring that no longer drives the last shell briskly back against the latch is a replacement part, not a repair.
On the gun documented here, the magazine carries a factory two-shot extension. The manual’s plug instructions are written for the standard tube and do not cover the extension; how the factory extension is retained was not established from any source.
4.8 Inspection: What to Look At, and When
RemArms publishes no replacement intervals for any 870 part; the manual’s instruction is professional service annually and whenever function is in doubt.1 The list below is therefore an inspection list built from the mechanism and from the parts Remington itself treated as upgrade points, not a published schedule.
Table 1 — Inspection: What to Look At, and When
| Part | Look for | Why this part |
|---|---|---|
| Chamber | Rust, pitting, rough machining marks; fired hulls that stick | The early-2000s Express problem reported by Field & Stream (Volume 2) |
| Extractor | A chipped or rounded claw; a weak or missing plunger spring; a claw that no longer snaps over a rim | A powder-metal part on the mid-2000s Express, by Remington’s statement (Volume 2); takes the whole extraction load |
| Ejector | Looseness at the rivets; a bent tip | Riveted to the receiver wall; its locating tongue keys the barrel |
| Shell latches | A latch standing proud of its groove at the rear; a latch that does not spring back fully | Held at the rear by staking, then by the trigger plate (Volume 3) |
| Action bars and fore-end tube | Bent bars; cracks at the brazed joint with the sleeve; a loose fore-end tube nut | The whole action is driven through the bars |
| Locking block and recess | Burrs, peening, fouling in the barrel’s locking notch | The manual singles out the locking notch for cleaning |
| Magazine tube | Dents; dimples on an Express tube; corrosion inside | Feeding and the fore-end both depend on it |
| Magazine spring | A last shell that does not come back smartly | Remington fitted a longer spring to Police guns |
| Trigger-plate pins | Pins that walk out; wallowed holes on a polymer plate | The plate is held by two pins through the receiver |
| Choke tube | Looseness; fouled threads | The manual says to check it “occasionally” |
4.9 When It Does Not Run: Diagnosis
Each row names the source for the cause it gives. Where a cause is this dive’s reading of the mechanism, it is marked as such.
Table 2 — When It Does Not Run: Diagnosis
| Symptom | First check | Likely cause | Source | Who fixes it |
|---|---|---|---|---|
| Action will not open after loading | Safety on, muzzle safe, then the manual’s two remedies | A shell slid back over the carrier: the 870 jam | Manual; Volume 3 | Owner |
| Fired hulls stick and the extractor tears through the rim | Inspect the chamber; try a different load | Rough chamber; weak or worn extractor | Field & Stream (Volume 2) | Gunsmith polishes; extractor by a competent owner or gunsmith |
| Hull extracted but not thrown clear | Ejector tip and rivets; weak stroke | Loose or bent ejector; short-stroking | Dive’s reading of the mechanism | Short-stroking: owner. Ejector: gunsmith |
| Two shells come out of the magazine at once | Shell latches: seated, springing back, stakes intact | A latch not holding its position | Dive’s reading of the latch sequence in Volume 3 | Gunsmith |
| No shell comes out of the magazine | Magazine spring and follower; dent in the tube; left latch | Weak spring; follower binding; latch not withdrawing | Dive’s reading; Remington’s Police spring upgrade | Owner for the spring; gunsmith for a dented tube |
| Shell on the carrier nose-dives or falls | Carrier dog spring | Weak carrier dog spring | Remington’s Police spring upgrade (Volume 2) | Parts replacement; see detail strip |
| Fore-end will not lock forward, or will not unlock | Trigger-plate reassembly (action-bar lock below left connector) | Mis-assembled plate; action-bar lock spring | Manual reassembly step 1 | Owner for assembly; spring: gunsmith |
| Trigger will not reset | Release the trigger fully; check the action is fully closed | The fire control is working as designed; if not, sear or connector | Patent (Volume 3) | Factory or authorised service |
| Hammer follows the bolt, or doubles | Stop using the gun | Fire-control fault | Manual: trigger work by factory only | Factory or authorised service |
| Fore-end binds on removal | Push the front of the bolt down | Slide catching the ejection port edge | Manual, disassembly note | Owner |
| Rust on exterior | Finish and oil film | Dry matte finish | Volume 2; manual lubrication | Owner |
4.10 The Classic 870 Repairs
4.10.1 Shell-latch staking
The patent’s own words describe the arrangement: the latches lie in grooves in the receiver walls, “At the rear end of the shell latches, the edges of the grooves are deformed by a staking operation to temporarily retain the latches during assembly. After assembly, they are confined in their grooves in the receiver walls by the trigger plate.”5 The staking is the only thing holding a latch while the trigger plate is out, and the trigger plate is the only thing holding it once the stakes have been pushed back.
The failure that follows is a latch whose rear end is no longer held tight in its groove. With the latch loose, the magazine can release shells at the wrong moment or fail to hold them, which is the “two at once” row of the diagnosis table. No maker’s document or failure-rate figure for this was located; the description is the dive’s reading of the patent’s construction, offered as that.
The repair is to seat the latch fully in its groove and re-stake the groove edges, or to fit a new latch and stake it. It is done with the trigger plate out, requires a staking tool that deforms the receiver metal accurately without marking the latch’s working edge, and is gunsmith’s work. The shell latches are separate parts on the RemArms list.1
4.10.2 Extractor
The extractor is a small hooked part at the right edge of the bolt face, held by a plunger and spring (Volume 3).51 Remington’s 2005 page described the Express extractor as “powdered metal cast” and the Police gun’s as “machined” (Volume 2).6 Field & Stream names extractor replacement, with chamber polishing, as the usual cure for an Express that leaves hulls in the chamber.7
Replacing an extractor involves compressing and capturing its plunger and spring in the bolt, which the manual does not describe. A competent owner with the part in hand and a bench to work on can do it; the manual’s position is that a qualified facility should. A new extractor should snap over a shell rim with a definite click and hold a hull against a light shake.
4.10.3 Action-bar lock
The action-bar lock, with its spring, rides on the trigger plate and holds the left action bar when the hammer is cocked and the action closed (Volume 3). An owner meets it every time the gun is unloaded. The commonest fault an owner can cause is the reassembly error the manual’s step 1 guards against; the check takes seconds. A broken or weak action-bar lock spring, or a worn lock, is a trigger-plate repair, and the manual reserves trigger-plate work for the factory or an authorised service centre.1
4.10.4 The magazine tube: dents and dimples
Two different problems share one name, and they should be kept apart.
Dimples. On the Express, the tube carries detents that lock the slotted spring retainer (the manual’s second retainer type), and Remington said in 2005 that the Express “will not allow for the addition of an extension tube without physical modification to the tube and barrel, which can nullify the warranty”.16 That modification is the familiar removal of the dimples. It matters only to an owner fitting an aftermarket extension; the gun documented here has its extension from the factory.
Dents. A dent in the tube is damage, and its consequences follow from what the tube does. The follower runs inside it, so a dent can stop the follower and the shells; and the fore-end tube slides along its outside, so a dent can bind the action. The patent describes the magazine tube as “rigidly secured to the receiver, as by a furnace or induction brazing operation”.5 Whether current production still brazes the tube was not confirmed, but on any gun built that way the tube is part of the receiver assembly, which the RemArms parts list marks “Restricted”.1 A dented tube is therefore a gunsmith’s or factory job: small dents can sometimes be raised from inside with a mandrel; a badly damaged tube means a receiver-level repair.
4.10.5 Chamber polishing
For fired hulls that stick, Field & Stream names chamber polishing as a standard cure.7 It removes metal from the one place the gun’s pressure is contained, and it is gunsmith’s work.
4.10.6 Oversize locking block
The RemArms parts list carries a “Locking Block Assembly (Oversize)” alongside the standard part.1 The manual gives no instructions for it. Fitting a locking block and checking the result is headspace work and belongs to an armourer or gunsmith with the gauges to check it.
4.10.7 Trigger work
The manual says it without qualification: “All adjustments to the trigger and trigger plate assembly must be made by the factory or a REMINGTON AUTHORIZED SERVICE CENTER.”1
4.11 Owner, Gunsmith or Factory
Table 3 — Owner, Gunsmith or Factory
| Job | Owner | Gunsmith or armourer | Factory or authorised service |
|---|---|---|---|
| Unload, field strip, reassemble, function check | ✅ (manual) | ||
| Clean barrel, choke, receiver, bolt, trigger plate as a unit | ✅ (manual) | ||
| Magazine plug; magazine spring and follower | ✅ (manual) | ||
| Clear the 870 jam | ✅ (manual) | ||
| Stock, forend, sights, rails, sidesaddle | ✅ with the maker’s instructions (Volume 5) | ||
| Extractor | Competent owner | ✅ | |
| Detail strip of bolt or trigger plate | ✅ | ✅ | |
| Shell-latch replacement or re-staking | ✅ | ||
| Ejector | ✅ | ||
| Chamber polishing | ✅ | ||
| Dented magazine tube | ✅ | ✅ | |
| Oversize locking block, headspace | ✅ | ✅ | |
| Trigger or trigger-plate adjustment | ✅ (manual) | ||
| Anything touching a restricted part (receiver, trigger plate, trigger assembly) | ✅ |
4.12 Parts and Service Today
Parts are sold by RemArms through its website, and the manual asks for the model and serial number with any order. It also warns: “USE ONLY REMINGTON PARTS IN REMINGTON FIREARMS”, and “SOME PARTS MAY BE RESTRICTED”. The parts list marks the receiver assembly, the trigger assembly and the trigger plates as restricted.1 Repairs go to RemArms after a service request, or to one of the independent full-service facilities it lists.8
RemArms offers no written warranty (Volume 2), and firearms sent for service “will be evaluated to determine if services will be provided at a fee or free of charge”.9 A Remington-era gun and a RemArms-era gun take the same parts (Volume 2).
4.13 What Could Not Be Verified
- Any armourer’s or military manual, and with it any published detail-strip sequence. None is reproduced; the constraints are set out instead.
- Replacement intervals for any 870 part. RemArms publishes none.
- A failure rate for shell-latch staking, extractors or any other part.
- How the factory two-shot extension on the Express Tactical is retained, and how the barrel is removed with it fitted.
- Whether current production brazes the magazine tube as the patent describes.
References
Footnotes
-
RemArms, LLC, Owner’s Manual — Model 870 & 870 Super Magnum Pump Action Shotguns, form RD 7058 Rev 0526 (document created 2021, revised May 2026), https://www.remarms.com/sites/default/files/2026%20Revised%20OMs/870%20Manual%20RD7058%20(REV%200526).pdf, linked from https://www.remarms.com/support/owners-manuals-(remarms), consulted 2026-09-19 — unloading; disassembly steps 1 to 14 and their notes; reassembly steps 1 to 14; cleaning, lubrication and storage; the magazine spring retainers and tube detents; the Ninth Commandment and the service recommendation; the parts list, its restricted parts and its Super Magnum footnote; the parts and repair instructions. Pictures 14, 20, 21 and 22 are reproduced from pages 12 and 14 for reference. ↩ ↩2 ↩3 ↩4 ↩5 ↩6 ↩7 ↩8 ↩9 ↩10 ↩11 ↩12 ↩13 ↩14 ↩15 ↩16 ↩17 ↩18 ↩19 ↩20 ↩21 ↩22 ↩23
-
Remington Military, “Part/Tech Manuals” page, remingtonmilitary.com, archived 18 October 2010. ↩
-
RemArms, law enforcement and defense page, https://www.remarms.com/ledefense/, consulted 2026-09-19. ↩
-
L. R. Crittendon and P. R. Haskell, US Patent 2,719,375, issued 4 October 1955 — the stop abutment that retains the breech mechanism when the barrel is removed. https://patents.google.com/patent/US2719375A/en ↩
-
L. R. Crittendon and P. R. Haskell, US Patent 2,645,873, filed 31 January 1950, issued 21 July 1953 — the bolt group’s three pieces; the staking of the shell latches; the brazed magazine tube; the fire-control behaviours. https://patents.google.com/patent/US2645873A/en ↩ ↩2 ↩3 ↩4 ↩5
-
Remington Arms, “Important differences between Remington 870 Police and 870 Express shotguns” (2005), remingtonmilitary.com, archived 16 February 2008 — the powdered-metal extractor, the extension and warranty passage, and the Police magazine spring. ↩ ↩2 ↩3
-
Phil Bourjaily, “The Story of the Remington 870”, Field & Stream, page dated 23 January 2026, consulted 2026-09-19 — sticking hulls, chamber polishing and extractor replacement. ↩ ↩2
-
RemArms, “Find Authorized Parts & Repair Centers”, https://www.remarms.com/support/find-authorized-parts-and-repair-centers, consulted 2026-09-19. ↩
-
RemArms, “Firearm Warranty Information”, https://www.remarms.com/support/firearm-warranty-information/, consulted 2026-09-19. ↩
Comments (0)