Japanese Type 64 Rifle · Volume 5
Field Strip, Maintenance and Repair
What the published Japanese military documents say about who may take a Type 64 apart and how far, how often it is cleaned and inspected, when a worn barrel is withdrawn, the faults its users learned to expect, and what no public source records
5.1 The manual that is not public
The Ground Self-Defense Force’s manual for the Type 64 (its 教範 or 取扱説明書) is not published, and no copy was found online in Japanese or English. The recruits’ handbook 『新入隊員必携』, which the Japanese Wikipedia cites for some details, was not found either. Model-gun makers have published stripping guides for their replicas; they describe replicas and are not used here.
Two official documents that are public do bear directly on maintenance, and this volume is built on them:
- The National Defense Academy’s directive on the custody and handling of weapons (防衛大学校達第19号, 1992, amended to 2020), whose first annex is a maintenance-echelon table listing, for the Type 64 by name, which parts the user may take apart, which only maintenance staff may, and which parts the armourer replaces.1
- The Ministry of Defense standard NDS Y 7101C, which sets the bore-gauge limit at which a Type 64 must not be used.2
Everything else here is from the Japanese Wikipedia and the sources it cites, attributed as such. Per this hub’s rule, no step-by-step stripping sequence is given, because none could be sourced. Section 5 sets out what a correct one has to account for.
5.2 Two kinds of stripping
Japanese service practice distinguishes two levels. The Japanese Wikipedia, citing Elite Forces, calls the user’s daily cleaning strip 通常分解 (“ordinary disassembly”, 日常の手入れ分解) and the deeper strip done by unit maintenance personnel for detailed cleaning 特別分解 (“special disassembly”).3 The Academy’s table uses the same distinction (it writes 特別分解結合, “special disassembly and reassembly”).1
Even the ordinary strip needs tools. The Japanese Wikipedia says the Type 64 has 58 parts, a lot for a military rifle, and that its daily strip needs a Phillips screwdriver and a pin punch, both carried in the accessory compartment in the buttplate.3 The handguards cannot be removed without a special tool.3
5.3 What the user may take apart
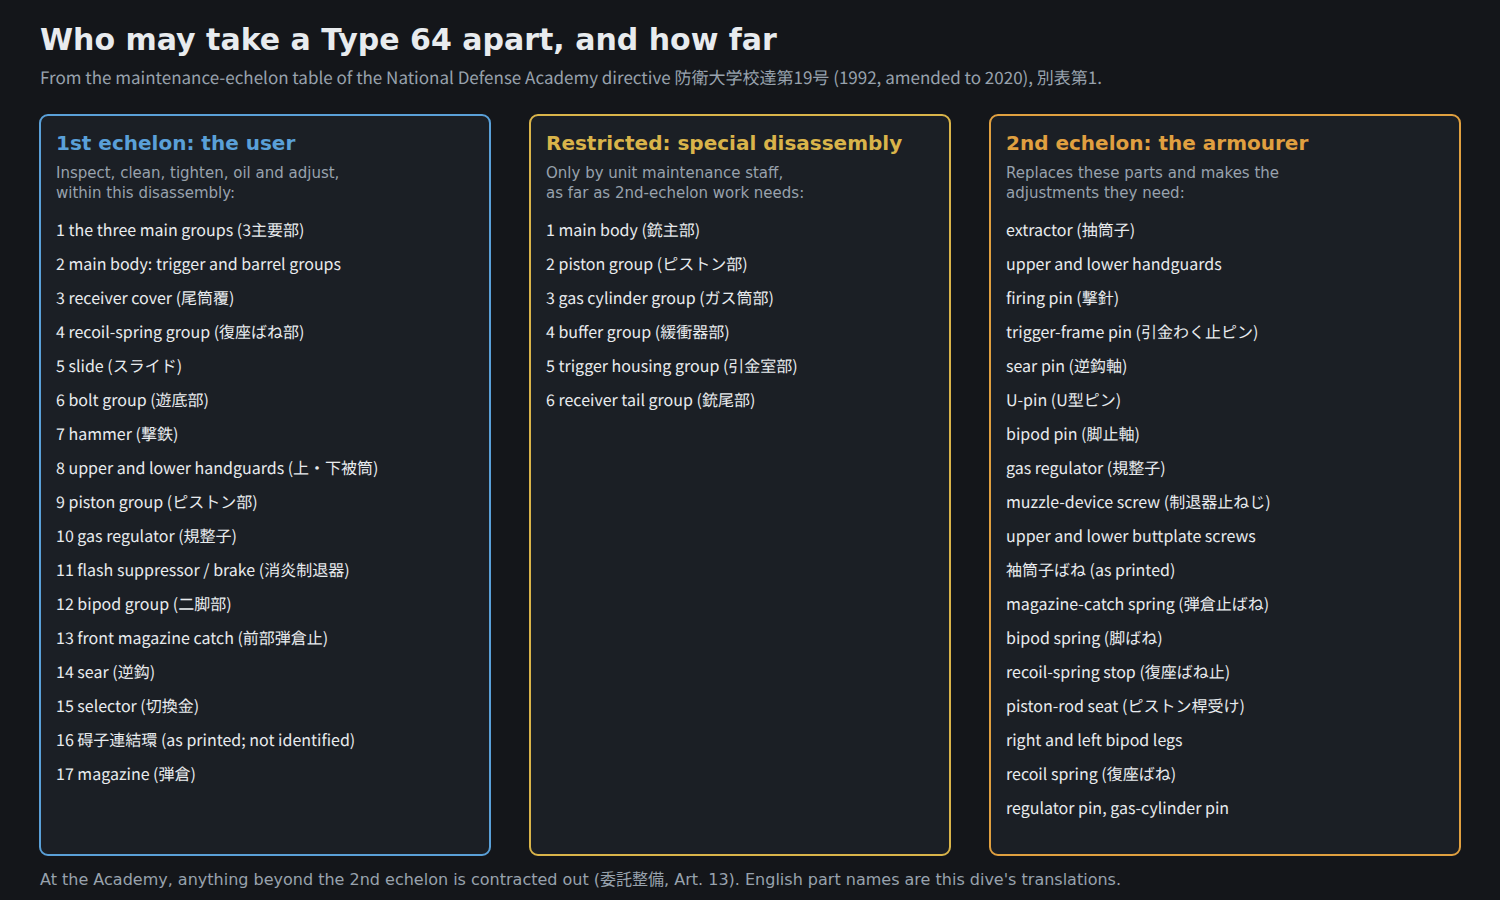
The Academy’s table authorises the user (第1段階整備, first-echelon maintenance) to “下記の制限に基づく分解の範囲内で行い得る点検、手入れ、締付、給油、調整” (“inspect, clean, tighten, oil and adjust, within the disassembly allowed under the limits below”), and lists seventeen items under 分解を許可する部位, “parts whose disassembly is permitted”:1
Table 1 — What the user may take apart
| No. | As printed | This dive’s translation |
|---|---|---|
| 1 | 3主要部 | the three main groups |
| 2 | 銃主部 (引金部及び銃身部) | main body (trigger group and barrel group) |
| 3 | 尾筒覆 | receiver cover |
| 4 | 復座ばね部 | recoil-spring group |
| 5 | スライド | slide (carrier) |
| 6 | 遊底部 | bolt group |
| 7 | 撃鉄 | hammer |
| 8 | 上・下被筒 | upper and lower handguards |
| 9 | ピストン部 | piston group |
| 10 | 規整子 | gas regulator |
| 11 | 消炎制退器 | flash suppressor / muzzle brake |
| 12 | 二脚部 | bipod group |
| 13 | 前部弾倉止 | front magazine catch |
| 14 | 逆鈎 | sear |
| 15 | 切換金 | selector |
| 16 | 碍子連結環 | as printed; not identified |
| 17 | 弾倉 | magazine |
Item 16 reads 碍子連結環 in the published text. 碍子 is an electrical insulator, which makes no sense on a rifle, and the term may be a misprint; it is left untranslated.
The table’s own heading for the restricted work is 制限事項, “restrictions”: “特別分解統合で部隊整備員等が第2段階整備に必要な範囲で行う”, that is, special disassembly is done by unit maintenance personnel and the like, to the extent second-echelon work requires, for six groups: 銃主部 (main body), ピストン部 (piston group), ガス筒部 (gas cylinder group), 緩衝器部 (buffer group), 引金室部 (trigger housing group) and 銃尾部 (receiver tail group).1 The buffer and receiver-tail groups are where the linear hammer’s spring and stop live (Vol 3); the user does not open them.
5.4 What only the armourer may do
The second echelon (第2段階整備) does “下記部品の交換作業及び所要の調整”, the replacement of the listed parts and the adjustments they need. The list is in effect the rifle’s wear-and-breakage list:1
抽筒子 (extractor); 上部被筒, 下部被筒 (upper and lower handguards); 撃針 (firing pin); 引金わく止ピン (trigger-frame retaining pin); 逆鈎軸 (sear pin); U型ピン (U-pin); 脚止軸 (bipod retaining pin); 規整子 (gas regulator); 制退器止ねじ (muzzle-device retaining screw); 上部床尾板止ねじ, 下部床尾板止ねじ (upper and lower buttplate screws); 袖筒子ばね (as printed, not identified); 弾倉止ばね (magazine-catch spring); 脚ばね (bipod spring); 復座ばね止 (recoil-spring stop); ピストン桿受け (piston-rod seat); 右脚, 左脚 (right and left bipod legs); 復座ばね (recoil spring); 規整子止ピン (regulator pin); ガス筒止ピン (gas-cylinder pin).
Anything beyond the second echelon is, at the Academy, “委託整備”, maintenance contracted outside (Art. 13).1 The Academy is a school, not a field unit, and the GSDF’s own arrangements are not in the document; but the parts named for the Type 64 are a property of the rifle, not of the school.
The same table shows how the Type 64 compares with the rifle it replaced. For the M1, the user is expressly forbidden to remove the slide from the follower (押上板からスライド), the part the table calls the 山型てこ from the operating-rod catch, the front sight, or the sear from the trigger group.1 For the Type 64 no part is expressly forbidden; the limit is set by the list of what is permitted.
5.5 What a correct field-strip procedure must account for
No sourced sequence exists, so none is given. A correct procedure for the Type 64 would have to account for the following, each from the sources above:
- Clearing first. Magazine out, operating handle on top drawn back, chamber checked. The rifle’s selector is on the right only and turns ア to タ to レ (Vol 3).
- Tools. The Phillips screwdriver and pin punch from the buttplate compartment.3
- The user’s limit. The seventeen items above, and no further. The buffer, receiver-tail, trigger-housing, gas-cylinder and piston groups are maintenance staff’s work.1
- The hammer and its spring. The hammer (item 7) is on the user’s list; its spring and stop in the receiver tail are not.1 The hammer spring is strong (Vol 3); a procedure that releases it uncontrolled would be wrong.
- The parts that can go back wrongly. The Japanese Wikipedia, citing Arms Magazine (December 2006), says one part, the piston-rod retainer (ピストン稈止), can be assembled in a wrong position.3 A correct procedure must say how it goes back.
- The muzzle device. Its tightness affects the zero, and refitting it after stripping can shift the point of impact (Tsunose, as cited by the Japanese Wikipedia).3 A procedure must give its seating and check the zero after.
- The bipod. It does not come off for firing; removing it means taking off the ring at its base and drawing a pin.3
5.6 Cleaning and inspection schedule
The Academy’s directive sets the user’s schedule for every weapon it holds, the Type 64 included:1
- Before and after every use, inspection and cleaning: “使用者は、その使用の前後に必ず点検、手入れを行うものとし”.
- Monthly, in addition: “1か月に1回を基準として点検及び手入れを行うものとする”.
- Before and after long leave, as the weapons officer directs.
- Faults are reported at once to the instructor, who decides what to do.
- Annually, a technical inspection by the weapons section, “to judge the weapon’s serviceability and estimate future maintenance and supply needs” (Art. 18).
The JMSDF’s Sasebo Training Unit adds a custody rule that is really a maintenance one: rifles are never left unattended, even during breaks, and recruits take turns guarding them.4
5.7 Lubrication
No published lubrication chart for the Type 64 was found. One fact bears on it: the rifle is sensitive to lack of oil. The Japanese Wikipedia says that when the slide’s rearward speed becomes irregular through dry or dirty working parts, feeding and ejection failures follow, and it traces this to the short receiver (below).3 A Type 64 run dry is a Type 64 that stops.
5.8 Barrel wear: the bore-gauge limit
The Ministry’s standard NDS Y 7101C, on the gauging of service weapons’ bores, gives the Type 64 a specific procedure and limit. A bore gauge is a tapered rod; inserted from the breech, its taper meets the lands at the start of the rifling, and a scale on the rod reads how far it went in, which grows as the throat wears.2
- How the Type 64 is gauged: “64 式 7.62mm 小銃は,遊底を引き弾室部上部からゲージを挿入して測定する” (“for the Type 64 rifle, draw back the bolt and insert the gauge from above the chamber”). The Type 89, by contrast, has its bolt removed and the gauge put in from the rear of the receiver.2
- The limit: “銃こう(腔)ゲージの読みが表 1 に示す値以上になったときは,その銃は使用してはならない” (“when the bore-gauge reading reaches the value in Table 1 or more, the weapon must not be used”). For the Type 64, Table 1 gives a scale reading of 10, an insertion of 20.30 mm from the zero point, and a diameter of 7.81 mm.2
- The scale: Annex Table A.4 gives the Type 64 gauge’s graduation interval as 2.097 mm, each graduation corresponding to an increase in bore diameter of 0.0226 mm, the same as for the Type 62 machine gun.2
The standard is primarily for the Ministry’s ammunition-test weapons, and its procedure also says to remove the barrel, clean and dry the chamber and bore, and let a hot barrel cool before gauging.2 The figures are the Ministry’s own and are given as printed; this dive has not tried to reconcile the scale interval with the insertion distance.
The barrel is chrome-lined and was meant to last over 37,000 rounds, and the receiver about 24,000 (Vol 3). By those figures, a well-kept rifle wears out its receiver before its barrel reaches the gauge limit.3
5.9 Faults and their causes
The Japanese Wikipedia, drawing on Tsunose and on Arms Magazine, records the faults the rifle was known for. All are as cited there; the underlying sources were not seen.3
Table 2 — Faults and their causes
| Fault | Cause given | Source as cited |
|---|---|---|
| Failure to feed or eject, especially when dry or dirty | The receiver was shortened 10 mm in development, leaving only 6 mm between bolt face and top cartridge with the slide fully back; irregular slide speed then upsets feeding. Troubled early mass production for a long time | Tsunose p. 186 |
| Stoppage, failure to go fully back, or unintended discharge after a blow to the butt | On rifles numbered 1 to 79054 the hammer tube was screwed into the stock and a blow could misalign it with the receiver. Fixed from 79055; slamming the butt stayed forbidden | 『新入隊員必携』 |
| Discharge when loading a grenade blank and fitting a rifle grenade | Shape of the sear and auxiliary sear on prototype and earliest rifles; sear redesigned | Itō, 『銃砲年鑑』 2005–06 |
| Rear sight folding in bursts | The sight stays put as the rifle recoils; drawing change only partly cured it | Tsunose p. 206 |
| Rear sight struck by the helmet brim in prone | Geometry of the Type 66 helmet and the sight | Elite Forces p. 77 |
| Scope shifting zero | Single-screw mount; gap between mount and receiver | 『丸』 August 2012 |
| Point of impact shifting after stripping | Muzzle-device tightness | Tsunose p. 193 |
| Slam-fires with foreign ammunition | Japanese primers were made less sensitive to suit the rifle; German NATO rounds all fired as the bolt closed | Tsunose p. 188 (Vol 6) |
| Bent handguards that then fall off | The lower handguard is light alloy, which does not spring back once bent; only its front is steel-reinforced | Elite Forces Part 2 p. 45 |
5.10 Parts that come off, and the tape
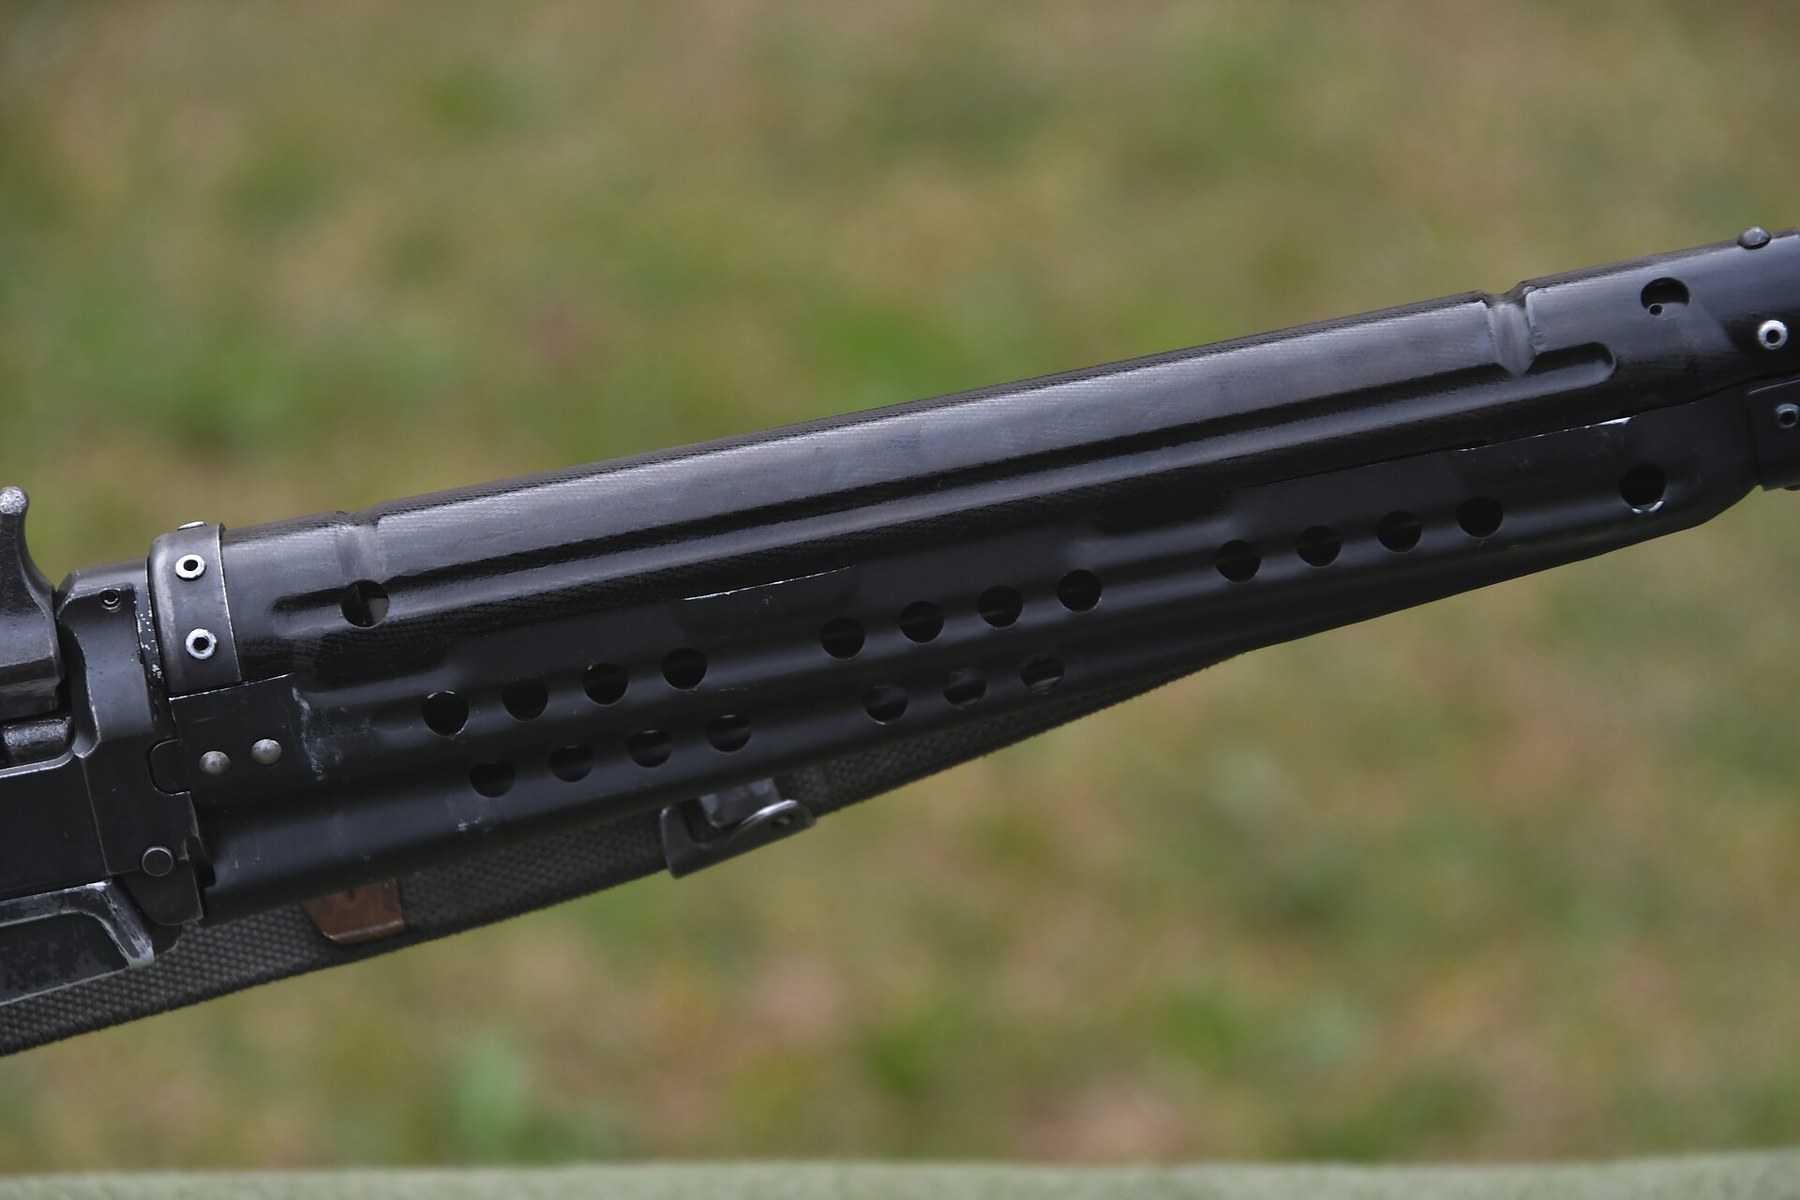
Photographs of Type 64s in training often show electrical tape and wire wound round them. The Japanese Wikipedia explains: on a properly maintained rifle with no worn parts nothing should fall off, but the rifle has some small parts that come loose more easily than on other military rifles, naming the muzzle-device retaining screw (消炎制退器止めねじ) and the spring pin of the piston-rod retainer (ピストン桿止め用ばねピン); and because the Self-Defense Forces account strictly for every item of equipment, units tape parts on during exercises to make sure nothing is lost.3 The Japanese Wikipedia illustrates the point with a 2013 GSDF photograph of a recruit whose rifle has been secured with vinyl tape and wire.3
Kaihōshi, writing in 2022, lists among the rifle’s practical weaknesses “細かい部品の脱落が起きること”, that small parts come off.5 The English Wikipedia says the rifle has “a false reputation for shedding parts” and adds a “better source needed” tag to its own sentence.6 The fair reading of the sources is that the problem is real but limited to a few small parts on worn rifles, and that the tape is partly an accounting precaution.
5.11 Repair and parts
Everything about repair follows from where the rifles are. Type 64s exist only in Japanese government hands (Vol 6), so:
- At the bench: an owner’s bench repair does not arise. In service, the user’s work stops at the seventeen items in section 3 and reporting faults; the armourer replaces the parts in section 4; anything beyond goes to a higher maintenance unit or, at the Academy, to contract maintenance.1
- Parts: no commercial source of Type 64 parts exists. Airsoft and model-gun parts do not interchange with the real rifle and are not parts for it.
- Depot rebuild: the Japanese Wikipedia says that rifles withdrawn from units went back to depots, where low-mileage examples were re-parkerised and stored as reserves.3
5.12 What could not be found
- The GSDF’s own manual and its stripping sequence.
- A lubrication chart.
- Published replacement intervals for springs, the extractor or the firing pin.
- The meaning of 碍子連結環 and 袖筒子ばね in the Academy’s table.
- Whether the GSDF’s own echelon table differs from the Academy’s.
Footnotes
-
防衛大学校達第19号 「防衛大学校の武器等の保管及び取扱いに関する達」, 31 August 1992, as amended to 21 October 2020 (Arts. 11–18 and 別表第1, 武器等整備段階区分表), http://www.clearing.mod.go.jp/kunrei_data/b_fd/1992/by19920831_00019_000.pdf , read 2026-10-20. Translations this dive’s. ↩ ↩2 ↩3 ↩4 ↩5 ↩6 ↩7 ↩8 ↩9 ↩10 ↩11
-
Ministry of Defense, NDS Y 7101C 「小火器弾薬射撃試験用銃器」, established 30 May 1978, revised 15 April 2015, sections 5.3.1–5.3.1.2, Table 1 and Table A.4, https://www.mod.go.jp/atla/nds/Y/Y7101C.pdf , read 2026-10-20. ↩ ↩2 ↩3 ↩4 ↩5 ↩6
-
Japanese Wikipedia, 「64式7.62mm小銃」, wikitext read 2026-10-20, citing 津野瀬光男『幻の自動小銃 六四式小銃のすべて』 (pp. 186, 188, 193, 206); 『エリートフォーセス 陸上自衛隊編』 Part 1 pp. 74, 77 and Part 2 pp. 44–45; 『月刊アームズ・マガジン』 December 2006, p. 29; 伊藤眞吉, 『銃砲年鑑』 2005–06, p. 267; 『丸』 August 2012; 『新入隊員必携』. None seen for this dive. ↩ ↩2 ↩3 ↩4 ↩5 ↩6 ↩7 ↩8 ↩9 ↩10 ↩11 ↩12 ↩13
-
海上自衛隊佐世保教育隊, 「小銃取扱」, 4 December 2023, https://www.mod.go.jp/msdf/s-tc/contents/diary/r5aki/5.12.4-5shoju.pdf , read 2026-10-20: 「武器である銃は休憩中も放置せず、武器係を中心に交代で見張りにつきます。」 ↩
-
貝方士英樹, MotorFan, 4 June 2022, https://motor-fan.jp/article/61101/ , read 2026-10-20. ↩
-
English Wikipedia, “Howa Type 64”, wikitext read 2026-10-20. ↩
Comments (0)