Smith & Wesson M&P Shield · Volume 7
Keeping It Working — Field Strip, Detail Strip, Maintenance and Repair
Smith & Wesson's own takedown and lubrication, why there is no owner detail strip, the malfunctions the manual diagnoses, the parts that wear, and what goes back to Maryville
A carry pistol is maintained differently from a range pistol: it is fired less, carried more, and needs to work the first time after weeks of lint, sweat and holster wear. Smith & Wesson’s manuals are the authority for what an owner does to a Shield, and they are short and restrictive. This volume sets out what they permit, what they diagnose, and where their authority stops — which, for a Shield, is exactly at the field strip. How the mechanism works is in Volume 4.
7.1 What the maker permits, and why it matters here
Every Shield manual consulted carries the same limit: “NEVER DISASSEMBLE YOUR FIREARM BEYOND THE DISASSEMBLY/FIELD STRIPPING PROCEDURE DETAILED IN THIS MANUAL, OR PERFORM ANY MAINTENANCE, ADJUSTMENT, OR SERVICE NOT SPECIFIED.” And: “Never modify or swap out any of the components of your Smith & Wesson® firearm unless specifically instructed to do so in this manual or in an official Smith & Wesson accessory parts manual or instruction sheet. Changes not covered in this manual or in a Smith & Wesson instruction sheet will require a qualified gunsmith (or factory-trained personnel) using factory-authorized parts.”1
This is not only a safety caution. The warranty in the same manual excludes “defects or malfunctions resulting from careless handling, unauthorized adjustments or modifications made or attempted by anyone other than a qualified gunsmith following Smith & Wesson authorized procedures, or failure to follow the disassembly instructions”.1 An owner who detail-strips a Shield is outside both the manual and the warranty, whatever the owner’s skill.
For the lab this hub is written for, the practical line is therefore not competence but documentation: the field strip is published; nothing beyond it is.
7.2 Field strip, as Smith & Wesson describes it
Smith & Wesson’s manuals — 2012 and 2025 — give the same sequence, and they forbid going further: “Never disassemble your firearm beyond the disassembly/field stripping procedure detailed in this manual.”1 The procedure below is theirs, in their order; the words in quotation marks are theirs.
- Point the pistol in a safe direction, finger off the trigger and out of the guard. On pistols with a thumb safety, put it on “SAFE”.
- Depress the magazine release and remove the magazine.
- With the slide closed, “briskly draw the slide fully rearward in order to extract any cartridge from the barrel chamber and clear it from the pistol.”
- Pull the slide fully to the rear and press up on the slide stop, “letting the slide move slightly forward thereby locking the slide open.”
- “Make certain that the chamber is clear of any ammunition.”
- “Use a small screwdriver (or a similar device) to gently push the yellow(ish) sear deactivation lever down (rotate forward) into the magazine well.” The 2025 manual’s figure adds: “Do not force lever down beyond this position.”
- “Rotate the takedown lever 90 degrees clockwise.”
- “Pull the slide slightly rearward to disengage the slide stop and then remove the slide forward from the frame while being careful to retain the recoil spring and guide rod assembly.”
- Remove the recoil spring assembly from beneath the barrel: “Compress the rear of the spring forward slightly and lift it up from the rear and out of the groove in the barrel lug.”
- “Remove the barrel from the bottom of the slide … by grasping the barrel lug and lifting it up and back.”
The result is four groups: slide, barrel, recoil spring assembly and frame, plus the magazine. At no point is the trigger pulled — the sear deactivation lever of step 6 is what makes that possible (Volume 4).21
7.3 Reassembly, and the step that is easy to skip
From the manual, again in its order:1
- With the slide upside down, put the barrel in “so the muzzle is flush with the end of the slide and the barrel lug is turned up away from the ejection port.”
- Insert the recoil spring assembly, muzzle end first, and “tip the rear of the spring into the notch on the barrel lug.” The manual pairs photographs of a spring “misaligned” and “aligned correctly”, and “not seated correctly” and “seated correctly”; check both.
- “Make sure the sear deactivation lever is tipped down (forward) before installing the slide.”
- With the takedown lever down, start the rear of the slide onto the front frame rails, run it back until it engages the rear rails, pull it fully rearward, and lock it open on the slide stop.
- “Rotate the takedown lever 90 degrees counterclockwise so it is parallel with the frame.”
- Release the slide to close.
- “Replace the empty magazine into the pistol - this returns the sear deactivation lever to normal operation mode.”
- “Check for proper functioning by drawing the slide fully rearward - at which point the slide stop should move up and hold the slide open.”
Step 7 is the one to watch. It is the only step that looks optional and is not: until a magazine has been inserted, the sear deactivation lever is where step 6 of disassembly put it. The manual makes the empty magazine part of reassembly, and step 8’s function check with that magazine in place is how an owner confirms the pistol is back in its normal state.
7.4 Detail strip: what no published source supplies
No Smith & Wesson armorer’s manual for the Shield was obtained for this dive, and no military technical manual exists for it — the Shield is a commercial pistol with no general service adoption. Smith & Wesson’s owner’s manuals stop at the field strip and forbid going further; its “M&P Certified Armorer” programme, named in the 2013 safety alert as the alternative to returning a pistol to the factory (Volume 4), is the route by which detail disassembly is taught, and its materials are not public.3 No detail-strip sequence is therefore given here, and none should be reconstructed from memory or from video.
What a correct detail-strip procedure must account for can be stated from the published sources without inventing the sequence:
- The sear housing and trigger mechanism housing. On the patent description the fire control sits in separate housings that carry the slide rails (Volume 4, US 7,472,507). Their retention and removal order are not published.
- The sear deactivation lever and the magazine disconnect lever, both of which protrude into the magazine well and interact with the magazine; their correct state after reassembly is what the owner’s manual checks with an empty magazine.
- The striker block and its spring (US 7,703,230), which must be proved to block the striker after any reassembly.
- The articulated trigger and the trigger bar pin — the parts named in the 2013 safety alert; a reassembly that damages or mis-seats them affects the drop safety.3
- The thumb safety, where fitted, and its engagement with the trigger.
- The rear sight or the optic insert in the slide dovetail, which both Smith & Wesson and Leupold put in a gunsmith’s hands (Volume 5).
- A function check at the end that proves every condition in Volume 4’s table: no fire with the trigger safety undepressed, the striker blocked, the disconnector working, the thumb safety and magazine disconnect working where fitted.
A pistol that has been taken beyond the field strip, by anyone, should pass that function check before it is carried.
7.5 Lubrication and cleaning
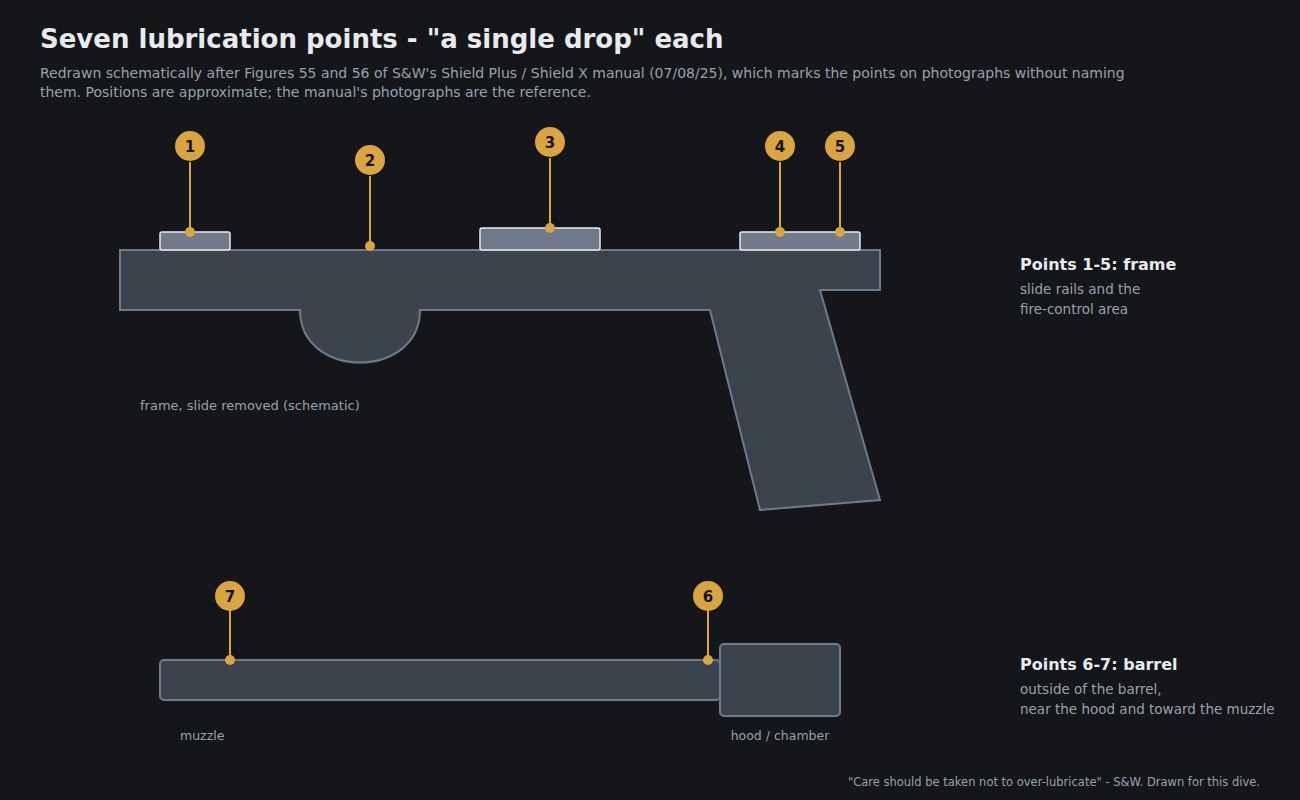
Lubrication. “There are seven (7) lubrication points where a single drop of high-quality firearm lubricant should be applied … Care should be taken not to over-lubricate. Excess lubricant can collect quantities of unburned powder and carbon residue, which could interfere with proper functioning of the pistol.”21 Both manuals mark the seven points on photographs rather than naming them. As the photographs show them — redrawn at the head of this volume — five are on the frame, at the slide rails and in the fire-control area, and two are on the outside of the barrel, one where the hood meets the barrel and one toward the muzzle. The manual’s photographs, not this summary, are the reference; “a single drop” is the operative instruction.
Cleaning. The manual asks for a cleaning before first use, to remove the factory preservative, and then:1
- a brass bore brush with solvent through bore and chamber, finished with a dry patch;
- a light coat of gun oil on metal parts, inside and out;
- cleaning and lubricating after exposure to “sand, dust, extreme humidity, water, or other adverse conditions”;
- in cold climates, an oil “of an appropriate weight so that it will not congeal”;
- no “ammoniated solvents or other strong alkaline solvents”, and no “prolonged solvent immersion and prolonged ultrasonic cleaning”;
- for storage, nothing that “will attract or hold moisture, for example, leather or heavy cloth”, and no bore plug.
That last point bears on a carry pistol specifically: the manual’s warning against storing in leather is a warning about leather holsters, and about any holster that stays on the pistol when it is put away.
Wear. “Every time you clean your firearm, check it for signs of wear. If excessive wear is noted, do not use the firearm. Return it to Smith & Wesson for service or have it checked by a qualified gunsmith.”1 The manual gives no service interval and no spring-replacement schedule, and none is invented here.
7.6 Magazine maintenance
Magazines are the part of a Shield an owner is expressly permitted to take apart. Smith & Wesson’s current manual gives disassembly and reassembly for both floorplate types — “Type 1 uses a ‘push-button’ floor plate catch and Type 2 uses a ‘friction-fit’ floor plate catch” — and warns in every step that the spring is under pressure and must be controlled.1 The Type 1 procedure is summarised in Volume 3; the manual’s own figures should be followed for Type 2.
Three points specific to maintenance:
- Reassemble in the same orientation. The manual requires the spring, follower and floorplate catch to go back “in exactly the same orientation as they were in when they were first removed during disassembly.”
- Check the floorplate is locked — by pushing on it “as if trying to slide it off the tube.”
- Floorplates and catches are model-specific: “there are several versions” for various models, so parts from a different Shield magazine are not spares.1
The manual gives no replacement interval for magazine springs. Smith & Wesson’s Lifetime Service Policy explicitly does not cover magazines (below), and whole magazines are the Shield spare part most easily bought from Smith & Wesson (Volume 3).
7.7 With the optic fitted
Smith & Wesson’s field strip removes the slide with the optic on it; nothing in either maker’s instructions requires the DeltaPoint Micro to come off for cleaning, and it should not, because its zero and its 25 in-lb screws are set with it in place (Volume 5). Leupold’s manual asks that the battery contact surface be kept “clean of dirt and corrosion, cleaning with alcohol if necessary.”4 Neither maker addresses solvent on the optic’s window, and no instruction is supplied here beyond the obvious one that the window is an optical surface.
Smith & Wesson’s warning for slide-mounted optics applies to the Micro without modification: “Observe the condition of the mounting screws before and after firing. If the mounting screws show signs of being loose … do not fire the pistol until you have tightened the screws.”1
7.8 Ammunition, as Smith & Wesson specifies it
Smith & Wesson’s manuals are explicit.
- Commercial ammunition to SAAMI pressures. “Use only commercially manufactured ammunition with internal ballistic pressures which are in strict accordance with the specifications of the Sporting Arms and Ammunition Manufacturers’ Institute ‘SAAMI’.”1
- +P is permitted in 9 mm; +P+ is not. The 2025 manual’s table marks 9mm Luger “OK” for standard and +P ammunition and “NO” for +P+, and warns that +P “may affect the wear characteristics and may result in the need for more frequent service.” Of +P+: it “must NOT be used in Smith & Wesson® firearms”, because the marking “does not represent defined pressure limits.”1
- Reloads. The 2012 manual’s words are “NEVER USE RELOADS OF ANY KIND”; the 2025 manual’s are “never use reloaded ammunition that has not been subjected to internal ballistic pressure testing.”21 This hub’s Reloading material does not override the maker’s instruction for this pistol, and nothing here suggests that it does.
- No oil on cartridges. “Never apply lubricants or cleaner directly onto ammunition … can contaminate the ammunition and result in a squib load.”1
- Extraction trouble. “Some brands of ammunition may cause difficulty in extracting spent cartridge cases from the chamber. If this situation occurs, thoroughly clean the chamber with solvent. If this condition persists, we recommend changing to another brand of ammunition.”2
On a Performance Center pistol with a ported barrel and slide, the manual adds a warning an owner of a standard Shield does not need: keep face, hands and bystanders away from the ports, because “particles and hot gas will be forced out of the barrel/slide ports during normal use.”1
7.9 Malfunctions: what the manual diagnoses
Smith & Wesson’s manual covers five malfunctions, and its general rule comes first: “If your firearm gives any indication that it is not performing properly or the operation of your firearm has changed ‘the way it feels or sounds’, stop firing … unload the firearm and have it inspected and test fired by a gunsmith qualified to perform services on Smith & Wesson® firearms.”1
Table 1 — Malfunctions: what the manual diagnoses
| Symptom | Maker’s diagnosis | Maker’s remedy |
|---|---|---|
| Hangfire — “a noticeable delay between the impact of the firing pin on the primer … and the actual discharge" | "generally caused by defective or damaged ammunition” | keep the muzzle safe and the finger off the trigger; wait 60 seconds; remove the magazine and clear the chamber; inspect the rest of that ammunition |
| Misfire — “failure of the chambered cartridge to fire after the trigger has been pulled" | "defective or damaged ammunition or a dirty or fouled firearm” | wait 60 seconds; clear; inspect and clean before returning the pistol to use |
| Light primer strike | ”caused by a dirty or fouled firearm" | "unload the firearm and clean it as instructed in the ‘Cleaning and Maintenance’ section” |
| Misfeed / jam | ”Any autoloading firearm may, on occasion, fail to feed a cartridge properly” | remove the magazine; lock the slide back — “drawing the slide fully to the rear should allow clearance for the jammed cartridge to fall free”; if not, remove it using “only wood ‘tools’, such as a pointed dowel or a pencil”, avoiding the primer |
| Hard extraction | ”Some brands of ammunition may cause difficulty in extracting spent cartridge cases" | "thoroughly clean the chamber with solvent”; if it persists, “changing to another brand of ammunition”2 |
Sources: the 2025 manual’s “Hangfires and misfires” and “Clearing a misfeed/jam” sections, and the 2012 manual’s ammunition section for extraction.12
What the manual does not diagnose, and where this dive does. Three further failures belong to parts other volumes cover, and each has a first check an owner can make:
- Slide does not lock back on the last round. The slide stop is raised by “the magazine follower [which] exerts upward pressure on the slide stop”.1 The first suspect is therefore the magazine — a worn follower, a weak spring, or a magazine from the wrong Shield family (Volume 3).
- Failure to fire with a magazine removed, or with a magazine not fully seated, on a pistol with a magazine disconnect: that is the disconnect working, not a fault (Volume 4).
- Point of impact shifting, or the dot flickering or dying, on the pistol documented here: check the DeltaPoint Micro’s screws before anything else — Smith & Wesson: “if the mounting screws show signs of being loose … do not fire the pistol until you have tightened the screws” — then the battery (Volume 5).1
A pistol that fails to go into battery, doubles, or fires without a trigger pull is out of the owner’s hands entirely: stop, unload, and contact Smith & Wesson.
7.10 Parts that wear, and parts that break
Smith & Wesson publishes no service intervals for the Shield. Neither manual gives a round count for replacing the recoil spring assembly, the striker spring, the extractor or the magazine springs, and none is supplied here. The maker’s only instruction is inspection: “Every time you clean your firearm, check it for signs of wear. If excessive wear is noted, do not use the firearm. Return it to Smith & Wesson for service or have it checked by a qualified gunsmith.”1
What the sources do establish:
- The recoil spring assembly and barrel lug interface is the part of the pistol the owner handles most, and the manual devotes two pairs of photographs to getting it right — spring centred, spring seated — at every reassembly.1 A spring assembly that will not seat, or that is bent, is a part to replace rather than to force.
- The lower trigger and trigger bar pin are the parts named in the only safety notice ever issued for the striker-fired Shield (Volume 4).3
- The trigger safety can be damaged by a lock that presses on it for long periods (Volume 6).1
- +P ammunition “may affect the wear characteristics and may result in the need for more frequent service” — Smith & Wesson’s own statement that the service life depends on what is fired.1
- Magazines wear, and are consumables in all but name; the Lifetime Service Policy excludes them.
Parts availability. Smith & Wesson’s own store, as read on 19 September 2026, lists under “compatible with Shield” and “compatible with Shield Plus” only magazines, a pinky extension for the 10-round Shield Plus magazine, 3.1-inch and 4-inch threaded and unthreaded barrels, optics-ready slides and Performance Center Carry Comp slide kits.56 No springs, extractors, strikers, triggers or small parts appear in those listings. Those parts reach a Shield through Smith & Wesson’s service department, its certified armorers, or the aftermarket. The aftermarket carries a caution of its own: American Rifleman’s review of the Shield Plus reported that “due to the entirely new nature of the trigger, aftermarket options designed for use in the original M&P Shield will not work in the Shield Plus” — the same generation question as the magazines (Volume 2).7
7.11 Owner, gunsmith, or factory
Drawn from the manuals’ own boundaries:
Table 2 — Drawn from the manuals' own boundaries
| Job | Who | Source |
|---|---|---|
| Field strip, clean, lubricate, reassemble | owner | manual, field stripping and lubrication |
| Magazine disassembly and cleaning | owner | manual, magazines |
| Reversing the magazine release (Shield Plus, Shield X) | owner | manual, ¼-turn plunger procedure |
| Drifting the front sight for windage | owner, with a brass drift | manual, sight adjustment |
| Optic on an optics-ready slide | owner, with the optic maker’s screws | manual, optical sight instructions |
| Removing or replacing the rear sight (including fitting a DeltaPoint Micro insert) | gunsmith | S&W manual; Leupold manual |
| Anything beyond the field strip; replacing internal parts | qualified gunsmith using factory parts, or Smith & Wesson | manual |
| Inspection after an “indication that it is not performing properly” | gunsmith qualified on Smith & Wesson firearms | manual |
| Warranty and Lifetime Service Policy repairs | Smith & Wesson | manual, warranty |
Sources: Smith & Wesson’s 2025 manual throughout; Leupold’s DeltaPoint Micro manual for the rear sight.14 The reversible magazine release applies to the Shield Plus and Shield X, whose manual describes it; the 2012 manual for the original Shield does not describe one, and none is claimed for it.
7.12 Warranty, the Lifetime Service Policy, and sending it back
Smith & Wesson’s current manual sets out three layers.1
The warranty. “Smith & Wesson firearms are warranted to be free from defects in material and workmanship” for defects of which Smith & Wesson “receives written notice within one year from the date of purchase by the original owner.” A claim needs the bill of sale in the owner’s name or “a copy of ATF Form 4473 indicating date of purchase”, and should state the model, serial number and “the description of the difficulty experienced”. Excluded: careless handling and unauthorised work (above), “defective or improper ammunition, corrosion, neglect, abuse, ordinary wear and tear, or unreasonable use.”
The Lifetime Service Policy. After the warranty period, Smith & Wesson “will repair, without charge, for the lifetime of the original owner, any Smith & Wesson firearm, that is found to have a defect in material or workmanship.” Two conditions matter: “Eligibility for this Lifetime Service Policy requires returning the Product Registration Card within 30 days of purchase”, and “The Lifetime Service Policy covers functional defects; it does not include the firearm’s finish, grips, magazines, or sights.” The 2012 Shield manual carries the same registration-card condition and the same exclusions, in slightly different words (“any Smith & Wesson handgun purchased on or after February 1, 1989”).2 Its storage warning adds that using a lock that presses on the trigger safety may “void coverage under the manufacturer’s lifetime service policy.”
Returning a pistol. A Return Merchandise Authorization comes first: contact customer service at 800-331-0852 ext. 4125 or [email protected], because the RMA process “allows Smith & Wesson an opportunity to try to diagnose and correct a customer’s concerns with the product (such as ammunition problems) before it is returned.” Service returns go to Smith & Wesson, 1852 Proffitt Springs Rd., Maryville, TN 37801, with the RMA number on the outside, on a shipping label bearing the name and address of the individual or the FFL shipping it.1
⚠ Whether the pistol documented here is registered with Smith & Wesson, and is therefore covered by the Lifetime Service Policy, is not recorded. It is among the questions for the owner.
7.13 Bibliography
Footnotes
-
Smith & Wesson, Safety & Instruction Manual for SHIELD® PLUS and SHIELD X™ pistols, 07/08/25, part 3017716, https://smith-wesson.canto.com/direct/document/64u457llr51g7db5vqethvi635/gY5JDnG1Bq08wv-8wMzkvdugsCU/original?content-type=application/pdf&name=SHIELD_PLUS&X_Manual_070825_3017716.pdf (accessed 2026-09-19) — safety responsibilities, storage and locks, ammunition, hangfires and misfires, clearing a misfeed, field stripping (Figures 44–54), lubrication (Figures 55–56), assembly (Figures 57–68), sight adjustment, magazines, optical sight instructions, reversible magazine release, cleaning and maintenance, limited warranty, contact and shipping. ↩ ↩2 ↩3 ↩4 ↩5 ↩6 ↩7 ↩8 ↩9 ↩10 ↩11 ↩12 ↩13 ↩14 ↩15 ↩16 ↩17 ↩18 ↩19 ↩20 ↩21 ↩22 ↩23 ↩24 ↩25 ↩26 ↩27
-
Smith & Wesson, Safety & Instruction Manual, M&P SHIELD™ Pistols, © 2012 — ammunition, +P and +P+, extraction, field stripping, lubrication, assembly, warranty and Lifetime Service Policy. Copy hosted at https://savannaharsenal.files.wordpress.com/2014/05/mp_shield_manual_04-02-2012.pdf (accessed 2026-09-19); Smith & Wesson’s own manual portal is script-only. ↩ ↩2 ↩3 ↩4 ↩5 ↩6 ↩7
-
Smith & Wesson Corp., safety alert release, 22 August 2013, reproduced verbatim by The Firearm Blog, https://www.thefirearmblog.com/blog/2013/08/22/safety-alert/ (accessed 2026-09-19). ↩ ↩2 ↩3
-
Leupold & Stevens, DeltaPoint Micro™ Red Dot Sight Mounting & Operation Instructions, artwork 180678E, https://www.leupold.com/media/manuals/DeltaPoint_Micro_Manual_French_180678E.pdf (accessed 2026-09-19). ↩ ↩2
-
Smith & Wesson, “Compatible with Shield”, https://www.smith-wesson.com/products/compatible-with-shield, read from the page’s product data 2026-09-19. ↩
-
Smith & Wesson, “Compatible with Shield Plus”, https://www.smith-wesson.com/products/compatible-with-shield-plus, read 2026-09-19. ↩
-
“Review: Smith & Wesson M&P Shield Plus”, American Rifleman, 19 April 2021, https://www.americanrifleman.org/content/review-smith-wesson-m-p-shield-plus/ (accessed 2026-09-19). ↩
Comments (0)