Luger P08 (Parabellum) · Volume 6
Field Strip, Detail Strip, Care and Repair
Four official procedures side by side, the Swiss army's detail strip, cleaning and lubrication from the manuals, decocking, the parts that break, springs, and what an owner should and should not attempt
6.1 The manuals
Five documents give a Luger field strip in their own words, and they agree on the sequence while differing on one step and in what they let a soldier do beyond it:
Table 1 — Five documents give a Luger field strip in their own words, and they agree on the sequence while differing on one step and in what they let a soldier do beyond it
| Document | Date | Whose | What it covers |
|---|---|---|---|
| Anleitung zur Kenntnis und Behandlung der Pistole 1900/06 | Approved 31 Jan 1911 | Swiss Army | Field strip, striker, six detail-strip operations, cleaning, inspection |
| German Infantry Weapons, Special Series No. 14 | 25 May 1943 | US War Department | Field strip and reassembly of captured P08s |
| Czechoslovak police weapons text, “Pistole vz. 08” | 1946 | SNB (police) | Field strip without tools |
| Century International Arms importer’s guide | 1990s | US importer | Cleaning without disassembly |
| Krieghoff Parabellum Instruction Manual | 2006 edition | The maker of a new P08 | Field strip, striker, reassembly, function check |
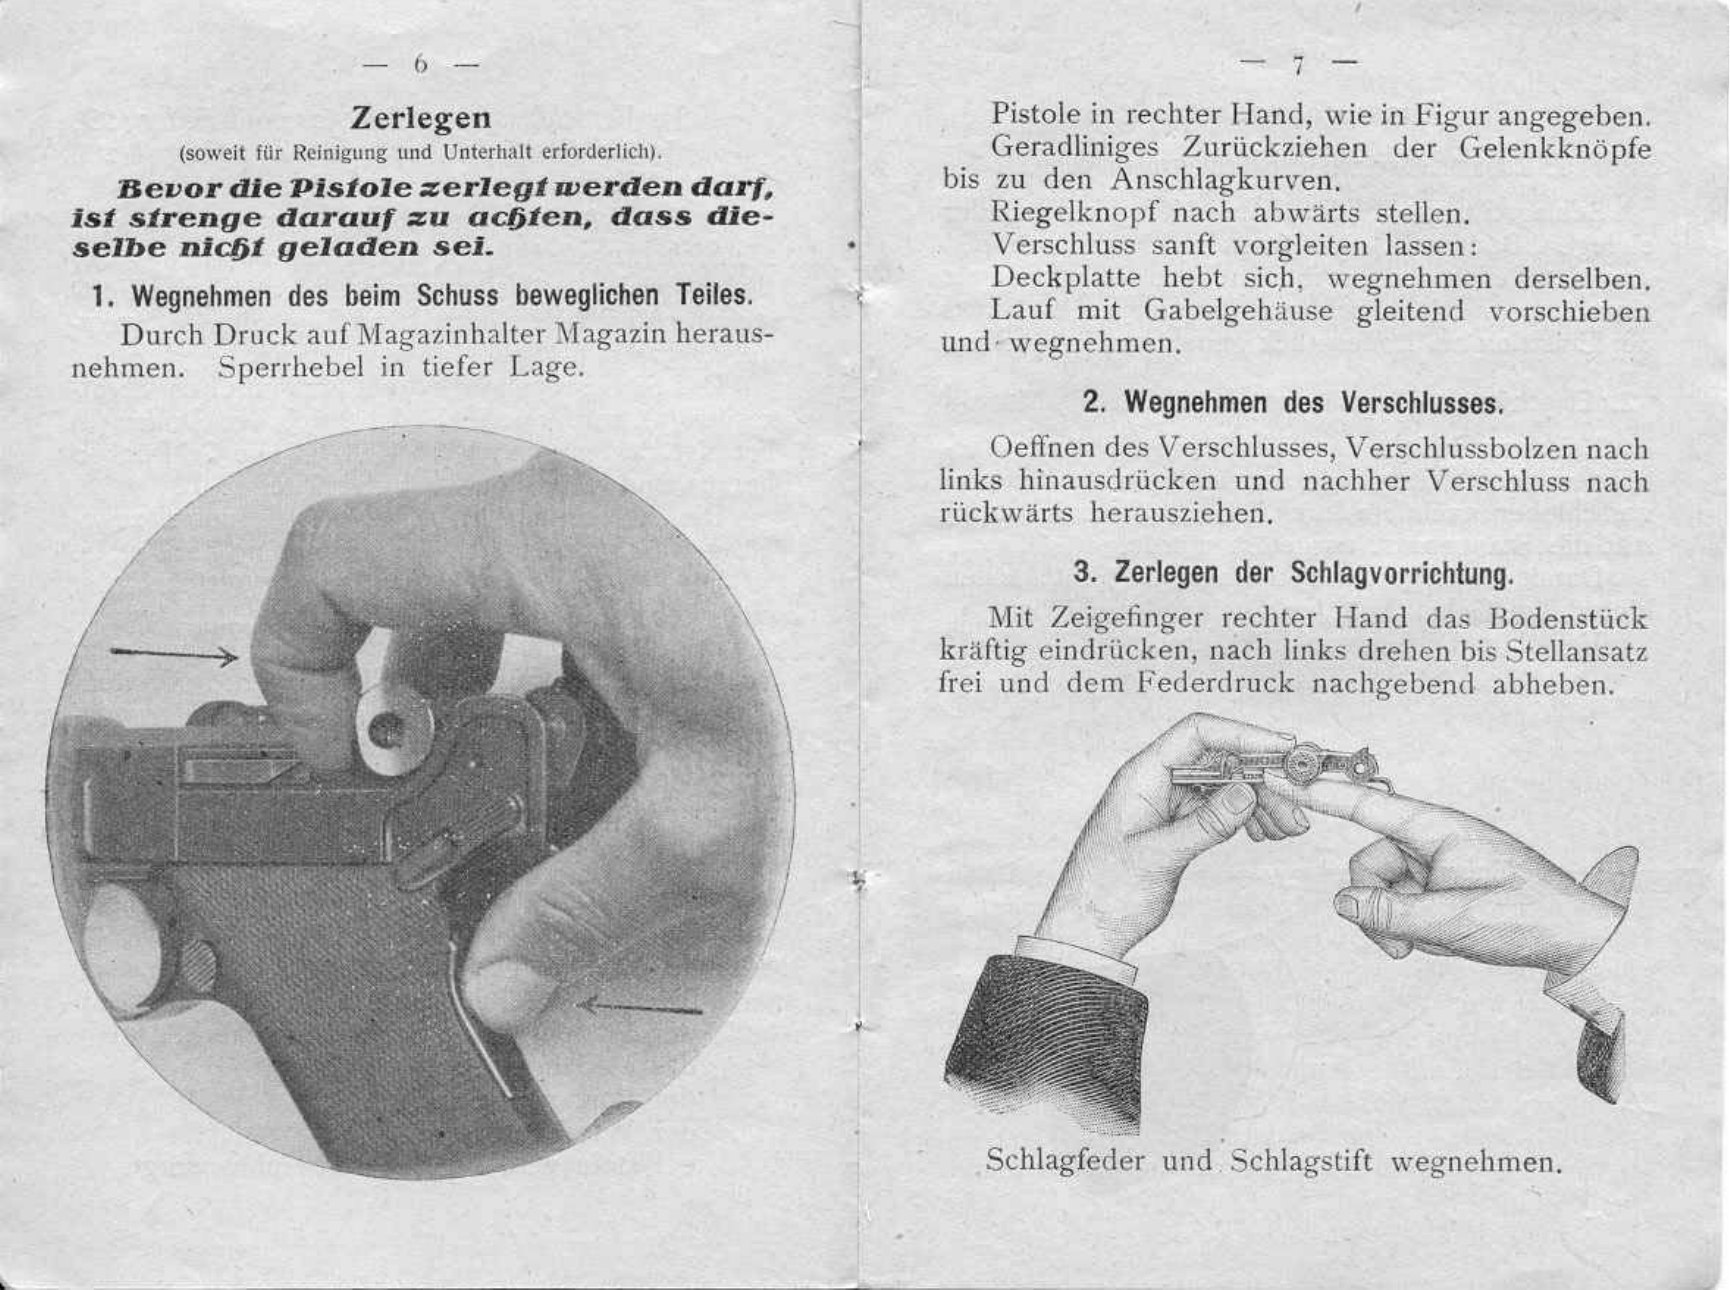
12345 The German Army’s own manual, the D.V.E. Nr. 255 of 1909 and its successor H.Dv. 255, was not found online. The Land of Borchardt collection describes a copy of the 1909 issue (81 pages, marked Entwurf, “draft”, with changes to 1914) and says it was written mainly for officers and has few disassembly illustrations; it gives no text from it.6 The Swiss booklet is therefore the fullest official procedure available, and it is followed here, with the others compared.
6.2 Before anything: unload, and why the upper alone can fire
Every manual begins with the same rule. The Swiss: “Before the pistol may be stripped, strict care is to be taken that it is not loaded.”1 Remove the magazine, draw the toggle back, look into the chamber, let the toggle close.
There is a Luger-specific reason to be careful after the pistol is apart. The sear bar is on the receiver, not the frame (Volume 4), and the striker stays cocked when the barrel group is removed from a cocked pistol. Krieghoff’s manual: “WARNING!! The dismantled Pistol is able to fire, when the sear bar is pushed!! Even without the grip frame mounted!!!!”5 German police pistols from 1933 had a sear safety for exactly this (Volume 2); army pistols do not. Treat a removed barrel group as a loaded pistol until the chamber is seen empty, and keep fingers off the sear bar.
6.3 Field strip: four procedures compared
Table 2 — Field strip: four procedures compared
| Step | Swiss 1911 | US 1943 | Czechoslovak 1946 | Krieghoff 2006 |
|---|---|---|---|---|
| Unload | Magazine out; grip-safety lock down | Magazine out, chamber emptied | Magazine out (after the side plate) | Safety on; magazine out |
| Relieve the spring | Pull the toggle knobs straight back to the ramps and hold | Press the muzzle on a hard surface “until the barrel has moved to the rear about a half inch” | Toggle “to the free position” | Push the muzzle on “a hard protected wooden or plastic surface”; pull the toggle fully back |
| Takedown lever | ”Turn the lever knob downward" | "Push the knurled section of the cover-plate latch downward” | Press with the left thumb and turn “to the opposite position" | "Turn the locking bolt on the side plate down to a vertical position” |
| Side plate | Lifts by itself as the breech runs forward; remove | Remove | Lift out upward | Lift out |
| Barrel group | Slide barrel and receiver forward off the frame | Turn the pistol upside down and slide forward | Draw the barrel forward | Slide forward off the frame |
| Breechblock | Open the toggle, push the axle pin out to the left, draw the breech out rearward | ”Punch out the rear pivot pin” | Not removed: “further disassembly is not needed” | Fold the toggle slightly, remove the pin on the left, pull the toggle and breechblock back out |
| Striker | Press the plug in with the right forefinger, turn left, lift off | — | — | Press the spring guide with the combination tool or a 6 mm screwdriver, turn left |
| Tools | None | None, though the holster tool is mentioned | ”Without any tools” | Combination tool supplied |
1235 The difference that matters is the second row. The Swiss draw the toggle back against the ramps to take the spring load off the takedown lever; the Americans and Krieghoff push the barrel back by pressing the muzzle on a surface. Both work. The muzzle method risks the muzzle crown on a hard surface, which is why Krieghoff specifies a “protected wooden or plastic” one. The US manual’s instruction to “punch out” the axle pin is unnecessary: the Swiss push it out by hand, and so does Krieghoff.
The Czechoslovak police text has a slip in its data: it gives the pistol’s length as 82.9 mm, against 220 mm in every other source.3
6.4 The Swiss procedure in full
Translated from the 1911 booklet, its section headings kept:1
1. Removing the part that moves on firing. Press the magazine catch and take out the magazine. Grip-safety lock in the lower position. Pistol in the right hand, as in the figure. Draw the toggle knobs straight back as far as the ramps. Turn the takedown lever knob downward. Let the breech slide gently forward: the side plate lifts; remove it. Slide the barrel with the receiver forward and remove it.
2. Removing the breech. Open the breech, push the axle pin out to the left, and then draw the breech out to the rear.
3. Stripping the firing mechanism. With the forefinger of the right hand press the plug (Bodenstück) in firmly, turn it to the left until its lug is free, and, giving way to the spring pressure, lift it off. Remove the striker spring and striker.
On a P08 there is no grip safety, so the first instruction becomes “safety on”. Everything else is the same.
6.5 Reassembly, and the step everyone gets wrong
The Swiss booklet again, in its order:1
- Striker. Striker and spring into the breechblock; insert the plug; compress the spring and turn the plug to the right until its lug snaps in. “When correctly assembled, the mark on the plug must stand exactly vertical.” Krieghoff gives the same check: “The index mark in the endplate of the firing pin spring guide must be in the vertical position.”5
- Breech into the receiver. With the underside of the receiver toward the face, carefully start the breechblock and slide it forward, “after the sear bar’s notch has been released by pressing on the snap pin”. To line up the pin holes, push the bearing surfaces behind the toggle knobs together. Insert the axle pin from the left.
- Barrel group onto the frame. Barrel with breech in the left hand, “the chain directed to the rear, the underside of the receiver turned upward”. Carefully start the frame onto it and slide it on, “standing the whole thing upright, so that the chain hooks into the claws of the bell crank (important!)”. Pistol in the right hand as for stripping; draw the knobs back to the ramps; insert the side plate “with its narrow part toward the takedown lever”; turn the takedown lever up.
The step in bold is the one owners get wrong. If the coupling on the rear toggle link does not hook into the lever at the top of the closing spring, the pistol goes together, the side plate goes on, and the toggle has no spring behind it. The US manual makes the same point: “making sure that the hook-shaped link engages in the claws of the recoil-spring head”.2 Krieghoff: “Make sure the T-shape coupling is clear and can engage the recoil lever in the frame … assembly is completed by turning pistol upright allowing coupling to fully engage recoil lever.”5 Pollard’s verdict, in 1920, that the Luger “is easily dismounted for cleaning though difficult to reassemble”, is mostly about this hook.7
The side plate must also sit flat before the lever will turn. Krieghoff: “Side plate must sit flat against the frame before the disassembly lever can be properly seated.”5 A side plate that will not seat is usually a trigger lever out of position or a coupling not hooked.
6.6 Function check
The Swiss: “By repeatedly drawing back and letting the breech snap forward, and by pulling the trigger, one satisfies oneself of the working order of the assembled parts.”1 Krieghoff adds working the safety.5 This dive suggests three specific checks, derived from the mechanism in Volume 4 and labelled as its own: that the toggle closes fully straight from half-way back under spring power alone; that with the safety on, a pull of the trigger does not release the striker; and that with the trigger held through a cycle of the toggle, the striker does not fall until the trigger is released and pulled again (the disconnector). A pistol that fails the last check must not be fired.
6.7 Detail strip: what the Swiss allowed
The booklet’s section “further stripping and assembly” permits six operations, and only these:1
Table 3 — Detail strip: what the Swiss allowed
| Part | Removal | Fitting |
|---|---|---|
| Ejector | Lever the rear up slightly with a knife edge until its stud bears on the edge, then push the nose out with the left forefinger | Lay it over its openings in the receiver and press gently on stud and shoulder together |
| Sear bar | Lift its spring with a knife edge and slide it out; turn the receiver to the left, if necessary rap it into the hollow of the hand, and the bar falls out | Lay it in its recess, snap pin forward; slide the spring in with pressure from above |
| Extractor | Drift the pin with a punch far enough that the extractor’s rear lifts off its spring; take the extractor out forward and the spring upward | Seat the spring, slide the extractor in from the front, press down, refit the pin; then check the extractor’s play |
| Grip safety | Remove the left grip; hold the safety pressed in at its wing and lift out the pivot | Fit under the lock lever and let the pivot into its bearing by sliding the lever up, taking “great care” that its stud lies behind the safety spring |
| Hold-open | Lift lightly with the right forefinger and push back | Hold it so the middle finger presses the spring; lay it with its spring over the pin; push forward while pressing, so the hook catches under the pin |
| Trigger | Slide it out along its pivot axis | With simultaneous pressure on its spring |
| Takedown lever | Push the lever up and pull it out | With the same pressure |
The Luger Forum reference adds two bench notes from owners: the pins holding the sear-bar plunger (the snap pin) and the coupling (“S-link”) are “very tight”, and one owner pressed them out in a drill press with an upturned drill bit or punch over a drilled wooden block; “the spring is small and thin, easy to lose or damage”.8 Those are an owner’s methods, not a manual’s.
6.8 What the manuals forbid
The Swiss booklet ends the detail strip with: “Further dismantling may as a rule be done only by experts. The magazine is not to be dismantled, and in particular nothing is to be altered on the front sight or on the toggle pins.”1 The US Army board found in 1907 that even the inventor did not dismantle the breechblock with its toggle links and recoil spring, the trigger plate and lever, or the magazine follower, all being “riveted together or so joined as to make dismounting impracticable except in a machine shop”.9 Krieghoff: “No further disassembly is recommended or necessary”, and “DO NOT modify this firearm in any way”.5 The Czechoslovak police text: the pistol may be dismantled “only when this is needed for cleaning”.3
The cleaning rule was as strict. The Swiss: after the prescribed method, “any other cleaning is forbidden”. Never block the muzzle with rag, plug or grease (“because dangerous, forbidden”), and never shoot out an obstruction: if the cleaning kit cannot remove it, “the weapon is to be handed to the armourer”. A barrel fired with an obstruction bulges.1
6.9 Decocking and dry firing
Decocking. The P08 has no decocker. The striker stays cocked after the pistol is unloaded unless it is let down. Krieghoff’s method: “Pull breechblock back 1cm or 1/2 inch. Pull trigger. While holding trigger in rear position, slowly release breechblock into battery position.”5 The Luger Forum reference gives the same method and explains it: the trigger, pulled at the point in the toggle’s travel where the trigger lever meets the snap pin, lifts the sear away so the striker rides forward with the breechblock.8 The Swiss: unload, let the breech snap forward, then “uncock (pull the trigger with the barrel pointed at the ground)”.1
Dry firing. The Forum’s answer to “Is it OK to dry-fire a Luger?” is “No, it is very hard on the firing pin, at a minimum, use snap caps, but best advice is not to do it.”8 The Swiss let the trigger be pulled to uncock; the Forum’s advice is the cautious one for a century-old striker that is expensive to replace.
6.10 Cleaning and lubrication
The Swiss 1911 procedure, which assumes the corrosive priming of the day:1
- Immediately after shooting, clean the barrel “with plenty of weapon grease” and grease it well afterwards; if that is impossible, at least grease the bore at once.
- Draw the greased bristle brush through the bore repeatedly (“usually 15 to 20 times”).
- Wind a cotton strip about 2 cm wide spirally on the wiping rod and draw it through until the bore is clean; inspect from both ends.
- Wind a greased strip on the rod and draw it through several times.
- Wipe all metal parts with a dry cotton rag; dissolve hardened grease with fresh; then coat every part thinly from a clean woollen rag soaked in grease.
- Grease heavily: the guide grooves of the breechblock and the receiver, the axle pin, and the front and rear toggle links.
The US handbook of 1943 adds a warning for the conditions it was written for: “in desert countries, or in other places where dust is prevalent, oil should be used sparingly or not at all.”2 The Century guide, for a modern owner, says to clean the bore and bolt face with solvent and a brass brush, and “apply a light coat of penetrating oil to the bore and action, paying specific attention to the toggle link joints and the rails on which the bolt rides”, adding that “no further disassembly is required for normal cleaning”.4 The Luger Forum reference gives the collectors’ principle: “parts that rotate against each other are oiled, and parts that slide against each other are greased”, and warns against silicone products and over-cleaning.8
Old military ammunition, and some commercial ammunition still sold, is corrosively primed. After firing any ammunition whose priming is unknown, clean the bore the same day.
6.11 Storage and inspection
The Swiss: store the pistol “lying or hanging in a dry place. Dust is not harmful”, but avoid rooms “heavily lived in and subject to rapid changes of temperature” because of condensation.1 The Swiss post-cleaning inspection checked general cleanliness, the condition of metal parts, the greasing of the parts that rub, and “the play of the breech, in particular of the firing mechanism and the trigger”.1
6.12 What breaks
The only systematic evidence found is a small owner survey. Dwight Gruber surveyed Luger shooters on the Luger Forum in the autumn of 2002; nineteen replied, covering more pistols than that. The parts reported broken, and how often:8
Table 4 — What breaks
| Part | Reports | Note |
|---|---|---|
| Ejector | 11 | Proof-stamped on Erfurts and most Simsons |
| Takedown lever spring | 7 | |
| Extractor | 6 | Serial-numbered |
| Grip screw | 3 | |
| Breechblock | 2 | Serial-numbered |
| Rear toggle link | 2 | Serial-numbered |
| Hold-open spring | 2 | |
| Firing pin | 2 | Serial-numbered |
| Grip safety spring, rear toggle axle pin, trigger lever pin, hold-open, upper receiver, flat recoil spring | 1 each |
Gruber’s own comment frames it: the pistols are “in no way ‘fragile’”, but “over the course of 60-100 years … metal can become fatigued, crystallized, parts can develop microscopic cracks.”8 The ejector and the extractor, small spring parts doing the most violent work, lead the list; serial-numbered parts that break cost the pistol its “matching” premium as well as the part (Volume 7).
6.13 Springs
Closing springs vary by model, and the tables collectors use come from Harry Jones’s Luger Variations, reproduced in the Forum reference: for example, a 1908 pistol’s spring of 0.058 in wire, 17 turns, 3.2 in free length and 56–57 lb at solid height; a 1914 long pistol’s of 0.057 in, 21 turns, 3.25 in, 55 lb; a 1906 Swiss pistol’s of 0.062 in, 14–14.5 turns, 2.8 in, 55–58 lb; the 1920 carbine’s of 0.050 in, 21.2 turns, 3.1 in, 23 lb.8 A Luger Forum moderator wrote in 2015 that “Wolff springs has three weights of recoil spring”, suggesting the 36 lb one for 7.65 mm pistols and early 9 mm guns; Wolff’s own page could not be reached for this dive.10 The same post quotes the factory specifications that Görtz and Sturgess print: DWM’s 1904 spring of 19 turns, loading 7 to 8 kg at 50 mm length and 15 to 16.5 kg at 34 mm; early P08s with 18 turns of 1.5 mm wire, changed in 1915–17 to 22 turns of 1.4 mm; and Mauser’s 1934 specification of “cast steel spring wire ‘Extra-Extra’, carbon content 0.8 %”.10
The practical rule, derived from the mechanism and the 1907 board’s findings rather than stated by any one source: match the spring to the ammunition and the pistol. A pistol that short-strokes with standard loads may have too heavy a spring or too light a load; one that batters, or whose toggle slaps the frame hard, may have a tired spring. An old spring of unknown history is the cheapest part in the pistol and the first to change.
6.14 Malfunctions and their usual causes
Table 5 — Malfunctions and their usual causes
| Symptom | Usual cause | Source |
|---|---|---|
| Toggle stops short of straight; cartridge not fully seated | Final seating by momentum: weak load, dirt or dry guides, heavy or wrong spring | US board 1907 (“corrected by striking the link”); Swiss greasing points |
| Toggle does not open fully; failure to eject | Weak load; weak recoil; heavy spring; dirt | US board 1907 |
| Cartridge caught nose-up between breech and chamber | Magazine lips or follower; timing of the feed | US board 1907 |
| Pistol will not fire with safety off | Coupling not hooked after reassembly (no spring); sear bar or its spring out of place | Swiss reassembly; Krieghoff |
| Side plate will not seat | Trigger lever or coupling out of position | Krieghoff |
| Doubling | Disconnector (snap pin, its spring or pin) worn, broken or gummed | Swiss “Funktionen”; Forum |
| Stoppages in dust or sand | The open top of the action | US 1943; US board 1907 |
| Breakage of ejector or extractor | Fatigue | Forum survey 2002 |
91582 A pistol that doubles is a danger and, in law, potentially a machine gun (Volume 8). Stop and repair it before it is fired again.
6.15 Bench or gunsmith
At the bench, from the manuals: field strip; the striker; the six Swiss detail-strip operations; cleaning; springs.
For a Luger specialist:
- Barrel work. A replacement barrel must be screwed into the receiver (with an inch-pitch thread on the Swiss drawings, Volume 1), timed so that the sight stands upright, and headspaced. Specialist restorers do it; one American shop listed an LP08 barrel replacement at $100 to $435 on 19 October 2026, with an option to “replicate original factory process: after fitting, application of proper factory proofs and numbers on the barrel”.11 That option is a reason for a buyer to look hard at any long pistol’s barrel (Volume 5).
- Toggle pins, sights, the sear and the trigger: the parts the Swiss forbade an owner to touch.
- Anything serial-numbered on a collector’s pistol: a replacement part lowers the value; a repaired original keeps more of it (Volume 7).
- Refinishing: almost never, on a collectable pistol.
Parts. Original parts are traded by collectors and specialist dealers; the post-war East German factory made parts and magazines, many sold in the United States after the Cold War; new springs are made; and the stainless American Lugers of the 1990s were not made to German dimensions and are not a reliable parts source for German pistols.8 Because every pistol was hand-fitted, an original part from another pistol may need fitting too.
6.16 What this volume could not settle
- The German Army’s own text of D.V.E. 255 (1909) or H.Dv. 255, and whether its procedure differs from the Swiss.
- Wolff’s Luger spring range, from the maker.
- Any maker’s figure for spring replacement intervals; none was found, and none is given.
- The pistol length in the Czechoslovak text, which is plainly a slip, and what figure was meant.
References
Footnotes
-
Anleitung zur Kenntnis und Behandlung der Pistole 1900/06, approved by the Swiss Federal Council on 31 January 1911, “Zerlegen”, “Zusammensetzen”, “Weiteres Zerlegen und Zusammensetzen”, “Handhabung”, “Reinigen und Unterhalt”, pp. 6–20, Internet Archive, https://archive.org/details/gunmanual_Luger_1900-06, consulted 2026-10-19. Translations are this dive’s. ↩ ↩2 ↩3 ↩4 ↩5 ↩6 ↩7 ↩8 ↩9 ↩10 ↩11 ↩12 ↩13 ↩14
-
War Department, Military Intelligence Service, German Infantry Weapons, Special Series No. 14, 25 May 1943, pp. 9–10, Internet Archive, https://archive.org/details/GermanInfantryWeapons1943, consulted 2026-10-19. ↩ ↩2 ↩3 ↩4 ↩5
-
Muzeum Policie ČR, “Opis z nauky o zbraních pro příslušníky SNB z r. 1946: Pistole vz. 08 (něm.)”, https://vojensko.cz/upload/9mm-pi-vz-08-n-parabellum-p-08-popis.pdf, consulted 2026-10-19. Translation this dive’s. ↩ ↩2 ↩3 ↩4
-
Century International Arms, Guide on the Use of the German Model P.08 Pistol, Caliber 9mm Parabellum (9x19mm), “Care and Cleaning”, Internet Archive, https://archive.org/details/gunmanual_Luger_P08, consulted 2026-10-19. ↩ ↩2
-
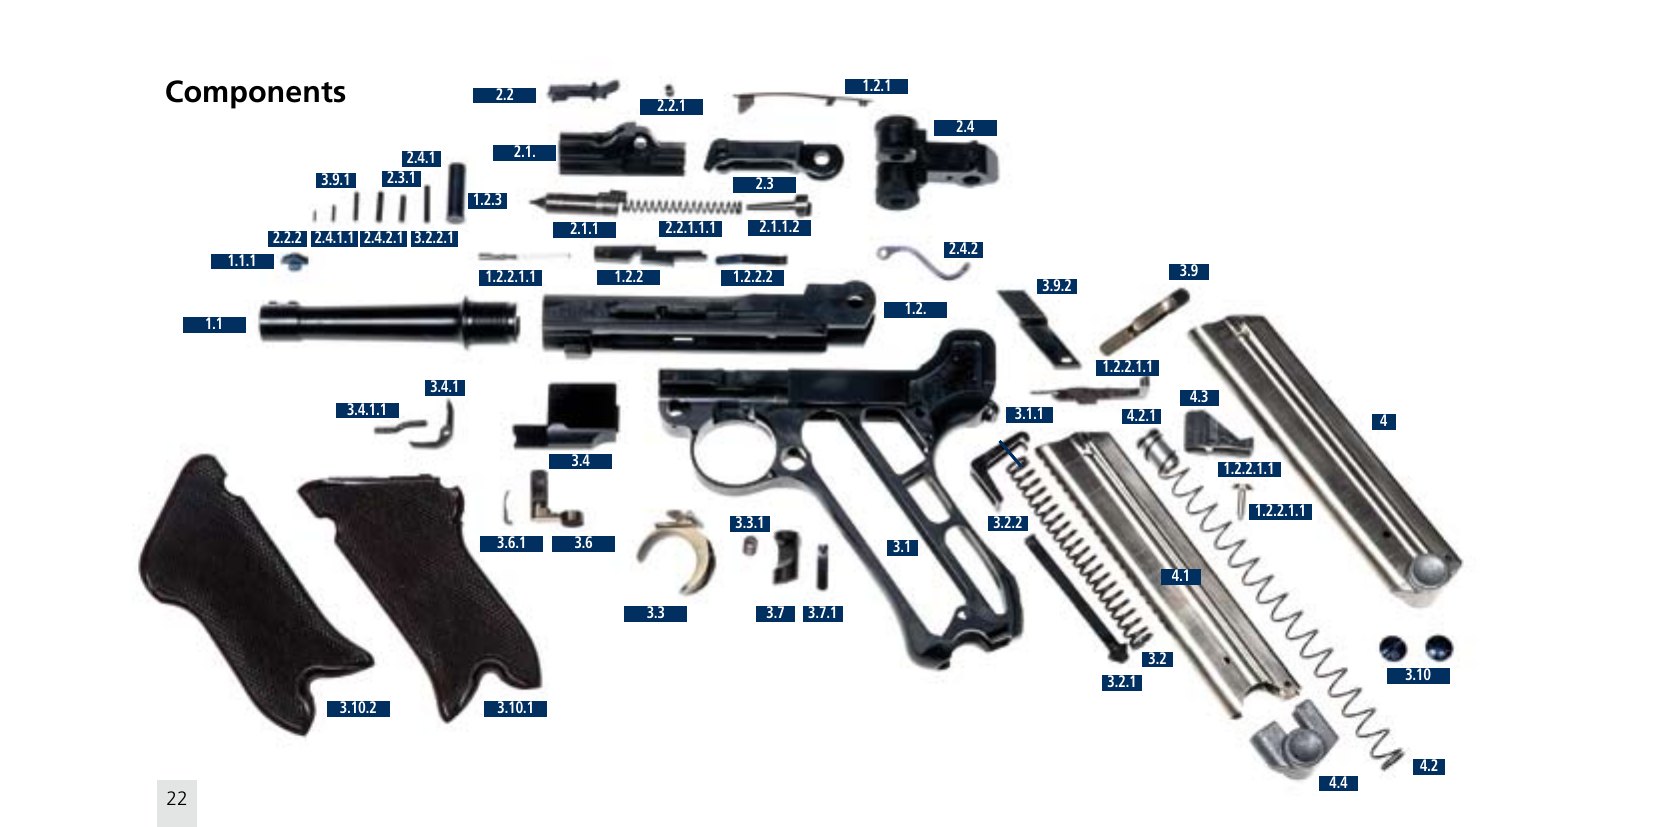
Krieghoff, Instruction Manual, Krieghoff Automatic Pistol PARABELLUM – Caliber 9mm, pp. 9, 16–22, Internet Archive copy of 5 July 2016 of https://www.krieghoff.de/fileadmin/krieghoff_filelist/Downloads/Bedienungsanleitung/PDF/instruction_manual_parabellum.pdf, consulted 2026-10-19. The components photograph is from p. 22. ↩ ↩2 ↩3 ↩4 ↩5 ↩6 ↩7 ↩8 ↩9 ↩10
-
Land of Borchardt, “1909 first official issue Pistole 08 instruction manual D.V.E. Nr. 255”, https://landofborchardt.com/1909man-article.html, consulted 2026-10-19. ↩
-
Hugh B. C. Pollard, Automatic Pistols (London, 1920), p. 29, Internet Archive, https://archive.org/details/automaticpistolspollard1920, consulted 2026-10-19. ↩
-
Luger FAQs, last updated 1 August 2019, Luger Forum and Jan Still Luger Forum, entries on de-cocking, dry firing, the broken parts survey, recoil springs (Harry Jones), sear plunger and S-link pins, lubrication, and the 2/1001 parts, Internet Archive, https://archive.org/details/20190801lugerfaqs, consulted 2026-10-19. ↩ ↩2 ↩3 ↩4 ↩5 ↩6 ↩7 ↩8 ↩9
-
“Report of Board on Tests of Revolvers and Automatic Pistols”, Annual Report of the Chief of Ordnance, 1907, Appendix, pp. 102–104, Internet Archive, https://archive.org/details/1907pistoltrials, consulted 2026-10-19. ↩ ↩2
-
Luger Forum, post #2 by the moderator “mrerick”, 17 April 2015, https://forum.lugerforum.com/forum/showthread.php?p=270349, consulted 2026-10-19, citing Görtz and Sturgess, The Borchardt and Luger Automatic Pistols, pp. 905, 1061, 1093. Not checked with Wolff. ↩ ↩2
-
Lugerman (Langhorne, Pennsylvania), “Luger LP08 Artillery – 8″ Barrel Replacement”, https://lugerman.com/?p=1271, consulted 2026-10-19. ↩
Comments (0)