Stonewall Creek 4-Gauge Blunderbuss · Volume 4
Fitting the Precarve: Inletting Barrel, Tang, Lock & Furniture
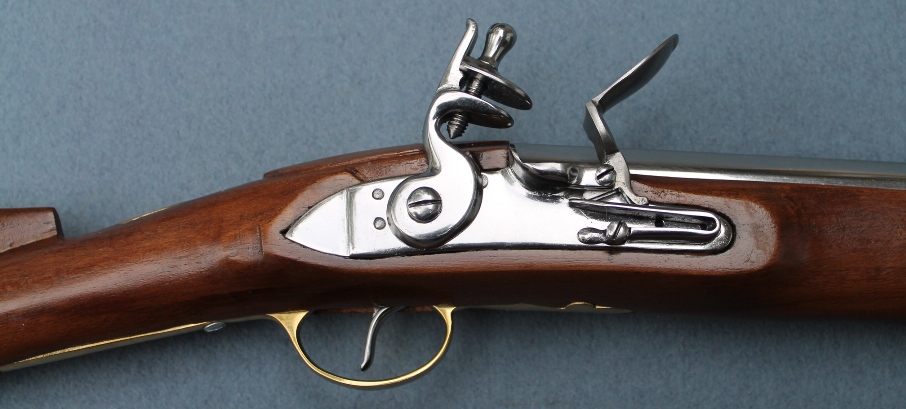
This is the volume that earns the kit its “advanced” grade — and it is also where that grade deserves a little context. Stonewall Creek marks the kit advanced, and the honest reason builders keep arriving at is that the label is there mostly to keep beginners off a scarce and valuable Rayl barrel, not because the joinery is beyond a competent amateur. The most experienced voice on record — a builder who has actually assembled a 4-bore Rayl buss — put it plainly: it is just as easy to learn while building a blunderbuss as anything else. Lock inletting, trigger-guard work, and buttplate work are identical to a fowler. The one thing that is new is the barrel channel, and that is because of the barrel’s size, not any special technique.
4.1 Read the precarve before you cut anything
The stock is a Keck precarve: shaped to profile, with the major mortices roughed in. Before touching a chisel, dry-assemble and study what the precarve has and has not done for you. Set the barrel in its rough channel, offer up the lock, sit the buttplate and guard. Find out where the wood is already close and where it is proud. The cardinal rule of fitting a precarve is the same as any inletting: remove wood only where you have proven it is holding metal off. Inletting black (or lipstick) on the metal, seated and lifted, shows you exactly the high spots. Cut those, and only those. Wood you remove does not come back, and on a stock this scarce there is no spare.
4.2 The barrel channel — the one real challenge
Everything different about this build lives here. The Rayl 4-bore barrel is large in diameter — roughly an inch of bore plus wall — but comparatively short, shorter than a fowler barrel. That combination is the whole story of the channel:
- The channel is wide and deep. You are letting a big cylinder into the forestock, and the wood on either side of it is correspondingly thin. Work patiently; a barrel this size is unforgiving of a channel gouged too deep on one side.
- Because the barrel is short, there is less length over which to fair the channel, so any twist or wander shows quickly. Establish the centerline, seat the breech end first and true, then work forward, checking that the barrel sits straight and the tang lines up on center as the barrel comes down to full depth.
- Take the barrel down to a full, even bearing along the channel floor and both flats or curves, not resting on high spots. Use inletting black repeatedly; scrape, don’t gouge, as you close in on final depth. The barrel should settle to a consistent seam all the way along.
- Mind the flared bell. The muzzle end flares, so the front of the channel and the forestock cap area have their own geometry — don’t inlet the flare as if it were straight tube. Leave the muzzle relief right and the forend wood supported.
Take your time here and the rest of the build is genuinely fowler-standard.
4.3 The tang
With the barrel bedded, inlet the breech tang into the wrist. The tang carries recoil into the stock and this gun recoils hard, so the tang must bear on wood along its full length and underside, not bridge on its tip or edges. Ink it, seat it, relieve the high spots, and repeat until it beds fully and the tang screw draws down without cocking the barrel in its channel. A tang that beds cleanly is part of what keeps a big-bore’s kick from splitting a wrist over time.
4.4 The lock
Inletting the Chambers lock is ordinary lockwork — identical to fitting a Chambers lock to a fowler. Locate the plate against the barrel and vent, mark it, and inlet the plate to a full flush bearing first. Then relieve behind the plate for the internals — the mainspring, tumbler, sear, and bridle — cutting clearance so nothing binds, but only as much as each part needs. Two cautions carried from Volume 3: keep the internal cavity clean of chips, and keep stock finish out of the mechanism. The sear and tumbler must move freely; a lock that “went bad” after inletting almost always has wood or finish fouling it, not a defect.
Fit the side plate opposite the lock, inletting it flush, and drill the lock bolts through so they draw the lock up tight to the plate bearing.
4.5 The furniture — brass, and fowler-standard
The buttplate, trigger guard, and ramrod pipes are correct brass castings, and fitting them is exactly the work you would do on any fowler:
- Clean the castings first. Investment-cast brass arrives with a light skin, mold-line flash, and sprue stubs. Draw-file and stone the flash off, true the mating surfaces, and dress the castings to the shapes you want before inletting — it is far easier to fit a finished casting to wood than to fit wood to a rough one.
- Buttplate: inlet the return and the tang so the plate sits flush around the butt with no gaps, ink-fitting as you go, then screw it home.
- Trigger guard: inlet the bow and both tangs flush, set so the trigger sits correctly within the bow, and pin or screw per the kit.
- Ramrod pipes: inlet the pipes into the ramrod groove aligned so the ramrod runs straight and enters the forestock channel cleanly; pin them.
None of this is exotic. If you have fitted brass to a fowler, you have done all of it before.
4.6 Sequence and the honest verdict
A sane order: barrel channel to full bearing, then tang, then lock and side plate, then trigger and guard, then buttplate, then ramrod pipes, checking the whole assembly comes together square before any final shaping. Dry-assemble the complete gun before you commit to finishing.
The verdict experienced builders keep landing on is worth repeating: this is a demanding build mainly because the barrel channel is big and the barrel is precious, not because the skills are rare. Fit the channel patiently, treat the Rayl barrel as irreplaceable — because it very nearly is — and the lock and brass work is the same fowler joinery you would do on any quality kit.
Sources
Stonewall Creek Outfitters; American Longrifles forum.
Comments (0)