Modding Classic Light Guns · Volume 3
Shells as Hosts — Which Classic Gun to Gut, What Goes In, and Where the Camera Sits
Why a GunCon shell became the default home for a modern IR gun, the carrier boards made for it and how OpenFIRE already knows their pin maps, the other shells weighed one by one, the rules for putting a camera behind a barrel, and the choice for this build with its reasons
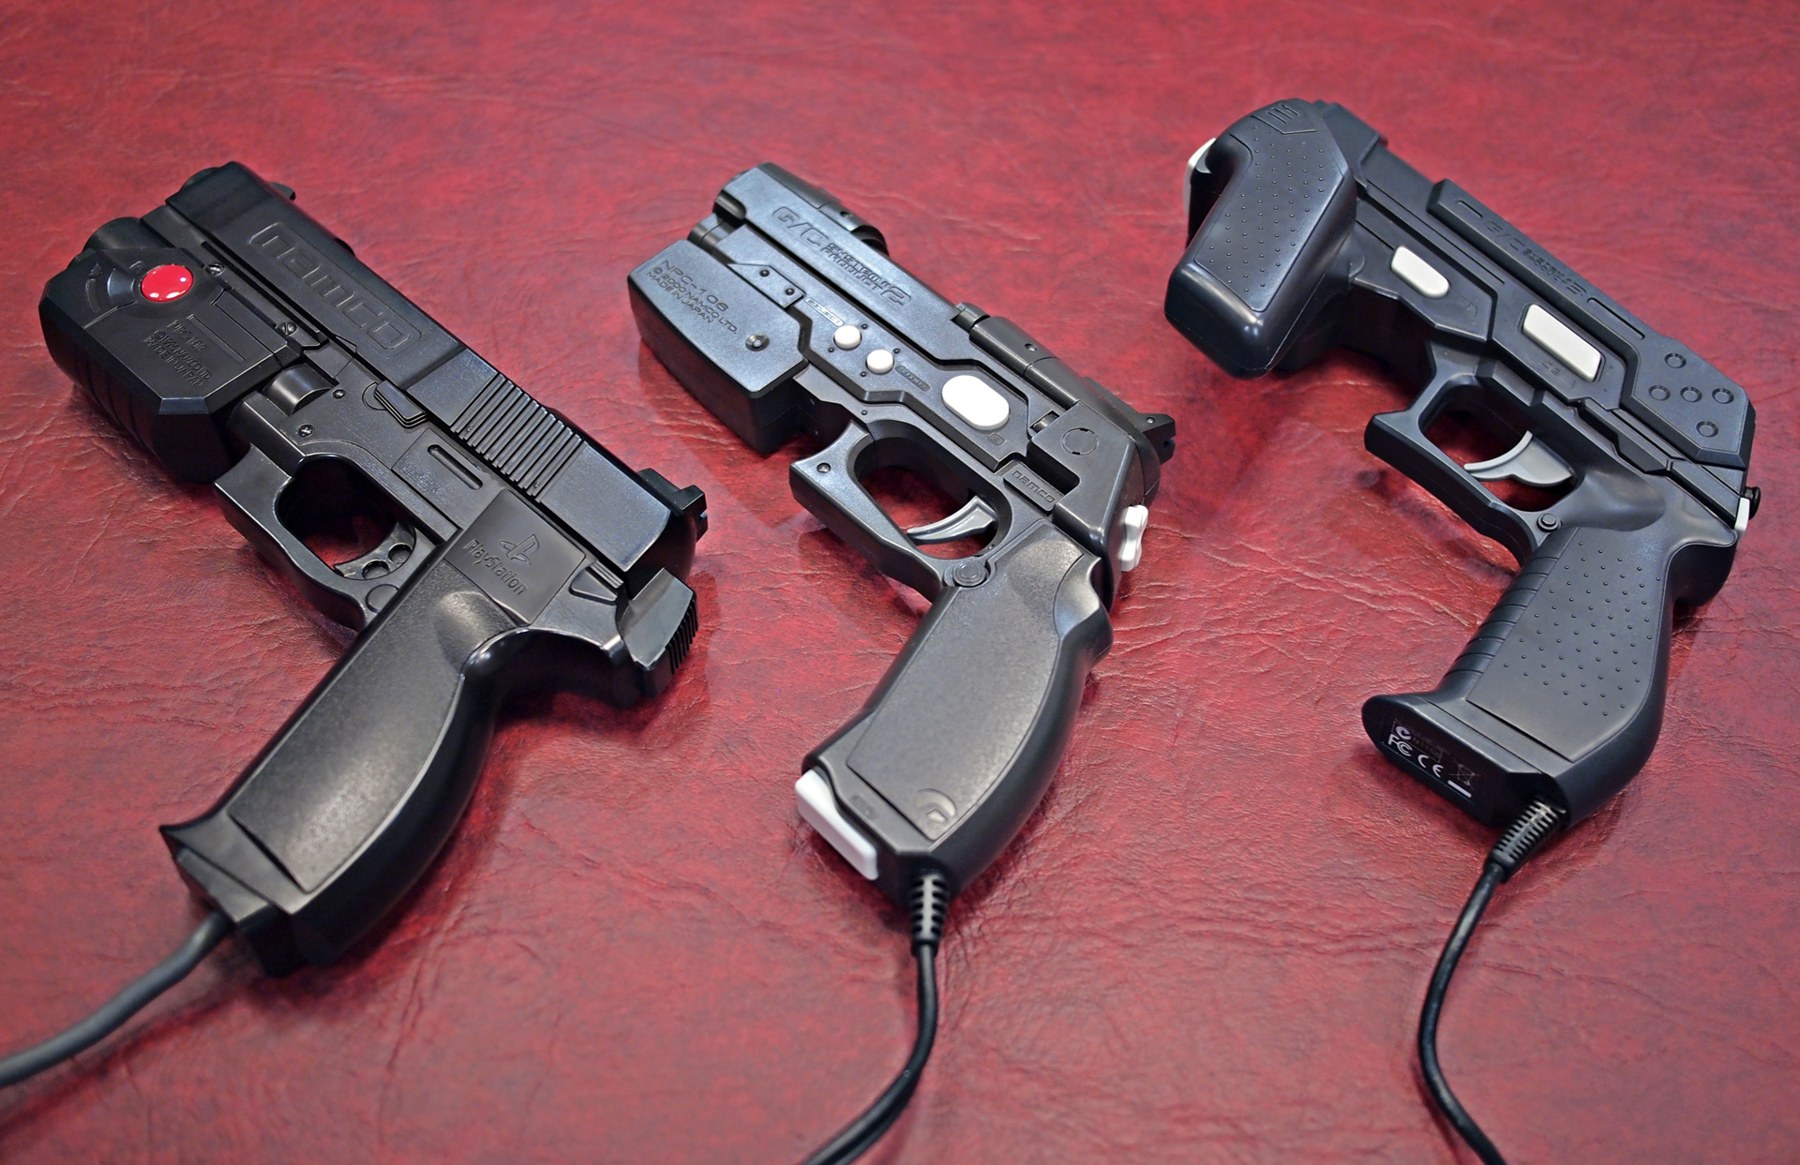
3.1 Why gut a classic gun at all
A modern infrared light gun is a camera, a microcontroller, a trigger and some buttons. Everything else is the housing, and the housing is where most home-built guns fall down: printed shells take hours, need finishing, and rarely feel as solid as an injection moulding designed by a games company. The classic guns solve that. They were designed to be held for hours, their switches are already in the right places, and the CRT-era guns are plentiful and cheap because nobody can use them on the television they own.
That is why the do-it-yourself revival grew up inside them. Sam Ballantyne’s SAMCO, the first widely built open IR gun, was “a Namco light gun with the insides replaced with an Arduino micro controller and DF Robot IR positioning camera”, published in June 2019.1 GUN4IR made its name the same way (History of Light Guns, Volume 8). And when Michael’s original brief for this project chose OpenFIRE, its fallback was “buy a used GunCon and swap in OpenFIRE internals” (Open-Source Firmware, §1.13). This volume decides which shell, and the next volume builds it.
There is a cost. A gutted CRT gun is a gun nobody will use on a CRT again. The author of the build in Volume 4 recommends “seeking out a GunCon 2 being sold for parts” unless the builder is sure they will never want to play GunCon 2 games on a CRT.2 A non-working gun with a sound shell is the right donor; Volume 2 shows how to tell whether a cheap gun is dead or merely mis-connected before deciding which it is.
3.2 What a host shell has to provide
Table 1 — 3.2 What a host shell has to provide
| Need | Why |
|---|---|
| A straight bore-axis tube at the muzzle with room for a camera module and, ideally, a lens | The camera’s optical axis should be the aim axis. A camera mounted off-axis works but adds a fixed offset that calibration has to remove (Reference Electronics, Volume 3) |
| A cavity for the microcontroller | A Pico is 51 × 21 mm (Raspberry Pi’s datasheet); smaller boards (ItsyBitsy, KB2040, Waveshare Zero) exist when it does not fit (Open-Source Firmware, Volume 3) |
| Switches that can be reused or replaced in place | The trigger especially; reusing the original keeps the feel |
| A cable exit | For USB, and a second conductor pair or connector if a solenoid supply is added |
| Room for a solenoid or rumble motor, if wanted | Volume 6 |
| Availability and price | A shell that costs more than a printed one, or is a collector’s item, defeats the point |
3.3 The GunCon family as hosts
GunCon (G-Con 45). A trigger and two side buttons (A and B), a 20 mm lens in a tubular barrel, a single main board and a nine-wire cable (Volume 1, §1.4). Its barrel takes a DFRobot-class camera, and the SAMCO and GUN4IR projects both made boards for it (§3.4). Its weakness as a host is the button count: three inputs, no D-pad. For PC and emulator use that means mapping start, coin and menu to combinations or adding switches.
GunCon 2. The most-converted shell. It has a trigger, A, B and C buttons, Start and Select, and an eight-way D-pad at the rear of the slide, spread across a main board, a D-pad-and-trigger board and two small button boards, with a USB cable through the grip.2 A published conversion fits a DFRobot camera and a Pico-footprint board with only two plastic tabs cut, and keeps the work reversible (Volume 4). It has room for a solenoid and rumble motor, which GUN4IR’s kits place with printed holders (Volume 6). GUN4IR warns that its printed holders were “tested only on Japanese gun models and some EU models” and may not fit “every gun version/variation/color”;3 the GunCon 2 mould differs between markets in ways no source documents, so a printed part designed for one gun should be test-fitted on another.
GunCon 3. Already an infrared camera gun that works on any display; there is little reason to gut one. Its problems are a missing pair of marker units (Volume 2 has a replacement) and its PlayStation 3 interface, which the community drivers for Windows and Linux address (that is for the Platform Support dives).
3.4 The carrier boards made for GunCon shells
Two families of boards were made to drop into GunCon shells.
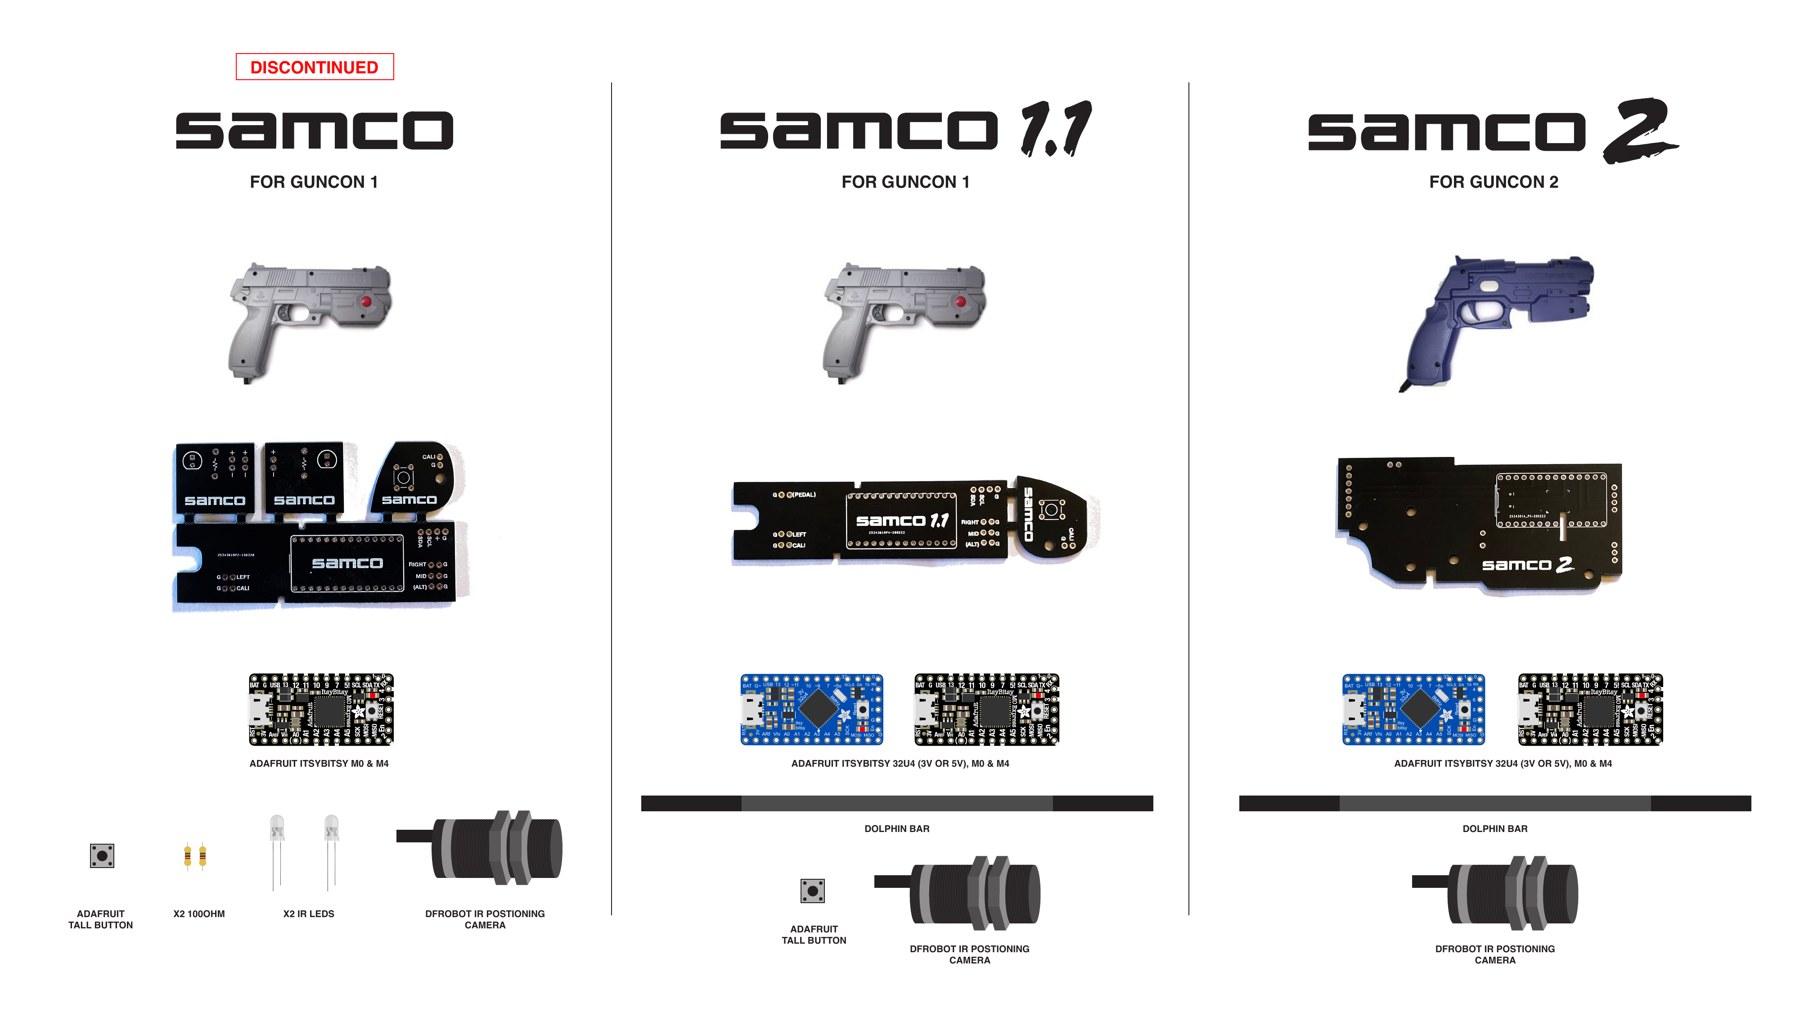
SAMCO. Ballantyne’s boards are shaped to each shell’s interior and carry an Adafruit ItsyBitsy: originally the 32u4, M0 and M4 versions. The SAMCO 2 wiring sheet for the GunCon 2 puts the trigger, the D-pad, Reload and the pedal on the ItsyBitsy’s digital pins, A, B, Start and Select on A0 to A3, and the camera on the I2C pins, with the note “do not solder header pins to A4”.4 The project has since been folded into OpenFIRE: the SAMCO repository now says “Samco has been ported over to the Amazing OpenFIRE project”, and OpenFIRE’s own organisation page points buyers to “Samco boards for Namco GunCon 1/2’s” in Ballantyne’s eBay store.5 6
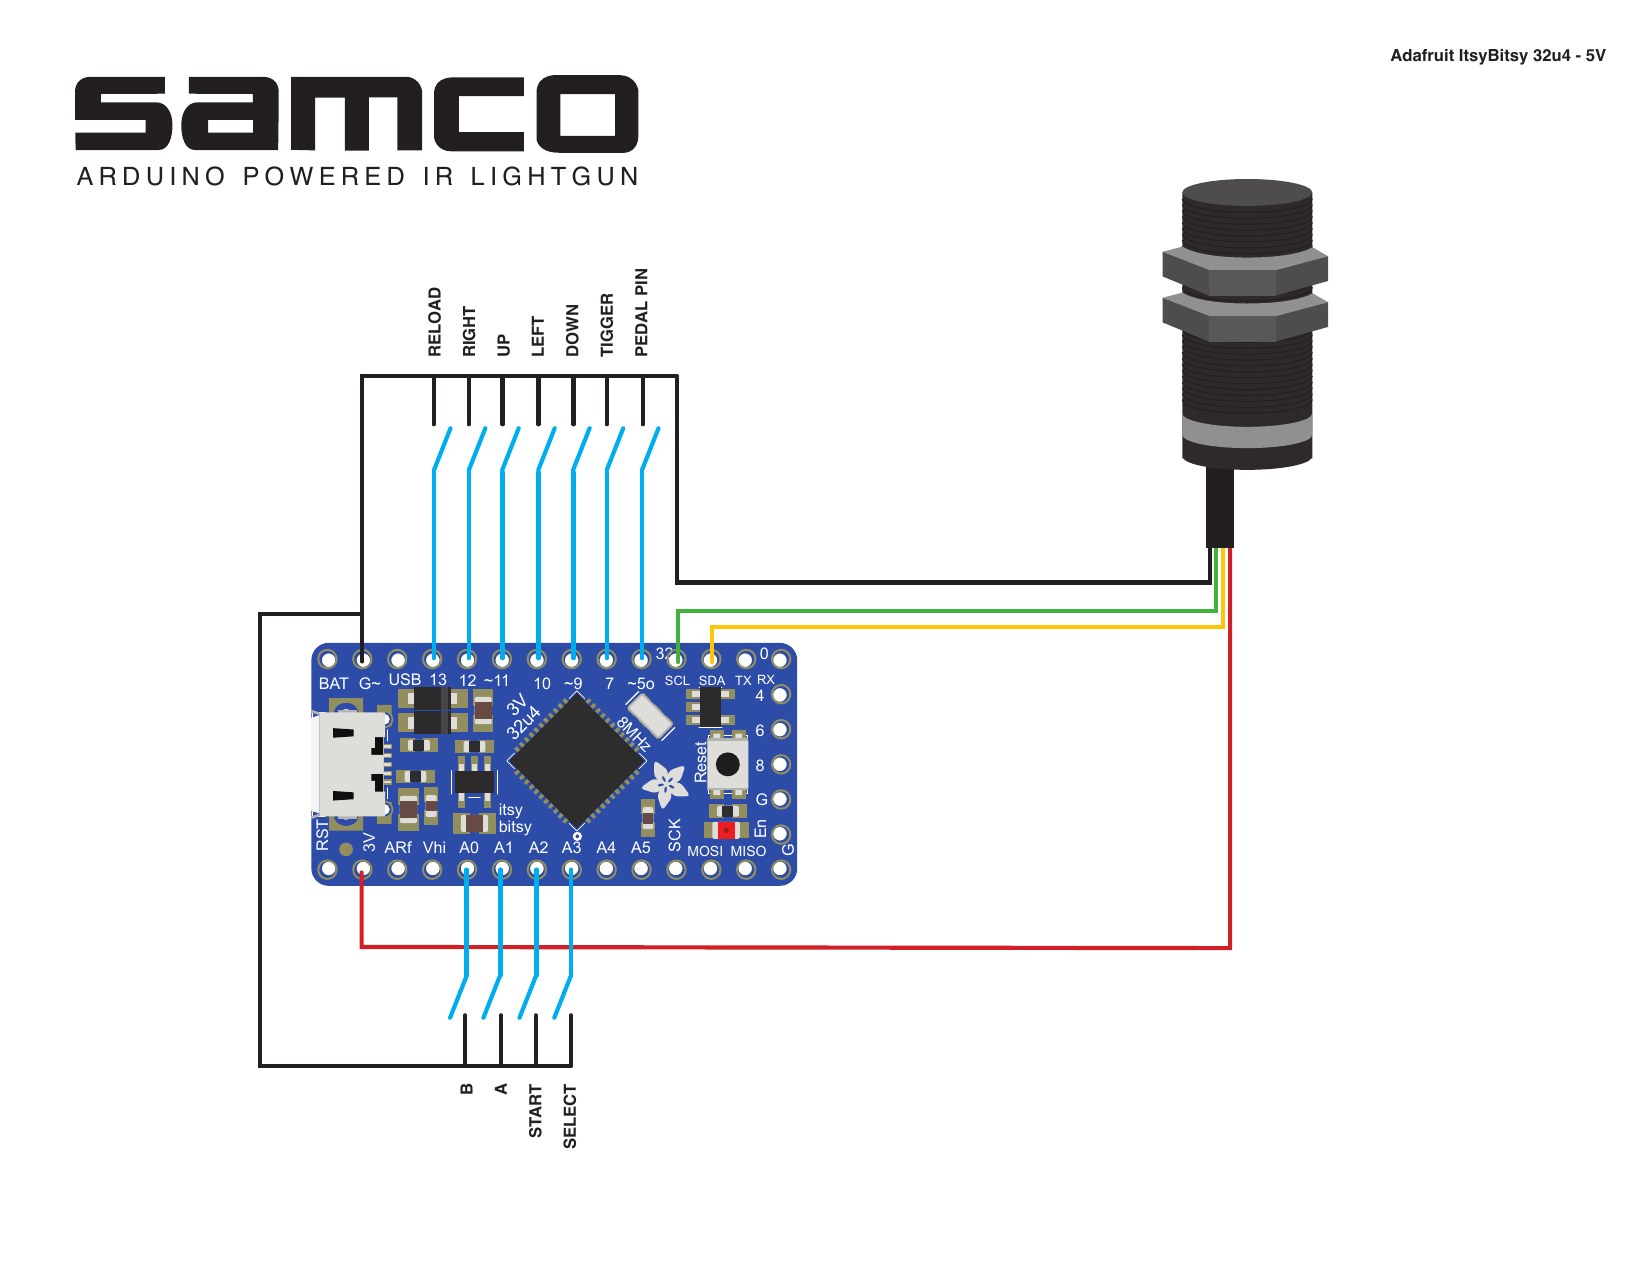
The OpenFIRE presets. OpenFIRE already knows these boards. Its shared board file defines, for the Adafruit ItsyBitsy RP2040, two alternative pin presets named “SAMCO 2.0 (Btn C as Home)” and “SAMCO 1.1”, alongside the ItsyBitsy’s default map, which places the camera on GP2 and GP3, the trigger on GP6, the D-pad on GP7 to GP10, the solenoid on GP25 and the rumble on GP24.7 Open-Source Firmware, Volume 3 lists the ItsyBitsy RP2040 as the board that “fits SAMCO carrier boards”. In other words, an ItsyBitsy RP2040 on a SAMCO board in a GunCon is a configuration the firmware’s maintainers intended, selectable in the App.
GUN4IR. Jean-Baptiste Bongrand sells GC1 and GC2 PCBs and complete mod kits for both GunCons. The current GC2 kit (€155, sold out when read on 19 October 2026) contains SMD boards, a combo cable, a camera module in a drop-in shell with a screw-in lens set, a rumble motor, a solenoid and printed holders; IR emitters are extra. The bare GC2 SMD board has no USB port and needs either the original GunCon 2 cable or the combo cable.8 Its firmware is closed and its licence forbids commercial use (Open-Source Firmware, §1.8).
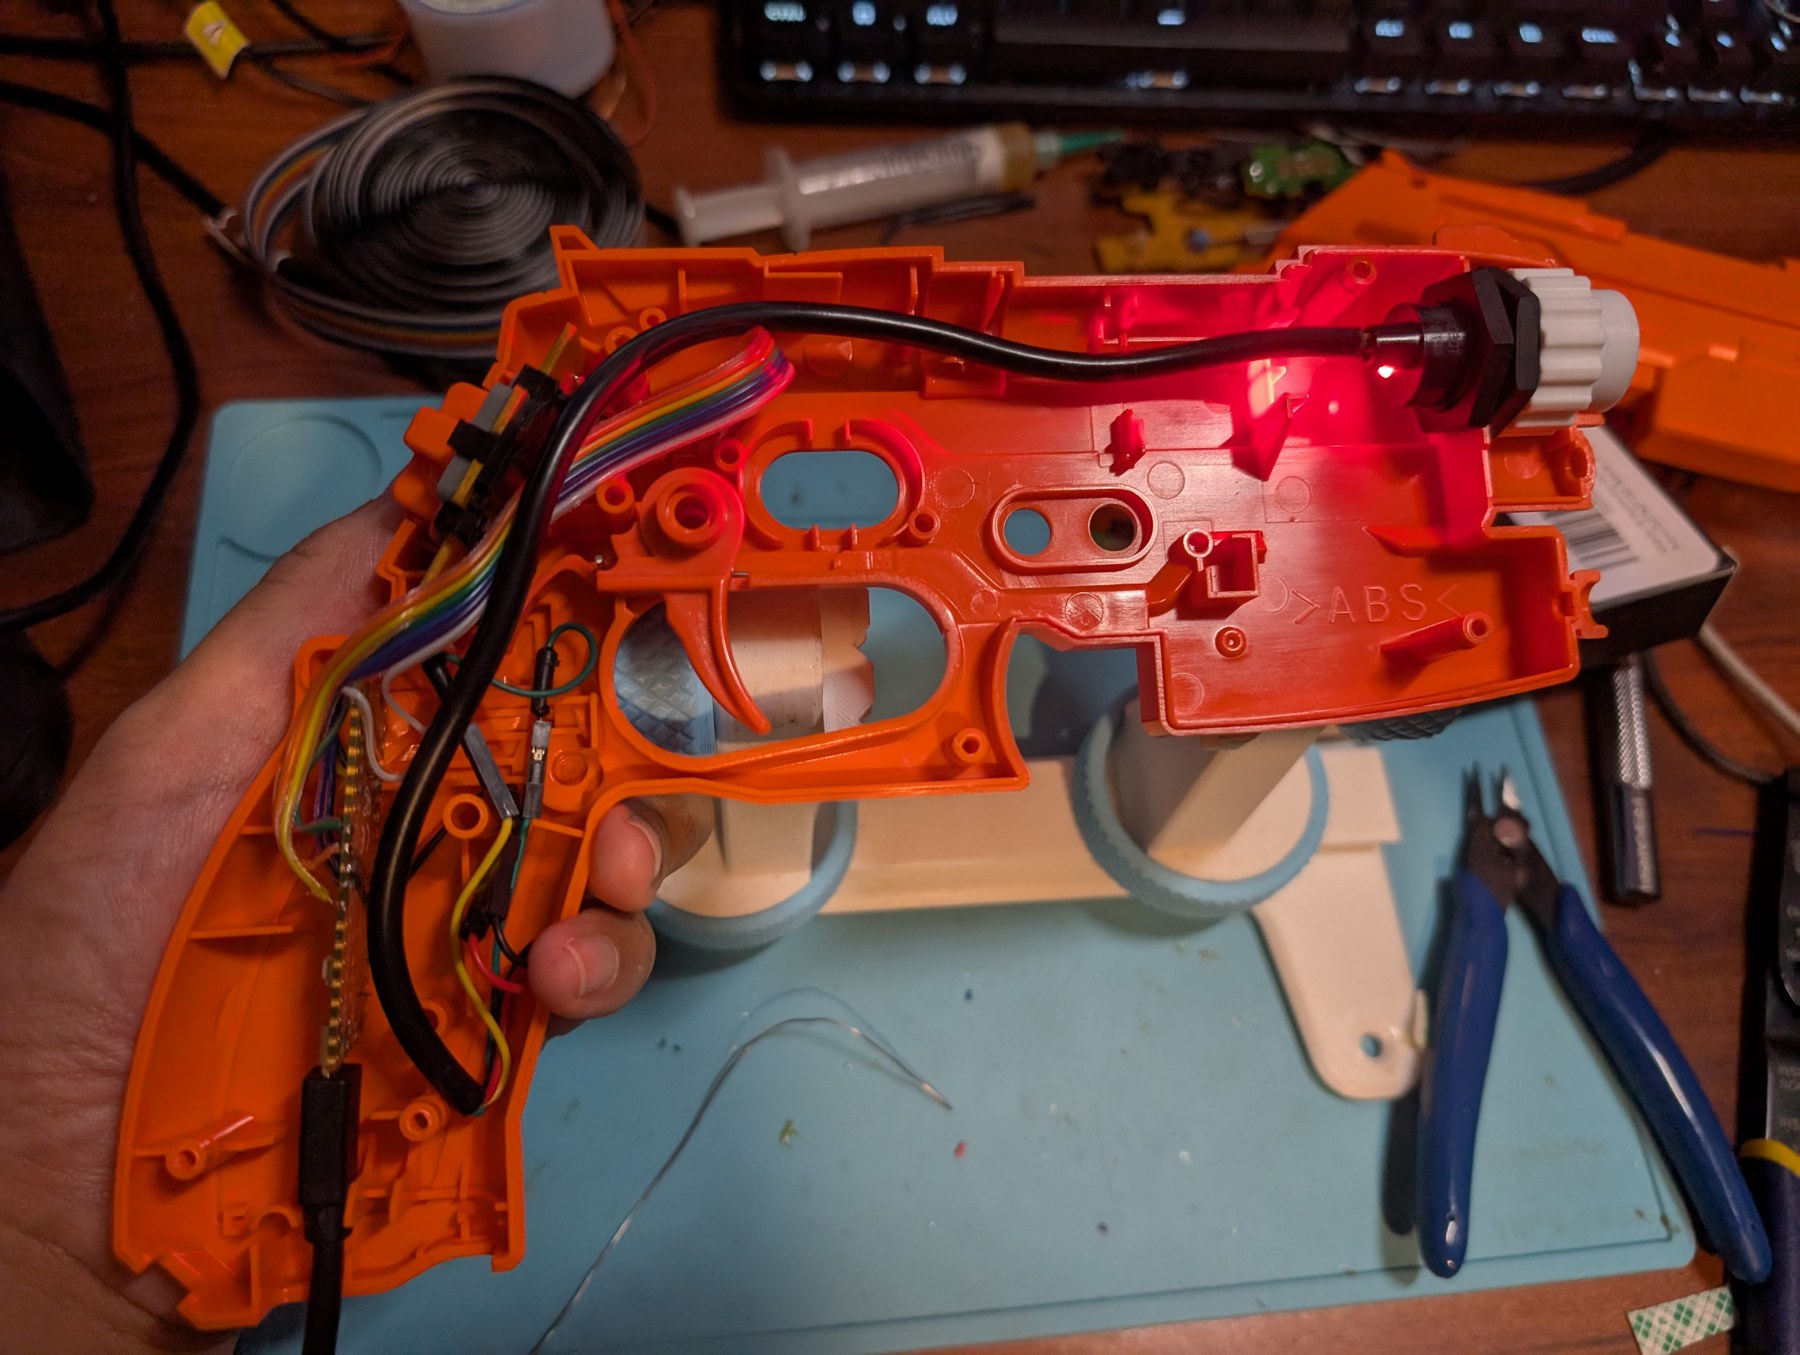
No board at all. The build in Volume 4 uses neither: it wires the GunCon 2’s own switch boards to a Pico-footprint board with ribbon and wrap wire, and leaves the original boards in place.2
3.5 The other shells
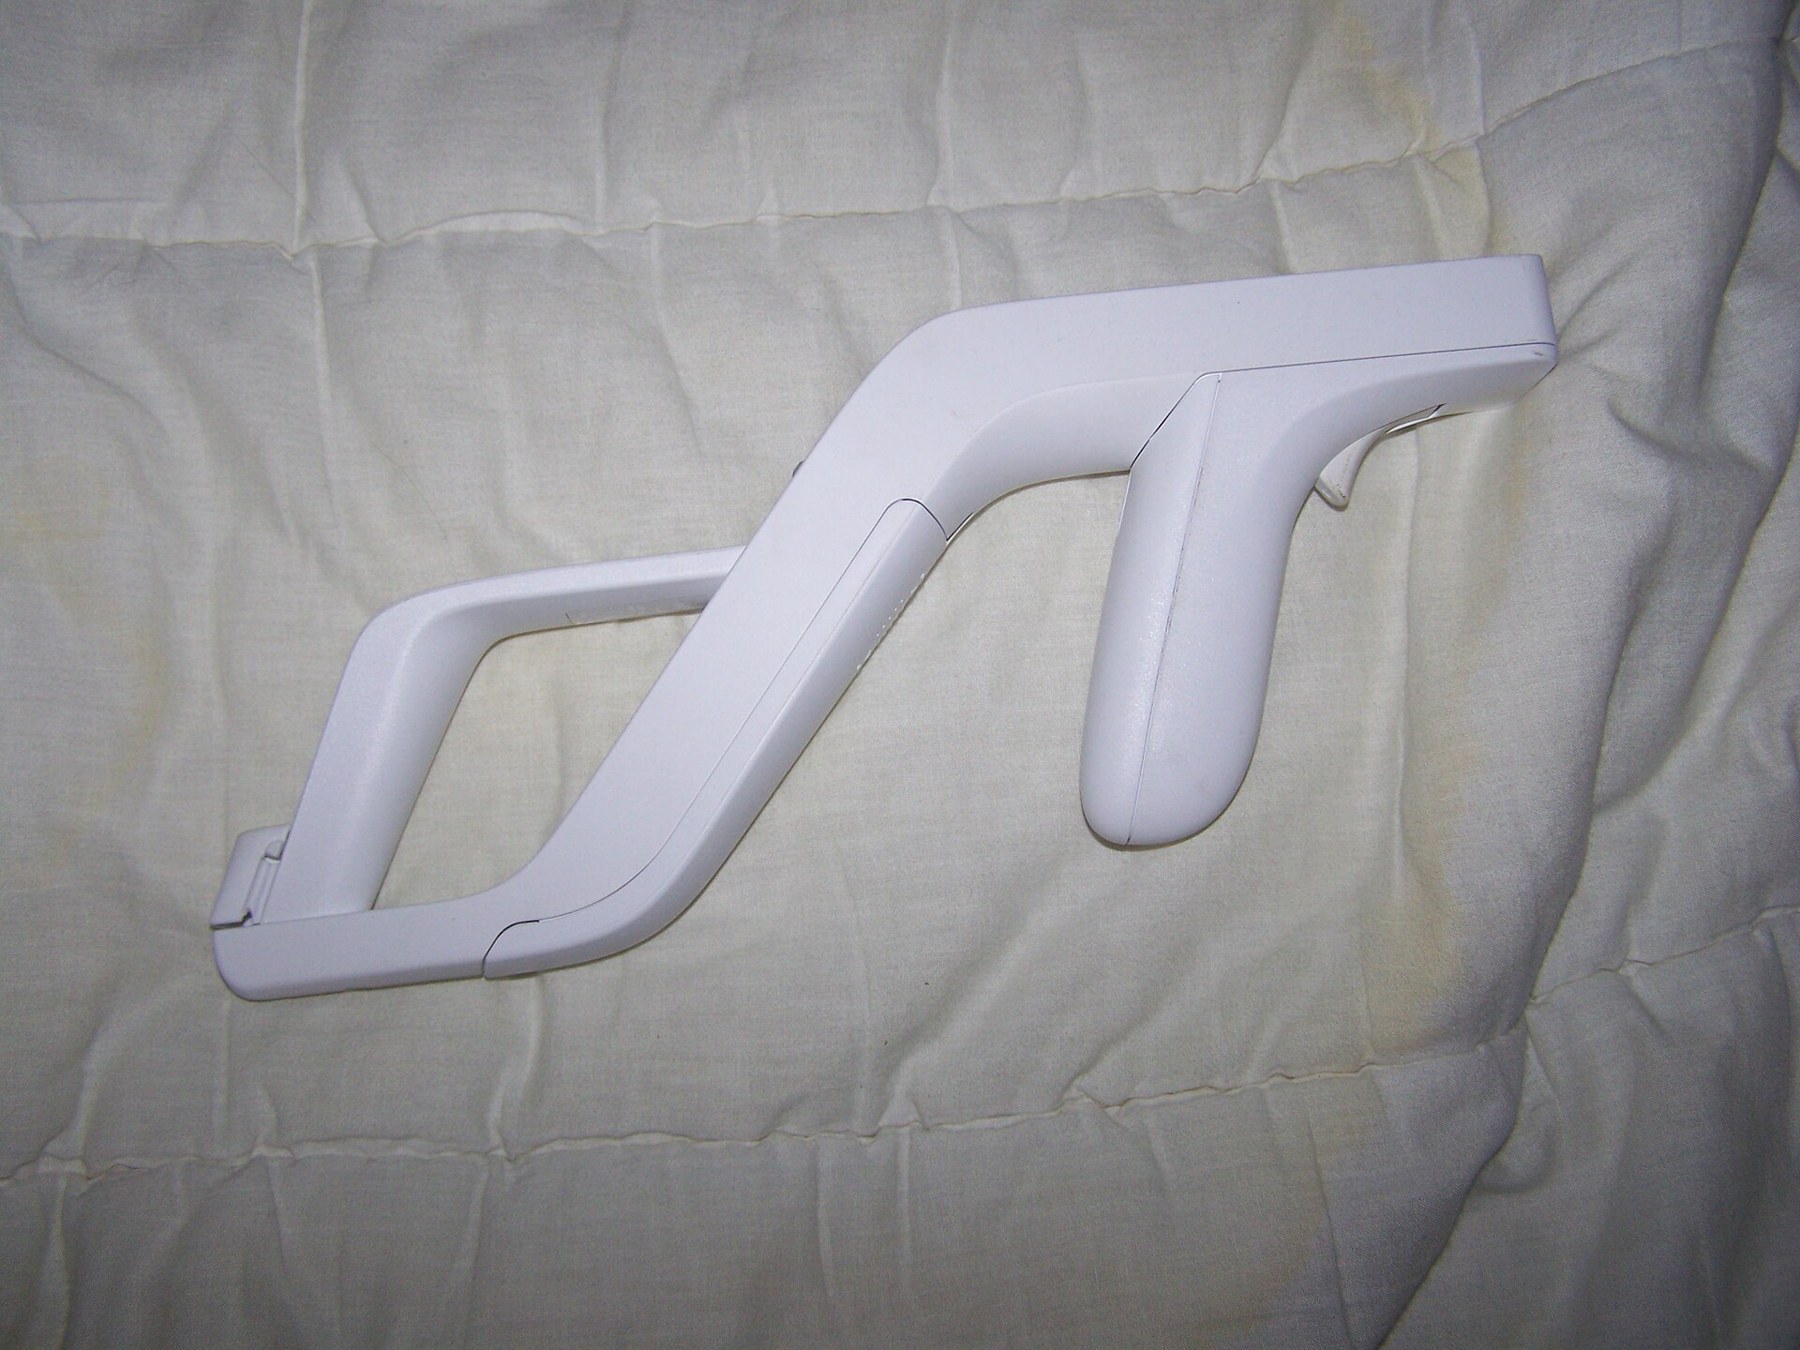
Table 2 — 3.5 The other shells
| Shell | As a host | Basis |
|---|---|---|
| Wii Zapper (and third-party Wii shells) | An open frame, cheap and common, with a cradle sized for a Wii Remote. It has no electronics and no switches of its own: the trigger is a lever onto the Remote’s B button. Every input must be added. No published build putting a camera and microcontroller in one was found. Its appeal is the cradle: a printed sled the size of a Wii Remote could carry a camera at the front and a board behind it, and the trigger lever could press a new switch. | Console Light Guns Vol 6; this dive’s search, 19 October 2026 |
| NES Zapper | Trigger only; a narrow barrel with two apertures and a weight; a collectable shell. Conversions to modern internals are rare for good reason: one input. | Volume 1 |
| Sega Light Phaser, Virtua Gun, Dreamcast Gun | Not assessed from any published conversion; the Dreamcast Gun has a D-pad and buttons. Measure before committing. | — |
| Arcade guns (Namco Time Crisis and others) | Heavy, durable, and already sized for a solenoid; but they are cabinet parts priced as such, and their maintenance belongs to Arcade Light Guns, Volume 6. One builder moved a GunCon 2’s board into a Namco arcade gun instead, finding the trigger, ground, +5 V and optical-signal wires with a meter. | Arcade Otaku forum9 |
| Printed shells | Unlimited room and any shape; the MP7 dives take this path. Printables carries shells drawn for GUN4IR and DFRobot cameras, one noting a barrel bore “just right to snugly fit” the DFRobot sensor. | Printables listing10 |
3.6 Putting a camera behind a barrel
Wherever the camera goes, the same rules apply. They come from the camera’s behaviour, which Reference Electronics, Volume 3 owns; what follows is what they mean inside a classic shell.
- Remove the original optics. A CRT gun’s lens and apertures are built to restrict the field of view to a small patch of screen; an IR blob camera needs the opposite. The GunCon 2 conversion removes the whole black camera tube (“pulling at the four tabs on the sides”).2
- Put the camera on the bore axis, as near the muzzle as the shell allows, and square to it. Any angle between the camera’s axis and the barrel is an aim error that calibration has to absorb.
- Get the orientation right before gluing anything. DFRobot’s own “TOP” marking is not reliable: the GunCon 2 build says to ignore it, and that “the LED on the rear of the camera should be on the left side when oriented properly”;2 a builder who converted a GunCon 1 found the sticker “90 degrees off” and the true top to be “where you see the VCC/GND on the side”.11 Confirm in the OpenFIRE App’s camera view before closing the shell.
- Decide on a lens early. The DFRobot-class camera’s 33° by 23° field of view forces a long standing distance on a large television (Reference Electronics, §3.6), which is why the GUN4IR kits ship screw-in lenses and the GunCon 2 build fits a clip-on phone fisheye in a printed coupler.8 2 A lens changes how close the player can stand, and the mount must hold it concentric with the sensor.
- No visible-light window is needed. The camera sees infrared and is unaffected by the colour of the plastic it looks through only if that plastic passes infrared; the safe course is an open muzzle or a window tested in front of the camera in the App before it is fitted.
- Keep the camera’s I2C leads short and away from the solenoid. Long, unshielded runs beside a pulsed coil invite resets and corrupted reads, which Power Supplies, Volume 5 explains.
3.7 Why this, and why not the others
The decision here is the shell and board for Michael’s fallback build: a classic shell with OpenFIRE inside, built cheaply and quickly while the MP7 work proceeds. The criteria are the project’s: the firmware is OpenFIRE (decision row OF-1 in the category’s decision log, and Open-Source Firmware, §1.14); the board is a Raspberry Pi Pico to start (D2); the work should be reversible and documented by someone who has done it.
Table 3 — 3.7 Why this, and why not the others
| Candidate | Verdict | Reason |
|---|---|---|
| GunCon 2 shell, original switch boards kept, Pico-footprint board wired direct | Chosen | The only combination with a complete, published, photographed conversion to OpenFIRE (Volume 4); uses the Pico of D2; reversible; a trigger, six buttons and a D-pad already in the shell; room for a solenoid later; loose GunCon 2s are common |
| GunCon 2 shell with a SAMCO 2 board and an ItsyBitsy RP2040 | Strong alternative | A tidier, purpose-made board with a ready OpenFIRE preset; but the ItsyBitsy is not the Pico of D2, the board’s price could not be read (its eBay listing refused automated access), and a SAMCO board was drawn for 2020-era ItsyBitsys, so its fit with the RP2040 version should be confirmed with the seller |
| GunCon 2 with a GUN4IR kit | Rejected | Closed firmware with a non-commercial licence, not OpenFIRE; sold out when read; the kit would teach nothing transferable to the MP7 |
| GunCon (G-Con 45) shell | Rejected for this build | Three inputs and no D-pad; boards exist for it, so it remains a fine second gun |
| Wii Zapper | Rejected for now | No switches, no published build; every input added from scratch. Worth revisiting as a printed-sled design exercise |
| NES Zapper | Rejected | One input and a collectable shell |
| A printed shell | Not a fallback | It is the main line of work (the MP7 dives); the point of the fallback is to have a gun working before a shell is designed |
Michael’s brief noted one limit of the fallback: a GunCon “gives internal solenoid feedback but not slide recoil”.12 That is true of every classic pistol shell, and Volume 6 treats what kick a GunCon can carry.
3.8 What a kit seller cannot do with a classic shell
The project may sell kits (D11), so the shell question has a commercial side. A conversion kit that requires the buyer to supply their own GunCon is how GUN4IR and SAMCO both sell, and it avoids selling Namco’s moulding. Selling pre-converted guns means reselling a second-hand Namco product under a modified specification, with Namco’s marks on it. That is a question for Licensing, IP and Kits (planned), not one this dive answers. For the fallback build, which is not for sale, it does not arise.
3.9 What could not be verified
- SAMCO board prices and current stock: the eBay store named on OpenFIRE’s page could not be read.
- SAMCO board fit with the ItsyBitsy RP2040: the 2020 sheets name the 32u4, M0 and M4; OpenFIRE’s preset implies the RP2040 version is used on them, but no fit statement was found.
- Regional differences in the GunCon 2 mould: GUN4IR’s warning implies they exist; none is documented.
- Interior dimensions of any shell: none published. The Wii Zapper and GunCon 2 cavities are owed measurements.
- Any published Wii Zapper conversion to camera-based internals: none found.
Footnotes
-
Sam Ballantyne (samco), “SAMCO Arduino Powered IR Light Gun/Mouse”, Hackster.io, published 23 June 2019. https://www.hackster.io/samco/samco-arduino-powered-ir-light-gun-mouse-05d110 (read 2026-10-19). ↩
-
The Opponent, “GunCon 2 to OpenFIRE Conversion”, theo.minuspoint.com, 28 July 2025. https://theo.minuspoint.com/2025/07/guncon2-openfire-conversion.html (read 2026-10-19). Content CC0. ↩ ↩2 ↩3 ↩4 ↩5 ↩6
-
JB Game Lab, “GC2 DIY Cam and Rumble holders set”, gun4ir.com. https://www.gun4ir.com/products/gc1-gun4ir-diy-cam-and-rumble-holders (read 2026-10-19). ↩
-
Sam Ballantyne, “SAMCO 2.0 (32u4 5V)” and “SAMCO All boards” wiring sheets (PDF, 17 March 2020), in the IR-Light-Gun repository. https://github.com/samuelballantyne/IR-Light-Gun (read 2026-10-19). GPL-3.0. ↩
-
samuelballantyne/IR-Light-Gun, README. https://github.com/samuelballantyne/IR-Light-Gun (read 2026-10-19). ↩
-
TeamOpenFIRE organisation profile README. https://github.com/TeamOpenFIRE (read 2026-10-19). ↩
-
TeamOpenFIRE, OpenFIRE-Boards,
OpenFIREshared.h,boardsPresetsMapandboardsAltPresets. https://github.com/TeamOpenFIRE/OpenFIRE-Boards (read 2026-10-19). ↩ -
JB Game Lab, “New GC2 Mod Kit”, gun4ir.com. https://www.gun4ir.com/products/new-gc2-mod-kit (read 2026-10-19; €155.00, sold out). ↩ ↩2
-
Arcade Otaku forum, “PS2 Guncon2 PCB to Original Namco Arcade Gun mod”. https://forum.arcadeotaku.com/viewtopic.php?p=495044 (seen in search 2026-10-19; summary only). ↩
-
Printables, “Operation Wolf Assault Weapon - Gun Shell - for GUN4IR”, model 69057. https://www.printables.com/model/69057-operation-wolf-assault-weapon-gun-shell-for-gun4ir (seen in search 2026-10-19). ↩
-
Peter Donnell, “I Built My Own Light Gun for my PC & Arcade Machine”, eTeknix, 26 May 2020, updated 24 March 2025. https://www.eteknix.com/i-built-my-own-light-gun-for-my-pc-arcade-machine/ (read 2026-10-19). ↩
-
Michael’s project memory note, in
Open-Source-Firmware/02-inputs/brief/(private working file), “Fallback”. ↩
Comments (0)