Chinese Type 63 Rifle · Volume 5
Field Strip, Maintenance and Repair
What the sources show of the Type 63's stripping into groups, the gas regulator and the trigger group, the cleaning kit in the butt, what a correct procedure has to account for when no Chinese manual can be found, and the failures the PLA recorded, part by part, with what each one means for a rifle today
5.1 The short version
No Chinese, Vietnamese or Albanian manual for the Type 63 was found, so no step-by-step stripping sequence is given here. What the sources do show is enough to describe the result and the controls involved. The rifle field strips into the same kind of groups as an SKS: receiver cover, recoil spring, carrier, bolt, a separate piston with its spring, the regulator plug, the upper handguard and the magazine. The trigger group comes out of the stock as a unit, released by a trigger-guard catch.123 The regulator is removed from the front, and Iannamico describes how.1 The butt carries an AK-type cleaning kit, including a tool for the gas port.1
The PLA’s own record of the rifle’s failures is unusually detailed (Volume 3), and it is the best guide to what goes wrong: cases sticking in a thin chamber, barrels creeping forward on their pins, zero shifting as stamped receivers moved, carriers running off shortened guides, stocks splitting, paint flaking, and sparks from the gas block.34 Those are the places to look on any surviving rifle.
5.2 No manual was found
Searches in Chinese for the rifle’s manual (说明书), its training text (教材) and its stripping procedure (分解结合) found nothing. The searches looked for the PLA’s own 《射击教材》, which a Chinese article mentions. They also covered Vietnamese material for the K63, an Albanian manual and the full US intelligence guide of 1983, of which only one plate is public.52 The US Army’s 1967 guide predates the rifle (Volume 3). That leaves three partial sources:
- Iannamico (2009), who photographed a field-stripped museum rifle, described the regulator’s removal and the trigger mechanism, and published the US Army’s photograph of the trigger group laid out at Aberdeen.1
- The DIA plate (1983), which labels the external controls.2
- The 1993 article, which says the rifle strips “quickly and conveniently” (分解结合迅速方便), that the trigger group “can be fitted to and removed from the receiver very easily”, and that the piston and regulator plug are “inserted from the front” of the gas block.3
A blog repost says that Ian Hogg called the Type 63’s field stripping “very simple” (十分简便) in Jane’s. That edition was not seen.5
Following the hub’s rule, a sequence is not reconstructed from memory or from the SKS. The SKS’s own procedure is in the SKS dive, Volume 10. It is the closest relative, but its bolt, piston extension and gas tube are different parts, and a reader should not assume that the Type 63 comes apart in the same order.
5.3 The groups a field strip produces
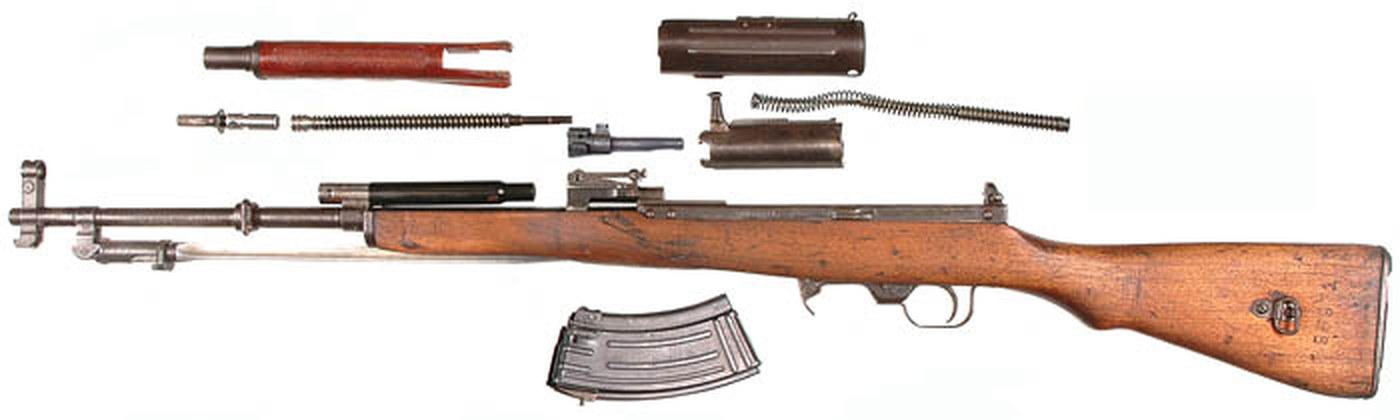
Iannamico’s photograph is captioned simply “field stripped view”. The parts it shows, identified by comparison with his text and the gas-system photograph below, are:1
Table 1 — The groups a field strip produces
| Group | Notes from the sources |
|---|---|
| Receiver cover | Sheet metal; the DIA labels a “Lock” at its rear on the left side and a “Dust Cover” on the right |
| Recoil spring and guide | Housed in the carrier (“machined for containing the recoil spring”) |
| Carrier | Steel forging, integral handle, cam track, clip guides at the front |
| Bolt | Two locking lugs; rotates in the carrier |
| Piston and its spring | Separate from the carrier; “the piston rod extends through a spring that returns the piston to a forward position” |
| Regulator plug | Removed from the front after its retainer is released |
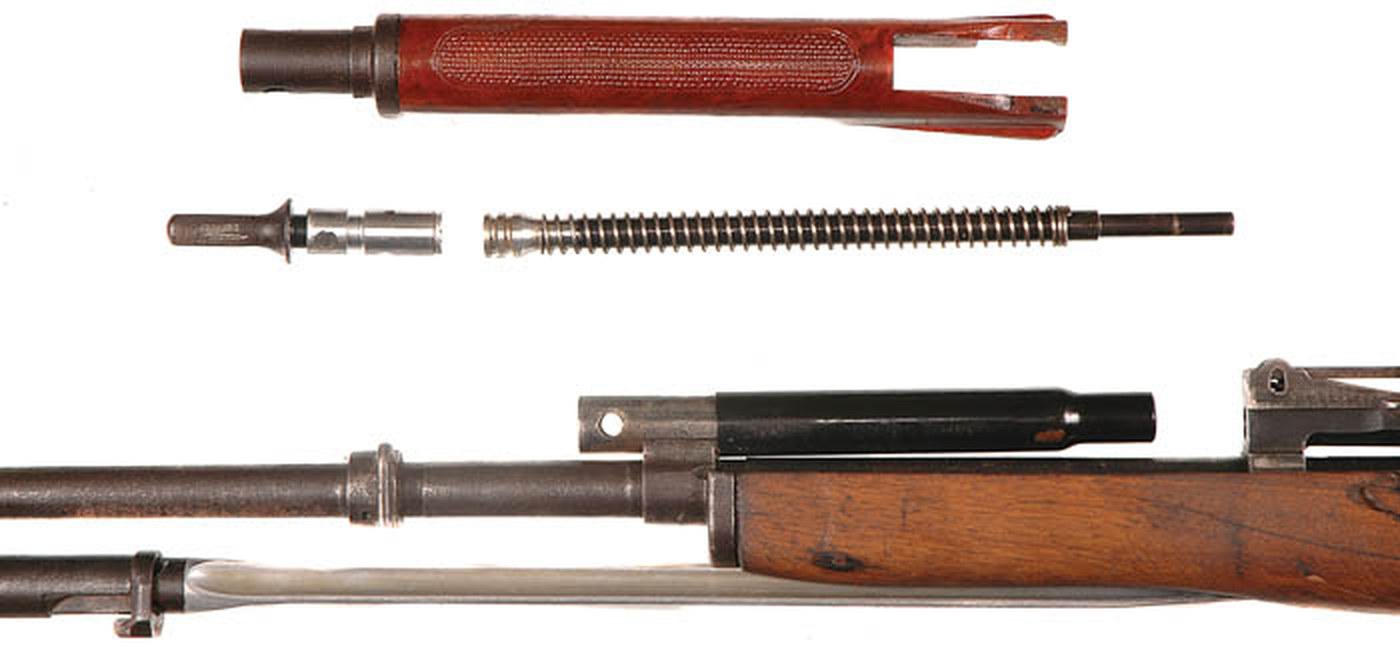
| Upper handguard | Plastic on the rifle examined, with a metal sleeve at its front; the piston’s sheet-metal heat shield sits around the piston |
| Magazine | Detachable, released by the catch ahead of the trigger guard |
The trigger group is not removed in the photograph. The barrel, gas block and bayonet stay with the stock and receiver.
5.4 The gas regulator and piston
The regulator procedure is the one place where a source gives the steps:
“The gas regulator is adjusted by pressing the retainer and rotating it downward, which will allow it to be pulled free, and the regulator knob rotated to the desired position.”1
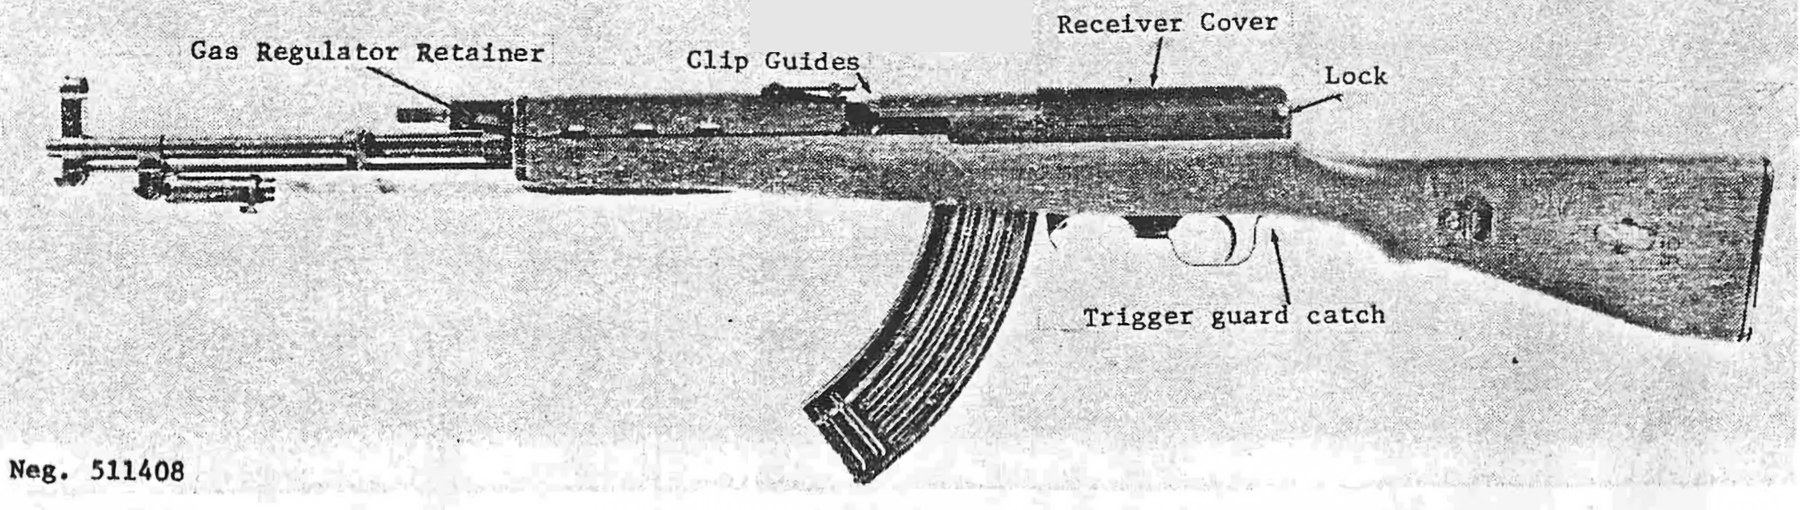
The 1993 drawings show a cross pin (固定销) that retains the plug and a latch (固定销闩片) that holds the pin (Volume 2).3 In the DIA’s terms this is the “Gas Regulator Retainer”.2 Read together, the sources say that releasing the latch frees the plug, which comes out of the front of the gas block. The piston, which the 1993 article says is also inserted from the front, comes out the same way. None of the sources says whether the piston can come out with the handguard in place.
The setting. The small hole is the normal position; the large hole is for “special conditions”, when fouling, cold or dirt would otherwise slow the action. The position is read from the small or large hole visible on the back of the knob (识别孔, the “identification hole” in the 1993 drawing).31 A rifle that runs reliably only on the large hole is telling its owner that the gas system needs cleaning. The 1993 article’s argument for the regulator was that routine firing on the small hole protects the rifle’s service life.3
5.5 The trigger group
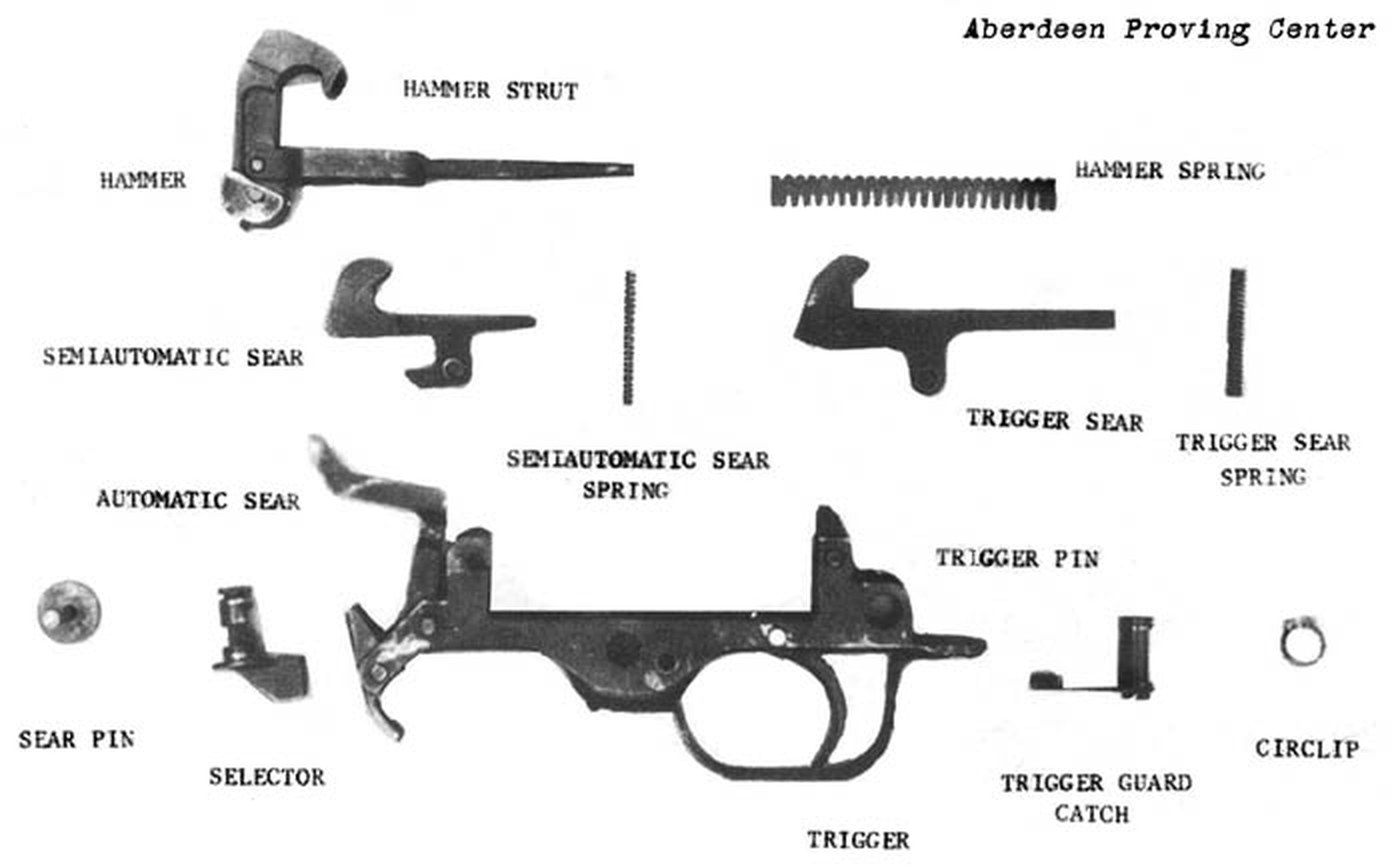
The 1993 article says the trigger mechanism “is assembled on its own frame as an independent unit”, which “can be fitted to and removed from the receiver very easily when the rifle is stripped”.3 The Aberdeen photograph names a trigger guard catch, and the DIA plate labels the same catch at the rear of the guard on the left side.12 On the SKS, whose group the Type 63’s is modelled on, the guard is unlatched and the whole group lifted out (SKS Volume 10). The Type 63’s catch is a separate part, with a circlip in the Aberdeen layout. That points to a different latch, and the sources do not describe how it is worked.
The Aberdeen layout shows the parts of the group but not how they go together. Detail stripping of a select-fire trigger group is beyond what this dive covers, for two reasons: no procedure was found, and in the United States the automatic sear and its relatives are machine-gun parts with legal consequences (Volume 6).
5.6 What a correct procedure must account for
Without a manual, the honest thing is to set out what any correct procedure must deal with, so that a reader who finds the manual can check it, and a reader who has none can see where the unknowns are.
- Clearing. Selector to 0, which on this rifle blocks the trigger sear (Volume 2). Magazine out, by the catch ahead of the trigger guard. Carrier to the rear by the handle; the hold-open will catch it only on an empty magazine, so the chamber must be looked at, not assumed. The chamber and the magazine well must be checked by eye.
- The receiver cover. It is retained by a lock at its rear (DIA). How the lock is worked is not documented.
- Recoil spring, carrier, bolt. The spring lives in the carrier. The carrier is drawn back and lifted out of the receiver rails, and the bolt is turned out of its cam track. The order is not documented. One caution comes from the 1993 article: on late rifles the carrier’s guides were shortened by 6 mm, and such carriers “came off their rails” in use. A carrier that will not run smoothly in the rails after reassembly is a symptom, not a fitting error.
- Gas parts. The regulator retainer, then the plug, out of the front (Iannamico). The piston and its spring come out the same way (1993 article). The handguard and heat shield: not documented.
- Trigger group. Released by the trigger guard catch. The method is not documented.
- What stays together. Barrel, gas block, front sight and bayonet stay on the stocked receiver. On production rifles the barrel is pressed and pinned (Volume 3) and must never be “removed” for cleaning.
- Reassembly checks. Regulator plug on the small hole for normal use, and its retainer engaged; carrier free in its rails; bolt fully rotated to lock when the carrier is forward; the selector working through 0, 1 and 2 with the rifle unloaded and the action closed.
5.7 Cleaning and lubrication
The rifle’s own kit is the guide to what the army expected to be cleaned. Iannamico lists the contents of the butt trap as “an AK capsule type cleaning kit, which contains a combination tool, gas port cleaning tool, jag, patch holder and bore brush”, with the cleaning rod carried under the barrel.1 The gas-port tool means the port and the regulator plug’s holes were expected to foul and to be scraped clear.
No published Type 63 lubrication schedule was found. Three points follow from the design and the record:
- The gas system. The piston and plug fit in a cylinder that is also the gas block, and gas and burning residue leaked past them (Volume 3). The plug’s holes, the cylinder and the piston head carry the carbon. Fired with Chinese or Soviet-bloc surplus ammunition, which is commonly corrosive-primed, the gas parts and bore need cleaning the same day. The SKS dive, Volume 8, explains why corrosive salts matter. Whether Type 63 bores were chrome-lined is not stated in any source found, so a reader should not assume that they were.
- The carrier rails. On a stamped receiver the rails are where the 1993 article located the worst tolerance problem: the main slot “31 +0.17 mm” could not be held and moved in use. Keep them clean and lightly oiled, and watch for burrs and bright rub marks, which show where the carrier is binding.
- The finish. Late rifles were painted, and the paint “came off in patches” with use. Bare steel under failed paint rusts. On a painted rifle the real rust protection is a light coat of oil wherever the paint has gone.
5.8 The failures the PLA recorded
This is the rifle’s own service record, from the 1993 article and the 2003 account (Volume 3 tells the story in full). Each failure is listed with its cause as the sources give it.
Table 2 — The failures the PLA recorded
| Failure | Cause given | Source |
|---|---|---|
| Cases stick; failures to extract | Production barrel’s chamber outside diameter cut from 25 to 18 mm; thin wall deforms elastically on firing | 1993 |
| Barrel moves forward; locking loosens; poor accuracy | 18 mm press fit only 19 mm long, one 4 mm pin | 1993 |
| Zero shifts after storage or transport (“can’t ride in a truck, can’t sit overnight”) | Stamped-and-riveted receiver distorts in manufacture and in use | 1993; 2003 |
| Rails out of tolerance; asymmetry to bore over 1 mm | Riveted receiver | 1993 |
| Cracks in receiver walls; service life cut from 15,000 to 10,000 rounds | Tears in stamping; weakened locking shoulders in the trunnion | 1993 |
| Carrier derails, sticks | Carrier guides shortened by 6 mm | 1993 |
| Sparks blown back at the shooter’s face | Front-loaded piston and plug in a gas block that is also the cylinder; fixed with a sleeve over the piston | 1993; 2003 |
| Stock cracks at the neck and sides | 40 mm-wide receiver leaves 4 mm of wood each side | 1993; 2003 |
| Paint flakes; rust | Electrophoretic paint process not mastered | 1993 |
| AK magazines loose and drop out (1979 rifles) | Modified magazine well | 1993 (as reproduced) |
| Recoil spring and firing pin | Improved in 1979 with better spring wire and better-hardened firing pin, implying earlier weakness | 1993 (as reproduced) |
5.9 Inspection: what to look at on a surviving rifle
The failure table translates directly into an inspection for a museum, a collector abroad, or anyone examining a rifle in lawful custody:
- Receiver type. Rivet heads mean a stamped receiver and the whole list of stamped-receiver problems (Volume 4).
- The barrel pin and the barrel’s seat. Any sign that the barrel has moved forward, such as a gap at the receiver face, a sheared or proud pin, or witness marks, means the joint has failed. The 1993 article links it to loose locking. That is a reason to stop firing the rifle.
- Receiver walls and trunnion. Look for cracks around rivets and stampings, especially near the locking shoulders. The 1993 article notes that stamping tears were “not easily noticed”.
- Chamber. Erosion or rings, and fired cases that show sticking. On a production barrel the chamber wall is thin.
- Carrier. The shape of the top (three arcs or the “roof”), the handle (hollow and flanged, or a solid cone), and wear on the guides.
- Gas parts. The holes in the regulator plug; the anti-spark sleeve or heat shield over the piston; erosion at the piston head.
- Stock. Cracks at the neck and along the thin sides by the receiver.
- Finish. Paint or black oxide, and rust where paint has failed.
- Magazine well. Whether the rifle takes AK magazines, and whether the hold-open is present (Volume 4).
5.10 Repair and parts
No maker supports the rifle. China stopped production after 1979, and no commercial parts source was found in any country. Parts come only from other rifles.
What can be fixed at the bench, on the evidence of the design: cleaning and freeing the gas system; replacing springs from donor rifles; stock repair, where cracks in thin wood beside the receiver are a woodworker’s job; and refinishing. What cannot be fixed cheaply follows from the 1993 article’s own conclusion that some problems “came from the design or from the structural changes in production, and naturally could not be fundamentally solved”. A distorted riveted receiver, a loose press-fitted barrel and a cracked trunnion are not adjustments. The article says a quality campaign could not correct the receiver’s lack of rigidity, and an owner will not do better than the factory.3
In the United States the question of parts is a legal one before it is a mechanical one. The automatic sear and the select-fire trigger group of a machine gun are not ordinary spare parts, and a set of parts from which a machine gun can be assembled is itself a machine gun in law. Volume 6 explains this, and this dive gives no conversion, reactivation or fitting instructions of any kind.
5.11 What could not be verified
- Any manufacturer’s or army’s stripping sequence, Chinese, Vietnamese or Albanian. None found.
- How the receiver-cover lock and the trigger-guard catch are worked.
- Whether the bore is chrome-lined.
- A lubrication schedule and parts-replacement intervals. The only service-life figure is the 10,000 rounds of the production rifle, against 15,000 for the certified design.
- The full 1983 DIA guide, whose “operation” section would probably have covered field stripping. Only its plate is public.
References
Footnotes
-
Frank Iannamico, “Chinese 7.62x39mm Type 68 Rifle”, Small Arms Review vol. 12 no. 11, August 2009, https://smallarmsreview.com/?p=15367 (accessed 2026-10-20). Photographs of a rifle lent by the US Marine Corps National Museum; trigger group photographed by the US Army at Aberdeen. ↩ ↩2 ↩3 ↩4 ↩5 ↩6 ↩7 ↩8 ↩9
-
US Defense Intelligence Agency, Small Arms Identification and Operation Guide, Eurasian Communist Countries, 1983, plate “Type 68”, negative 511408, https://commons.wikimedia.org/wiki/File:Diatype63.png (accessed 2026-10-20). ↩ ↩2 ↩3 ↩4 ↩5
-
向军 (Xiang Jun), 我国63式7.62mm自动步枪盛与衰, 《轻兵器》 (Light Weapons) 1993 no. 6, reproduced on 枪炮世界, http://pewpewpew.work/china/rifle/1963/63.htm (accessed 2026-10-20). Translations for this dive. ↩ ↩2 ↩3 ↩4 ↩5 ↩6 ↩7 ↩8 ↩9
-
“资料:新中国步枪发展历程——自制阶段”, 《舰船知识》 via 千龙新闻网, Sina Military, 22 July 2003, http://mil.news.sina.com.cn/2003-07-22/138626.html (accessed 2026-10-20). ↩ ↩2
-
孤独的老顽童, 昙花一现的中国63式自动步枪, NetEase News repost, undated, https://m.163.com/news/article/BAS2K42S00014OVF.html (accessed 2026-10-20). ↩ ↩2

Comments (0)