Ruger Precision Rifle & Precision Rimfire · Volume 4
Keeping Them Working — Field Strip, Detail Strip, Maintenance and Repair
Both rifles, from Ruger's own manuals — including where two revisions of the same manual disagree, and where the manual and the catalogue do
Every procedure in this volume is taken from Ruger’s instruction manuals, quoted or closely paraphrased with the manual’s printed page number. Nothing is added from armourer courses, forum practice or memory. Where the manuals stop — and Ruger is explicit that they stop on purpose — this volume stops too, and says what lies beyond and who is meant to do it.
Ruger’s position, in both rifles’ manuals: “It will only be necessary to disassemble up to the step required for the particular area you will be servicing. Disassembly beyond what is described in this section is not recommended and may result in a non-functioning firearm.”12
4.1 Which Manual Applies
The Precision Rifle has two current instruction manuals, and they are not interchangeable.
Table 1 — Which Manual Applies
| Manual | Covers | Found as |
|---|---|---|
| PM605 | Rifles below serial 1806-00000 | 2015 original (60 pp.) and a 2018 revision marked “TAC 8/18 R3” (64 pp.) |
| PM924 | ”RIFLES BEARING SERIAL NUMBERS: 1806-00000 AND ABOVE AND CS14-00000 AND ABOVE” | current; separate Custom Shop and Magnum inserts |
PM605 describes the rifle with the Precision MSR stock and a left-side, reversible safety; PM924 describes the ambidextrous safety and the newer stock, calls the magazine-well halves by that name rather than “lower receiver”, and adds torque values PM605 does not give. Where they differ below, both are shown.
The Precision Rimfire has one manual, PM697; the copy read here is marked “PRR 4/2026 R10” and carries no serial-number restriction.5
Ruger publishes video demonstrations of disassembly, reassembly, cleaning and the function check for both rifles; every manual points to them at “Ruger.com/TechTips”. They were not reviewed for this volume.
4.2 Unloading, and the Safety’s One Quirk
Both rifles are unloaded the same way: safety to SAFE if the striker is cocked, magazine out, bolt lifted and drawn fully back, chamber inspected, and — for the rimfire — “Always remove the magazine before clearing the chamber”, because a round drawn out slowly can fall onto an empty magazine and be chambered again on the next stroke.67
The quirk is in the phrase “if the striker is cocked”. On both rifles the safety “can be moved from the ‘FIRE’ position to the ‘SAFE’ position only when the firing pin is cocked. (Fully raising the bolt handle cocks the firing pin.)”8 After dry firing, or after firing the last round and closing the bolt on an empty chamber, the selector will not go to SAFE until the bolt handle has been lifted. That is normal, not a fault.
The Precision Rifle manual also requires, twice, that the bolt be “in the forwardmost and locked (handle down) position when folding or opening the stock. Failure to fully close the bolt may result in damage to your rifle, the bolt shroud, and/or bolt.”9
4.3 Precision Rifle: Field Strip
The whole of Ruger’s field strip is the removal of the bolt (PM924 p. 41; PM605 2018, p. 38):
- Muzzle in a safe direction, fingers out of the trigger guard.
- Safety to SAFE if the firing pin is cocked.
- Remove the magazine.
- Raise the bolt handle and draw the bolt fully back, extracting any cartridge.
- Safety to SAFE if not already done.
- Check the chamber visually; no magazine in the rifle.
- Close the bolt, press the stock pivot lock button and fold the stock to the left. Lock it folded by turning the tab end of the pivot latch a quarter-turn clockwise. Lift the bolt handle and draw the bolt out of the rear of the receiver while pressing the rear of the bolt stop on the left side of the receiver.
“This is as far as you need to disassemble the rifle for routine cleaning.”10
To put the bolt back, the handle must be at two o’clock and the lobe of the firing-pin back (the cocking piece) at six o’clock; if they are not, the owner grips the whole bolt shroud and turns it clockwise until they are. The bolt goes in with the handle toward the bolt channel on the right, fully forward, and is locked down before the stock is unfolded.11
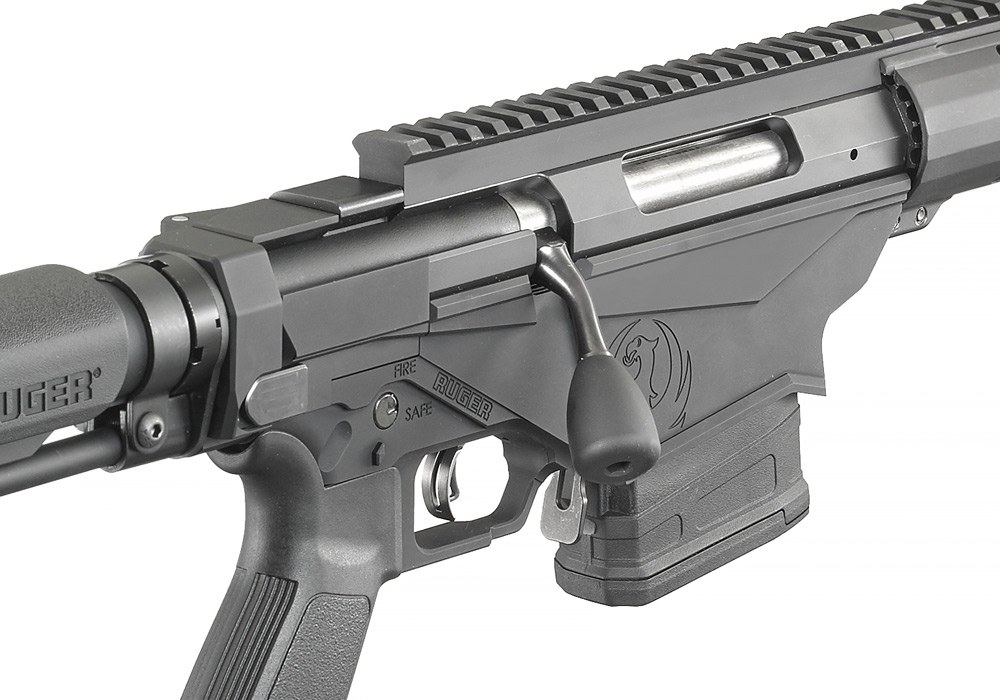
4.3.1 The bolt, as far as Ruger takes it
Ruger allows one step into the bolt, and only for lubrication (PM924 pp. 42–43; PM605 2018 pp. 39–40):
- With the lobe of the firing-pin back resting in its notch on the cam, grip the bolt shroud and the firing-pin back together and turn them clockwise, viewed from the rear, about 30°, until the lobe lines up with the centre of the bolt-handle base.
- Pull the shroud rearward and off. “This is as far as you need to dismantle the rifle to lubricate the cocking cams.”
- Lubricate: “A grease-type firearm lubricant is recommended. Lightly grease cam surfaces and the firing pin shaft … Grease may also be lightly applied to the lug surface of the bolt.”
- Refit the shroud over the firing-pin back and turn it 30° counter-clockwise; the firing-pin back locks into the bolt in its rest position.
Ruger qualifies how often this is needed — “If the rifle is used extensively, it is recommended that you lubricate the cocking cams occasionally. Note that this is not something that should be necessary under typical usage conditions” — and gives the symptom that calls for it: “If lifting the bolt handle becomes difficult or requires more force than usual, remove the bolt shroud … and clean and lubricate the bolt cocking cam surfaces.”1213
The trap in this step. “The firing pin back will only rotate fully if turned clockwise, relative to the bolt body … If the firing pin back is turned too far, it will ‘fall down’ to the bottom of the cocking cams and will take significant effort, and possibly the use of hand tools or a gripping aid, to return the firing pin back to the correct cam notches. Because there are dual cocking cams, you may need to rotate the firing pin back through both cams in order to return the firing pin back to its proper position.”12 Ruger lists a “Firing Pin Reset” video among its Precision Rifle demonstrations.14
“Further disassembly of the bolt is not required for lubrication. Some parts are under spring tension and may dislodge abruptly if removal is attempted.” The extractor, ejector and firing pin are not removed in any Ruger procedure, and the complete bolt, bolt body and (in PM924) the firing pin, its spring and its spring stop are factory-fit parts.15
4.4 Precision Rifle: Detail Strip — the Magazine Well and the Trigger Group
Ruger’s manual goes two steps further, each marked as something to do only when inspection or cleaning requires it — “Otherwise, always leave the magazine well assembled.”
4.4.1 Removing the magazine well (PM924 pp. 43–44; PM605 2018 p. 41)
- Check the chamber and magazine are empty; remove the bolt and magazine.
- With a 3/16-inch hex key, remove the cap screw at the rear of the receiver (the stock is folded at this point, which exposes it).
- Unfold the stock and remove the cap screw at the front of the magazine well. “Only remove the cap screws as identified above; no other cap screws should be removed or loosened.”
- Turn the rifle so the magazine-well opening faces up.
- Confirm the safety is on SAFE — “If the safety selector is not in the ‘SAFE’ position, the magazine well cannot be removed” — and lift the well off.
On a PM605 rifle, this is also the step that allows the selector to be moved from the left side to the right (p. 42): depress the long leg of the selector spring, draw the selector out from its indicator side, and refit it from the other side with the long leg of the spring along the left wall of the lower. “The rifle will not go together properly if it is skewed.”
4.4.2 Removing the trigger group (PM924 p. 45; PM605 2018 p. 43)
“It is recommended that you clean the trigger group approximately every 1,000 rounds. An increase in trigger pull weight (without adjustment) is an indicator that the trigger group may require cleaning.”16
- Remove the magazine well as above.
- With the 3/16-inch key, remove the screw at the front of the trigger assembly.
- Release the cocking-guide spring by pressing its pin into the long leg of the J-shaped slot.
- With a non-marring tool, press the firing-pin back guide (PM605: “cocking piece guide”) down through the bolt opening inside the receiver, and slide the trigger assembly rearward, toward the stock, and out.
“This is as far as you need to dismantle the rifle to clean the trigger group and inspect the internals. NOTE: Further disassembly of the trigger group is not required for cleaning, some parts are under spring tension and may dislodge abruptly if removal is attempted.”
4.4.3 Cleaning the trigger group (PM924 pp. 46–47; PM605 2018 pp. 44–45)
Ruger specifies the materials: non-chlorinated parts cleaner, cotton swabs, an oil-type lubricant, “and a synthetic grease-type lubricant such as Slip 2000® EWG or equivalent.”
- Spray the inside of the group with the parts cleaner; wipe every visible surface with a swab.
- One drop of oil on each axle shaft, allowed to run down into the assembly.
- With the grease syringe, put grease where the sear meets the top of the trigger “until a 1/8” bead forms between the parts.” It will spread and show through the inspection ports.
- A small bead of grease on the opposite side of the sear.
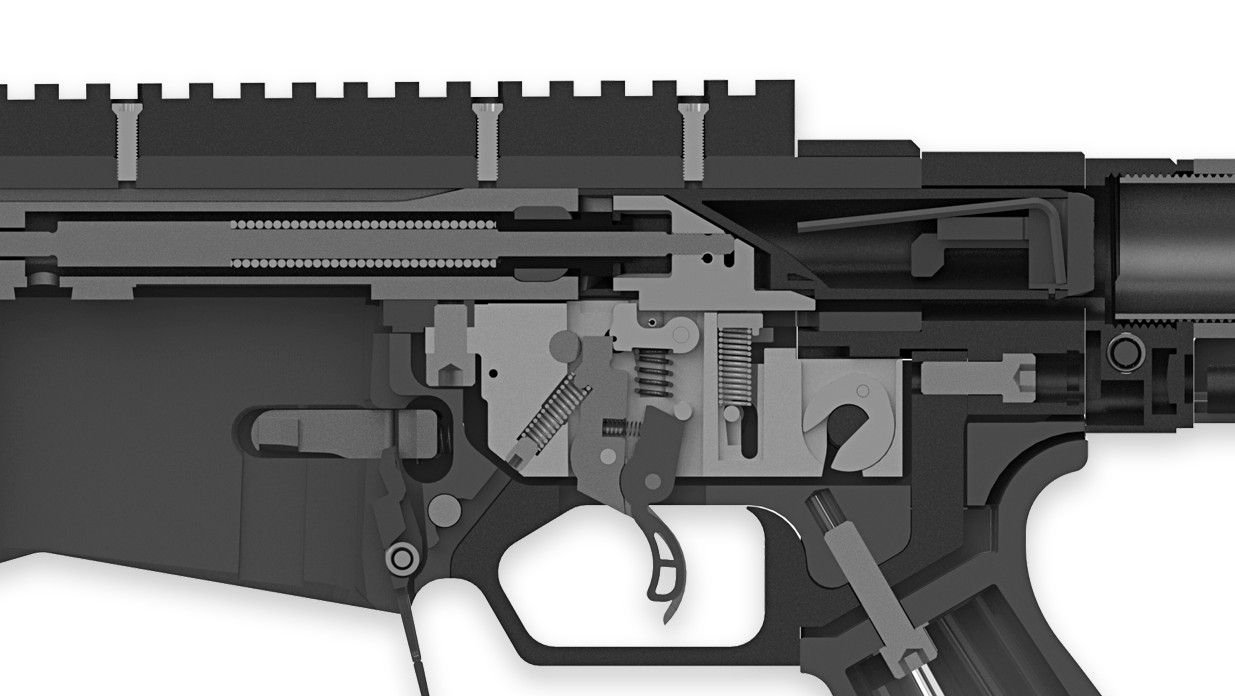
4.4.4 Reassembly, and the one order that matters
(PM924 p. 48; PM605 2018 p. 47)
- Trigger group: receiver upside down; slide the group in, away from the stock; seat the guide in its mating feature; compress its spring by moving the pin into the short leg of the J slot; tighten the front screw — 70 in-lb in PM924. PM605 gives no torque.
- Magazine well: safety on SAFE; set the well on. Fold the stock and fit the rear cap screw first; then unfold and fit the front screw. “This sequence is important to properly seat the components.” PM924: both 70 in-lb.
- Test the safety.
- Refit the bolt shroud (30° counter-clockwise) and the bolt.
4.4.5 The function check (PM924 pp. 49–50)
With no ammunition anywhere near the rifle:
- Bolt and firing pin: cycle the bolt three times; it must move freely. Close it, safety to FIRE, pull the trigger and listen for the firing-pin click. Three times.
- Safety: close the bolt without dry firing. On SAFE, pull the trigger: there must be no click. Release the trigger and check the release blade in its centre “has fully rebounded”. Move to FIRE and pull: click, and the bolt can be cycled.
- Follower: press it down; it must return freely to the top.
- Latch: with the bolt open, insert an empty magazine until it clicks, and pull on it with moderate force without touching the latch lever. It must stay.
“If any of the above function checks fail, please consult a competent gunsmith or contact Ruger Customer Service … for further firearm inspection before using the firearm.”17
4.5 Precision Rifle: the Handguard and the Brake
4.5.1 The handguard
Removal. PM924: with a T-15 Torx driver, take out the six screws — two on top, two underneath, one each side — and slide the tube off without touching the barrel. PM605 (2018): four screws on top and two underneath.1819
Installation (PM605 2018 pp. 35–36, repeated in PM924 p. 39):
- Put the nut inside the bushing, nut toward the muzzle, and slide the pair over the barrel; turn the nut clockwise onto the threads of the barrel nut, finger tight.
- Set the bushing with its four screw holes up and two down, then rotate it about 15° counter-clockwise “to compensate for movement of the bushing during final tightening.”
- Tighten the nut to 35–50 ft-lb with a 1-3/8-inch wrench, watching where the threaded holes stop.
- Slide the handguard on with its rear tabs either side of the scope base. Fit the two bottom screws at 25 in-lb and confirm the tube sits centred on the barrel; if it does not, “the bushing probably is not timed correctly and one of the tabs is contacting the scope base.”
- Fit the remaining screws at 25 in-lb.
“Note that this may require a few attempts the first time.” The timing of the bushing is the whole difficulty; the torque range is wide enough that a second try at a different clock position is normal.
4.5.2 The muzzle brake — where two revisions of the manual disagree
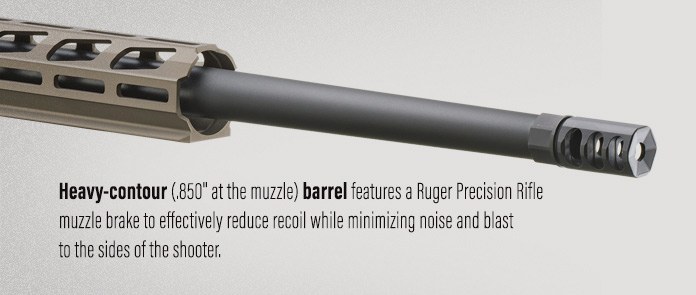
Both revisions give the same method: loosen the jam nut, unscrew brake and nut; to refit, thread nut and brake on together until they stop without tightening, back the brake out until its side ports are at three and nine o’clock, then tighten the jam nut against it. Everything else differs:
Table 2 — Both revisions give the same method: loosen the jam nut, unscrew brake and nut; to refit, thread nut and brake on together until they stop without tightening, back the brake out until its side ports are at three and nine o'clock, then tighten the jam nut against it. Everything else differs
| PM605, 2018 revision (p. 18) | PM924 (p. 18) | |
|---|---|---|
| Wrench | 7/8 in | 15/16 in |
| To loosen the jam nut | turn it “clockwise” | turn it “counterclockwise” |
| To tighten it | turn it “counter-clockwise” | turn it “clockwise” |
| Torque | 15 ft-lb | 25 ft-lb |
The wrench size and torque differences are consistent with a different brake and jam nut: the current rifle’s barrel is heavy-contour, .850 in at the muzzle, against the .75 in of the rifles PM605 covers.2223 The owner of an older rifle should use PM605’s figures for the brake it came with.
The direction reversal is harder to explain, and neither manual states which end of the rifle the turning is viewed from. What can be said from the procedure itself: the jam nut goes onto the thread first, so it sits behind the brake, and locking it means driving it forward against the brake — the unscrewing direction of a right-hand thread seen from behind the rifle, and the tightening direction seen from the muzzle. On that reading PM605’s words describe the nut as seen from the shooter’s position and PM924’s as seen facing the muzzle, and both are correct. This is reasoning from the manuals’ own sequence, not something either manual says. A brake that will not move in the stated direction should not be forced.
The thread itself is 5/8-24 on the .308 (and the other 5/8-24 calibres listed in Volume 2). “If something does not feel right in the first revolution of muzzle device installation, stop and inspect both the muzzle device and barrel threads”, and any muzzle device, suppressors included, must be checked for correct calibre, pitch and concentricity before firing.24
4.6 Precision Rimfire: Field Strip and Detail Strip
From manual PM697, pp. 33–40.
4.6.1 Field strip
- Safety to SAFE if the firing pin is cocked.
- Remove the magazine and check the chamber “visually and physically”.
- “Open the bolt and pull it to the rear while at the same time pressing on the rear of the bolt stop, which is located on the left side of the receiver.” There is no stock to fold; the bolt comes straight out.
“This is as far as you need to dismantle the rifle for a routine cleaning. It is rarely necessary to proceed further.”25
Refitting the bolt. The firing-pin lobe, on the underside of the cam, must be resting in its detent notch. If it is not, “grasp the bolt handle knob firmly and rotate counter-clockwise while holding the bolt stationary.” Then, handle aligned with its raceway and the cartridge seat facing away, press the bolt stop and slide the bolt in.26
4.6.2 The barreled action out of the chassis
- Turn the rifle over, magazine well up; safety on SAFE (“If the safety selector switch is not in the ‘SAFE’ position, the lower receiver cannot be removed”).
- Remove the two bedding screws in the bottom of the stock.
- Lift the barreled action out. The safety selector may drop out; the reversal instructions on p. 35 cover refitting it.
On reassembly the bedding screws go to 35 in-lb, and the safety must be on SAFE with the selector held in place.26
4.6.3 The handguard
Loosen — do not remove — the two screws underneath and slide the tube off, starting it with a non-marring hammer if it is tight. Refit with the screws on the bottom.27
4.6.4 The trigger group
The Precision Rimfire’s trigger is the same design family as the centerfire rifle’s, and comes out the same way: a flat screwdriver moves the cocking-guide spring pin into the long leg of the J slot, the cocking-piece guide is pressed down through the bolt opening, and the group slides rearward and out. Ruger gives the same thousand-round cleaning interval, the same symptom and the same Slip 2000 grease procedure. On reassembly the group slides in toward the muzzle and the pin returns to the short leg of the J.27
4.6.5 The bolt-throw clip
The one adjustment unique to the rimfire. “The bolt has an additional groove and spring clip to adjust for length of bolt throw. The rifle ships with the spring clip in place for a short throw.” To remove it, a small screwdriver goes under the edge of the clip on the right side of the bolt and lifts its tabs clear of the slot; Ruger says to “retain it for future use”. To refit it, the clip’s hook goes on the left side and the clip is pressed down until the hook snaps over the left edge and the tabs into the slot on the right.28 Volume 3 shows what the clip does, and Volume 5 why a shooter would take it off.
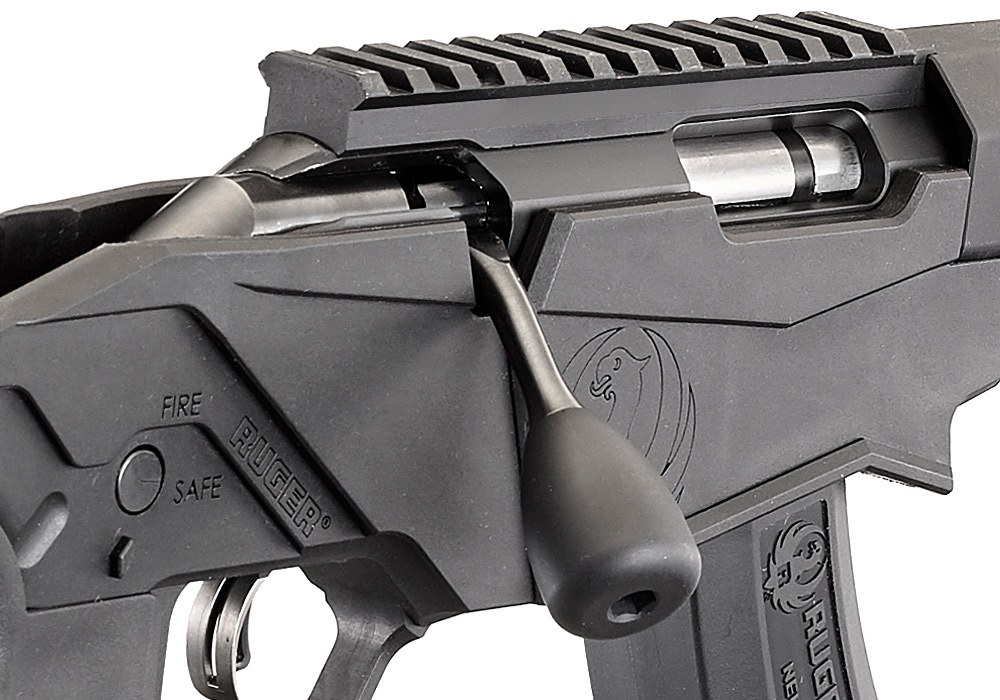
4.7 Cleaning and Lubrication
The two manuals give nearly identical routines (PM924 pp. 51–52; PM697 pp. 43–44):
- Routine cleaning needs only the bolt and magazine out.
- Clean from the breech. Insert the rod from the chamber end; do not reverse a brush or patch before it exits the muzzle; do not use patches or brushes dripping with solvent.
- Bore: several solvent-wet patches, then a solvent-wet brush “as many times as is necessary”, then dry patches; repeat if still fouled.
- Receiver and bolt: solvent on a patch for reachable surfaces, a toothbrush for caked residue.
- Oil sparingly: “A drop of oil applied to the bolt assembly components, the pivot points of the trigger mechanism, the safety, the bolt stop, and the magazine latch, will work into all the parts that need lubrication.” Oil “collects” dirt; wipe off the excess.
- No caustic or acetone-based cleaners, and test any cleaner on an inconspicuous area first. The rimfire manual adds: no automotive or paint-stripping products.
- Cerakote: soft brush or rag and mild solvent or detergent; “Do not use hard metallic brushes or aggressive solvents”; finish with a light coat of oil.
- Before storage: clean thoroughly, re-wipe with preservative oil, and store unloaded — not in leather, which “attracts moisture, even though it may appear to be dry.”
The Precision Rifle manual also warns about the bore after storage or weather: “Excess oil, grease or water may form an obstruction … open the bolt and clean out the barrel.”29
4.8 Inspection and Parts That Wear
Ruger’s inspection instruction is the same in both manuals: “clean and inspect your firearm after each range session or whenever the firearm has been exposed to sand, dust, moisture, humidity, or other adverse conditions”, and before each use look for components that are “damaged, missing, loose, bent, cracked, chipped, or peened.”30
The only service interval Ruger publishes for either rifle is the trigger group’s, “approximately every 1,000 rounds”. Neither manual gives a replacement interval for any spring, the extractor, the firing pin or the barrel, and none is supplied here. Accuracy life of a .308 barrel is a real consideration for a rifle used in competition, but no Ruger figure for it was found, and a figure borrowed from another maker’s barrel would not be a statement about this one.
What the manuals do give are tests:
- Magazine spring: load one round, press it down firmly and release; it must return “instantly and fully” to the feed position. If cleaning does not restore that, retire the magazine.31
- Fired cases: “Form the habit of examining fired cartridge cases from time to time. If fired cases have bulged heads or show splits on any part of the case, stop using that ammunition. If the problem persists with different types of ammunition, return the rifle to the factory for inspection.”32 What each mark on a fired case means is the subject of Headspace, Volume 12.
- Trigger: a heavier pull without adjustment means the group needs cleaning.
- Bolt lift: a stiffer lift means the cocking cams need cleaning and grease.
- Precision Rimfire accuracy: if the rifle will not group, Ruger’s checklist is (1) the two bedding screws at 35 in-lb, (2) the bore free of metal fouling, (3) scope base and ring screws tight and aligned — and several brands of ammunition tried before anything else.33
4.9 Malfunctions: What the Manuals Say
Table 3 — Malfunctions: What the Manuals Say
| Symptom | What Ruger says | Source |
|---|---|---|
| Misfire, or a report louder or quieter than normal | Keep the rifle pointed safely 60 seconds (RPR) / at least 30 seconds (Rimfire) before opening the bolt; then check the bore for an obstruction | PM924 p. 26; PM697 p. 23 |
| Bullet stuck in the bore | Safety, magazine out, bolt out; a proper-size rod “without a tip or brush” from the muzzle; tap lightly; otherwise a gunsmith or Ruger. Never shoot it out, or use a blank | PM924 pp. 25–26 |
| Fired case stuck in the chamber | ”use a cleaning rod to knock it out” | PM924 p. 27 |
| Live round stuck in the chamber | Fold the stock, remove the bolt, and pry it out from the breech with “a piece of 3/16” brass rod which has one end shaped like a screwdriver tip” in the extractor groove, using the ejection-port face as a fulcrum; never strike the primer | PM924 p. 27 |
| Round jams feeding | Do not force it by pushing or striking the bolt handle; usual causes “a damaged magazine, incorrect firearm handling, insufficient lubrication, or improper ammunition” | PM924 p. 27 |
| Unfired round falls back onto the magazine | Remove the magazine before retracting the bolt; tip the rifle right; retract briskly | PM924 p. 28 |
| Rimfire fails to extract or eject | ”usually the result of the bolt not being pulled rearward vigorously, coupled with an accumulation of bullet fouling in the chamber”; clean the chamber and extractor | PM697 p. 22 |
| Rimfire: long-case .22 LR sticks | ”Stinger” cartridges “can stick in the chamber of this rifle” — do not use | PM697 p. 14 |
| Safety feels loose or will not stay in position | Do not use the rifle; return it to Ruger | PM924 p. 14 |
| Magazine release feels like two stages | Normal: “This is normal for a side-latching magazine” | PM924 p. 17 |
| Firing-pin back “fallen” to the bottom of the cams | Rotate it back through the cams to the correct notches; may need a gripping aid | PM924 p. 42 |
| Trigger adjustment screw backed out too far | It can come out completely; call Ruger | PM924 p. 35 |
Ruger’s position on reloaded ammunition belongs in the same table: its manuals “specifically disclaim responsibility for any damage or injury whatsoever occurring in connection with … hand loaded (reloaded) ammunition”, and name reloads as the most frequent source of a bullet lodged in the bore.34 That is the maker’s position, not a finding about handloads; Volume 6 sets it beside the hub’s reloading material.
4.10 Repair: What the Owner Does, and What Goes to Ruger
4.10.1 Factory-fit parts
Both manuals’ parts lists mark the parts Ruger will fit only itself, “on an exchange basis only. We will not return the replaced parts.”
Table 4 — Factory-fit parts
| Rifle | Factory-fit (asterisked) parts |
|---|---|
| Precision Rifle, PM605 (2015 and 2018) | complete bolt/firing-pin assembly; bolt body; barrel nut; barrel; complete trigger assembly; sear; safety link; trigger-block pin; safety shaft; safety spring; trigger housing; trigger release; trigger |
| Precision Rifle, PM924 | complete bolt/firing-pin assembly; firing-pin back; firing pin; firing-pin spring stop; firing-pin spring; bolt body; complete trigger assembly; trigger housing; trigger; E-clip; barrel — the barrel nut is no longer asterisked |
| Precision Rimfire, PM697 | complete trigger-housing assembly; trigger housing; trigger; sear; sear spring; safety shaft; safety link; trigger-block pin; safety spring; trigger release; complete bolt assembly; front bolt; threaded bolt handle; complete barrel/receiver assembly, including the barrel |
Everything not on those lists — magazine parts, the stock and its fittings, the handguard, the grip, the bolt stop, springs outside the fire-control and bolt groups, the muzzle brake — is sold as a part, and the manuals’ warning covers the owner who fits it: “It is the purchaser’s responsibility to be absolutely certain that any parts ordered from the factory are correctly fitted and installed.”37
4.10.2 The barrel: Ruger’s catalogue against Ruger’s manual
This is the sharpest contradiction in the rifle’s documentation.
The catalogue. The launch specification sheet: “Barrels can be easily replaced by a competent gunsmith using AR-style wrenches and headspace gauges.” Every later Precision Rifle sheet, including the current one: “Barrel can be replaced easily by a competent gunsmith using headspace gauges.” The Precision Rimfire’s sheet, to this day: “Barrel can be replaced easily by a competent gunsmith using AR-style wrenches and headspace gauges.”382239
The manual. Every manual, in its parts policy: “Barrels, and a number of other component parts must be fitted at the factory. Company policy is to proof-test and/or function fire all barrels after fitting to the receivers in which they are to be used. This procedure ensures maximum protection to our customers. The special proof-test ammunition used in this testing is sold only to bonafide firearms manufacturers and is not available to gun shops, gunsmiths, or individuals.” And the barrel carries the factory-fit asterisk in every parts list.4037
The two statements answer different questions. The catalogue describes what the design permits: a barrel held by a nut and set with gauges is, mechanically, a gunsmith’s job and not a factory’s. The manual states Ruger’s parts policy: Ruger will not sell a Precision Rifle barrel for someone else to fit, and will not certify a barrel it did not proof. Neither statement cancels the other, and neither says what happens to a rifle’s warranty or to Ruger’s willingness to service it after an outside barrel change — no Ruger document found addresses that, and it is not guessed at here.
What the competition rules say, for context: the 2026 PRS rules allow a Production Division rifle to be re-barrelled “by a gunsmith if no factory option to re-barrel exists”, with a factory barrel only.41 For the Precision Rifle, whose maker says barrels “must be fitted at the factory”, that clause is itself ambiguous.
How a barrel-nut barrel is fitted. The method — stripped bolt, a GO gauge, the barrel turned in against it, the nut run up with the bolt open, then GO and NO-GO checked — and its central warning are set out in Headspace, Volume 5, with the barrel-nut case discussed specifically in its “Pre-Fit Barrels” section and in Volume 13. Ruger’s launch sheet names “AR-style wrenches” as the tools; the current sheets name only gauges. No Ruger document gives the barrel-nut torque, the thread, or the function of the “Barrel Nut Lock” listed in both parts lists, and none is supplied here. Barrels sold by third parties as fitting the Precision Rifle exist; none was assessed for this dive, and none is named.
4.10.3 Sending a rifle to Ruger
- Obtain a Repair Authorization Number first, online or at 336-949-5200; unauthorised or collect shipments are not accepted.
- Ship the complete rifle, unloaded, without scope, sling, case or custom accessories. Rifles may go by U.S. Mail; the owner must check that state or local law allows receiving it back.
- Enclose a letter with name, address, telephone, serial number, model, the authorisation number, and a detailed description — “Merely stating that the firearm ‘needs repair’ is inadequate information.”
- “All work performed is subject to a minimum labor charge”, and “custom gunsmithing service or nonstandard alterations are NOT AVAILABLE from Ruger Customer Service Departments.”42
The Precision Rimfire’s manual adds a point about the stock: “DO NOT alter the stock bedding in any way … Once a rifle stock has been altered, it cannot be reworked by our Customer Service Department.”33
Footnotes
-
Ruger, PM924, “Disassembly,” p. 40. ↩
-
Ruger, PM697, “Disassembly,” p. 33. ↩
-
Ruger, Instruction Manual for Ruger Precision Rifle, PM605. 2015 edition: https://web.archive.org/web/20150906142211/https://ruger-docs.s3.amazonaws.com/_manuals/RugerPrecisionRifle-Bp2dZ95h4Rs7.pdf ; 2018 revision (“TAC 8/18 R3”) at the same address, replaced in place: https://ruger-docs.s3.amazonaws.com/_manuals/RugerPrecisionRifle-Bp2dZ95h4Rs7.pdf (read 2026-09-19). ↩
-
Ruger, Instruction Manual for Ruger Precision Rifle, PM924, cover. https://ruger.com/dataProcess/manual/fetch.php/ms/18104/manual_18104.pdf (read 2026-09-19). ↩
-
Ruger, Instruction Manual for Ruger Precision Rimfire, PM697, “PRR 4/2026 R10.” https://ruger.com/dataProcess/manual/fetch.php/ms/8400/manual_8400.pdf (read 2026-09-19). ↩
-
Ruger, PM924, “To Unload,” p. 23. ↩
-
Ruger, PM697, “To Extract and Eject a Chambered Cartridge,” p. 22. ↩
-
Ruger, PM924, “Operation of Safety,” p. 14. The Rimfire manual’s wording is the same (PM697, p. 12). ↩
-
Ruger, PM924, “Stock Adjustment,” p. 28. ↩
-
Ruger, PM924, “To Disassemble Your Ruger Precision Rifle,” p. 41. ↩
-
Ruger, PM924, “Unboxing Your Rifle,” pp. 12–13. ↩
-
Ruger, PM924, “Disassembly of Bolt for Cleaning,” pp. 42–43. ↩ ↩2
-
Ruger, PM924, “Care and Cleaning,” p. 52. ↩
-
Ruger, Ruger Precision Rifle model page, list of instructional videos. https://ruger.com/products/precisionRifle/models.html (read 2026-09-19). ↩
-
Ruger, PM924, “Trigger Group,” p. 45. ↩
-
Ruger, PM924, “Check Your Rifle’s Function,” p. 50. ↩
-
Ruger, PM924, “Handguard Removal and Installation,” pp. 38–39. ↩
-
Ruger, PM605 (2018 R3), “Handguard Removal and Installation,” pp. 35–36. ↩
-
Ruger, PM605 (2018 R3), “Muzzle Brake System,” p. 18. ↩
-
Ruger, PM924, “Muzzle Brake System,” p. 18. ↩
-
Ruger specification sheet, model 18104. https://ruger.com/products/precisionRifle/specSheets/18104.html (read 2026-09-19). ↩ ↩2
-
Ruger specification sheet, model 18028, captured 17 July 2019. https://web.archive.org/web/20190717012851/https://ruger.com/products/precisionRifle/specSheets/18028.html ↩
-
Ruger, PM924, “Threaded Barrel” and “Warning – Muzzle Devices,” p. 19. ↩
-
Ruger, PM697, “Disassembly,” step 3, p. 34. ↩
-
Ruger, PM697, “Handguard Removal” and “Trigger Group Removal,” pp. 36–38. ↩ ↩2
-
Ruger, PM697, “To Adjust Bolt Throw,” p. 32. ↩
-
Ruger, PM924, “To Remove a Bore Obstruction,” p. 24. ↩
-
Ruger, PM924, “Check Your Rifle’s Function,” p. 49. ↩
-
Ruger, PM924, “Care and Cleaning of Magazine,” p. 18. ↩
-
Ruger, PM924, “To Clear a Malfunction,” pp. 26–27. ↩
-
Ruger, PM924, “Ammunition (Cartridges) Notice,” p. 16, and “To Remove a Bore Obstruction,” p. 25. ↩
-
Ruger, PM605, parts list, pp. 51–53 (2015 and 2018 editions). ↩
-
Ruger, PM697, parts list, pp. 48–49. ↩
-
Ruger, PM924, “Warning – Parts Purchasers” and “Ordering Parts,” p. 55. ↩ ↩2
-
Ruger specification sheet, model 18001, captured 13 January 2016. https://web.archive.org/web/20160113233641/https://ruger.com/products/precisionRifle/specSheets/18001.html ↩
-
Ruger specification sheet, model 8400. https://ruger.com/products/precisionRimfire/specSheets/8400.html (read 2026-09-19). ↩
-
Ruger, PM605 (2018 R3), “Ordering Parts,” p. 50. ↩
-
Precision Rifle Series, 2026 Rules & Standard Operating Procedures, rule 2.1.3k. https://prs-website-uploads.s3.amazonaws.com/public/prs_rules.pdf (read 2026-09-19). ↩
-
Ruger, PM924, “Service and Parts Policy,” p. 54. ↩
Comments (0)