Ruger Precision Rifle & Precision Rimfire · Volume 3
How the Two Actions Work — the Cycle, Part by Part
The Precision Rifle's three-lug bolt, cocking cams, trigger and two-catch magazine latch, and the Precision Rimfire's action with its adjustable throw
Both rifles are manually operated bolt actions that cock on opening. That one phrase explains most of how they feel and most of what can go wrong with them. The shooter’s lift of the bolt handle does the work that a Mauser-pattern rifle does on closing: it drives the firing pin back against its spring. The trigger then has only to release a pin already held back, and the safety — which blocks the trigger — can be applied only once that has happened.
This volume walks through each rifle’s cycle part by part. Part names are Ruger’s, from its parts lists. Where Ruger’s documents say how a part behaves, they are quoted. Where they give only the part’s name, the description of what it does is the standard function of a part of that name in a bolt action, and is marked as such; nothing here is taken from disassembling a rifle beyond the steps Ruger publishes.
3.1 The Precision Rifle’s Parts, by Group
From the current manual’s parts list (PM924, pp. 56–58; the 2015 manual’s list has the same parts under slightly different names):1
Table 1 — The Precision Rifle's Parts, by Group
| Group | Parts Ruger lists |
|---|---|
| Bolt | bolt body (short action); bolt handle and knob; firing pin; firing-pin spring and spring stop; firing-pin back (the cocking piece, “cocking piece” in PM605); extractor, extractor ball, extractor spring; ejector plunger and ejector spring; two pins shared by ejector and firing-pin back; bolt shroud with O-ring, cap and hex key |
| Trigger | trigger housing; trigger; trigger release with pin and spring; sear and sear spring; sear stop pin; trigger-block pin; safety shaft, safety link, safety connector, safety spring; trigger adjustment screw and trigger-pull adjustment spring; firing-pin back guide and its spring; E-clips |
| Receiver | receiver (serialised); barrel; barrel nut and barrel-nut lock; bolt stop, spring and pin; scope base and screws; handguard, nut, bushing and screws |
| Magazine well | right and left halves; magazine latch lever and spring; magazine side-latch catch and pin; lower lever pin; safety selector (and ambidextrous selector), screw and spring; pistol grip |
3.2 The Cycle, Step by Step
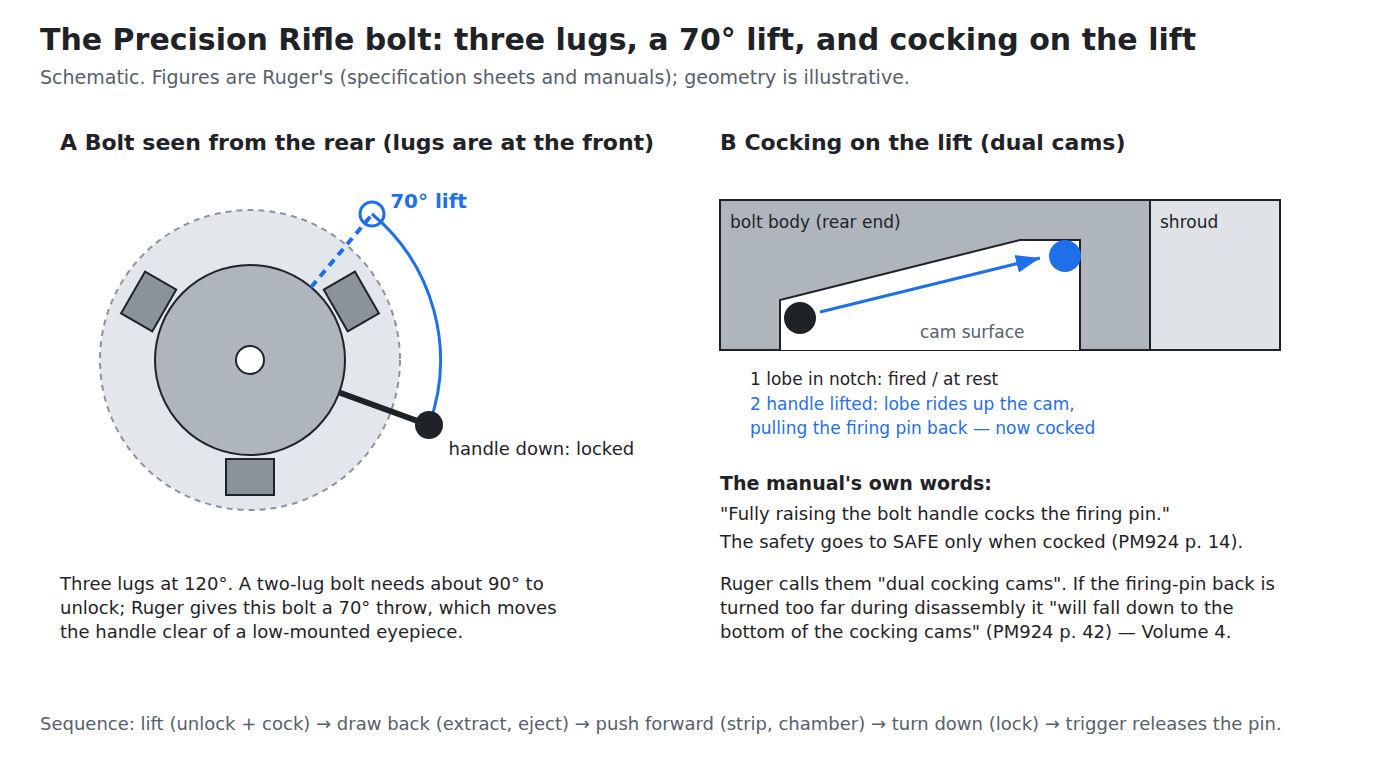
The drawing below shows the two features that set this bolt apart from a Remington 700’s: three locking lugs, which need only 70° of rotation, and cocking on the lift.
3.2.1 Lifting the handle: unlock and cock
The shooter lifts the handle through its 70°. Two things happen at once.
- The lugs rotate out of their seats in the receiver. With three lugs at 120° intervals, 70° is enough to clear them; a two-lug bolt needs close to 90°. Ruger’s sheets give the figure and the lug count; the geometry is general.2
- The firing pin is cocked. “Fully raising the bolt handle cocks the firing pin.” The lobe of the firing-pin back rides a cam surface on the bolt body — Ruger specifies “dual cocking cams” — and the helix draws the firing pin rearward, compressing its spring.34
Because the effort of cocking is paid on the lift, a bolt that becomes hard to lift is telling the owner about the cams: Ruger’s remedy is to take off the shroud and clean and grease the cam surfaces (Volume 4).5
3.2.2 Drawing the bolt back: extract and eject
The bolt slides rearward on its full-diameter body. The extractor — which Ruger lists with a ball and a spring behind it — holds the case rim against the bolt face and draws the case out of the chamber. The ejector plunger, a spring-loaded pin in the bolt face, pushes constantly on the case head; once the case mouth clears the chamber, it tips the case out of the ejection port. (Extractor and plunger ejector are named in Ruger’s parts list; their operation described here is the standard function of those parts.)
The bolt stop on the left rear of the receiver arrests the bolt at the end of its travel. Pressing the rear of that stop is how the bolt is removed.6
Ruger’s manual adds a handling point about this stroke. When extracting a live round, “tip the right side of the rifle towards the ground so that gravity will assist the cartridge falling out of the receiver. Always retract the bolt briskly”, and remove the magazine first so that a round that falls back is not fed again.7
3.2.3 Pushing the bolt forward: feed
“Grasp the bolt knob and push the bolt handle forward. This will strip a cartridge from the magazine and push the cartridge ahead of the bolt into the chamber.”8 The bolt face picks the top round off the magazine’s feed lips on its way forward. A round that binds must not be forced: “do not attempt to force it into the chamber by pushing or striking the bolt handle.”9
3.2.4 Turning the handle down: lock
The handle is turned down; the three lugs rotate into their seats behind the barrel, and the bolt face closes against the case head. The firing pin stays back — held, in any cock-on-open design, by the sear once the cam has carried the cocking piece past it. Ruger does not describe the sear engagement in words; its parts list names the sear, its spring and a sear stop pin.1
3.2.5 The safety
The selector rotates 45° between FIRE and SAFE. “When the safety is on ‘SAFE,’ it blocks the trigger.” It can be set only when the rifle is cocked.3 What blocks the trigger — the parts list carries a safety shaft, a safety link, a safety connector and a trigger-block pin, and Ruger’s 2014–2016 safety patent is titled “Safety mechanism for firearm” — is not described further in any manual.110 Ruger’s function check tests exactly what matters: on SAFE, a pull of the trigger must not release the firing pin.11
3.2.6 The trigger
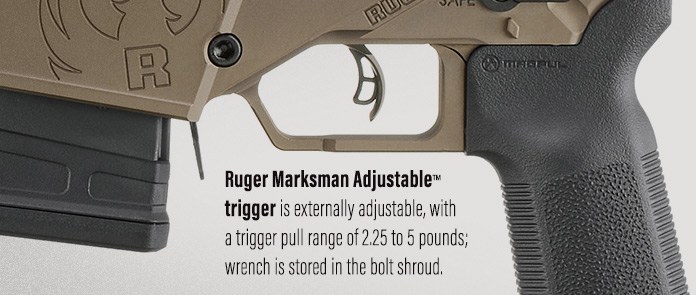
The Marksman Adjustable trigger carries a trigger release — a pivoting blade in the centre of the trigger face — which must be pressed before the trigger itself can move. Then the trigger moves the sear, the sear releases the firing pin, and the firing-pin spring drives the pin forward into the primer. Ruger’s safety patent describes the cocked state in its own terms: the firing pin “is held rearward in a cocked position by sear 38 via engagement between blocking and stop surfaces … of the sear and cocking piece 36 of the bolt”, and the sear “is in the upwards blocking position being held there by the trigger release member 37”. The same patent describes the safety as a shaft in the trigger housing that, when the selector is rotated to SAFE, “engages the trigger to prevent pivotable movement thereof to release the sear”.10
Pull weight is set by a screw bearing on the “Trigger Pull Adjustment Spring”. Turning the screw in loads the spring and raises the weight; about six turns take it through its whole range of roughly 2¼ to 5 lb, and past that the screw does nothing more — “Turning the screw beyond this amount will not further increase or decrease trigger pull weight.” Backed out too far, it can fall out.12 The screw is reached through the slot in the magazine latch lever, and the key for it lives in the bolt shroud.
3.2.7 If something goes wrong: the vents
“Venting holes evident in the upper receiver and bolt ensure that excess gas (as might occur with a plugged bore or overcharged round) has the safest possible path out of the rifle.”13 They are part of the design, not of the finish, and must not be covered.
3.3 The Magazine Latch in Operation
Volume 2 described what the latch accepts. What happens when it is used is set out in Ruger’s patent, US 9,194,637, whose text describes the embodiment in more detail than any manual:
- A side catch, which moves sideways into a notch in the side of the magazine, holds SR-25/AR-10, AR-15/M16 and HK G3/91-pattern magazines — the “side catch style”. The shipped Magpul PMAG 10 LR/SR is one of these.
- A rear catch lever, vertical and pivoted at the top of the magazine well’s rear wall, holds magazines that are retained by a lip at the back: Accuracy International magazines, which “only have a lip on the back and are not retained in the front”, and M14/M1A-type magazines, which have a lip at the back and a catch opening at the front.
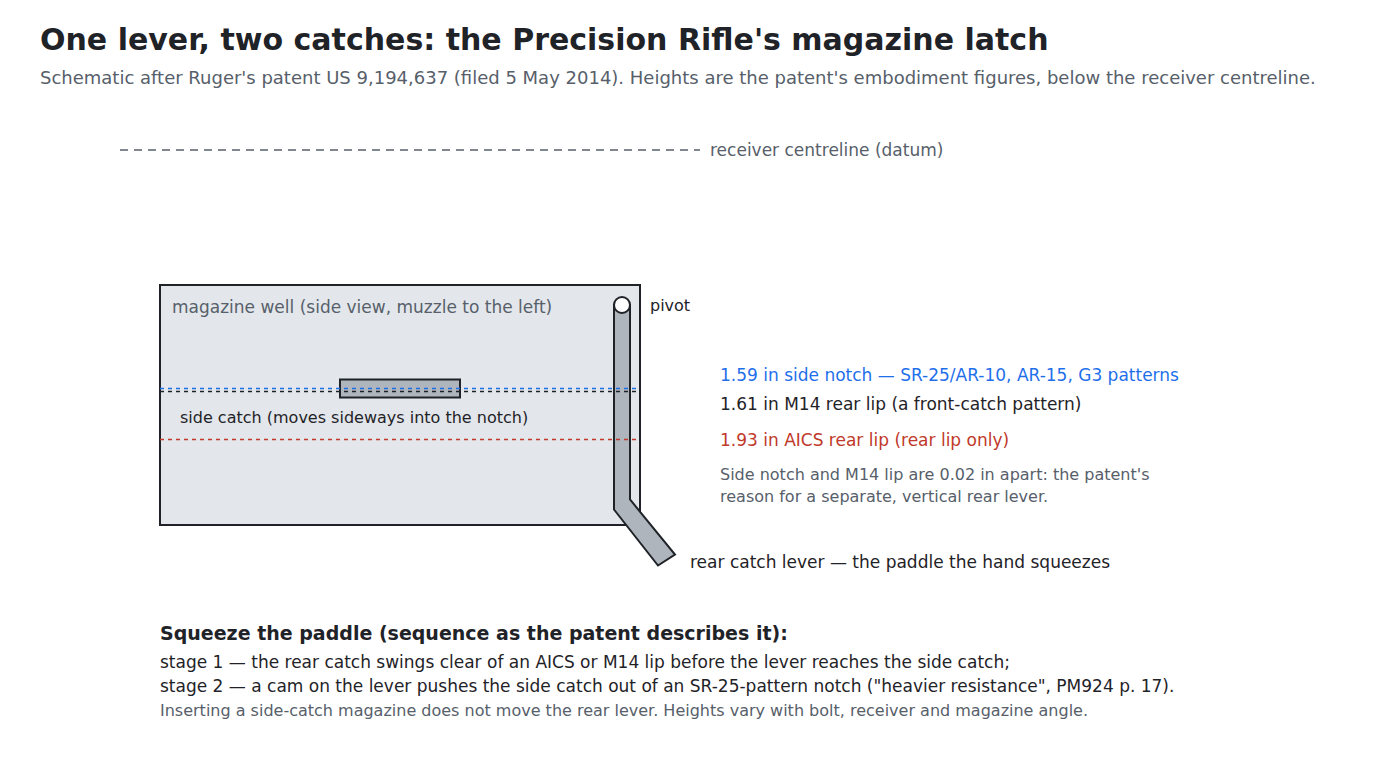
- The rear lever operates both. “Pivoting the rear catch lever linearly moves the side catch lever in a lateral direction”; “the side catch lever includes an inclined cam surface which is engaged by a cam protrusion on the rear catch lever.” A magazine latched by the side catch does not move the rear lever as it goes in.14
The patent also explains why the design needs two catches at all. In its embodiment the side-catch notch of an SR-25-pattern magazine sits about 1.59 in below the receiver centreline, the M14 rear lip about 1.61 in, and the AICS rear lip about 1.93 in: the M14 lip is too close to the side notch to be caught by the same part, and the AICS lip sits “approximately 0.300” below the M1A/M14 catch”.14
And it explains the two-stage feel the manual warns about. “The lever can be designed to allow the release of rear catch magazines before contacting the side catch, which reduces force and wear.”14 Squeezing the paddle first swings the rear catch clear, then — with more effort — cams the side catch out. The manual: “you will feel it move through two stages; you may encounter heavier resistance releasing the second stage. (This is normal for a side-latching magazine.)”15 With an AICS magazine, the first stage alone releases it.
Whether the production rifle follows every detail of the patent’s embodiment was not verified by examining one. The manual’s description of the two stages matches it.
3.4 The Precision Rimfire’s Action
The Precision Rimfire is a different action that deliberately feels the same. Ruger’s manual lists its parts; the comparison below is by part name.16
Table 2 — The Precision Rimfire's Action
| Precision Rifle | Precision Rimfire | |
|---|---|---|
| Cocking | ”Fully raising the bolt handle cocks the firing pin” | the same words (PM697 p. 12) |
| Bolt | one-piece bolt body; three lugs; 70° | listed as two parts, “Bolt, Front” and “Bolt, Rear”, with a rear bolt-retaining pin and a threaded bolt handle; lug arrangement and lift angle not stated by Ruger |
| Firing pin at rest | lobe of the firing-pin back in a notch on the cam | ”the lobe on the firing pin (located on the underside of the cam) is at rest inside the detent notch on the cam” |
| Bolt handle | oversized, 5/16-24 thread | ”Oversized bolt handle … (same as the Ruger Precision® Rifle)“ |
| Bolt throw | fixed, short action | 1½ in or 3 in, set by a clip |
| Trigger | Marksman Adjustable, 2¼–5 lb; key in the bolt shroud | Marksman Adjustable, 2¼–5 lb; key in a “tool caddy” behind the bolt |
| Safety | 45° AR-style selector; blocks the trigger; ambidextrous on later rifles | 45° AR-style selector, reversible side to side |
| Magazine | SR-25 and AICS patterns; paddle latch behind the magazine | Ruger 10/22-pattern (BX-1, BX-15, BX-25); “magazine release lever (located behind the magazine)”, pushed forward |
| Barrel | threaded into the receiver, barrel nut | barrel, barrel nut, barrel cap and barrel pin; sold only as a complete barrel/receiver assembly |
| Bedding | none; recoil path receiver-to-stock | barreled action held in a moulded chassis by two bedding screws, 35 in-lb |
Sources: manuals PM924 and PM697; specification sheets.11617
3.4.1 The rimfire’s cycle
It is the same sequence as the centerfire rifle’s in a smaller action. Lifting the handle cocks the firing pin; drawing the bolt back extracts the fired case; pushing it forward strips a round from the magazine; turning it down closes the action. Ruger’s rimfire manual adds what the centerfire manual does not need to say: extraction depends on the stroke. “When the bolt is operated by hand, there can be a failure to extract the cartridge from the chamber, or a failure to eject the cartridge clear of the rifle. These failures are usually the result of the bolt not being pulled rearward vigorously, coupled with an accumulation of bullet fouling in the chamber … If the bolt is not vigorously retracted when being operated by hand, the extracted cartridge can be ‘ejected’ into the magazine area, instead of outside the rifle.”18 A rimfire case is light and its rim small; a lazy stroke that would still throw a .308 case clear may not throw a .22.
The rimfire manual also names the one ammunition hazard particular to this chamber: “‘Stinger’ cartridges have a longer case than 22 LR cartridges loaded to U.S. Industry specifications. They can stick in the chamber of this rifle, which can result in a hazardous ruptured case”.19 The .22 Rimfire dive’s chamber volume explains why a tight chamber and a long case do not mix.
3.4.2 The rotary magazine
The rifle takes Ruger’s 10/22 magazines — “Accepts all 10/22® magazines” — and ships with one BX-15.17 The manual’s chart lists, for .22 LR, the 10-round rotary BX-1, the 15-round BX-15 and the 25-round BX-25; the .22 WMR and .17 HMR rifles use the 9-round JMX-1 and 15-round BX-15 Magnum, which are “dimensionally different from .22 LR magazines” and must not be mixed.20 How the rotary magazine’s spring-driven rotor presents each round, and why its feed geometry is so forgiving, is set out in the Ruger 10/22 dive’s volume on the action; its care is in the same dive’s upkeep volume. It is not repeated here.
3.4.3 The adjustable bolt throw
A .22 LR cartridge is about an inch long; a .308 is nearly three. A rimfire bolt therefore needs to travel only about half as far as a short-action centerfire’s to feed, and a shooter who trains on the short stroke will, under a match clock, short-stroke a centerfire rifle — pull the bolt back far enough to extract but not far enough to pick up the next round. Ruger’s answer is a clip. “Big-Gun bolt throw adjustment enables shooters to change from a rimfire 1-1/2” bolt throw to a short-action centerfire 3” bolt throw, reducing the chance of short-stroking your bolt in competition.”17
The mechanism, in the manual’s words: “The bolt has an additional groove and spring clip to adjust for length of bolt throw. The rifle ships with the spring clip in place for a short throw.”21 With the clip on, the bolt stops after 1½ in; with it off, the bolt runs the full 3 in. Ruger does not describe how the clip meets the bolt stop, and the drawing below shows the arrangement only in principle.
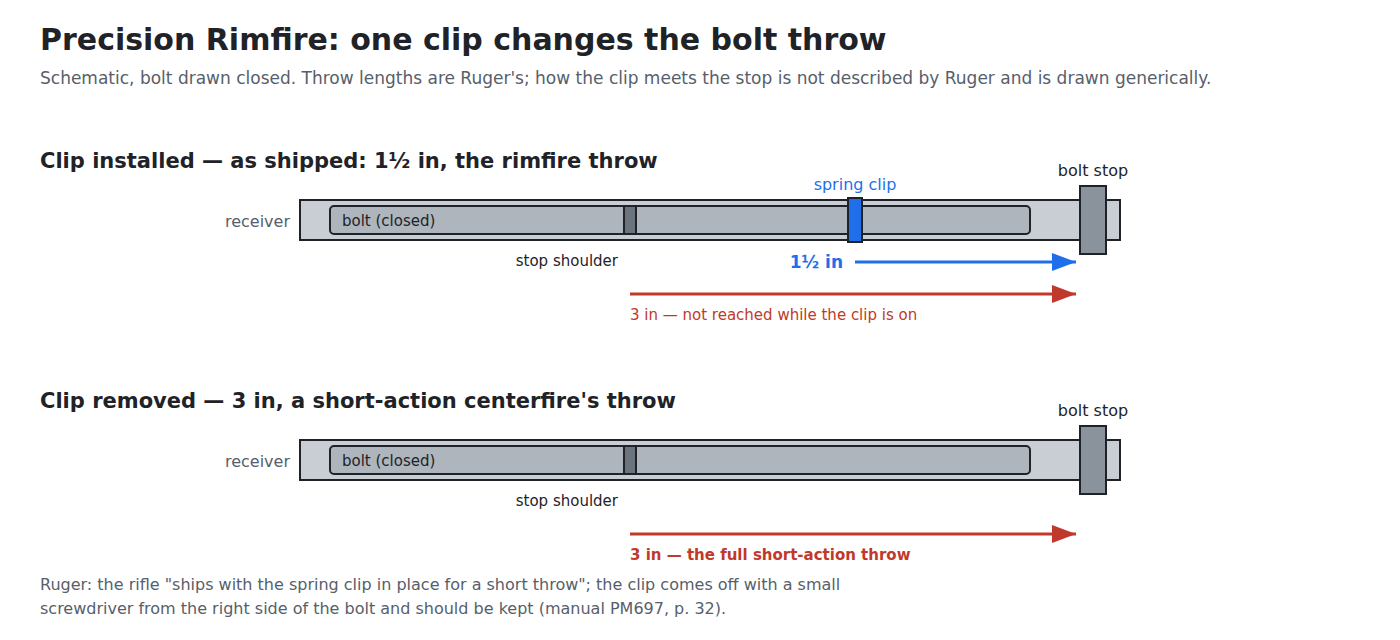
Nothing about feeding changes with the long throw; the extra travel is simply unused. That is the point — the hand learns the centerfire rifle’s stroke on the rimfire. Volume 5 takes up when that is worth doing and when it is not.
3.4.4 The trigger, and why the two rifles feel alike
The Precision Rimfire’s trigger group comes out the same way as the centerfire rifle’s — a cocking-piece guide held down, a spring pin moved in a J-shaped slot — and its parts list carries the same named parts: trigger release, sear, safety shaft, safety link, safety connector, trigger-block pin, adjustment screw.16 Ruger does not say in so many words that it is the same unit. What can be said from the documents is that the two triggers share a name, a weight range, an adjustment method, a removal procedure, a cleaning procedure and a parts vocabulary.
Footnotes
-
Ruger, Instruction Manual for Ruger Precision Rifle, PM924, parts list, pp. 56–58. https://ruger.com/dataProcess/manual/fetch.php/ms/18104/manual_18104.pdf (read 2026-09-19). ↩ ↩2 ↩3 ↩4
-
Ruger specification sheet, model 18104. https://ruger.com/products/precisionRifle/specSheets/18104.html (read 2026-09-19). ↩
-
Ruger specification sheet, model 18001, captured 13 January 2016. https://web.archive.org/web/20160113233641/https://ruger.com/products/precisionRifle/specSheets/18001.html ↩
-
Ruger, PM924, “Care and Cleaning,” p. 52. ↩
-
Ruger, PM924, “To Disassemble Your Ruger Precision Rifle,” p. 41. ↩
-
Ruger, PM924, “To Minimize Malfunctions,” p. 28. ↩
-
Ruger, PM924, “To Load and Fire (With Magazine),” p. 20. ↩
-
Ruger, PM924, “Warning – Malfunctions,” p. 27. ↩
-
US Patent 9,441,897, “Safety mechanism for firearm,” J. P. Mather and B. K. Parker, issued 13 September 2016. https://image-ppubs.uspto.gov/dirsearch-public/print/downloadPdf/9441897 ↩ ↩2
-
Ruger, PM924, “Check Your Rifle’s Function,” p. 50. ↩
-
Ruger, PM924, “Trigger Pull Weight Adjustment,” pp. 34–35. ↩
-
Ruger, PM924, “To Remove a Bore Obstruction,” p. 24. ↩
-
US Patent 9,194,637, “Universal magazine latch mechanism for firearm,” J. P. Mather, filed 5 May 2014, issued 24 November 2015; description quoted from the full text. https://image-ppubs.uspto.gov/dirsearch-public/print/downloadPdf/9194637 ↩ ↩2 ↩3
-
Ruger, PM924, “Removing the Magazine,” p. 17. ↩
-
Ruger, PM697, parts list, pp. 48–49; general information p. 11; safety p. 12; reassembly p. 40. ↩ ↩2 ↩3
-
Ruger specification sheet, model 8400. https://ruger.com/products/precisionRimfire/specSheets/8400.html (read 2026-09-19). ↩ ↩2 ↩3
-
Ruger, PM697, “To Extract and Eject a Chambered Cartridge,” p. 22. ↩
-
Ruger, Instruction Manual for Ruger Precision Rimfire, PM697 (“PRR 4/2026 R10”), p. 14. https://ruger.com/dataProcess/manual/fetch.php/ms/8400/manual_8400.pdf (read 2026-09-19). ↩
-
Ruger, PM697, “Magazines,” p. 15. ↩
-
Ruger, PM697, “To Adjust Bolt Throw,” p. 32. ↩
Comments (0)