M40A1 — the Marine Sniper Rifle, and a Clone · Volume 5
Field Strip, Detail Strip and Maintenance
What the maker's manual and the Marine Corps's own sniping manual let an owner take apart, how they clean it, and where both draw the line
A Remington 700 is one of the simplest centrefire rifles to strip, and one of the easiest to damage by stripping further than necessary. This volume sets out the procedures from two documents that agree with each other to a remarkable degree:
- RemArms’s current owner’s manual for the Model 700, Seven and 673 — the maker’s instructions, current as of its May 2026 revision.1
- FMFM 1-3B, Sniping — the Marine Corps’s own manual of 1981, reissued in 2004 as MCWP 3-15.3, whose maintenance section was written for the M40A1.2
A third document exists and is deliberately not used. The Army’s operator’s manual for the M24 Sniper Weapon System (TM 9-1005-306-10, June 1989), which also covers a Model 700 action, circulates freely online, but it carries Distribution Statement C — distribution authorised to U.S. government agencies and their contractors. The Marine Corps’s own technical manuals for the M40A1 and M40A3 could not be located in any public form. The two documents above are public, and between them they cover everything an owner needs.
No step below is reconstructed from memory. Where the manuals are silent, this volume says so.
5.1 Where Both Manuals Draw the Line
The two documents agree on a principle that shapes everything else here.
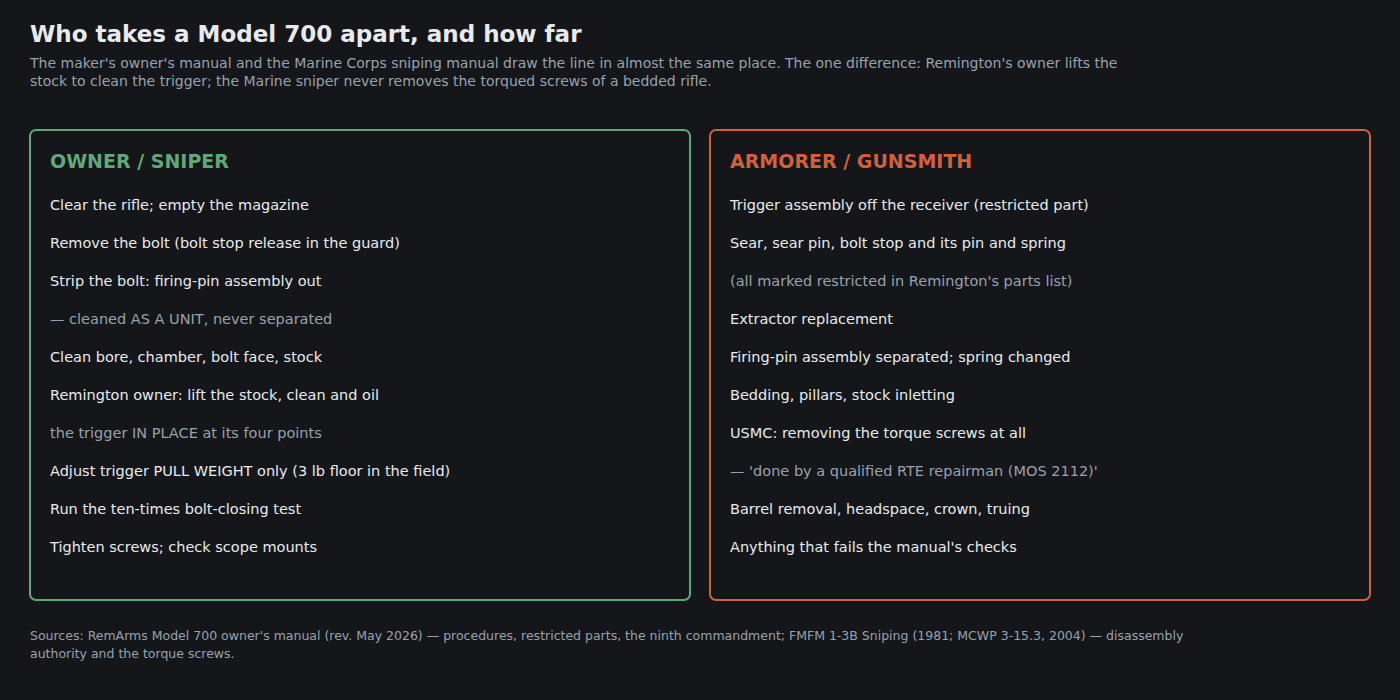
Remington: “Only a qualified service facility should service, repair or modify your Remington firearm.”1 Its parts list marks the trigger assembly, sear pin, bolt stop, bolt stop pin and bolt stop spring as “(Restricted)”, with the note “SOME PARTS MAY BE RESTRICTED”; the manual does not define the term further.1 And when the owner cleans the trigger: “Do not remove the trigger assembly from the receiver.”1
The Marine Corps, of the sniper and his own rifle: “The sniper, himself, can accomplish only the most superficial repair tasks, such as screw tightening or replacement. He has no disassembly authority (except that he may strip the bolt to clean and lubricate it) … Field repair of the rifle is the responsibility of the rifle team equipment (RTE) repairman.” And, in capitals: “NEVER REMOVE THE TORQUE SCREWS. THIS IS DONE BY A QUALIFIED RIFLE TEAM EQUIPMENT REPAIRMAN (MOS 2112). IF ANYTHING MALFUNCTIONS ON THE RIFLE, NEVER TRY TO REPAIR IT YOURSELF.”2
There is one difference, and it is instructive. Remington’s owner does remove the stock to clean the trigger and receiver. The Marine sniper does not, because his rifle is epoxy-bedded and torqued, and the Corps would rather a rifle stayed dirty under the stock than lost its bedding. An owner with an M40-pattern rifle — bedded, perhaps pillared, with a zero that matters — has to decide which of those two philosophies applies. For a bedded rifle, the Corps’s is the safer default: pull the stock only when there is a reason to, and re-torque to specification every time.
The owner of the rifle in Volume 8 has a full gunsmithing shop, so “gunsmith” in this volume is a role, not a referral. The line is still worth keeping, because it separates the routine work that can be done at any time from the work that changes the rifle.
5.2 Clearing
Every procedure in both manuals begins the same way. From Remington’s:1
- Point the rifle in a safe direction.
- Place the safety in the “S” position (pulled fully to the rear).
- Raise the bolt handle.
- Pull the bolt handle all the way back.
- Remove any ammunition from the chamber and magazine.
- Check the chamber and the magazine to make sure there are no cartridges in the rifle.
For a floorplate rifle the magazine is emptied through the floorplate. On the M40A1, “The floor plate latch is forward of the trigger guard and is opened by pressing the serrated detent on the forward edge of the trigger guard.”2 On a detachable-magazine rifle the manual’s instruction is to “Depress both latches to release magazine box”, remove the cartridges and replace it — the detail depends on the bottom metal fitted.1
5.3 Field Strip — Removing the Bolt
The field strip of a 700 is removing the bolt. Remington’s steps, verbatim in substance:1
- Point the rifle in a safe direction.
- Place the safety in “S”.
- Do not touch the trigger while moving the safety.
- Raise the bolt handle.
- Pull the bolt handle all the way back.
- Push the bolt stop release in the trigger guard.
- Slide the bolt assembly out of the rifle.
To install: place the safety in “S”, align the bolt’s lugs with the receiver, slide the bolt fully in, and push the handle down. The bolt must be cocked to go back into the rifle.1 On a rifle with the key-operated security lock, “The security system must be disengaged to close the bolt.”1
On aftermarket bottom metal the bolt stop release is still Remington’s, working through the guard; a guard that fouls it is a fitting fault.
5.4 Detail Strip — the Bolt
Stripping the firing-pin assembly out of the bolt is the one disassembly both manuals permit the user. Remington’s procedure:1
- Point the rifle in a safe direction and remove the bolt.
- Place the notch on the firing-pin head over a metal edge. Pull the bolt assembly away from the firing pin. This compresses the mainspring and draws the firing-pin head rearward out of the bolt plug.
- Place a coin into the slot near the back edge of the firing-pin head. The coin holds the mainspring compressed.
- Hold the bolt and turn the bolt plug counter-clockwise until the firing-pin assembly can be withdrawn from the bolt.
Then the instruction that matters most: “CAUTION: Clean the firing pin assembly as a unit.”1 The firing pin, mainspring and bolt plug stay together. Separating them needs a spring compressor, it is not in the maker’s procedure, and on a rifle with a tuned or aftermarket firing pin and spring it is gunsmith’s work.
Clean all parts with solvent, dry with a clean cloth, apply a thin coat of oil.1
To reassemble:1
- Place the firing-pin assembly into the rear of the bolt.
- Tighten the bolt plug into the bolt by hand.
- Pull the coin out of the slot in the firing-pin head.
- Turn the bolt plug until the firing-pin head goes into the small notch on the rear rim of the bolt. The bolt is now cocked — and it must be cocked to go back into the rifle.
The two notches this uses are the cam described in Volume 4.
5.5 Out of the Stock — and What Not to Remove
Remington’s owner-level procedure for cleaning the receiver and trigger:1
- Point the rifle in a safe direction; safety to “S”.
- Remove the bolt.
- Turn the rifle upside down.
- Remove the stock screws.
- Lift the stock away from the receiver and trigger assembly.
- On models without a floorplate only: remove the magazine spring and follower.
“NOTE: Clean and lubricate the receiver and the trigger assembly as a unit. Do not remove the trigger assembly from the receiver.”1 Separating the trigger housing from the receiver is outside the owner’s procedure, and the trigger assembly itself is a restricted part.
Reassembly for floorplate and detachable-magazine models: fit the trigger-guard assembly to the stock, lower the barrelled action into the stock, replace and tighten the guard screws, close the floorplate or refit the magazine, refit the bolt.1
The torque. Remington’s current manual gives no screw torque. The Corps’s manual gives the M40A1’s: 65 inch-pounds.2 That figure applies to the A1’s Winchester-pattern steel bottom metal in its epoxy-bedded McMillan stock. A rifle in a different stock, or on different bottom metal, should be torqued to the figure its stockmaker or bottom-metal maker specifies; none was consulted for this volume, and no figure is offered for them here. Whatever the figure, it should be the same every time, applied in the same order, with a torque driver rather than by feel — because the torque on those screws is part of the rifle’s bedding, and a change in it is a change in zero.
5.6 Cleaning the Trigger Without Removing It
This is the most detailed procedure in Remington’s manual and it doubles as a function test. With the barrelled action out of the stock:1
- Spray the receiver inside and out with action cleaner and let it dry.
- Spray inside the trigger assembly at the four points shown in the manual’s Picture 17.
- Put the safety at “F”. Pull the trigger and release it several times.
- Pull and hold the trigger. With a small punch or screwdriver, depress the sear (the manual’s lubrication point 1) and release it several times.
- Release the trigger. Move the safety from “F” to “S” several times.
- Spray the four points again. Air-dry, or dry with compressed air.
- Place one drop of oil at each of the four points.
- Safety at “F”: pull the trigger and release it several times. The trigger must return fully forward every time.
- Pull and hold the trigger; depress and release the sear several times. The sear must return to its full upward position “without hesitation”.
- Release the trigger; move the safety between “F” and “S” several times. It must move freely and the detent spring must hold it fully at “S” or fully at “F” — never between. If it does not, repeat steps 2 to 10; if it still does not, the rifle goes to a service centre.
- Safety at “S”: lightly spray oil on the outside of the trigger assembly and receiver, and wipe off the excess.
The manual’s warnings at steps 8 and 9 are unconditional: if the trigger does not return fully, or the sear does not return without hesitation, the rifle “is NOT in a safe operating condition and it must NOT be used” until inspected.1
5.7 The Test After Every Reassembly
When the rifle is back together, Remington requires a test that every owner of a 700 should perform after any work at all, however minor:1
After cleaning the trigger assembly, check the chamber and magazine to make sure there are no cartridges in the firearm. Place the safety mechanism in the “F” position. Close the bolt smartly. The firing pin must remain cocked. To check, pull the trigger. The firing pin must release. Repeat the test at least ten times. If the firing pin will not remain cocked when the bolt is closed smartly, return the firearm to the factory or a REMINGTON AUTHORIZED SERVICE CENTER.
Closing the bolt “smartly” is the point: a trigger whose sear engagement is marginal, dirty, or badly adjusted can let the firing pin follow the bolt down. This test, done ten times, is the simplest check an owner has on the fault at the centre of the 700’s litigation history (Volume 6).
The manual’s safety-mechanism rules add the rest: the safety must hold fully at “S” or “F”, never between; “Don’t pull the trigger when the safety is engaged or positioned between safe and discharge.”1
5.8 Cleaning the Bore
Here the Marine manual is more detailed than the maker’s, and the two do not conflict.
Remington:1 clean the bore “every time you’re going to shoot”; clean the entire rifle before and after long-term storage “and no less than once a year”, and after exposure to rain, dirt, mud, snow, sleet or salt water. Lay the barrel horizontal with the ejection port facing down, and clean from the chamber to the muzzle. Brush with solvent several times; patch until a patch comes out clean; run an oiled patch; then a dry patch; oil the outside of the barrel lightly.
The Marine Corps, for the M40A1:2
- Before firing: “The rifle must always be cleaned prior to firing.” “Oil in the bore and chamber of even a clean rifle will cause pressures to vary and first-round accuracy will be lost.” In the field, a wet or oily bore “will cause a puff of smoke that can disclose the sniper’s position.”
- After firing: within “a matter of hours”, then “daily for at least 3 consecutive days”, then checked with a clean patch for several days more.
- Rod: brass or aluminium, because “hard steel rods … may cause excessive wear on the lands, especially at the muzzle.”
- Brush: push it all the way through until it protrudes from the muzzle, then pull it back slowly, “a MINIMUM of 20 times”.
- Keep the muzzle lower than the chamber, “to prevent bore cleaner from running into the receiver or firing mechanism”, and — the instruction specific to a bedded rifle — “Be careful not to get any type of fluid between the receiver and the stock. If fluid does get between the stock and receiver, the receiver will actually ‘slide’ on the glass bedding every time the rifle recoils, thereby decreasing accuracy and increasing wear and tear on the receiver and glass bedding.”
- Chamber: a .45-calibre brush on a rod section, rotated 8 to 10 times — “DO NOT scrub the brush in and out of the chamber.” Then patches wrapped on the same brush, rotated, until clean.
- Finish: “with a clean patch, apply a very light coat of cleaning solvent to the bore and chamber” — and, before the next shot, dry them.
The Corps’s rod and muzzle instructions protect the crown, which a Precision Weapons Section tester called the rifle’s weak link: “The worst thing you can do with this gun, to affect its accuracy, is mess up the crown”. “Rough abuse with a cleaning rod will also cause small scratches and gouges to the crown that will affect the accuracy.”3 A bore guide in the action, a coated or brass rod, and cleaning from the breech are how a modern owner meets the same requirement.
5.9 The Bolt, the Stock and the Outside
Bolt. “Scrub the face of the bolt with the stiff bristle brush. Remove the grease, oil, and dirt from the bolt with a clean, dry cloth. In lubricating the bolt, put a light coat of rifle grease (if available) on the face and slides of the bolt.”2 The face is where the extractor and ejector live; fouling there is the usual cause of a sluggish ejector (Volume 6).
Stock. For a fibreglass stock, “the only cleaning that is required is to use a clean rag with soap and water. Then, dry thoroughly to prevent moisture from accumulating beneath the receiver.”2
Barrel exterior. A stainless barrel: “outer lubrication is not absolutely necessary.”2 A carbon-steel barrel — the SPS Varmint’s is carbon steel4 — needs the light oil Remington’s manual calls for.
Other metal. Blued parts “still require lubrication, especially if scratched or if the bluing has rubbed off.”2
5.10 Lubrication
Remington: “Over-lubrication should be avoided at all times. A light application of Oil helps to prevent rusting.” “Do not use congealing lubricants. The use of non-congealing lubricants is strongly recommended.” When the rifle is to be used, “all excess lubrication must be removed. The chamber and bore must be thoroughly wiped dry.”1
The Marine Corps: “All moving parts of the rifle should be lubricated with rifle grease or something similar”, with grease specifically on the bolt face and bolt “slides” (the bearing surfaces of the bolt body).2
The two agree in substance: oil the trigger at its four points and nowhere else inside it; a light film on the bolt and its bearing surfaces; nothing in the bore or chamber when the rifle is fired. In cold, the Marine manual’s warning about oil congealing and ice forming from condensation — “The rifle should be stored in a room with the temperature equal to the outside temperature” — is the reason for Remington’s insistence on a non-congealing lubricant.21
5.11 Storage
Remington: “When the firearm is to be stored, it should be carefully cleaned and thoroughly oiled. Outside metal surfaces should be wiped with oil occasionally”, and all of that oil comes out of the bore and chamber before it is fired again.1 After immersion — “In case of salt- water immersion, first flush all parts with fresh water, then dry, clean and lubricate the firearm.”1
5.12 The Scope and Its Mounts
The Marine manual’s scope instructions are short and universal:2
- “Check and tighten all mounting screws periodically and always prior to leaving on an operation.”
- Keep lenses capped and free of oil; body grease and perspiration injure the coatings. Brush dust off with a clean camel-hair brush; remove oil by breathing on the glass and wiping with lens tissue.
- “Do not force elevation and windage screws or knobs.”
- Keep the scope out of direct sun: the lenses “concentrate sunlight into a pinpoint of intense heat which is focused on the mil scale reticle. This may melt the mil dots”.
Ring and base torque, lapping, levelling and tracking tests are covered in the Types of Scopes dive and are not repeated here.
5.13 Inspection — Before and After Firing
Neither manual publishes a formal inspection interval in rounds or years for a privately owned 700. The Corps’s philosophy is the useful one: “A weapon, sheltered in garrison and infrequently used, must be inspected often to detect dirt, moisture, and signs of corrosion … A weapon in use and subject to the elements, however, requires no inspection for cleanliness, since the fact of its use and exposure is sufficient evidence that it requires repeated cleaning”. The sniper “couples his daily cleaning chores … with a program of minute inspection for damage or defect.”2
Drawn from both manuals, a checklist that any owner can run:
Table 1 — Drawn from both manuals, a checklist that any owner can run
| When | Check | Source |
|---|---|---|
| Before firing | Bore and chamber clean and dry; no obstruction (“look through the barrel from the chamber end”) | Manual; FMFM 1-3B |
| Before firing | Scope mounting screws tight | FMFM 1-3B |
| Before firing | Safety holds fully at S and F | Manual |
| After any work | Close the bolt smartly ten times; the firing pin must stay cocked each time and release on the trigger | Manual |
| After firing | Clean within hours; clean daily for three days after heavy firing | FMFM 1-3B |
| After firing | Bolt face, extractor and ejector free of fouling | FMFM 1-3B |
| When the stock is off | Trigger returns fully; sear returns without hesitation | Manual |
| When the stock goes back on | Guard screws to the specified torque | FMFM 1-3B (65 in-lb for the A1) |
| Yearly, at least | Whole rifle cleaned | Manual |
5.14 Parts That Wear — and What Is Not Published
Remington does not publish replacement intervals for any Model 700 part, and neither manual gives a round count for the barrel, the firing pin, the mainspring, the extractor or the ejector spring. No figure is offered here. What can be said from the sources:
- The firing-pin assembly is sold as a unit and is not restricted.1 A short or damaged firing pin is a known cause of misfires.
- The extractor, ejector, ejector spring and ejector pin are listed as ordinary, unrestricted parts.1 Fitting a new extractor is nonetheless gunsmith’s work (Volume 6).
- The trigger assembly, sear pin and bolt stop parts are restricted.1
- Barrel life depends on cartridge, load and firing schedule and is not published by Remington. Measuring throat erosion and setting headspace on a replacement barrel are covered in the Headspace dive.
- Corrosion protection on plated parts “may be worn sufficiently to reduce corrosion protection” after extensive use; “Such worn parts should be replaced”.1
5.15 What Could Not Be Verified
- A public Marine Corps technical manual for the M40A1 or M40A3. None was found. The Army’s M24 manual exists but carries Distribution Statement C and is not reproduced.
- Guard-screw torque for any stock or bottom metal other than the M40A1’s (65 in-lb).
- Replacement intervals for any 700 part.
- The four trigger lubrication points are identified only by the manual’s own picture; this volume does not describe their location in words beyond “the sear” (point 1), to avoid mis-describing the others.
5.16 Bibliography
Footnotes
-
RemArms, LLC, Model 700, Seven & 673 Bolt Action Centerfire Rifles owner’s manual, 2021, revised May 2026 (“REV 0526”) — the Ten Commandments (the ninth: service only by a qualified facility); loading and unloading; bolt removal and installation; the security system; trigger pull adjustment; cleaning the barrel; cleaning the receiver and trigger assembly, including the four lubrication points and the trigger, sear and safety checks; reassembly; the ten-times bolt-closing test; cleaning frequency; lubrication; storage; salt-water immersion; bolt disassembly and reassembly; the parts list and its restricted parts. https://www.remarms.com/sites/default/files/2026%20Revised%20OMs/700%20Manual%20RD7055%20Final%20F3509%20(REV%200526).pdf (retrieved 2026-09-19). ↩ ↩2 ↩3 ↩4 ↩5 ↩6 ↩7 ↩8 ↩9 ↩10 ↩11 ↩12 ↩13 ↩14 ↩15 ↩16 ↩17 ↩18 ↩19 ↩20 ↩21 ↩22 ↩23 ↩24 ↩25 ↩26 ↩27 ↩28 ↩29
-
Headquarters, U.S. Marine Corps, FMFM 1-3B, Sniping, 28 January 1981, reissued as MCWP 3-15.3 (erratum 27 May 2004) — §201 (the floorplate latch; the M40A1 tabulated data including 65 in-lb torque); the maintenance section (inspection, repair authority, cleaning tools, when and how to clean, the bolt, stock, barrel and other parts, lubrication, “NEVER REMOVE THE TORQUE SCREWS”); optical maintenance; cold-weather care. Internet Archive item
mcwp-3-15.3-sniping-2004(consulted 2026-09-19). ↩ ↩2 ↩3 ↩4 ↩5 ↩6 ↩7 ↩8 ↩9 ↩10 ↩11 ↩12 ↩13 -
Leatherneck, April 2009, p. 36 — a Precision Weapons Section tester on the crown and on damage by cleaning rods. Archived at https://web.archive.org/web/20110713194328/http://www.leatherneckmagazine-digital.com/leatherneckmagazine/200904/?pg=36 ↩
-
RemArms, product page “Model 700 SPS Varmint”, consulted 2026-09-19 — barrel material carbon steel. https://www.remarms.com/rifles/bolt-action/model-700/model-700-sps-varmint ↩
Comments (0)