High Standard Sentinel · Volume 4
Keeping It Working — Field Routine, Detail Strip, Maintenance and Repair
What High Standard actually published, what it never published, the springs that jump out when the hammer pin comes out, and what can still be done for a revolver whose factory closed in 1984
4.1 What Documentation Exists — and What Does Not
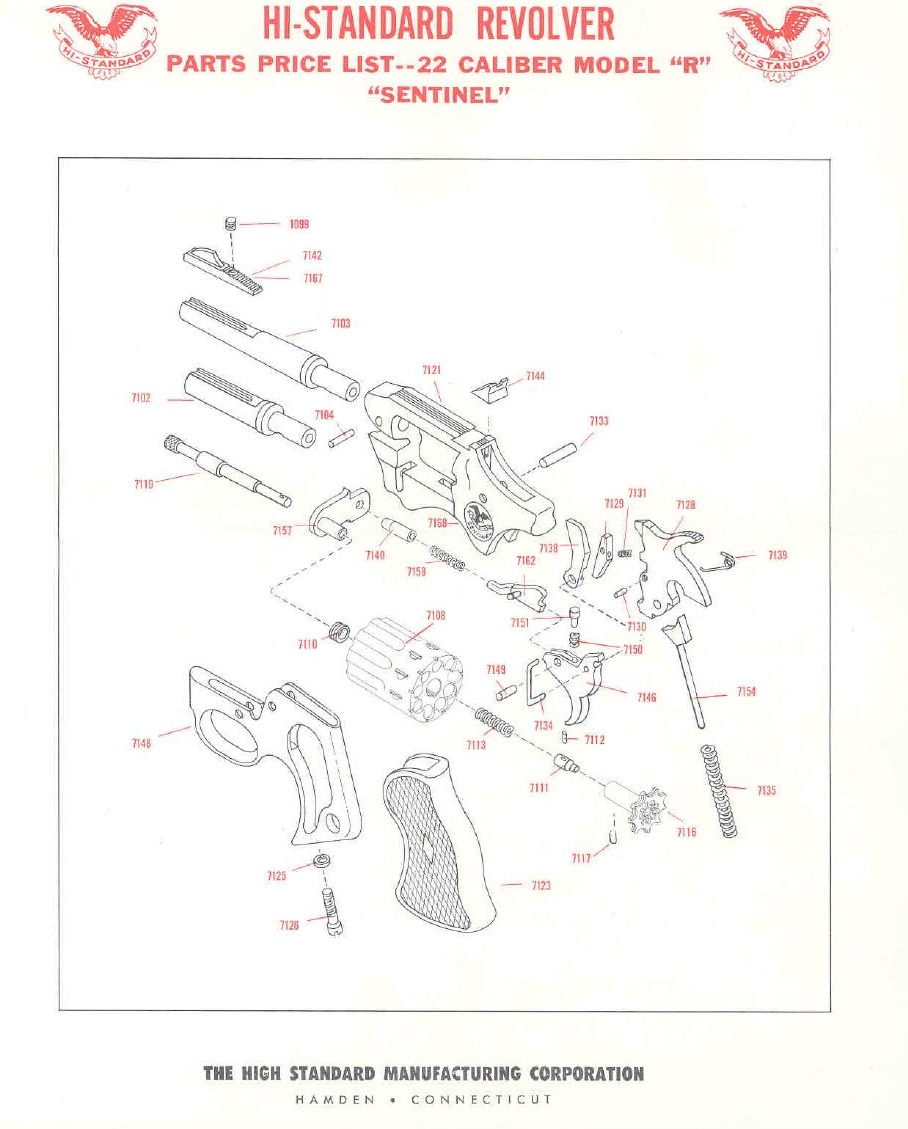
Eleven High Standard revolver parts sheets covering the Sentinel family, from the undated Model “R” list of about 1955 to the Mark I/Mark IV breakdown of April 1974, were obtained for this dive from John Stimson Jr’s High Standard archive.1 Between them they contain:
- how to order parts (model, series number, serial number, part number and name, and colour);
- factory service terms and shipping rules;
- a full parts list with prices and an exploded view;
- and “Instructions for Operation and Care of Your ‘Sentinel’ Revolver” — loading, firing, unloading, sighting, cleaning.
🔴 Not one of them contains a disassembly procedure, and no High Standard armourer’s manual for these revolvers was located anywhere. The factory’s published position was blunter than an omission: every sheet carries, across the foot of the page in red, “CAUTION: FOR SAFETY’S SAKE DO NOT ATTEMPT TO REPAIR REVOLVER WITHOUT RECEIVING RELIABLE ADVICE. WE MAINTAIN A SERVICE DEPARTMENT WHICH WILL PROMPTLY GIVE YOU ADVICE AND SERVICE.”2 The designer said the same thing in 1955 in the first person: “Disassembling the Sentinel is something Harry does not recommend.”3
So this volume does what the brief for every dive in this hub requires — it sets out the field routine, the strip, maintenance and repair — but it does so from the documents that exist, and it does not reconstruct a step-by-step detail-strip sequence that no source publishes. What the patent and the 1955 article establish about how the gun comes apart is set out below as constraints on a correct procedure, which is a different thing from a numbered list invented at a desk.
4.2 Before Anything Else
Open the cylinder and look through all nine chambers, then look through the bore from the breech. Nine chambers is two more than most people count by habit, and a Sentinel with a live round in chamber nine looks exactly like an empty one from the left side.
Two more preliminaries that are specific to this revolver:
- The cylinder release is the ejector rod, and it moves forward. Anyone used to a thumb latch will push sideways on a smooth frame and conclude the gun is broken.
- On pre-1961 guns the ejector rod does not spring back. It must be pulled forward again by hand before the cylinder is closed (below).
4.3 The Field Routine the Factory Published
The operating instructions are almost unchanged from the first sheet to the last. This is the R-102 sheet of January 1961, quoted as printed:2
- Be sure that hammer is forward.
- Pull ejector rod forward and, at the same time, swing out cylinder to left by pressing right index finger against it.
- Insert one .22 caliber short, long or long rifle cartridge in each of the nine chambers of the cylinder.
- Return cylinder to frame by pressing thumb against cylinder. Do not push ejector latch forward when closing cylinder. The revolver is now ready to fire.
- Revolver may be fired double action merely by squeezing trigger for each shot.
- Target shooting, or other shooting demanding a maximum of accuracy, is usually done single action. For single-action shooting, pull back hammer to cocked position for each shot.
- To unload revolver or remove fired cartridge cases, pull ejector rod forward, swing out cylinder to left, and push ejector rod to rear.
- Spring loaded ejector will return automatically to forward position.
- Because cylinder chambers are counterbored, revolver may be “dry-fired” without injury to cylinder.
Point 8 is the R-102 improvement. The corresponding sentence in the Sears booklet for the earlier gun reads instead: “Pull ejector rod forward before attempting to reload or to close cylinder.”4 That is the whole difference, and it is worth a moment of attention every time an early gun is loaded, because the alternative is the scratch down the left side of the frame that so many surviving Sentinels wear.
Point 9 is a licence most .22 revolvers do not give, and it comes from the counterbored chambers described in Volume 3. It is the factory’s statement about its cylinder; it says nothing about dry-firing any other rimfire.
4.4 Sights
Both the Sears booklet and the factory sheets say the revolver is sighted in at 50 feet, that the front sight is staked and should not be moved, and that windage is adjusted by drifting the rear sight — the Sears text says with “a soft wooden wedge and a hammer”, the High Standard sheets say “using a brass or plastic hammer” — always moving the rear sight in the direction you want the point of impact to move.42
Neither text mentions elevation, because until the R-109 Kit Gun of 1969 there was none to adjust.5
4.5 Cleaning and Lubrication, in the Maker’s Words
The care instructions on the Sentinel and Double-Nine sheets are the same text, and they are more restrained than most modern habits:26
- Solvent: “the use of kerosene or any other good quality cleaning solution is recommended”.
- Cylinder face and muzzle: “an old toothbrush or similar brush should be used.”
- 🔴 The bore: “IT IS STRONGLY EMPHASIZED THAT THE BORE RARELY REQUIRES CLEANING EXCEPT FOR THE PRESENCE OF MUD OR FOREIGN MATTER.” When it is cleaned, a stiff bristle or copper wire brush for .22 guns, then flannel patches on a .22 rod until they come out clean.
- Chambers: the same procedure as the bore.
- Afterwards: wipe the whole gun dry of solvent with a clean absorbent cloth, then wipe the surfaces with a lightly oiled patch. “For best results in rust prevention only gun oils containing silicones should be used.”
- The action: “A few drops of light-bodied oil should be applied to the action internally near the pivot point of the hammer. Retract the hammer first — then work the trigger double action a few times to distribute the oil. The same procedure applies to the cylinder crane link.”
- Never: heavy-bodied oils; “no animal or vegetable oils should ever be used in guns”.
- Cold: “If the gun is used in climates where extreme cold prevails, powdered graphite should be substituted for oil in lubricating the internal mechanism.”
- Damp: clean more often, and store “in a container treated with silicones to prevent rust”.
There is no lubrication point in that list that requires the gun to be opened. That is deliberate: the factory’s maintenance model is oil at the hammer pivot, oil at the crane, and send it to Hamden for anything else.
4.6 The Frame Is Not Steel
Everything in the cleaning routine above is aimed at the steel parts. The frame, trigger guard and crane are anodised aluminium, and Volume 2 sets out what that means. In short: strongly alkaline cleaners attack anodising; a scratch through it cannot be touched up; and polishing removes the finish permanently, leaving grey metal. Solvent choice matters more on this revolver than on a steel one, and the safest habit is to keep bore solvent on patches and off the frame. The hub’s Whitney Wolverine dive reaches the same conclusion about the other aluminium-framed .22 of the period.
4.7 Ammunition
The Sentinel is chambered for .22 Short, Long and Long Rifle, and every sheet says so on its face.72 Two practical notes:
- Standard and high-velocity .22 Long Rifle were both contemplated by the makers: the Sears booklet says “regular or high-speed ammunition” in as many words.4 Nothing located from High Standard addresses modern hyper-velocity loads, and no opinion is offered here.
- 🔴 No aluminium-framed Sentinel is chambered for .22 WMR. The Magnum chambering arrives only with the Mark IV of 1974, which is one of the steel-framed guns.85 A .22 Magnum round will not enter a .22 Long Rifle chamber, so this is not a loading trap so much as an identification one — see Volume 5, and do not let a seller’s “it’s a magnum Sentinel” turn an R-series aluminium gun into something it is not.
The hub’s .22 Rimfire dive covers the ammunition itself — the family, the quality levels, and what each load is for — and is not repeated here.
4.8 Detail Strip: What a Correct Procedure Must Account For
No published procedure exists (above). What is documented, in the patent and in the 1955 article, is the architecture that any correct procedure has to respect. Six points, each sourced:
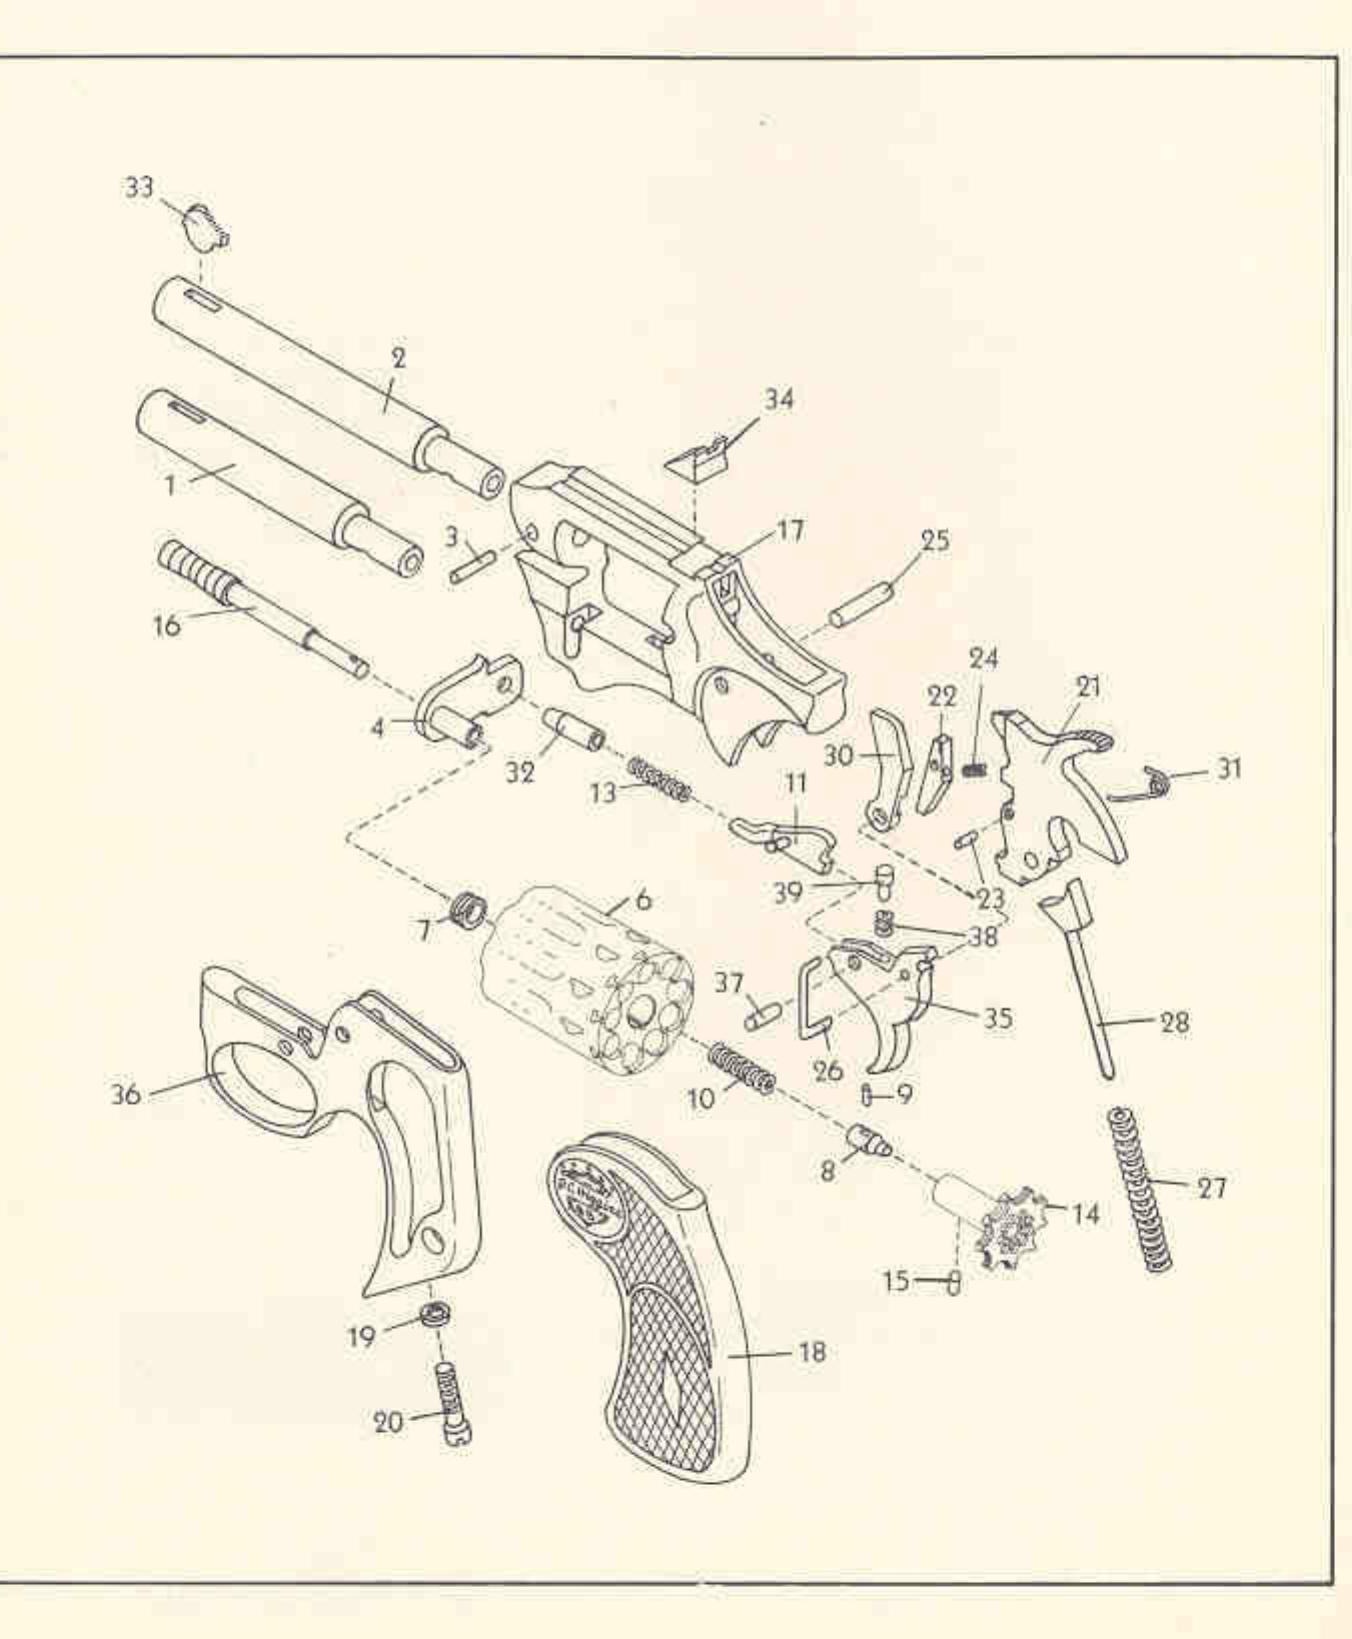
- The gun comes apart into four groups: “the cylinder-crane, trigger-guard-bolt, grip, and barrel-frame assemblies.”3
- The hammer pin holds everything together. It “passes through both guard frame and main frame, to hold everything together”, and it is also the hammer’s pivot.39
- The cylinder comes out at the front pin, not the hammer pin. The crane link is held on a tapered pin urged forward by a spring; the patent’s own instruction is to insert “a slender rod or similar tool into the open end of passage (116)” and press the pin back until it clears the link, after which link and cylinder lift out of the frame.9
- With that front pin out, the trigger guard’s front end is already free. Removing the hammer pin as well separates the two halves of the frame.9
- 🔴 Springs leave the gun when the hammer pin does. Edwards: “there are some springs inside which usually make their appearance in the palm of your hand after that first sudden jump which happens when the hammer pin is pushed out. Worst offender is the hand spring, a small torsion spring sometimes called a ‘grasshopper’ spring.” He adds that on guns in production by mid-1955 this spring was “really nailed down, and it will not accidentally get lost” — so the risk is greatest on the earliest revolvers.3
- Two small parts must be seated correctly on reassembly or the gun will not go together: “the little trigger return spring plug bears against its notch cut on the frame shoulder inside”, and “the large plunger, which fits into a hole on the front edge of the guard assembly, is in place with its spring”.3
Anyone intending to go further should work over a tray, in a room where a 3 mm wire spring can be found again, and should photograph each stage — and should read the next section first, because the reassembly problem is the real one.
4.9 The Reassembly Trick the Designer Described
This is the most useful single paragraph in the 1955 article, and it is quoted almost whole because it is the only account of putting a Sentinel back together that exists in the sources located:3
“One thing necessary to reassemble the Sentinel is a small work pin to hold the hammer in the guard assembly. This pin must stick out far enough to serve as a temporary holder for the hand spring, but still permit the guard assembly to be put into the frame. Then driving the hammer pin through quickly secures the entire assembly. These extra pins may soon be supplied with each gun, taped inside the handle in a small cavity.”
In other words: a slave pin. The hammer, its spring and the hand spring are assembled into the trigger-guard unit on a temporary pin that is shorter than the frame is wide; the unit goes up into the frame; and the real hammer pin is driven through, pushing the slave pin out as it goes. No dimension for the slave pin is published; it is the diameter of the hammer pivot pin, which can be measured from the gun in hand.
Whether High Standard ever did tape a pin inside the grip cavity is not recorded in any source located, and no example with one was found in the auction photographs examined for Volume 6. If a Sentinel does turn up with a small steel pin in the grip recess, it is not a stray.
4.10 The Inspection a Sentinel Actually Needs
The factory published no inspection schedule and no replacement intervals for any part; none is invented here. What follows is the ordinary revolver inspection applied to this revolver’s particular features, and it is offered as general practice rather than as a High Standard specification.
Every cleaning:
- The frame’s left side, ahead of the cylinder, for the ejector-rod scratch — on a pre-R-102 gun, evidence the rod is being closed forward.
- The ejector rod tip and its slot in the frame for burrs; this is the latch, and a burr there makes the cylinder hard to close.
- The cylinder face and the forcing cone for lead build-up. The Sentinel’s very open lead-in (Volume 3) means it should be unusually clean; if it is not, look for a timing problem.
- The nine keyhole recesses in the ejector head for peening at the edges of the arrowhead lugs. This is where the hand works, and it is the part of the design that is meant not to burr.
- The grip screw — the only screw in the gun, and the only one that can shoot loose.
Annually, or on any gun new to its owner: the timing checks below.
4.11 Timing, End Shake and the Checks That Find Them
These are the standard revolver checks; what is specific to the Sentinel is what each result means on this mechanism. Perform all of them on an unloaded revolver, and treat a failure as a reason to stop shooting it rather than a reason to start filing.
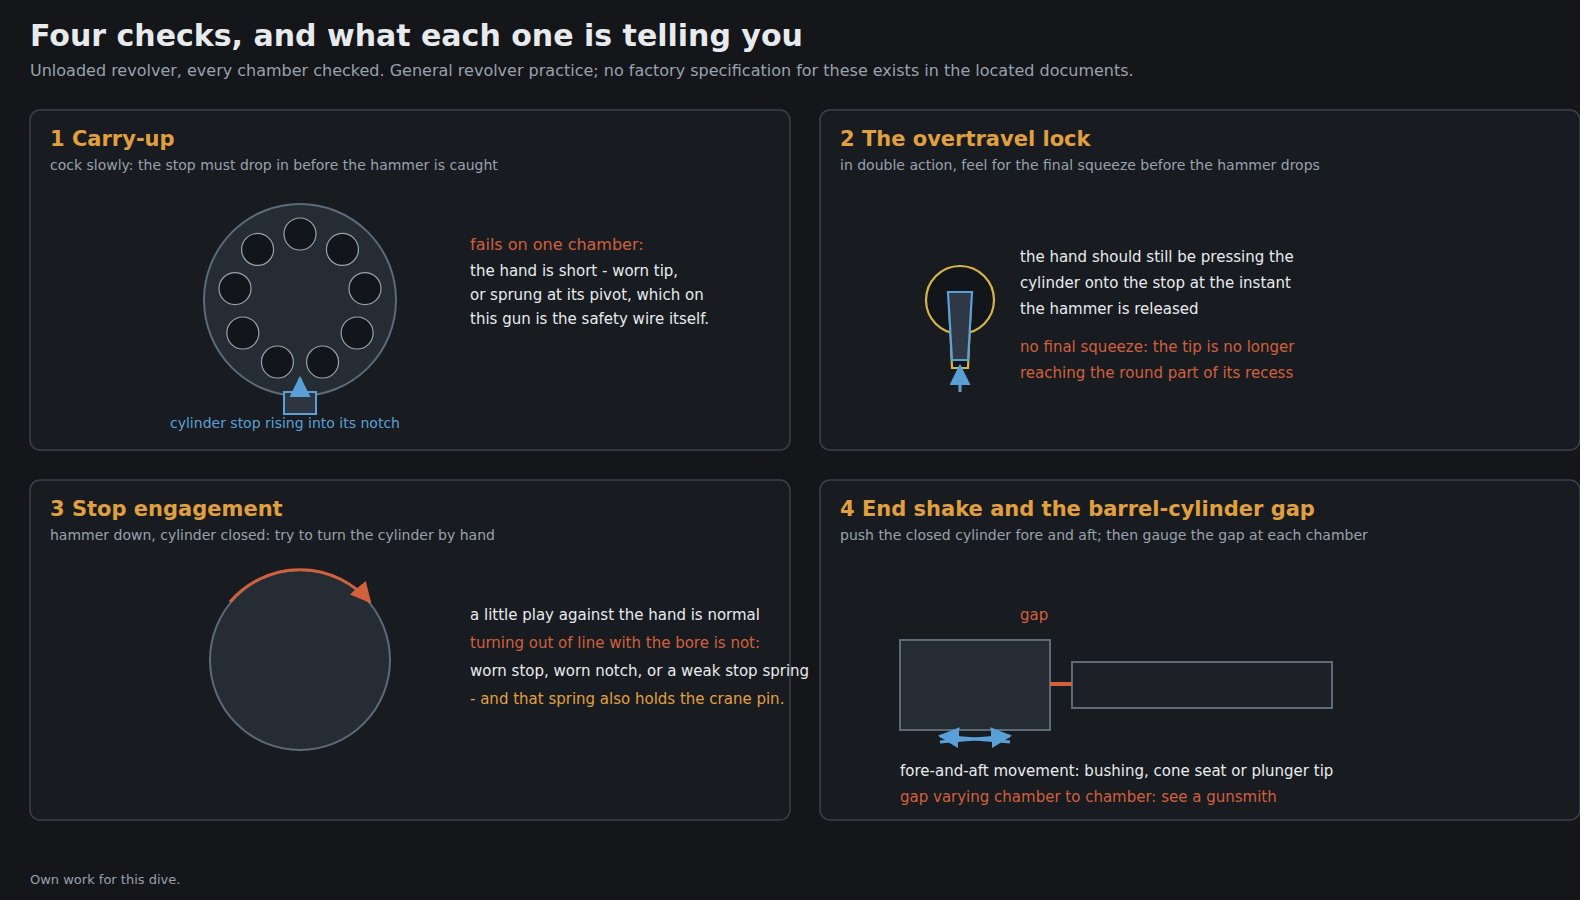
1. Carry-up. Cock the hammer slowly, single action, and watch the cylinder stop drop into its notch. It should drop before the hammer reaches full cock, on all nine chambers. If a chamber fails to lock up before the hammer is caught, the hand is short — worn at the tip, or sprung at its pivot. On this design the hand’s pivot is the lower leg of the hammer safety stop, so a bent safety wire shows up as a timing fault (Volume 3).
2. The overtravel lock. Pull the trigger through slowly in double action, with the hammer blocked by the thumb, and feel for the cylinder being pressed firmly against the stop just before the hammer would fall. That final squeeze is the round recess of the ratchet doing its job. If the cylinder can be rattled at the moment of release, the hand is no longer reaching its recess and the gun is firing with the chamber positioned only by the stop.
3. Cylinder stop engagement. With the hammer down and the cylinder closed, try to turn the cylinder by hand in both directions. A little rotational play against the hand is normal; being able to turn the cylinder out of line with the bore is not, and means a worn stop, a worn stop notch, or a weak stop spring — which on this revolver is also the spring that holds the crane pivot pin (Volume 3), so a weak one is two faults at once.
4. End shake. Hold the closed cylinder and push it back and forth along its axis. The Sentinel’s cylinder rides on a plunger running through the ejector shank, seated in a cone in the standing wall, with a bushing at the front. Excess fore-and-aft movement is usually the bushing, the cone seat or the plunger tip rather than a stretched crane.
5. Barrel-cylinder gap and cylinder-to-barrel alignment. Check the gap with feeler gauges and check that each chamber lines up with the bore by eye through the gap at lock-up. No factory gap specification for the Sentinel was located, so a figure cannot honestly be printed here; the meaningful test on a gun like this is comparative — a gap that varies markedly from chamber to chamber, or a cylinder face that has worn a bright ring on the frame, is worth a gunsmith’s opinion. Lead spitting out of the gap and heavy lead on the cylinder face are the symptoms owners actually notice.
4.12 What Breaks
Sorted by how often the surviving evidence suggests it matters. Each entry says what it rests on; none of this comes from a factory failure list, because none was located.
- The hand spring — the “grasshopper” torsion spring that is the first thing to leave the gun when it is opened, and the easiest thing to lose or to stretch on reassembly. It is a named line item on every parts sheet (7139, later 7181), which is itself evidence that they were replaced.72
- The hand. The wear point of any revolver; here it works inside a recess, which is the whole argument of the ratchet design, but the hand’s own tip still wears.
- The ejector rod and its return spring (R-102 and later). A bent rod, a tired return spring or a burred tip all show as a cylinder that will not latch shut.
- The cylinder stop and its spring. Also the crane-pin spring (Volume 3).
- Grips. Plastic grips sixty years old crack at the screw escutcheon and at the toe. The factory offered several, and the “Bone” grip of the colour guns was the dearest part in the box (Volume 2).
- The anodising. Not a mechanical failure, but the most common damage an owner inflicts — see Volume 2 on what cannot be touched up.
Two things this revolver is not known to break, on the evidence available: the frame itself, and the ratchet. The absence of reports is not proof, and it is recorded here as an absence.
4.13 The Die-Cast Frame’s Limits
A die-cast aluminium frame is not a forged steel one, and three consequences follow. These are general engineering points, applied here; no High Standard document addresses any of them.
- Pin holes are the weak feature. Every load in the lockwork passes through two pins bearing in cast aluminium. Repeated removal and refitting of the hammer pin wears its holes, and a hammer pin that will no longer stay put is a frame problem, not a pin problem.
- Threads and welds are not options. There is essentially nothing threaded in the frame except the grip screw, and a cracked aluminium die casting cannot be welded back to its original condition by any process a general gunsmith has — the casting alloy, the heat-affected zone and the anodising all argue against it.
- Refinishing is subtractive. Stripping anodising to re-anodise removes metal from the surfaces the lockwork runs against. On a gun whose tolerances were deliberately set loose, a little more clearance may not matter; on a worn one it will.
The practical rule that follows is the one collectors of these revolvers already apply: a Sentinel with a damaged frame is a parts gun, and the parts are worth having (below).
4.14 Bench or Gunsmith
Table 1 — Bench or Gunsmith
| Job | Where |
|---|---|
| Cleaning, lubrication, grip change, drifting the rear sight | Bench |
| Replacing the ejector rod return spring, the grip screw, grips | Bench |
| Anything requiring the hammer pin to come out | Gunsmith, or an owner prepared to make a slave pin and lose a spring |
| Fitting a hand, cylinder stop, crane, cylinder or barrel | Gunsmith — these are the parts High Standard itself marked “must be fitted at the factory”2 |
| Timing repair, end-shake correction, forcing-cone work | Gunsmith |
| Re-anodising | Only after reading Volume 2 and accepting the loss of originality |
The asterisked list on the factory sheets is a useful proxy for difficulty, because it is the maker’s own: barrels, barrel-and-sight assemblies, frames, cranes, cylinders and cylinder assemblies, ejectors, cylinder stop assemblies, hammer spring guide assemblies and trigger guards were all “must be fitted at the factory” parts, and the factory charged a $6.50 minimum for servicing a revolver on the premises.210
4.15 Parts for a Revolver Whose Factory Is Gone
High Standard’s Connecticut assets were auctioned in December 1984 (Volume 1). There is no service department, and the modern Houston company of the same name is a different firm.
What exists instead:
- The aftermarket catalogue. Numrich Gun Parts lists the whole family — R-100, R-101, R-102, R-103, R-106, R-107, R-108 and R-108 Snub, Mark I to Mark IV, and the Double-Nine W-100 to W-106. Its Sentinel R-101 category showed 70 items in a capture of 28 July 2021 and 51 items on 24 June 2025, most described as used factory original, with a mixture of in-stock and out-of-stock lines and prices about a fifth higher in 2025 than in 2021 (for example a 2⅜-inch blued barrel at $46.75 then and $56.97 at the later capture).1112 Availability changes constantly; those are the figures on those dates, and nothing here should be read as current stock.
- 🔴 A gold-toned 2⅜-inch snub barrel is a catalogued part (product 877450), which is the best evidence located that the colour guns’ steel parts were finished to match (Volume 2).12
- Donor revolvers. The clinching argument for buying a broken Sentinel: at the prices in Volume 6, a complete non-functioning gun is often cheaper than the two parts it would donate, and parts numbers are shared widely across the family — the Double-Nine’s own parts list repeats Sentinel numbers for the barrel pin, crane link bearing, cylinder bushing, cylinder stop assembly, hammer pawl group, hammer safety stop, link pivot pin and trigger pivot pin.6
- What cannot be replaced: the frame, which was never sold separately in the first place — every sheet marks it “Not Sold Separately” — and the original anodising.2
References
Footnotes
-
John Stimson Jr’s High Standard Information, revolver manuals index, https://www.histandard.info/manuals/hprevolvers/ , retrieved 2026-09-19. Eleven sheets covering the R, R-100/R-101, R-102, R-103, R-104, R-106, R-107, R-108, R-109 and Mark I/Mark IV were downloaded. ↩
-
The High Standard Manufacturing Corporation, parts price list 997-99, “Model R102 Blued and Nickel, Snub-Barrel Blue, Nickel; Dura-Tone Gold, Turquoise, Pink”, 1/61. ↩ ↩2 ↩3 ↩4 ↩5 ↩6 ↩7 ↩8 ↩9
-
William B. Edwards, “The First New Revolver in 50 Years”, Guns, June 1955, pp. 6–7 and 37. ↩ ↩2 ↩3 ↩4 ↩5 ↩6
-
Sears, Roebuck and Co., “J. C. Higgins Model 88” owner’s booklet and parts list 990.50, Sears model 583.880, undated. https://archive.org/details/gunmanual_Jchiggins_88 . ↩ ↩2 ↩3
-
Ed Buffaloe, “The High Standard Sentinel Revolver”, Unblinking Eye, consulted 2026-09-19. ↩ ↩2
-
The High Standard Manufacturing Corporation, parts price list 996-68, “Western-Style .22 Caliber Model W-104 ‘Double-Nine’”, undated. Internet Archive item gunmanual_Histandard_W104. ↩ ↩2
-
The High Standard Manufacturing Corporation, parts price list 990-55, “.22 Caliber Model ‘R’ — ‘SENTINEL’”, undated. ↩ ↩2
-
High Standard Sporting Firearms, parts breakdown 53951, “Mark I Sentinel / Mark IV Sentinel, .22 LR and .22 Magnum”, 4/74. ↩
-
US Patent 2,958,151 (H. H. Sefried II, assigned to The High Standard Manufacturing Corporation), filed 10 February 1956, granted 1 November 1960. ↩ ↩2 ↩3
-
The High Standard Manufacturing Corporation, parts price list 5509, “Sentinel Deluxe Model R-106”, 1965. ↩
-
Numrich Gun Parts Corporation, “High Standard Revolvers Sentinel R-101”, Internet Archive capture of 28 July 2021. ↩
-
Numrich Gun Parts Corporation, same category page, Internet Archive capture of 24 June 2025. ↩ ↩2
Comments (0)