H&K PSG1 · Volume 4
Field Strip, Detail Strip, Maintenance and Repair
What H&K's own PSG1 booklet says, what it leaves out, and how the Bundeswehr's G3 regulation fills the gaps for the shared roller-delayed parts
The PSG1 is a G3 in its working parts. Its operating principle, bolt group, recoil spring arrangement and the way the rifle comes apart are those of the H&K roller-delayed family, and H&K’s own PSG1 booklet opens by saying so: the rifle “corresponds in design, construction and function in principle to the known small arms of the HK family.”1 That sentence matters for this volume, because the PSG1’s factory literature is thin on maintenance and the G3’s is not. Where the booklet is silent, the shared parts can be read from the G3 documents, and where the PSG1 differs (the closing aid, the trigger box, the stock, the barrel and the scope) the booklet’s own words govern.
4.1 The sources, and what each one is
Table 1 — The sources, and what each one is
| Source | What it is | Status | What it supplies |
|---|---|---|---|
| H&K, Kurzbeschreibung des Präzisionsschützengewehres PSG 1 | The factory’s German short description: 46 printed pages | H&K copyright; quoted, not reproduced | The PSG1’s own field strip, bolt strip, trigger-box rule, adjustments, technical data |
| ZDv 3/13, Das Gewehr G3 | Bundeswehr central service regulation, issued 13 December 1978, current to amendment 38 of 8 January 1999 | German official work; Wikimedia Commons tags it public domain | The G3 user-level strip, cleaning regime, inspection criteria, stoppage table; the drawings and photographs in this volume |
| H&K, Technical Description of the Automatic Rifle HK G3 (English) | H&K-derived text printed under licence by a US publisher, which states it is “not an official manual” | Copyright Heckler & Koch Inc.; quoted only | Maintenance schedule table, maintenance instructions, malfunction table, the bolt gap and firing-pin protrusion figures |
| H&K, The Selfloading Rifle HK91 Cal. .308 | H&K Oberndorf’s pre-1990 operator’s leaflet for the civilian semi-automatic | H&K copyright; quoted | The civilian field strip, and H&K’s statement that any commercial gun oil may be used |
The PSG1 booklet, the G3 description and the HK91 leaflet are scans held in the Internet Archive’s “MManuals” collection; the ZDv 3/13 is on Wikimedia Commons as a PDF of a 1999 commercial reissue (Breuer-Computerpublishing) of the official text.1234 An H&K PSG1 Operator’s Manual (48 pages), a PSG1 Maintenance Manual and an MSG 90 Operator’s Manual exist as printed reprints sold by a US parts dealer, all listed as sold out on 18 October 2026; none was found as a file, and none was read for this dive.5 No PSG1 armourer’s manual and no MSG90 manual of any kind was located.
The ZDv 3/13 figures used here are the Bundeswehr’s own. Commons records the regulation as a public-domain official work under section 5 of the German copyright act; this dive relies on that determination and records it with every figure. The H&K booklet’s own drawings are not reproduced, because they are H&K’s copyright.
4.2 What the PSG1 booklet does and does not contain
It is worth being exact about the factory document, because it is often assumed to be a full manual.
It contains: a feature list, the six assembly groups with their parts, the adjustments (length of pull, cheekpiece, palm shelf, trigger shoe), loading and low-noise loading, the reticle illumination, the safety, a one-page description of the cycle, the field strip, the bolt strip and reassembly, the grip strip, scope zeroing and a technical-data page.1
It does not contain: a lubrication chart, a cleaning procedure beyond one sentence on washing out the trigger box, a maintenance interval of any kind, a malfunction table, a bolt-gap figure, a roller table, a barrel-life figure or a torque value. A reader looking for any of these in H&K’s PSG1 literature will not find them in this document, and this dive does not supply them from anywhere else as if they were H&K’s.
4.3 The six assembly groups
The booklet divides the rifle into six groups (page 4):1
- Receiver with barrel, cocking device and scope (Waffengehäuse mit Rohr, Ladeeinrichtung und Zielfernrohr).
- Bolt (Verschluß).
- Grip with trigger mechanism (Griffstück mit Abzugeinrichtung).
- End cap with buttstock (Bodenstück mit Schulterstütze).
- Handguard (Handschutz).
- Magazine.
That is the G3’s division with the stock and the scope renamed. The Bundeswehr regulation shows the same groups for the G3 (receiver with barrel and fittings, bolt, end cap with stock, grip with trigger mechanism and safety, handguard and magazine).2
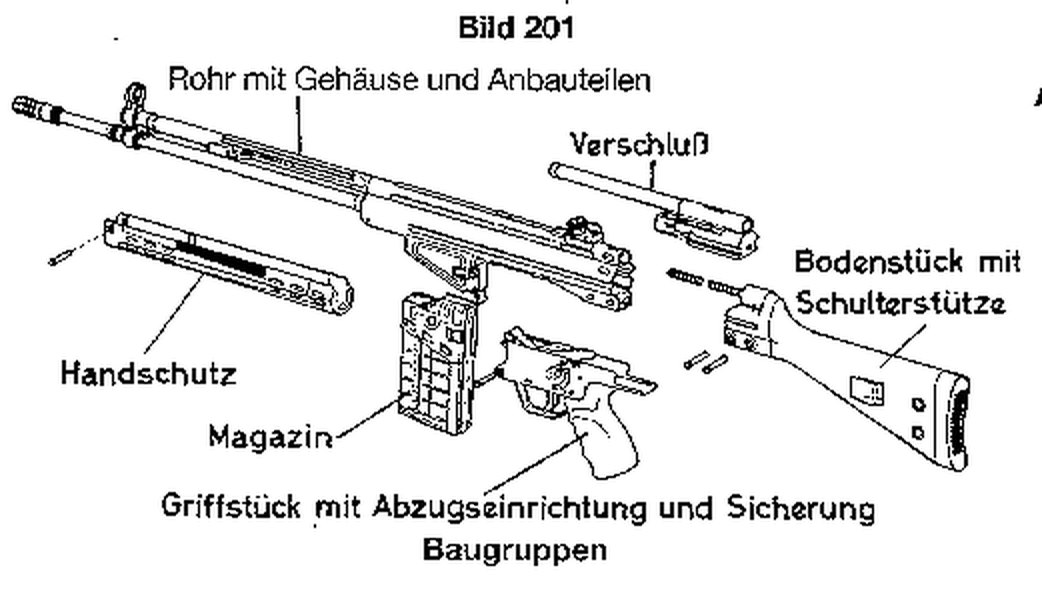
Three details of group 1 in the PSG1 booklet bear on maintenance. The barrel “is pressed into the locking piece and pinned” (the locking piece, Verriegelungsstück, is the trunnion that carries the roller recesses), so the barrel is not a user part. The magazine catch is on the left of the magazine well. And “the closing aid behind the ejection port serves for low-noise locking of the bolt”: the Schließhilfe, the PSG1’s best-known addition, sits on the receiver’s right side and is not removed in the field strip.1
4.4 Field strip: the PSG1 sequence
The booklet’s procedure, Zerlegen der Waffe zum Reinigen (dismantling for cleaning), is short. It is translated here step by step; the German is in the research notes.1
- Make the rifle safe (Waffe sichern): safety to “0”.
- Remove the magazine.
- Unload: pull the cocking lever back, check that the chamber is clear, then let the bolt snap forward.
- Remove both retaining pins from the end cap and stow them in the hollow rivets in the stock.
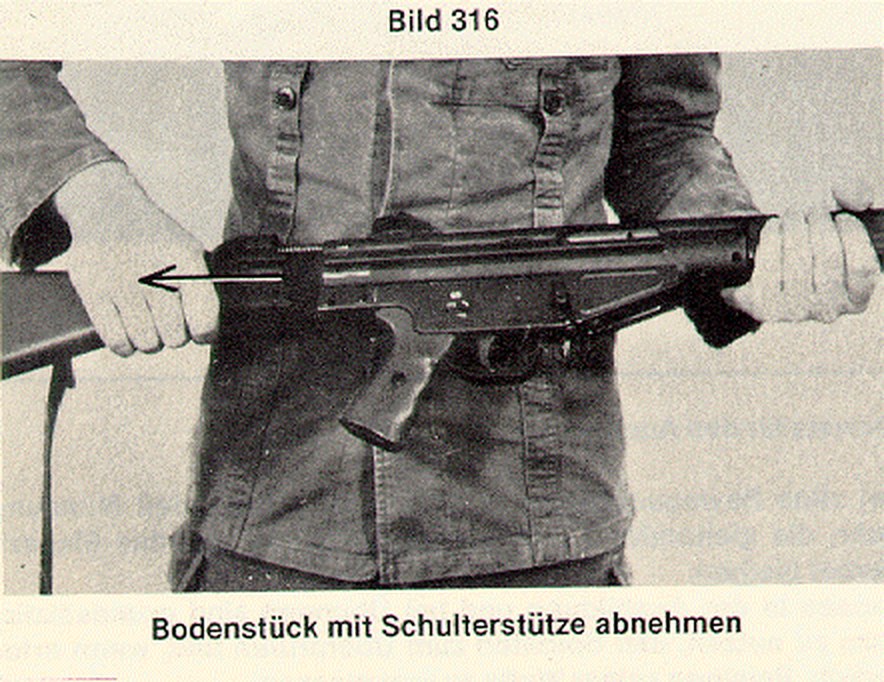
- Pull off the stock (with the end cap) and remove the grip.
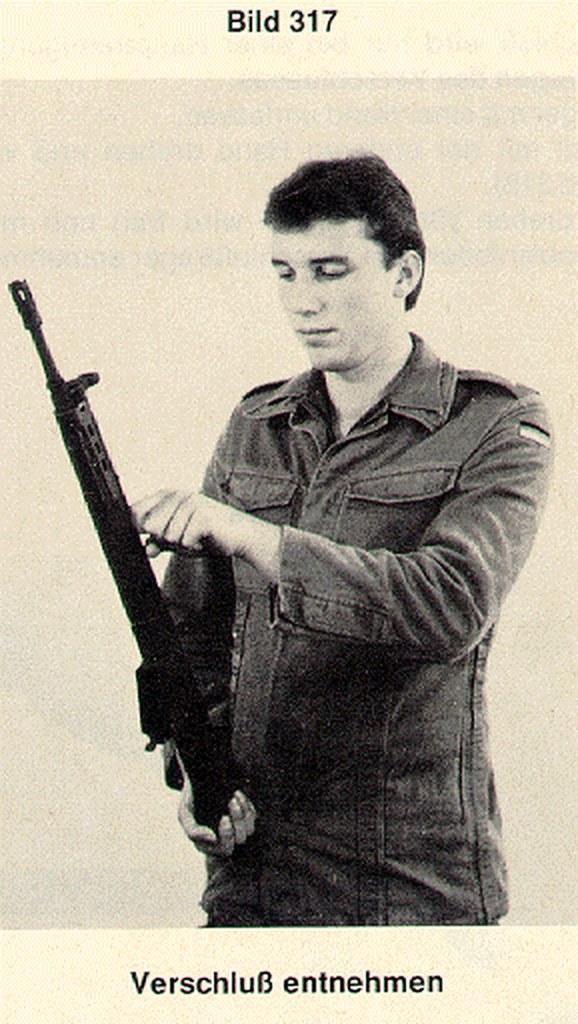
- Pull the bolt back with the cocking lever and take it out of the receiver.
- Handguard: with a screwdriver, press the handguard pin fully rearward and turn it 90 degrees; slide the handguard forward off the barrel.
Three things stand out against the G3. First, the PSG1 handguard needs a screwdriver; the G3’s needs nothing but a pin pushed out. Second, the stock comes off as a unit with the end cap, which carries the recoil-spring guide, the spring and the buffer, exactly as on the G3. Third, the booklet gives no instruction to remove the scope: on the PSG1 the scope stays on a fixed mount (Volume 6), and nothing in the user strip disturbs it.
4.5 Field strip: the G3 sequence, for comparison
The Bundeswehr regulation’s procedure (Nr 319) is longer, because it includes the clearing drill and the G3’s fittings, and it is worth reading beside the booklet’s. It begins with the rule that governs everything after it: “The rifle is dismantled and assembled without tools. Any use of force is forbidden. The soldier may dismantle the rifle only as far as this regulation describes. Parts may not be exchanged with parts of other rifles. Bolt carrier, bolt head and control piece are marked with the last three digits of the weapon number.”2
The fourteen steps: 1 safe the rifle; 2 remove the magazine; 3 pull back the cocking lever and check that the chamber is clear; 4 let the lever snap forward; 5 take off safe and pull the trigger; 6 safe; 7 unhook the sling from the eye-bolt; 8 pull both retaining pins at the end cap and stow them in the hollow rivets of the stock; 9 draw the end cap and stock straight back; 10 pull the grip pin, remove the grip and replace the pin; 11 pull the bolt back with the cocking lever and remove it; 12 push the cocking lever forward; 13 unscrew the flash hider or blank-firing device; 14 pull the handguard pin, remove the handguard and replace the pin.2
Step 5, the dry release of the hammer before the stock comes off, is in the G3 regulation and not in the PSG1 booklet. The H&K G3 description and the HK91 leaflet both open with the same order (safe, magazine out, unload, sling off, stock off, grip off, bolt out) and state that the rifle is stripped without tools.34
The point of reading the two together is the numbering rule. On a G3 the carrier, head and control piece are numbered to the rifle because the bolt’s fit to the trunnion (the bolt gap, below) is a property of the combination. The same logic applies to a PSG1. An owner who strips more than one rifle of this family on one bench should keep each bolt with its own receiver.
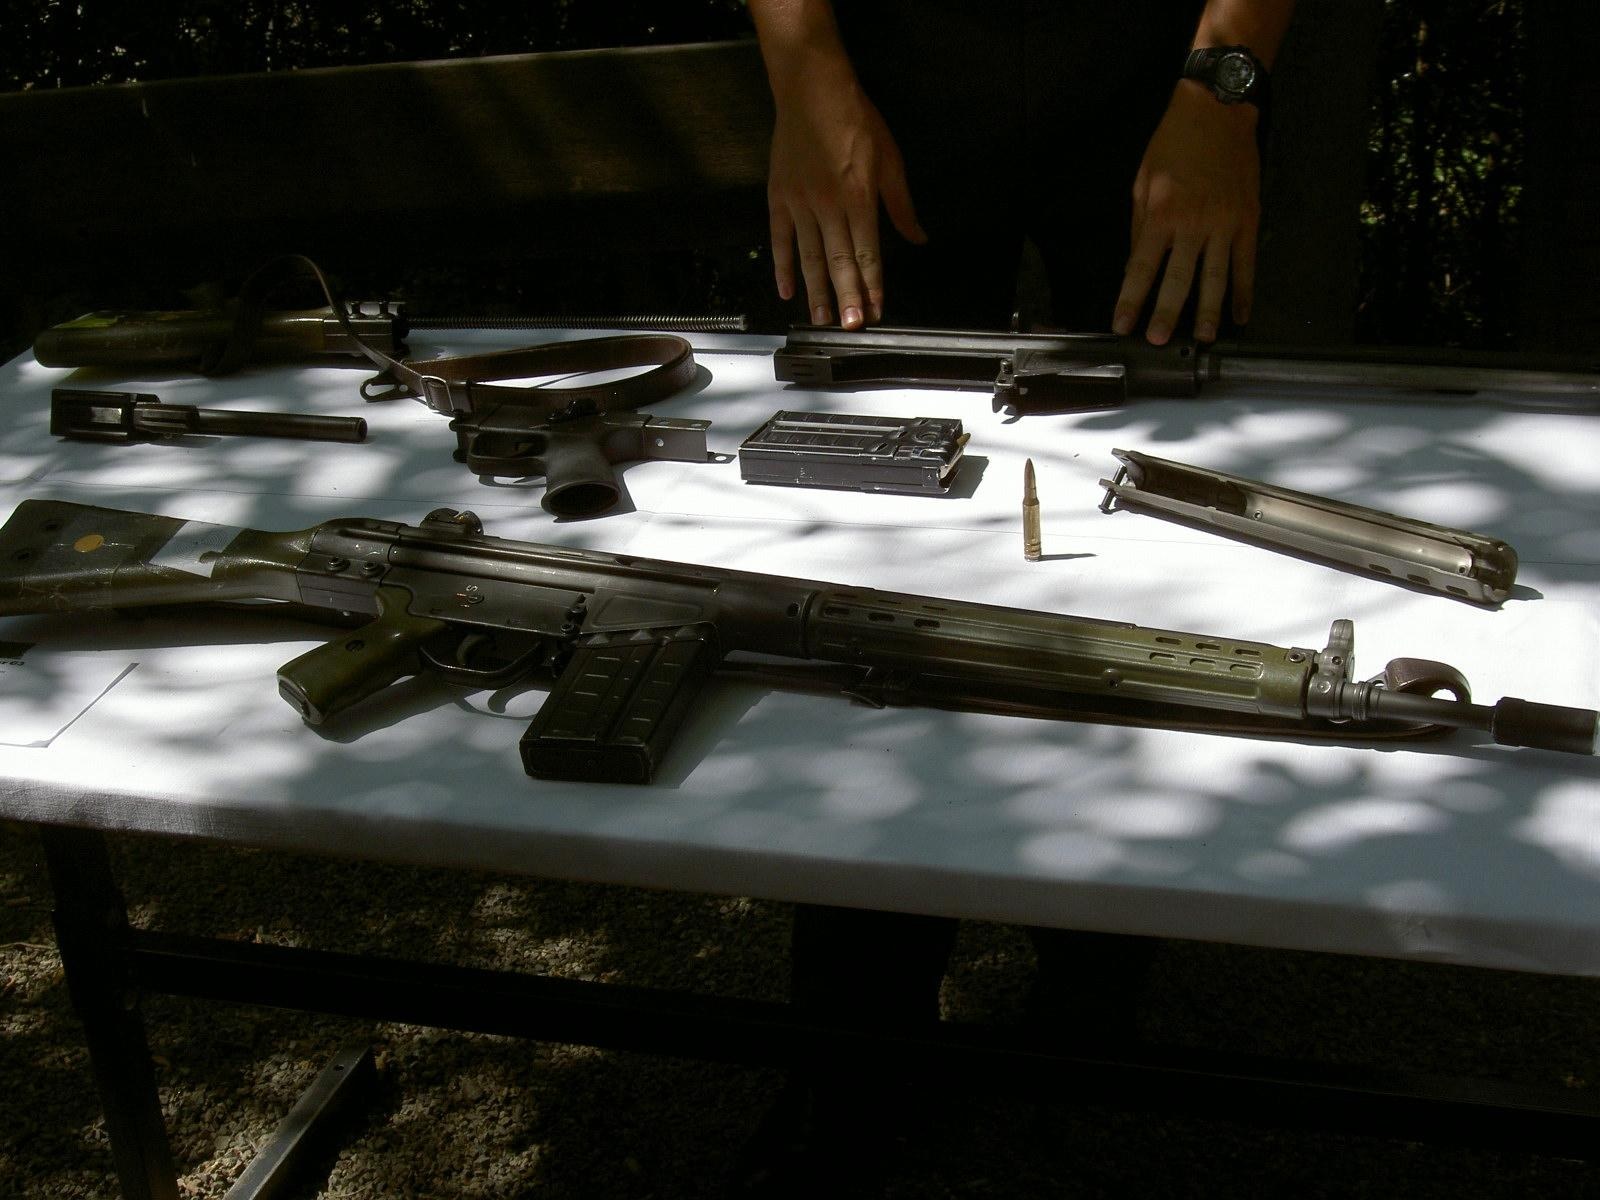
4.6 Stripping and reassembling the bolt
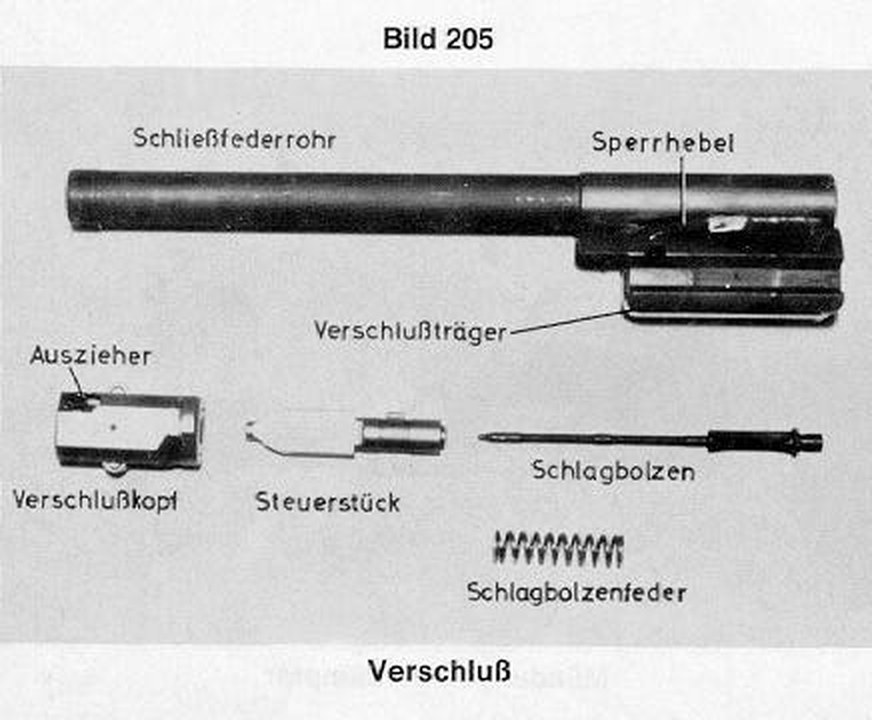
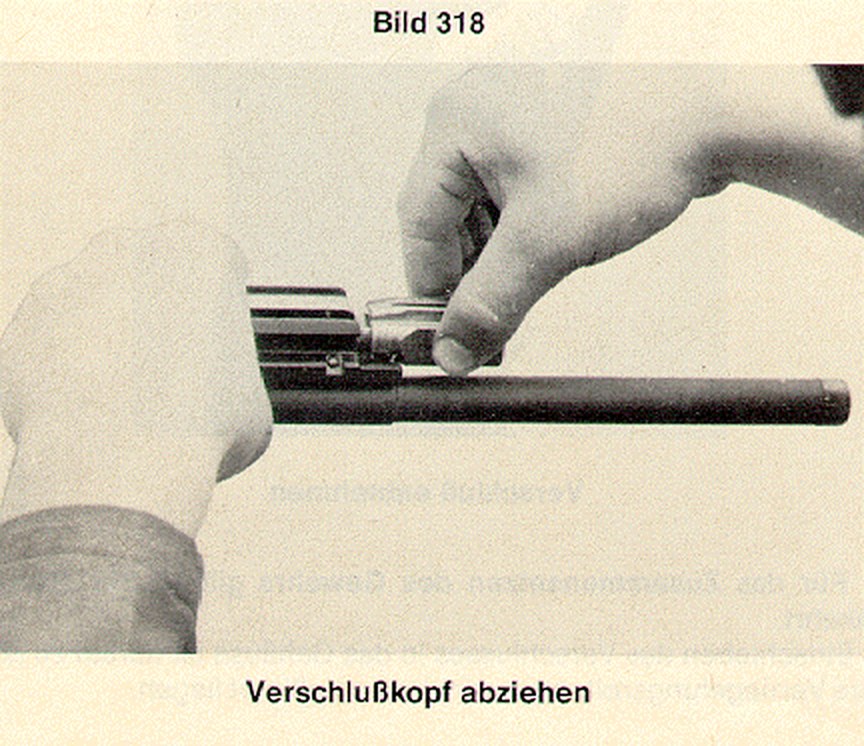
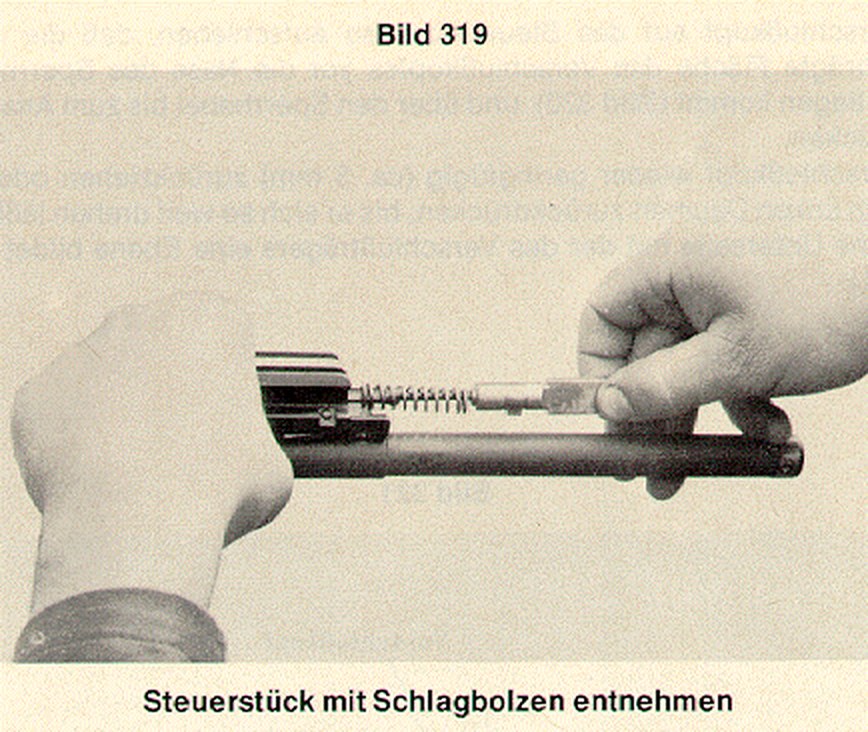
The bolt is stripped only at a main cleaning (G3 regulation Nr 321; the H&K G3 description says the same).23 The PSG1 booklet’s procedure:
Dismantling. Turn the bolt head 90 degrees to the left and remove it. Take out the control piece, the firing pin and the firing-pin spring.1
Reassembly, translated from the booklet: “Insert the firing pin with its spring and the control piece into the bolt carrier so that the lug on the control piece passes through the cut-out in the bore of the carrier. Push the control piece fully in and turn it until its narrow side lies under the locking lever. Set the bolt head on the control piece so that its bevel lies in front of the locking lever. Press the bolt head against the locking lever as far as the carrier. Turn the bolt head to the right until resistance is felt and the locking lever rests on the next face. Pull the bolt head forward to the stop, until both rollers can enter the recesses completely. Turn the bolt head to the right to the stop, until the sliding surfaces of bolt head and carrier form one plane.”1
The G3 regulation (Nr 322) and the HK91 leaflet give the same sequence in fewer words, and both supply the one number the PSG1 booklet does not: the bolt head is drawn back about 5 mm (the HK91 leaflet says “approx. 1/4 inch (approx. 5 mm)”) before it will rotate into line with the carrier.24 The regulation’s photographs show each stage, and Bild 320 labels the part that does the work: the nose of the locking lever (Nase des Sperrhebels), the spring-loaded lever on the carrier that stops the head rebounding when the bolt closes (Volume 3).
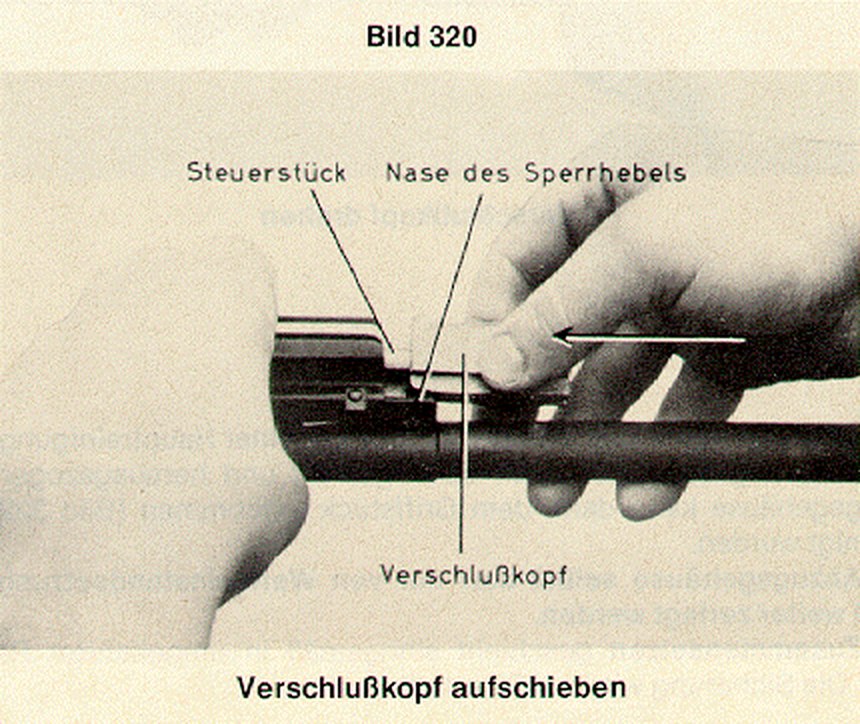
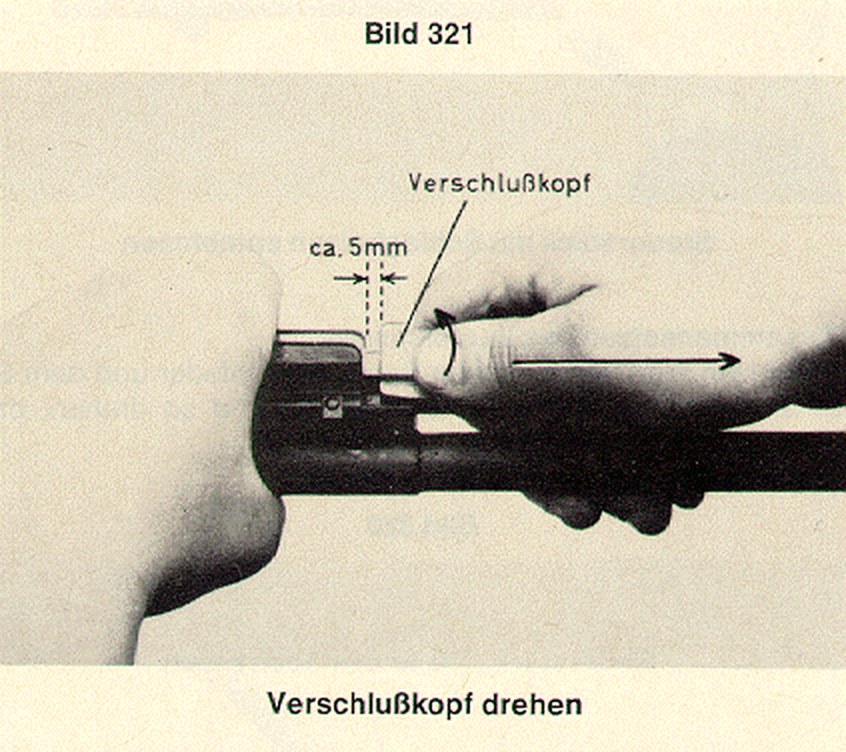
The common reassembly error on the roller guns is putting the bolt into the receiver with the rollers sitting out. All three documents warn against it. The booklet: “insert the assembled bolt into the receiver (the bolt rollers must lie in the bolt head).” The regulation (Nr 320) and the G3 description say the same.123 A bolt forced home with its rollers out is the “use of force” the regulation forbids.
4.7 The grip and trigger box
The PSG1’s grip strip, from the booklet: loosen the trigger shoe with the Allen key; set the safety lever vertically upward and pull it out; take out the trigger box (Abzugkasten). “Further dismantling of the trigger box is not permitted.” If it is heavily fouled, “the trigger box may be washed out with a cleaning agent.”1
The safety lever is also the cross pin: the booklet says the grip and trigger box “are joined by the safety”, and that is why lifting the safety vertical and drawing it out frees the box.1 The PSG1 adds one step the G3 lacks, loosening the trigger shoe, because the shoe is clamped to the trigger blade and would otherwise foul the grip as the box comes out.
The G3 regulation’s rule for its own trigger housing is the same in substance: the grip is stripped only at a main cleaning, by setting the safety vertical and pulling it out, and “the trigger housing itself may be dismantled further only by weapons-repair personnel” (Nr 323).2
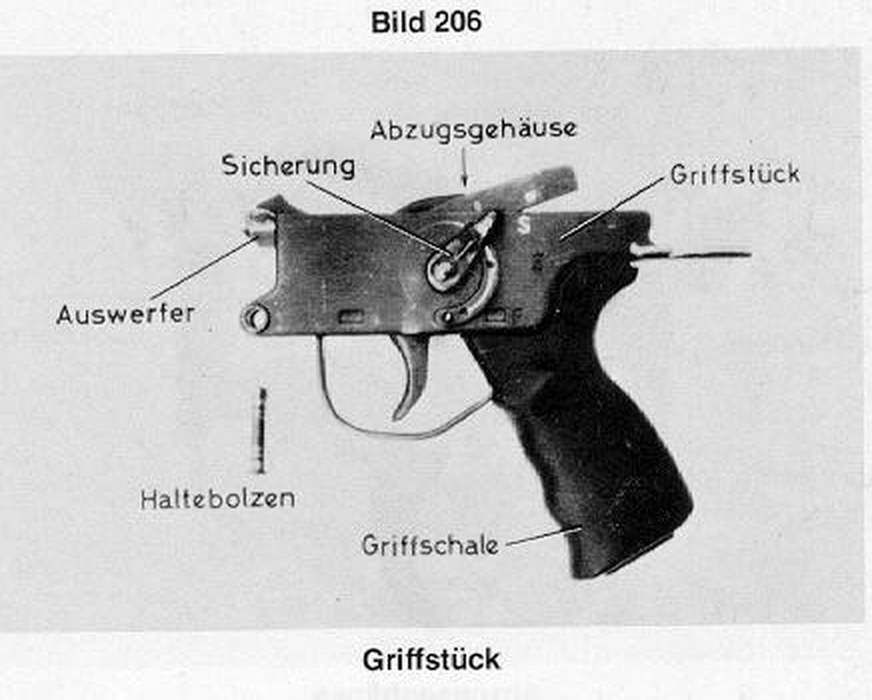
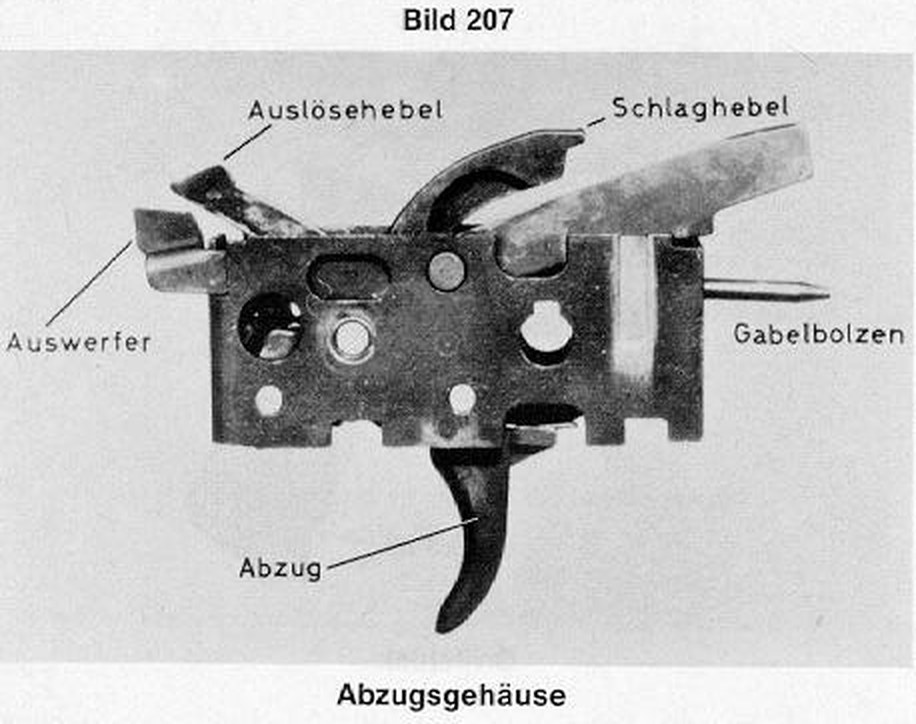
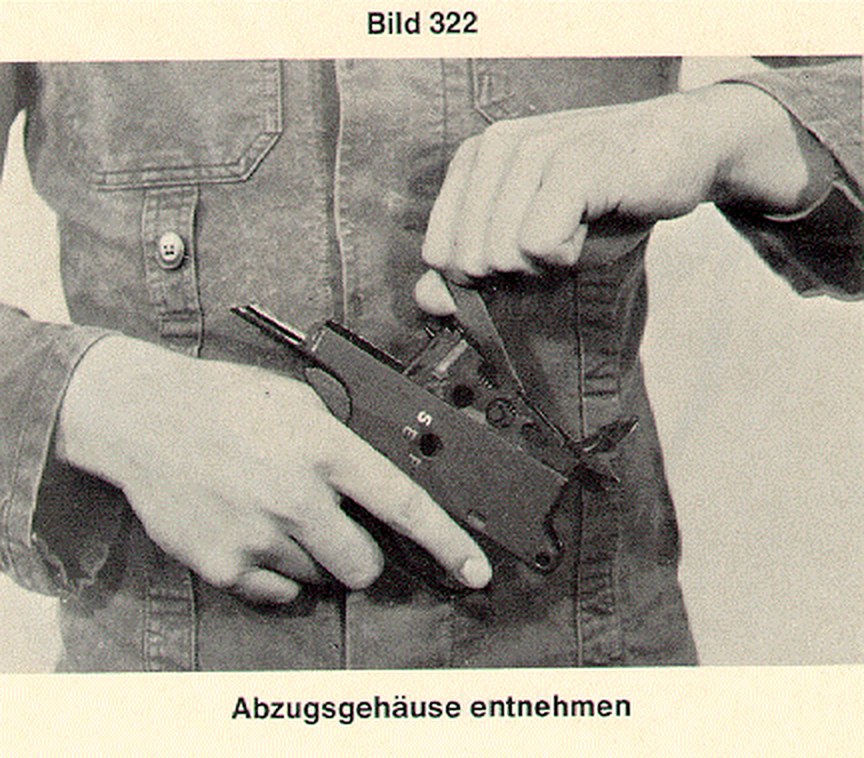
The PSG1’s safety has two positions, “0” (safe) and “1” (single fire), with the numerals repeated on both sides of the grip, and the booklet notes that the rifle can be loaded while safe.1 The G3 selector reads S, E and F (safe, single, burst).
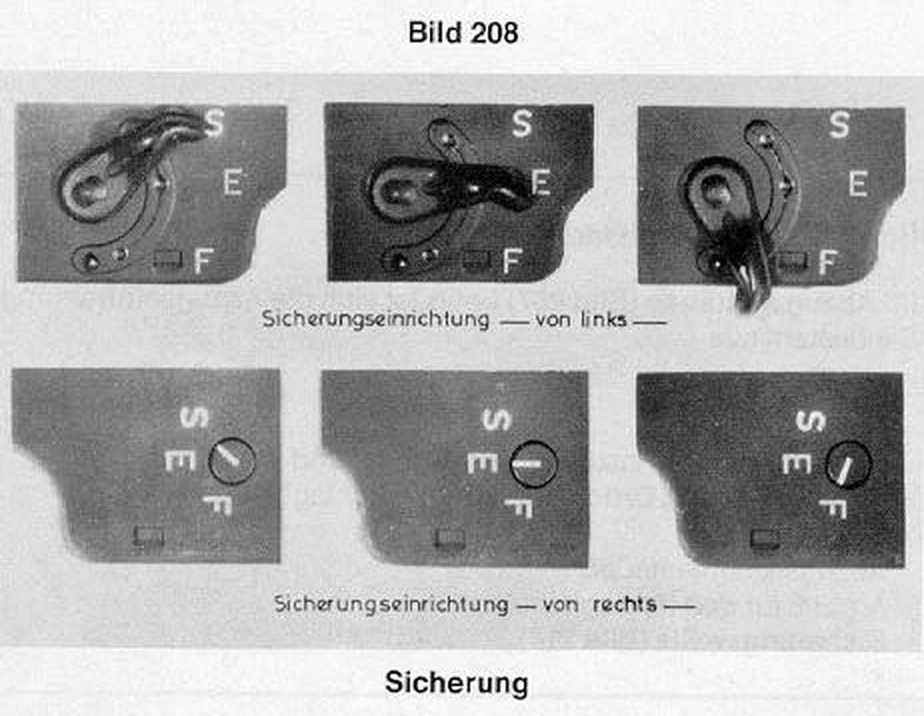
4.8 Reassembly and the function check
The booklet’s reassembly: slide the handguard over the barrel from the front, press the pin in with a screwdriver and turn it 90 degrees; insert the assembled bolt with the rollers in the head; fit the grip with the safety at “0”; slide the stock onto the receiver and press in the retaining pins.1
The booklet gives no function check. The G3 regulation does, twice. The user check after reassembly (Nr 320) is to cock and release the rifle several times and confirm that the trigger will not move at safe, that the bolt locks fully (“on releasing, it slides fully into its foremost position: look into the ejection port”), and that the magazines latch.2 The armourer’s function test at an inspection (Nr 624) uses dummy rounds: with four in a magazine, the bolt must feed one; at safe the trigger must not pull through; at single fire the hammer must fall audibly; on cycling, the first dummy must be extracted and ejected and the second chambered; and “if the trigger is now released, a click is audible”, the disconnector resetting.2
For a PSG1 the parts of that test that apply are the feed, safe, single-fire and reset checks. The burst check does not apply. The PSG1 also has a step of its own, which the booklet describes in the loading section rather than the strip: for low-noise loading the cocking lever is eased forward rather than released, and the closing aid is then pushed forward “to lock the bolt fully”.1 A rifle that has just been reassembled should be checked both ways: released, to confirm the spring closes the bolt unaided, and eased, to confirm the closing aid seats it.
4.9 Cleaning: the regime the G3 regulation sets
The PSG1 booklet’s only cleaning instruction is the trigger-box wash-out. The G3 regulation’s cleaning chapter (Nr 601 to 613) is therefore the nearest factory-family document, and the most useful passages are set out here. They describe a service rifle’s regime; a precision rifle’s owner will adapt the frequency but not the logic.
Materials (Nr 602): the issue cleaning kit for calibres 7.62 to 9 mm, patches and rags, wooden sticks and brushes, and “multipurpose corrosion-preventive oil O-190”. Forbidden: “metal objects, plastics (for example nylon, Perlon), chemical agents (for example petroleum spirit), cold or hot water.”2 The H&K G3 description repeats the same prohibitions in English: no metal objects except the cleaning kit, no “synthetic materials (e.g. nylon)”, no chemical treatment and no boiling in water.3 H&K’s HK91 leaflet, written for civilian owners, is more relaxed: “For cleaning and preservation any sort of gun oil in normal commercial usage can be used.”4
When (Nr 603): a main cleaning after every firing, when the rifle has got wet or dusty, after every field exercise, on temporary storage, on handover, and before inspections. At a main cleaning the rifle is broken into its groups, the bolt is stripped and the trigger housing removed. An ordinary cleaning, at intervals set by storage and weather, always includes pulling the barrel through and re-oiling it.2
Straight after firing (Nr 606): “Immediately after every firing, the barrel is to be pulled through several times with the oil-soaked cleaning brush while still hand-warm, on the range or in the field. This prevents combustion residues from setting and makes the later main cleaning easier. The cleaning oil should be allowed to act for several hours.” The H&K G3 description adds that cleaning and oiling are to be repeated “at least 3 days running” after a firing.23
The philosophy (Nr 607): “What matters is not frequent cleaning, but correct cleaning at the right time. Experience shows that barrels suffer less from firing than from late or wrong cleaning.”2
The procedure (Nr 608 and 609): remove dirt from every joint and corner; pull the barrel through three times with the oiled brush; pull dry patches through until clean; oil the bore with the oil brush and the sliding parts and other unprotected metal with a brush or rag; reassemble; function-check. The cleaning chain is always pulled from the chamber toward the muzzle, with the flash hider fitted to protect the muzzle.2 On a PSG1, which has no flash hider and a crown that is part of the rifle’s accuracy, the equivalent precaution is a rod guide and a coated rod, but no PSG1 document says so: that is this dive’s inference, not H&K’s instruction.
Before firing (Nr 611): de-oil everything that the bullet and the propellant gas touch, “since otherwise carbonised oil, burn-in and barrel bulges can occur”; oil all sliding parts except below minus 10 °C. The HK91 leaflet says the same in one sentence: “Prior to every shooting the barrel has to be freed from oil by a clean pull-through.”24
4.10 The fluted chamber is the cleaning priority
One paragraph of the G3 regulation matters more to a roller-delayed owner than all the rest. Nr 610:
“The barrel is clean when no more residue can be seen and the cleaning patch stays clean after several passes. No residue may remain in the relief grooves of the chamber. Fouled grooves lead to stoppages. Stubborn residue is removed by the armourer with a chamber rod brush.”2
The relief grooves (Entlastungsrillen) are the twelve flutes cut lengthwise in the chamber (Volume 3). The G3 description: “The chamber has 12 flutes which facilitate the extraction of the cartridge case utilizing the gas pressure.”3 H&K’s PSG1 booklet labels the same grooves on its own sectional drawing, so the PSG1 chamber is fluted like the G3’s.1 Gas has to reach the flutes to float the case; carbon packed into them stops it doing so, and the case then grips the chamber wall while the bolt is already moving. The stoppage table below lists a fouled chamber as a cause of three different faults.
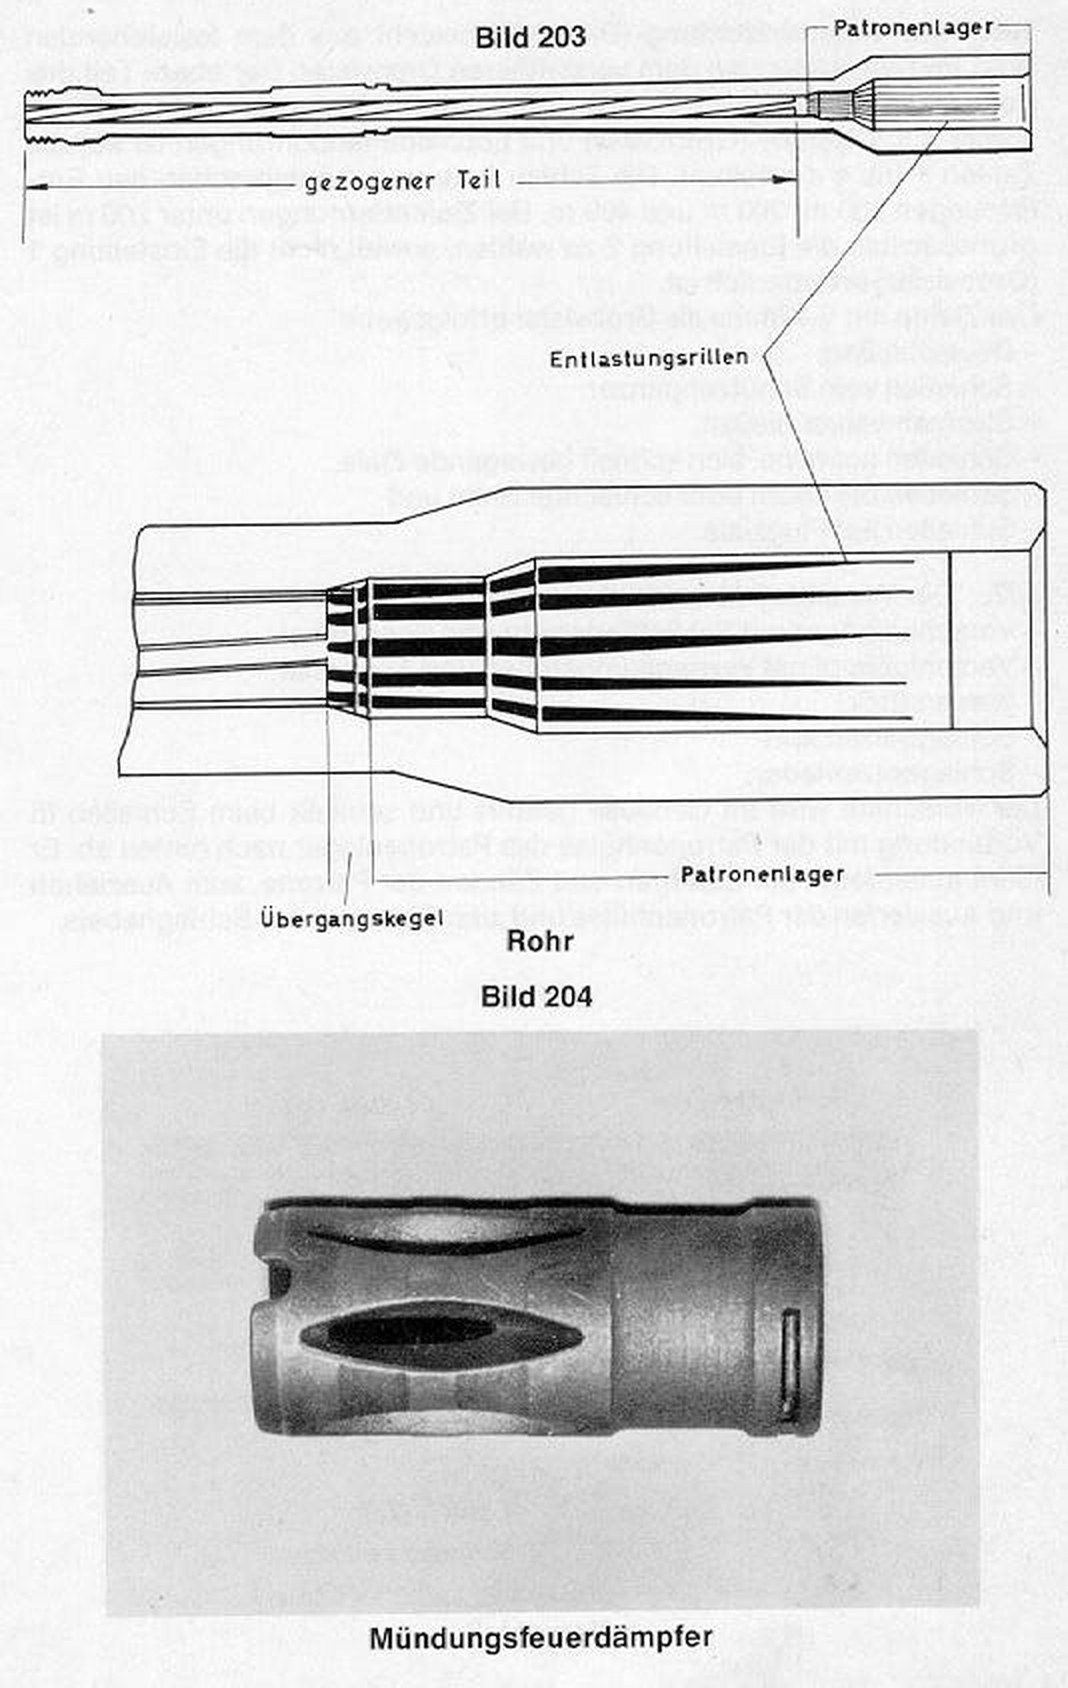
The regulation’s answer is a chamber brush on a rod, used by the armourer when the flutes will not come clean with the issue kit. A brush sized for the chamber body reaches the flutes; a bore brush does not.
4.11 Lubrication
No lubrication chart exists in any of the four documents. What they say:
- The PSG1 booklet: nothing on lubricants or points.1
- The G3 regulation: oil the bore lightly after cleaning; oil “the sliding parts and other metal surfaces not otherwise protected” with a brush or rag; de-oil the bore and everything the gas touches before firing; oil sliding parts before firing except below minus 10 °C; re-oil hot barrels in long pauses and de-oil again before resuming.2
- The H&K G3 description: “oil barrel and sliding parts a little again” after cleaning.3
- The HK91 leaflet: any commercial gun oil.4
The O-190 named in the regulation is a NATO-coded oil; this dive has not confirmed its specification and does not suggest a modern equivalent. “Sliding parts” on a roller gun are, in practice, the bolt carrier’s guide surfaces, the rollers and their seats, the control piece’s inclined faces and the cocking-lever tube; that list is the reading of the cycle in Volume 3, not a factory list.
4.12 The maintenance schedule
The only schedule found is in the H&K G3 description, as a table headed “Time schedule for maintenance” with columns for after use, before firing, after firing and once a week.3 The rows that apply to a PSG1 are:
Table 2 — The only schedule found is in the H&K G3 description, as a table headed "Time schedule for maintenance" with columns for after use, before firing, after firing and once a week.[^hk-g3-desc] The rows that apply to a PSG1 are
| Part | Care | After use | Before firing | After firing | Weekly |
|---|---|---|---|---|---|
| Barrel | Clean and lubricate | x | x (repeat three days running) | x | |
| Barrel | Free from oil | x | |||
| Bolt | Clean and lubricate | x | x | x | |
| Bolt | Disassemble, clean and lubricate | x | |||
| Buttstock | Clean | x | x | x | |
| Recoil-spring guide rod with spring | Clean and lubricate | x | x | x | |
| Grip assembly with trigger mechanism | Clean and lubricate | x | x | x | |
| Handguard | Check proper fitting | x | x | x | x |
| Magazine | Check for damage | x | x | x | x |
| Magazine | Clean and lubricate; strip weekly | x | x | x (strip) |
Rows for the flash hider, rotary rear sight and training devices are omitted because a PSG1 has none of them. The G3 regulation adds one rule worth keeping on any magazine-fed rifle (Nr 613): loaded magazines are to be emptied at least once a week so that the follower spring does not take a set.2
4.13 Inspection: what an armourer looks for
The Bundeswehr’s technical inspection (Nr 623) is written for an armourer looking at a service G3, and it is the most precise statement of what wears on a roller-delayed rifle found anywhere in the factory-family literature. The bolt criteria, translated:2
- The bolt must go in and come out without difficulty.
- Bolt and carrier must show no impact damage.
- The recoil-spring tube must sit tight in the carrier and must not be dented.
- The extractor must be correctly seated, must move, and must not be chipped.
- “The locking rollers must not be damaged by impact or chipped, and must turn freely.”
- “The firing-pin tip must be hemispherical and protrude far enough.”
- “The inclined faces of the control piece must show no pressure marks.”
- The nose of the locking lever must not be impaired by impact damage; its spring must be neither weak nor broken.
- The numbers must match.
And the barrel: the lands must be sharp-edged (“rounded land edges usually result from too frequent cleaning or the use of harsh agents”); a factory-new bore is matt grey, while one cleaned too often or with harsh agents is “bright like nickel”; faults include damaged lands and grooves, bulges (“shadow-like ring-shaped depressions”), rust pitting, scratches and grooves; the chamber must be clean, without cracks, scores or hard residue; and barrel wear is checked with barrel-condemnation gauges (Rohrausschußlehren).2
Two of those criteria are specific to the roller system and deserve emphasis. Pressure marks on the control piece’s inclined faces are the mark of rollers hammering the faces they bear on; the faces set the delay ratio (Volume 3), so a marked control piece changes the timing. Rollers that do not turn freely cannot roll over the trunnion’s support faces and the control piece as the head unlocks; they slide instead, and the delay changes again.
4.14 Wear parts and the numbers that matter
The figures below are the only ones found in the family’s literature. They are G3 figures; none is stated in the PSG1 booklet.
Table 3 — Wear parts and the numbers that matter
| Item | Figure | Source |
|---|---|---|
| Firing-pin protrusion | 1.45 mm | H&K G3 description, technical data3 |
| Distance between bolt head and bolt head carrier (the bolt gap) | “0.5 - 0.1 mm”, as printed | H&K G3 description, technical data3 |
| Head and carrier separation during unlocking | ”about 5 mm” (H&K); “about 4 mm” (ZDv 3/13) | Both; the two figures are given separately32 |
| Trigger-lever play in its slot | about 1.5 mm | ZDv 3/13 Nr 215; H&K G3 description23 |
| PSG1 A1 barrel life | ”long life (15,000 rounds)“ | H&K Military and Law Enforcement catalogue, 2008 (the only PSG1-specific wear figure found)6 |
The bolt gap is the clearance between the front of the carrier and the rear of the bolt head with the bolt locked. It is the measure of how far the rollers sit out in the trunnion recesses, and therefore of the locking geometry as it stands on a given rifle: as rollers, recesses and the control piece wear, the head settles further forward relative to the carrier and the gap closes. The H&K figure for the G3 is a range between 0.1 and 0.5 mm. The ZDv 3/13 is a user regulation and contains no bolt-gap figure and no roller table; the armourer-level Bundeswehr instruction that would contain them (a TDv) was not found.2 How the gap is measured and corrected, by fitting oversize rollers, is the gunsmith’s job and is treated in Volume 9 for builders, where the community’s practice is set out and attributed.
Other wear parts, by the inspection list: the extractor and its spring, the locking-lever spring, the firing pin (tip shape and protrusion), the rollers, the control piece, the recoil spring and the buffer. The stoppage tables add the magazine (lips, follower, spring) and the ejector. Apart from H&K’s 15,000-round barrel figure for the PSG1 A1, no replacement interval in rounds was found for any of these in any document read; the regulation’s regime is condition-based, by inspection.
4.15 Stoppages: diagnosis by symptom
The G3 regulation’s principle (Nr 336): “Most stoppages can be cleared quickly by cycling once. The first rule for stoppages is therefore: safe, cycle and keep firing. If that does not succeed, the soldier must find the cause and remove it.” For a police precision rifle the “keep firing” half belongs to a service rifle’s doctrine; the diagnostic table is what transfers.2
Table 4 — Stoppages: diagnosis by symptom
| Symptom | Causes listed | Remedy listed |
|---|---|---|
| Bolt does not feed a round | Magazine not seated; magazine dirty; follower or spring defective; lips bent; magazine loose | Seat or clean the magazine; replace a damaged one and hand it in; check the catch and the magazine’s notches, and hand in for repair if worn |
| Case not extracted or ejected | Dirty chamber; broken extractor or extractor spring; faulty ejector | Clean the chamber; extractor and ejector to repair |
| Round does not fire | Faulty ammunition; locking incomplete; firing pin broken or too short; fault in the trigger mechanism | Cycle (for the first two); the rest to repair |
| Bolt not fully closed, round not fully chambered | Damaged round; dirty chamber; dirty locking piece; weak recoil spring | Cycle; clean; spring to repair |
| Rifle fires irregularly | Magazine not seated, dirty or dented; dirty chamber; faulty rounds | Seat, clean or replace the magazine; clean; change ammunition |
| Cases repeatedly thrown at right angles or right-rearward instead of right and forward | ”Various causes, singly or together, from general weapon wear; bolt, extractor; ejector; receiver” | Hand in for repair |
| Shot does not break; cycling ejects only an empty case | Ammunition fault: no propellant, bullet lodged in the bore | Stop firing this weapon at once; hand in for repair |
All from ZDv 3/13 Nr 336.2 The H&K G3 description’s table covers the same ground in English and adds a recoil spring “worn out” as a cause of incomplete closing, and a fouled barrel extension (the trunnion) alongside a fouled chamber.3
Two rows are worth singling out. The ejection pattern is a diagnostic. A roller gun normally throws its cases to the right and forward; the regulation treats a pattern that has shifted to square or rearward as a sign of wear somewhere in the bolt, extractor, ejector or receiver, to be looked at by an armourer rather than ignored. And the squib row is the one that matters most to a semi-automatic owner: if a shot fails to break and cycling produces an empty case, a bullet may be in the bore, and the next round fired behind it is the classic barrel-bulging accident.
The PSG1 adds a seventh row of its own, which no table lists because it is a feature rather than a fault: a bolt eased forward for low-noise loading may not lock fully, and the booklet’s remedy is the closing aid.1 A PSG1 that fails to fire after a quiet load should be checked for an unlocked bolt before anything else.
4.16 What the user may fix, and what goes to an armourer or the factory
The documents draw the line plainly.
The user may: field strip, strip the bolt, remove the trigger box from the grip, clean, oil, replace a magazine, adjust the stock, cheekpiece, palm shelf and trigger shoe, and zero the scope with its turret screws.1
The user may not: strip the trigger box (“further dismantling of the trigger box is not permitted” in the PSG1 booklet; “only by weapons-repair personnel” in the G3 regulation), go beyond the described strip on a G3 (the G3 description: “the user is not allowed to carry out a further disassembly … than described”), or exchange numbered bolt parts between rifles.123
The armourer handles: extractor, ejector, firing pin and springs; stubborn chamber fouling (with the chamber brush); bolt-gap measurement and roller selection; barrel condemnation with gauges; the trigger mechanism beyond the housing. The barrel itself is pressed into the trunnion and pinned, so its replacement is a factory or fully equipped workshop job.1 No PSG1 service arrangement with H&K’s US company was found published, and none is described here.
4.17 Parts availability
Genuine PSG1 parts are scarce, and a reader should assume that any PSG1-specific part (the trigger box, the closing aid, the stock and its key, the barrel, the receiver, the scope and its mount) is obtainable only second-hand, if at all. The parts the PSG1 shares with the G3 and HK91 (bolt head and carrier components, rollers, extractors, springs, firing pins, magazines) are a different matter, because the G3 was made in very large numbers in many countries and its parts circulate widely as surplus. The suppliers who sell them, and what they charge, are in Volume 9, dated and sourced from their own pages. Whether a G3 part is a correct fit for a given PSG1 is a question for an armourer with the rifle in hand, and no published interchange list was found.
4.18 What could not be established
- An H&K PSG1 or MSG90 operator’s or maintenance manual as a readable file. Printed reprints are listed, sold out.5
- Any lubrication chart, maintenance interval or malfunction table in H&K’s PSG1 literature. None exists in the booklet read. The one PSG1 wear figure H&K published is the 2008 catalogue’s 15,000-round barrel life.
- The PSG1’s own bolt gap, roller sizes, firing-pin protrusion or control-piece identity. Only G3 figures were found.
- The Bundeswehr armourer-level instruction (TDv) for the G3, which would carry roller tables and gauges.
- Whether the H&K G3 description’s malfunction table continues beyond the last page of the scan read (its page 54).
- The specification of the oil O-190 named in the regulation.
References
Footnotes
-
Heckler & Koch GmbH, Kurzbeschreibung des Präzisionsschützengewehres PSG 1 (Oberndorf, n.d.), printed pp. 2–45: Allgemeines pp. 2–3, Baugruppen p. 4, Gruppe 1 p. 6, Gruppe 3 p. 10, Gruppe 4 p. 12, loading pp. 26–28, safety pp. 30–31, cycle pp. 32–35 with Bild 28–29, Zerlegen pp. 36–41, Griffstück p. 42, Technische Daten p. 45. Scan in the Internet Archive collection “MManuals”, https://archive.org/download/MManuals/HkPsg1.pdf, consulted 2026-10-18; re-read by OCR for this dive and checked against the page images. H&K copyright; quoted in translation. ↩ ↩2 ↩3 ↩4 ↩5 ↩6 ↩7 ↩8 ↩9 ↩10 ↩11 ↩12 ↩13 ↩14 ↩15 ↩16 ↩17 ↩18 ↩19 ↩20
-
Bundesministerium der Verteidigung, ZDv 3/13 Das Gewehr G3 (Bonn, 13 December 1978; text current to amendment no. 38 of 8 January 1999, Breuer-Computerpublishing reissue), Nr 201, 204, 214–215, 318–323, 336, 601–613, 623–624; Bild 201, 203–209, 316–322. Wikimedia Commons, https://commons.wikimedia.org/wiki/File:ZDv_3-13_Das_Gewehr_G3_(1999).pdf, licence tag “Public domain” (German official work), consulted 2026-10-18. Translations by this dive. ↩ ↩2 ↩3 ↩4 ↩5 ↩6 ↩7 ↩8 ↩9 ↩10 ↩11 ↩12 ↩13 ↩14 ↩15 ↩16 ↩17 ↩18 ↩19 ↩20 ↩21 ↩22 ↩23 ↩24 ↩25 ↩26 ↩27
-
Heckler & Koch, Technical Description of the Automatic Rifle HK G3, Cal. 7.62 mm NATO (English; printed by a US publisher with H&K’s permission and stating it is not an official manual; copyright Heckler & Koch Inc.), printed pp. 5, 9, 12–13, 27–35, 44, 50–54. Scan in the Internet Archive collection “MManuals”, https://archive.org/download/MManuals/HkG3AutomaticRifleCal7.62mmNato.pdf, consulted 2026-10-18. ↩ ↩2 ↩3 ↩4 ↩5 ↩6 ↩7 ↩8 ↩9 ↩10 ↩11 ↩12 ↩13 ↩14 ↩15
-
Heckler & Koch GmbH, The Selfloading Rifle HK 91 Cal. .308 (Oberndorf/Neckar, pre-1990), 6 pp. Internet Archive collection “MManuals”, https://archive.org/download/MManuals/Hk91.pdf, consulted 2026-10-18. ↩ ↩2 ↩3 ↩4 ↩5 ↩6
-
Midwest Gun Works product pages for reprinted H&K manuals: “PSG1 Operators Manual”, https://www.midwestgunworks.com/page/mgwi/prod/927823 ; “PSG1 Maintenance Manual”, https://www.midwestgunworks.com/page/mgwi/prod/927864 ; “MSG 90 Operator’s Manual”, https://www.midwestgunworks.com/page/mgwi/prod/980037 ; all shown sold out, consulted 2026-10-18. ↩ ↩2
-
Heckler & Koch (Ashburn, Virginia), Military & Law Enforcement catalogue, ”© HKDCS 01.12.08”, “HK Precision Rifles”, catalogue p. 19, http://photos.imageevent.com/smglee/cltactical/HK%20Military%20LE%20Catalog.pdf, consulted 2026-10-18. ↩
Comments (0)