Beretta U22 Neos · Volume 4
Field Strip, Detail Strip, Maintenance and Repair
Beretta's own eight-step field strip and the one tightening specification it publishes; the detail strip that does not exist, and the single factory procedure that goes beyond the manual; the cleaning rules that matter on a polymer-gripped rimfire; and the 2010 recall as a repair problem in 2026
4.1 Before Anything Else: the Recall
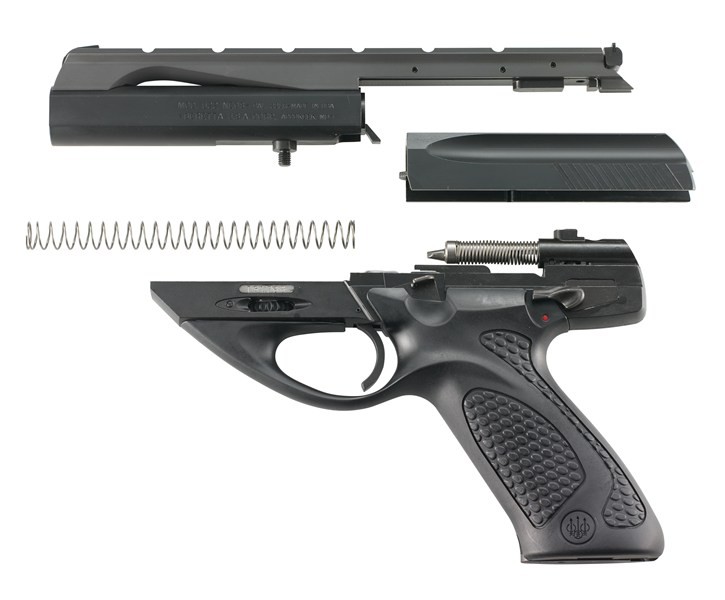
Any maintenance discussion of a U22 Neos has to start where Beretta started in September 2010, because the fault was in the fire-control parts and the check is something an owner does with the pistol in hand.
“Beretta U.S.A. Corp. has discovered a potential condition with Beretta .22 caliber NEOS semiautomatic pistols in which the pistol will fire even if the safety is activated and, in some cases, the pistols may fire if the safety is moved from the OFF to the ON position.”1
Beretta’s instruction was emphatic and is repeated here because it is the right instruction:
“Do not experiment with your Neos pistol to see if it has the potential safety issue.”1
How to tell an affected pistol from a corrected one is Volume 5, which handles identification. What the fix consisted of, and whether it can still be had, is at the end of this volume.
4.2 Field Strip, in Beretta’s Own Order
The manual’s sequence, in the order Beretta gives it. Nothing here is reconstructed.2
- Remove the magazine by depressing the magazine release button.
- Pull the slide back and visually check that there is no round in the chamber.
- If there is a round in the chamber, eject it by retracting the slide rearward until the slide stops and the cartridge is ejected.
- Engage the manual safety, pushing the lever downward so as to cover the red warning dot.
- Pull the slide rearward and engage the slide catch to hold the slide open.
- Depress the barrel nut lock button to permit the barrel nut to turn.
- Unscrew the barrel nut — clockwise, if the pistol is held upright — to release the barrel from the receiver.
- Pull the slide rearward to release the slide catch, then hold the slide and allow it to move forward to remove it from the receiver.
Beretta also asks that the whole thing be done “over a table to catch components should they drop.”2
Two details in that list are easy to get wrong.
The barrel nut unscrews clockwise. Beretta says so explicitly, with the qualification “if the pistol is held upright”. Every reflex a shooter has says anticlockwise. Forcing it the familiar way against a nut that will not turn, with the lock button pressed, is how a nut gets rounded.
The slide comes off forwards, and it is under spring tension when the catch is released. The order matters: the barrel must be off before the slide can come forward, and the catch is released by pulling the slide back a little further, not by pressing the catch down.
4.3 Two Warnings Worth Reading Twice
Both are Beretta’s, both are in capitals in the manual, and both describe things that happen to people.2
“The slide is under tension from the recoil spring. Releasing the slide catch without controlling the slide will allow it to spring forward and off of the pistol which may cause damage or injury.”
“If the safety is disengaged when the slide is off of the pistol, touching the trigger will disengage the firing pin. The firing pin is under spring tension and will be propelled forward, causing serious damage or injury.”
The second is the reason step 4 — engage the safety — comes before the pistol is opened. With the slide off, the striker sits in the receiver with nothing in front of it (Volume 3), and the trigger will launch it.
4.4 Reassembly, and the Two Clicks
Beretta’s instruction is short and the order is not obvious:
“Assemble the pistol by following the field stripping procedure in reverse order. When re-installing the barrel, start by fitting the rear dovetail into seat in the frame assembly, then rotate the barrel downward to engage the barrel nut.”2
And then the one tightening specification Beretta publishes for the entire pistol:
“NOTICE: When re-installing the barrel, the barrel nut should be tightened two (2) clicks beyond finger tight.”2
🔴 That notice is the most-ignored line in the manual and it is a shooting instruction, not a housekeeping one. The barrel carries both sights and the optic rail. Its clamp preload is therefore part of the sight system: a barrel seated to a different tension than it was when the gun was last zeroed is a barrel sitting at a slightly different attitude in its dovetail. “Two clicks beyond finger tight” is Beretta’s way of making that preload repeatable without a torque wrench — which is exactly what a pistol advertised as tool-free needs. A Neos put back together by feel is not assembled to specification, and the first place that shows is on paper.
4.5 The Barrel Mount
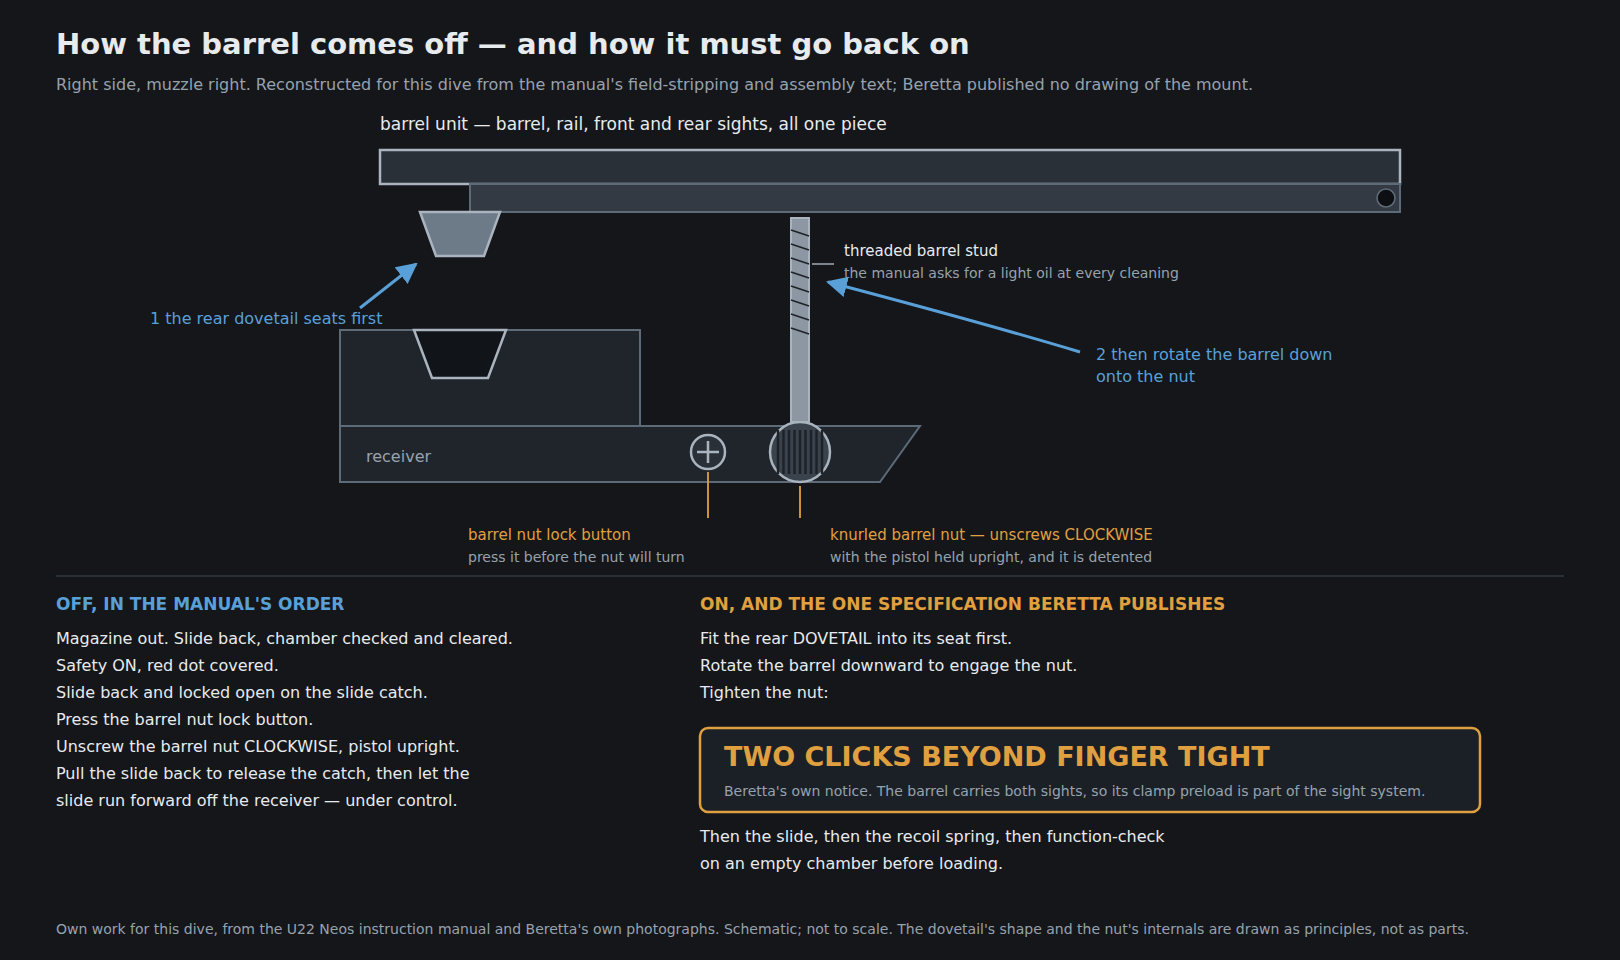
Beretta never published a drawing of the mount, and the manual describes it only through the sequence of operations. What that sequence establishes is:
- a rear dovetail that seats into the receiver and takes the rearward thrust of firing;
- a knurled barrel nut at the front, which clamps the barrel down onto its seat;
- a spring-loaded lock button that prevents the nut from turning until it is pressed — the cross-slotted head on the right side of the receiver, Beretta’s Figure 2-J;
- detents in the nut that click, because the tightening specification counts them;
- a threaded barrel stud that the manual asks to be lightly oiled at every cleaning.2
That last item is the mount’s one consumable maintenance point and it is the one nobody does. A dry stud in a nut that is turned every time the gun is cleaned is a galling problem waiting to happen, and Beretta put the instruction in the cleaning section rather than the disassembly section, where it would be read.
4.6 There Is No Factory Detail Strip
🔴 Beretta published no detail-strip procedure for the U22 Neos, and the manual tells the owner not to attempt one.
“CAUTION: No further disassembly should be necessary for proper cleaning and maintenance of the pistol. Any further disassembly is not recommended and should be done by a competent gunsmith.”2
No armourer’s manual, service manual or factory exploded parts diagram for the Neos was located in this research. Beretta sold a printed owner’s manual for the pistol and a separate one for the carbine kit, at $6.50 each, and nothing beyond them.3 That is a real gap, and it is stated here rather than filled: no detail-strip sequence is reconstructed in this dive, because reconstructing one from memory or from photographs is how a wrong procedure gets into print.
4.7 The One Procedure That Goes Further
There is exactly one factory instruction that goes beyond the field strip, and Beretta published it in 2010 so that owners could inspect their firing pins for the recall. It is short, it is illustrated, and it is quoted here in full because it is the only piece of Neos detail disassembly that carries the maker’s name.4
- Disassemble your NEOS per your owners manual.
- Support the front end of the firing pin and release the trigger.
- Remove the firing pin and spring.
- Separate the firing pin and spring.
- Compare your firing pin to the images below.
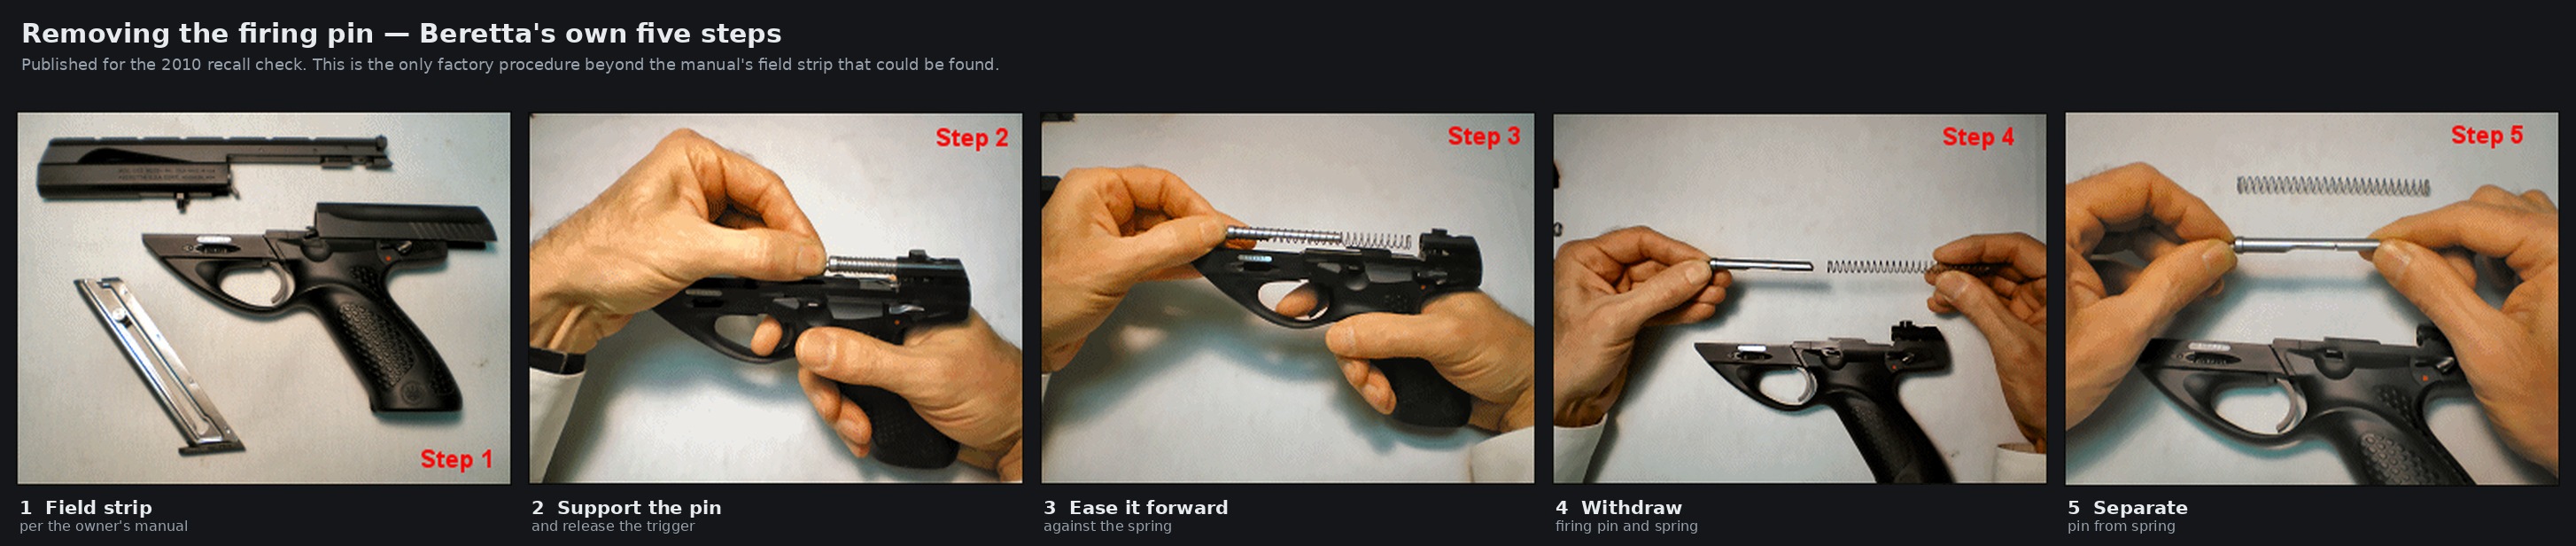
Step 2 is the whole procedure. “Support the front end of the firing pin and release the trigger” means: take the striker’s spring load on a finger or thumb before the sear is dropped, then let the striker down under control. Do it the other way round and the pistol does exactly what the manual’s second warning describes.
4.8 What a Correct Detail Strip Would Have to Account For
Since no factory sequence exists past that point, what follows is not a procedure but a list of the things any correct procedure would have to handle. It is offered so that a reader can judge somebody else’s instructions, and so that nobody mistakes this volume for a teardown guide.
- The striker’s spring load, twice. Once on removal, as above; once on reassembly, where the striker has to be pushed back past the sear against its spring with the sear free to catch it.
- The sear and trigger group live in or behind the grip module, which comes off the receiver with a single bolt, worked by the multi-purpose tool that shipped in the case.52 Nothing in Beretta’s literature describes what is behind that bolt, whether the fire-control parts stay with the receiver or the grip, or what falls out when the two separate.
- The disconnector. A single-action self-loader must have one; Beretta never names it. Any teardown that does not account for it is incomplete.
- The ejector. Its form and mounting are not shown anywhere located. It must come out, or stay in, in some defined order.
- The DLX pre-travel adjustment is on the far side of that bolt. Beretta says pre-travel “requires partial disassembly of the trigger mechanism. This operation should be performed by Beretta or by a competent gunsmith.”2 That is the company confirming that the trigger group is behind a disassembly it does not document.
- The rear sight blade needs a brass tool and a spring under compression. The windage screw must be removed completely, then the brass rear-sight removal tool goes into the windage screw hole with its slot upward, compressing a spring until the blade lifts out; the blade goes back with “the left side of the blade (the one with the round ‘hook’ shape) in first.”2 Without the brass tool this becomes a scratched sight.
- No parts diagram exists, so parts orientation has to be recorded as they come apart, not looked up afterwards.
4.9 Cleaning and Lubrication
Beretta’s interval is plain: “Clean and lubricate the pistol every day it is fired or at least once a month.”2 For a .22 that gets shot in three-hundred-round sessions, the first clause is the operative one.
The cautions are where a Neos differs from a steel pistol, and Beretta prints one of them twice:
“CAUTION: Do not use acids, water and chlorinated solvents.”2
That appears at the head of the cleaning section and again against the receiver. It matters because the pistol has a polymer grip module, because the receiver is the one part Beretta asks to be cleaned with nothing at all, and because rimfire fouling tempts people toward aggressive solvents.
Beretta’s instructions, part by part:2
Table 1 — Cleaning and Lubrication
| Part | What Beretta asks |
|---|---|
| Barrel | Spray a .22 bore brush with gun oil, scrub chamber and bore from the chamber end, use a solvent first if needed, then patch dry until the patches come out clean. Then lightly oil the threaded barrel stud. |
| Recoil spring and striker parts | Lightly oil the recoil spring, the firing pin guide, the firing pin spring and the firing pin. After long use, clean them first with a good cleaning brush. |
| Slide | Clean with gun oil, “paying special attention to the breech face, extractor and the slide surfaces that engage the receiver”. Dry with a lint-free patch, then a small drop of oil on the slide-to-receiver surfaces and on the extractor. |
| Receiver | ”Clean the receiver with a soft, lint-free cotton patch.” No solvent, no oil, no brush. |
| Magazine | See below. |
And the closing caution, which on a blowback .22 is the one that causes real malfunctions:
“CAUTION: Do not apply excess oil. Accumulation of oil attracts dirt and dust, which can interfere with the functioning and reliability of the pistol.”2
A rimfire slide running in an oily receiver picks up lead, wax and unburnt powder and turns it into a paste. The Neos’s slide rides directly on the receiver, and the receiver is the part Beretta will not let an owner put solvent on.
4.10 The Magazine, and the Only Interval Beretta Publishes
The magazine section is short and contains the only numeric service interval in the manual.
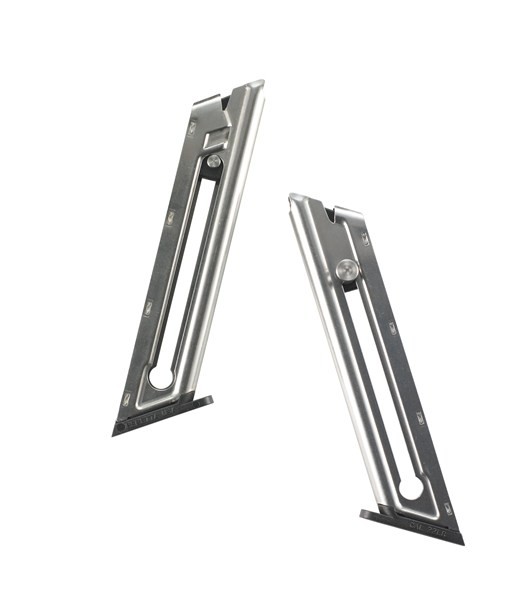
“Make sure the magazine is cleaned thoroughly and that the follower slides easily downward if pressed. If necessary, lightly oil the walls of the magazine box with Beretta oil or another good grade gun oil. Run a dry, lint-free cotton patch through the box. Do not leave lubricant inside the magazine box.
Due to various bullet lubricants used on some brands of ammunition, the inside of the magazine (especially the inside front radius) should be cleaned every 250 to 500 rounds.”2
🔴 That is the most useful maintenance sentence Beretta wrote about this pistol, and it names the right place. The “inside front radius” is where the nose of each cartridge rubs as the stack rises. Lubricated lead .22 ammunition leaves wax there; wax collects grit; the stack stops rising freely; the pistol starts short-stroking and failing to feed, and the owner blames the ammunition or the recoil spring. Two hundred and fifty to five hundred rounds is one or two range sessions.
The instruction to oil the walls and then wipe them dry is deliberate, not a contradiction: a film, not a lubricant bath. An oiled magazine interior is the second-best way to collect the same wax.
4.11 Beretta’s Troubleshooting Table, and What It Leaves Out
Reproduced whole, because it is short.2
Table 2 — Beretta's Troubleshooting Table, and What It Leaves Out
| Malfunction | Probable cause | Remedy |
|---|---|---|
| Mis-introduction of a cartridge into the chamber | Defective cartridge | Inspect and replace cartridge |
| Mis-fire | Defective cartridge | Wait 10 seconds, keeping the barrel pointed in a safe direction. Extract and replace cartridge |
| Mis-extraction or defective extraction | Dirty cartridge chamber | Clean, lubricate cartridge chamber |
| Mis-extraction or defective extraction | Defective or dirty ammunition | Replace or clean cartridges |
| Mis-extraction or defective extraction | Dirt under the extractor | Clean the extractor housing |
Preceded by a notice that is more useful than the table: “Due to the variability and many types of 22LR ammunition on the market, you will find that your pistol may function more reliably with certain types of ammunition.”2
What the table leaves out is everything that is the pistol’s fault. Every cause it lists is the cartridge or dirt. There is no entry for a tired recoil spring, a chipped extractor, a worn striker, a magazine whose follower binds, or a barrel nut that has worked loose — and the last of those is specific to this design, because the Neos is the rare pistol whose barrel is meant to be removed by the owner on a regular basis.
⚠ No independent survey of U22 Neos failures was located. Nothing beyond the 2010 recall is a manufacturer-acknowledged defect, and no reliability study, armourer’s report or aggregated failure data for this pistol could be found. The two published range reports consulted were both favourable — Paco Kelly in 2003 reported ten-shot groups of 1.1 and 1.6 inches at 25 yards, and Jeff Quinn in 2008 reported several brands under an inch at the same distance with the worst, Wolf match, under an inch and a half — and neither recorded a malfunction.67 Two reviews are not a reliability record, and they are presented as what they are.
What can be said on the maker’s own evidence is narrower and worth having: Beretta’s own instructions identify the magazine’s front radius, the slide-to-receiver surfaces and the barrel nut’s preload as the three things that need attention, and those are the three places a blowback .22 with a removable barrel would be expected to give trouble.
4.12 The Recall as a Repair Problem in 2026
The 2010 programme, as Beretta ran it:18
- Free, including shipping both ways, provided the owner generated the call tag through Beretta’s own site. “If you ship your Neos to Beretta at your own expense, we will be unable to reimburse you.”
- Pistol only. “Please send only the pistol. Do not include any magazines or accessories.”
- Factory only. “You will need to send your Neos to our Accokeek, MD service center. Please do not send your Neos to a dealer or other service center.”
- About six weeks, “depending upon the number we receive and our parts and labor availability.”
- No refunds. “The repair can easily be performed by the factory and firearm returned to you. We do not offer refunds.”
- Other faults could be repaired at the same time, at cost, on a separate work order and a longer turnaround.
🔴 And the answer that matters technically, from Beretta’s own FAQ:
“I have heard that all I have to do is replace the firing pin and this will resolve the issue. Where can I purchase a new firing pin? — This information is incorrect. The firing pin is replaced along with other components. Additionally, special gauging and testing is performed in conjunction with the repair.”8
Beretta added that it “will not send parts to an individual nor gunsmith for installation.”8
So the recall repair was never a parts swap. It was a parts swap plus gauging — which is consistent with the fault being an engagement dimension between the striker’s shoulder and the sear (Volume 3) rather than a single bad part.
⚠ Whether that service is still available could not be established, and it is the most consequential open question in this dive. What is known: the recall pages at berettasupport.com/neos were last usefully archived years ago; the serial-number lookup they offered is gone; the live host now returns a bot-verification page rather than content; Beretta U.S.A. announced in 2014 that production would move from Accokeek to Gallatin, Tennessee; and the pistol left Beretta’s catalogue between March and October 2023.9 A recall obligation does not expire because a model does, and Beretta still operates a customer service department — but no current Beretta statement confirming that the Neos recall service continues was found, and nothing here should be read as saying it does. Anyone buying a Neos should telephone Beretta before assuming the fix is available, and should treat an uncorrected pistol as a gun that needs work rather than a gun that can be checked out on the range.
4.13 Parts, and What They Cost When Beretta Sold Them
Beretta ran a substantial accessory line for this pistol. Prices are from Beretta’s own store pages, dated:31011
Table 3 — Parts, and What They Cost When Beretta Sold Them
| Part | Code | Price | Page date |
|---|---|---|---|
| Barrel, Inox, 4.5 in | JBU22S45X | $99.00 | 24 May 2016 |
| DLX grips | JGU22R | $36.00 | 24 May 2016 |
| Standard grip, red / grey / blue / black | JGU22P | $29.00, reduced to $14.00 | 24 May 2016 |
| Multi-purpose tool | UD5A0729 | $24.00 | 24 May 2016 |
| Magazine, 10 rounds | JMU22 | $24.00 | 24 May 2016 |
| Magazine, 10 rounds | JMU22 | $26.00 | 28 December 2010 |
| Front sight set of five | UD6A0283 | $35.00 | 24 May 2016 |
| Owner’s manual, pistol | UD6A0277 | $6.50 | 24 May 2016 |
| Owner’s manual, carbine kit | UD6A0307 | $6.50 | 8 May 2016 |
| Carbine kit | JU22CK1 | $249.00 | 28 December 2010 |
Two practical points come out of that table.
The multi-purpose tool is the one part worth chasing. At $24 it was the most expensive small item on the list for what it is, and it is the tool that adjusts the sights and removes the grip — which means it is also the tool that converts the pistol to the carbine.12 A Neos bought used without its case is likely to be missing it.
Barrels were a real accessory, not a theoretical one. A $99 replacement barrel for a $325 pistol is the modular claim working as advertised. Whether Beretta still stocks any of these is unknown; no current Beretta parts listing for the Neos was found.
4.14 Bench, Gunsmith, or Factory
A summary, drawn only from what Beretta itself says an owner may do.
Table 4 — Bench, Gunsmith, or Factory
| Job | Who |
|---|---|
| Field strip, clean, lubricate, refit the barrel to two clicks | Owner, no tools |
| Change barrel, grip, front sight, rear sight blade, slide | Owner, with the multi-purpose tool and the brass sight tool |
| DLX trigger overtravel adjustment | Owner, 1.5 mm hex key |
| Remove and inspect the firing pin | Owner, per Beretta’s recall procedure, with care |
| DLX trigger pre-travel adjustment | Beretta or a competent gunsmith — Beretta’s own words |
| Any disassembly past the field strip | A competent gunsmith — Beretta’s own words |
| The recall repair | Beretta only. Parts were not supplied to owners or gunsmiths, and gauging was part of the job |
References
Footnotes
-
Beretta U.S.A. Corp., “Recall Notice – Beretta Neos Pistols”, PDF at
berettasupport.com/neos/RecallNotice.pdf, Internet Archive capture of 22 September 2010. ↩ ↩2 ↩3 -
Beretta U.S.A. Corp., U22 NEOS Instruction Manual, Accokeek, MD, cover code UD6A0277-04/04, interior pages dated 4/23/04; Internet Archive capture of 26 December 2022 of
beretta.com/assets/12/29/Neos_Manual.pdf, accessed 2026-09-19. Field stripping pp. 29–30; cleaning and lubricating pp. 31–32; assembly and troubleshooting p. 33; DLX instructions pp. 27–28. ↩ ↩2 ↩3 ↩4 ↩5 ↩6 ↩7 ↩8 ↩9 ↩10 ↩11 ↩12 ↩13 ↩14 ↩15 ↩16 ↩17 -
Beretta U.S.A. online store accessory pages, Internet Archive captures of 8 and 24 May 2016:
barrel-neos-4-1-2-inox-slb-sd-see-ud7a0236/jbu22s45x/andmanual-u22-neos-carbine-kit/ud6a0307, together with the related-items prices printed on those pages. ↩ ↩2 -
Beretta Customer Support, “Visual Characteristics of the U22 Neos Firing Pins”,
berettasupport.com/neos/neos_identification.htm, Internet Archive capture of 18 September 2010. ↩ -
“Beretta U22 Neos”, Wikipedia, revision 1370411866 of 21 August 2026, retrieved as wikitext 2026-09-19, for the single-bolt grip attachment. ↩
-
Paco Kelly, “Beretta’s New Space Handgun – The U22 NEOS”, GunBlast.com, 10 May 2003, retrieved 2026-09-19. ↩
-
Jeff Quinn, “Beretta’s New Pink U22 Neos .22 Long Rifle Auto Pistol”, GunBlast.com, 17 June 2008, retrieved 2026-09-19. ↩
-
Beretta Customer Support, “Neos Frequently Asked Questions”,
berettasupport.com/neos/faqs.htm, Internet Archive capture of 18 September 2010. ↩ ↩2 ↩3 -
Internet Archive capture indexes (CDX API) for
beretta.com/en-us/u22-neos*andberettasupport.com/neos*, queried 2026-09-19; and a direct request toberettasupport.com/neos/faqs.htmon that date, which returned a browser-verification page rather than content. ↩ -
Beretta U.S.A. online store, “Beretta U22 Neos Carbine Kit .22LR”, stock no. JU22CK1, Internet Archive capture of 28 December 2010. ↩
-
Beretta U.S.A. online store, “U22 Neos”, stock no. JU2S6, Internet Archive capture of 18 July 2011. ↩
-
Beretta U.S.A., press release, “Beretta Adds Carbine Kit for U22 Neos and Expands Versatility of Product”, Accokeek, MD, 3 February 2010; Internet Archive capture of 7 April 2010. ↩
Comments (0)